ALDI bikemate 26600 User manual

Inhaltsverzeichnis
User Manual
RECHARGEABLE
COMPRESSOR
Spot
Process
Black C PMS 485 C
Ident.-Nr.: PO30030072_AUFLADBARER-KOMPRESSOR_ 26600_220621
General information .................................................................5
Scope of supply/Parts ..............................................................5
Technical specifications ............................................................5
Explanation of symbols ............................................................5
Safety ........................................................................................6
Intended use ........................................................................................6
Safety information.................................................................... 7
Safety instructions regarding rechargeable batteries............8
Safety instructions for the product..........................................8
Start-up.....................................................................................9
Legend...................................................................................................9
Charging the battery ........................................................................ 10
Checking battery charge level ........................................................ 10
Charging battery with USB charging cable ................................... 10
Charging the battery with the car charging adapter ................... 11
Use ......................................................................................... 11
Using the adapters ............................................................................. 11
Switching the product on/off ........................................................... 11
Measuring tyre pressure....................................................................12
Set pressure ........................................................................................12
Pumping process ...............................................................................12
Auxiliary light on/off ..........................................................................13
Troubleshooting ......................................................................13
Cleaning and care instructions................................................13
Disposal................................................................................... 14
ALDI guarantees that our exclusive brand products are developed to our strin-
gent quality specifications. If you are not entyrely satisfied with this product, please
return it to the nearest ALDI store within 60 days from the date of purchase, for a full
refund or replacement, or take advantage of our after sales support by calling the
supplier’s Customer Service Hotline.
AU
Made in China
BIKEMATE® is a registered trademark of ALDI Stores
DISTRIBUTED BY:
ALDI STORES
1 SARGENTS ROAD
MINCHINBURY NSW 2770
www.aldi.com.au
YEAR
WARRANTY
1
AFTER SALES SUPPORT
1800 269 981
AU
support@wunsche.com.au
MODEL:
26600 04/2022
811322

PSI
BAR
A
L
M
G 2
2a
5
5
Y
1. 2. 3.
I
F
B
9
10
4
D
4a 13
14
E
2
2a
2
X
1.
H
1. 2. 3. 4.
3.a 3.b 3.c
2.
2
2a
J K
2
2a
6
7
7
PSI
BAR
10
15
9
16
18
19
20
17
2a
2
Z
5
5
Z
1 2
567
8
3 4
The valves
X
,
Y
and
Z
are not included in
the scope of delivery.
11
C
3a 13
14
312
6
3
1
21

5
General information
GENERAL INFORMATION
Read and safely store the
operating instructions
These operating instructions belong to
this Rechargeable Compressor 1here-
inafter referred to as the product. The
operating instructions contain important
information on how to use the product.
Read the operating instructions, especial-
ly the safety instructions, carefully before
using the product. Non-compliance with
these operating instructions can lead to
serious injury or damage to the product.
The operating instructions are based on
the standards and regulations applica-
ble in the European Union. Also observe
country-specific guidelines and laws
abroad.
Store the operating instructions for fur-
ther use. If you pass on the product to
third parties, please ensure that you in-
clude these operating instructions.
SCOPE OF SUPPLY/PARTS
(Fig. A)
1 x Rechargeable compressor 1
1 x Compressed air hose with threaded
connection 2, suitable for Schrader
valves
1 x USB charging cable 3
1 x Car charging adapter 4, 12 V
1 x Dunlop/Presta valve adapter 5
1 x Metal adapter for balls 6
1 x Plastic adapter for inflatable articles 7
1 x Storage bag 8
1 x Warranty Certificate, without Fig.
1 x Operating instructions, without Fig.
TECHNICAL SPECIFICA-
TIONS
Item number: 811322
Batch: PO30030072
Model number: 26600
Battery: Lithium-ion
- Capacity: 2,000mAh
- Operating voltage: 12 V
- Power: 22.2 Wh
ta: 50 °C
Input voltage:
- charging connection cigarette lighter
socket: 12 V / 8 A
- charging connection USB cable:
5 V / 1 A
Power consumption: max. 10 A
Maximum pressure: 8.25 bar / 120 PSI
Rating Power: 96 W
Continuous operation: max. 5 min*
Air flow rate: 10 l / min
Charging time: up to 12 hours
Weight: 786 g
Date of production: 12/2021
Guarantee: 1 Years
!WARNING!
*CONTINUOUS OPERATION: Do not oper-
ate the installed compressor continu-
ously for more than 5 minutes. After-
wards, leave it to rest for 15 minutes.
EXPLANATION OF SYM-
BOLS
The following symbols and signal words
are used in these operating instructions,
on the product or on the packaging.
!
WARNING!
This signal symbol/word indicates a hazard
with a high level of risk which, if not avoid-
ed, may result in death or serious injury.

6 7
Safety Safety information
!CAUTION!
This signal symbol/word indicates a haz-
ard with a low level of risk which, if not
avoided, may result in minor or moderate
injury.
NOTE!
This signal word warns of possible prop-
erty damage or provides you with useful
additional information regarding the use.
This symbol indicates how to use
the operating instructions.
This symbol indicates interior use
only.
This symbol indicates usage.
This symbol indicates potential
danger to children.
8
This symbol indicates the age rat-
ing of the product.
This symbol indicates potential
problems with pressure displays.
These symbols indicates ON/
OFF switches.
This symbol indicates potential
danger in relation to electric
shocks.
This symbol indicates potential
danger in relation to overheating.
This symbol indicates potential
danger in relation to explosions.
This symbol indicates potential
danger from handling batteries /
rechargeable batteries.
This symbol indicates that hearing
protection must be worn.
This symbol indicates the use of the
LED.
This symbol indicates direct current.
This symbol indicates the polarity.
This symbol indicates a USB port.
This symbol indicates protection
class II (Double insulation).
This symbol indicates protection
class III.
SELV: safe extra-low voltage
These symbols inform
you about the disposal
of the packaging and
product.
The RCM (Regulatory Compliance
Mark) indicates a product complies
with all applicable Australian regu-
latory requirements.
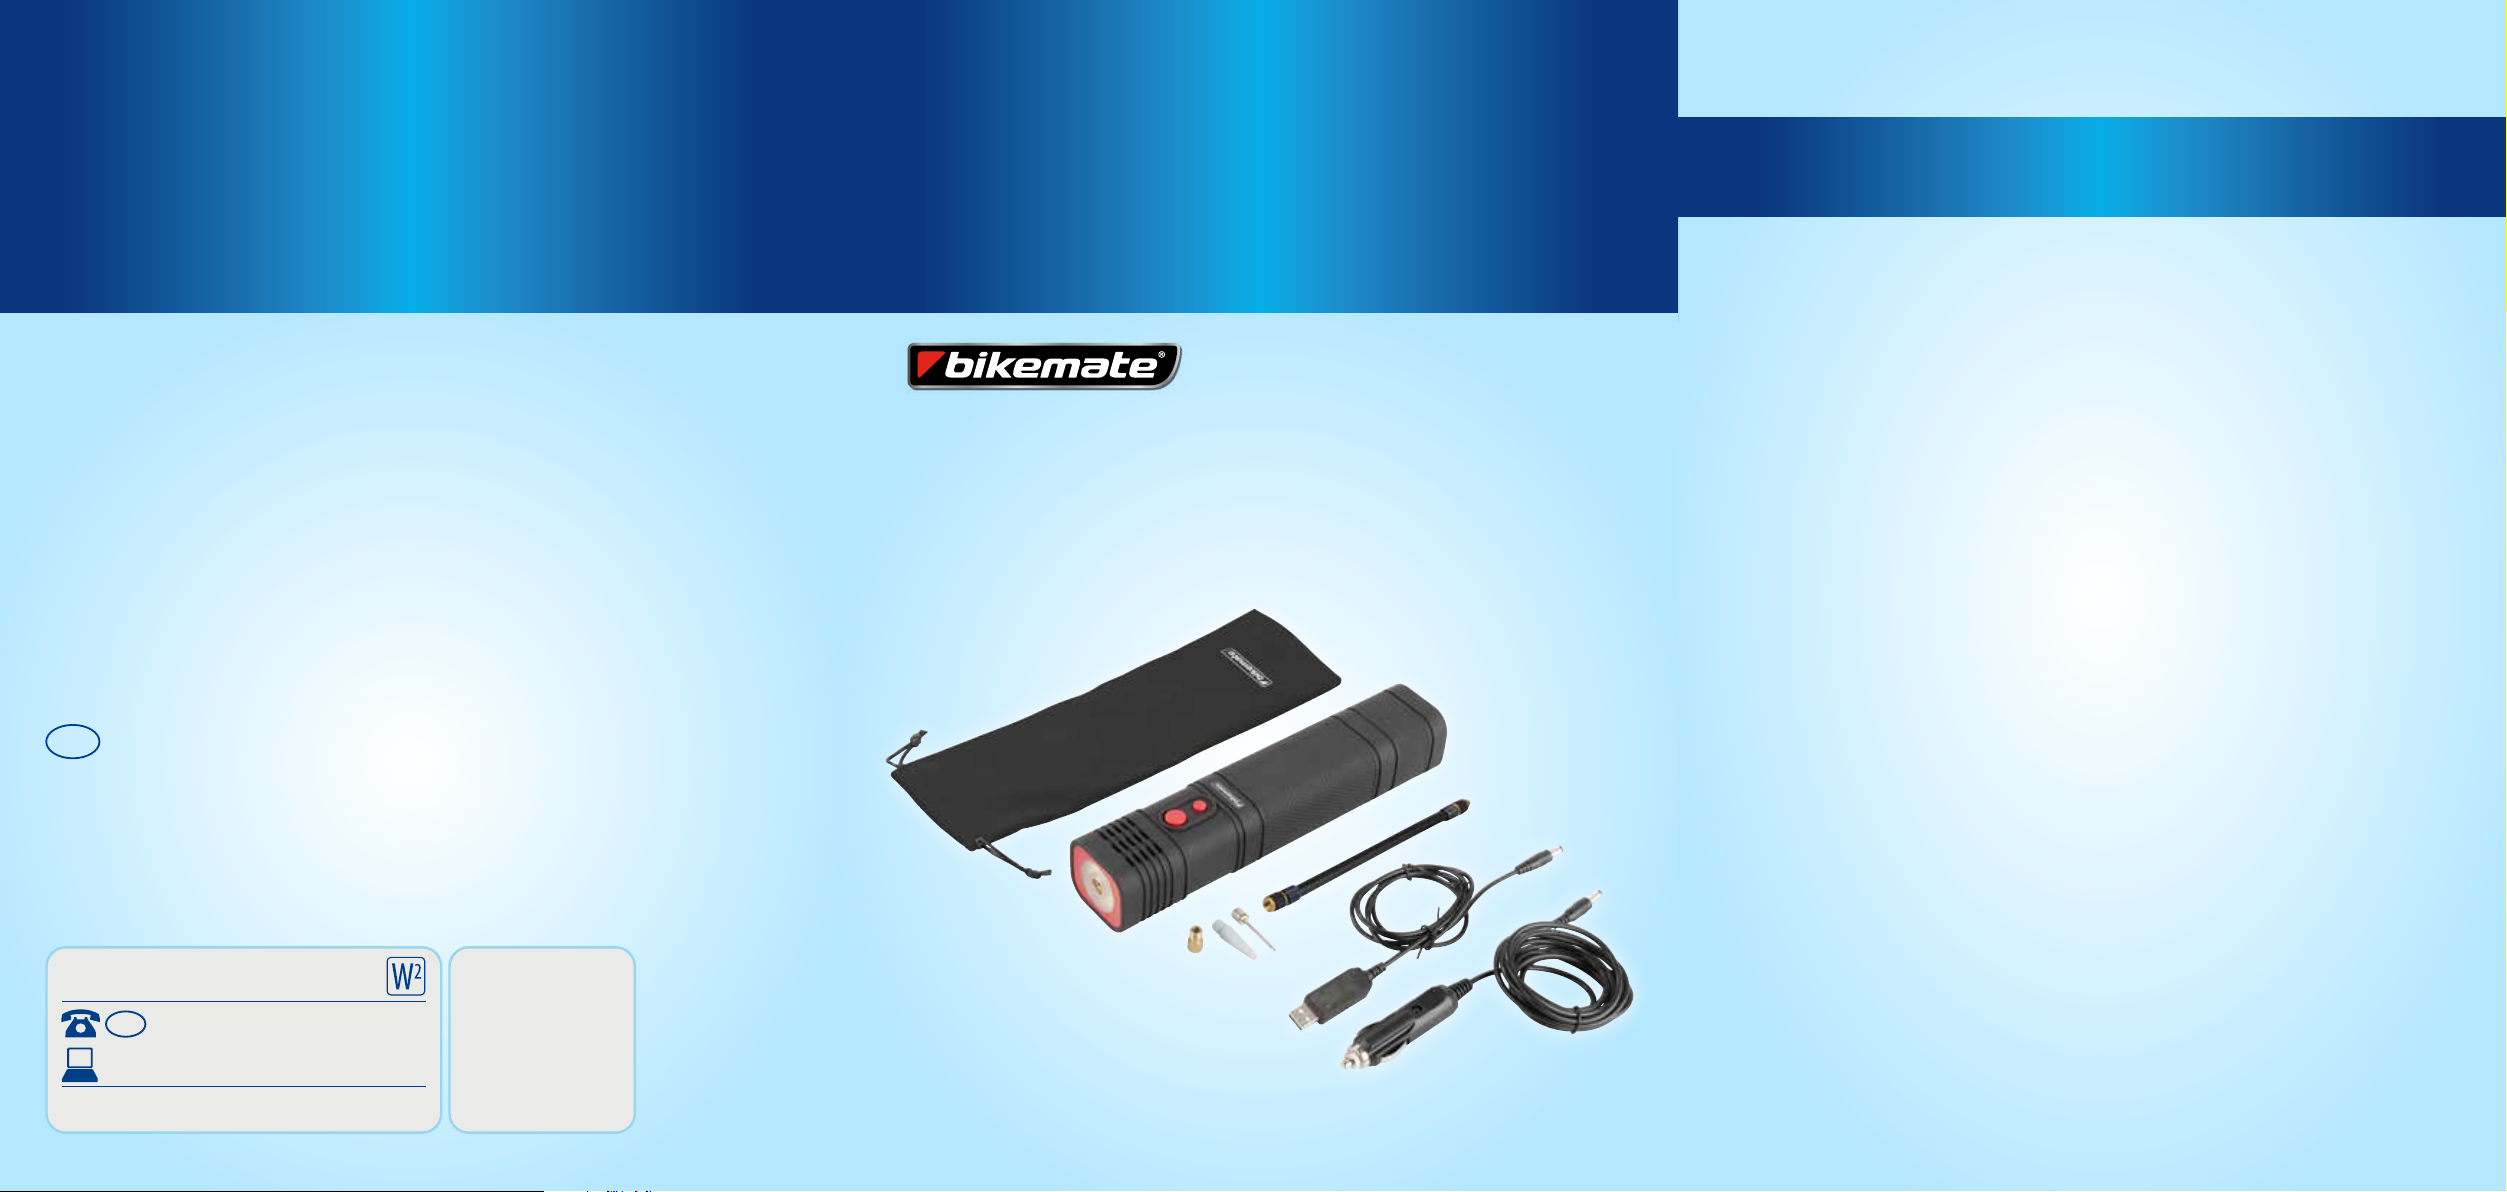
SAFETY
Intended use
This product is not suitable for
household room lighting.
This product is suitable for inflating all
common bicycle tyres, car tyres, small vol-
ume inflating articles, balls, etc.
The product is not designed for continuous
operation to generate pressure for more
than 5 minutes at a time. It was developed
to generate air pressure, not volume.
The product is not suitable for inflating
large-volume articles, such as air mat-
tresses or inflatable boats, as these can
heat up quickly without counter-pres-
sure. The product is designed to build up
a given air pressure, not to generate large
amounts of air. Danger of overheating!
!
WARNING!
Risk of injury!
The product may not be used
near liquids or in damp spaces.
There is a risk of injury from elec-
tric shock!
The product is not intended for commercial
use. Different use or a modification to the
product are not deemed as intended use
and may lead to risks, such as injuries and
damage. The distributor assumes no liability
for damage that results from improper use.
SAFETY INFORMATION
!
WARNING!
Risk of strangulation
and suffocation!
If children play with the product
or the packaging, they could be-
come caught in it and suffocate!
- Do not let children play with the prod-
uct or the packaging.
- Supervise children who are close to
the product.
- Keep the product and the packaging
out of reach of children.
!
WARNING!
Risk of injury!
8
Not suitable for children under
the age of 8! There is a risk of in-
jury!
- Children from the age of 8, as well
as people with impaired physical,
sensory or mental capabilities or with
a lack of experience and knowledge,
must be supervised when using the
product and/or be instructed regard-
ing the safe use of the product and un-
derstand the resulting dangers.
- Children are not allowed to play with
the product.
- Maintenance and/or cleaning of the
product is not allowed to be performed
by children without supervision.
Observe national regulations!
- Observe the applicable national re-
quirements and regulations for the
use and disposal of the product.
Pay attention to ambient conditions!
- The product may not be charged and
used at ambient temperatures above
50°C or below 0°C.
!
WARNING!
Risk of injury!
Do not use in an explosive envi-
ronment! There is a risk of injury!
- The product is not allowed to
be used in an explosive (Ex) environ-
ment. The product is not approved for
an environment, in which flammable
liquids, gases or dust are present.
!
WARNING!
Risk of injury!
A defective product is not allowed to be
used! There is a risk of injury!
- Do not use the product in the case of
malfunctions, damage or defects.
- If you discover a defect in the product,
have the product checked by a spe-
cialist and repaired if necessary before
you use it again.
- Significant danger can occur for the
user in the case of improper repairs.
- The light source contained in the
product may only be replaced by the
manufacturer, its customer service or a
similarly qualified person.
- If the product makes unusual noises,

8 9
Safety instructions regarding rechargeable batteries Start-up
switch it off immediately and allow it
to cool for at least 15 minutes.
!
WARNING!
Risk of injury!
The product is not allowed to be
manipulated! There is a risk of
injury from electric shock!
- The casing must not be opened and
the product must not be manipulat-
ed/modified under any circumstances.
Manipulations/modifications can cause
danger to life from electric shock. Ma-
nipulations/modifications are prohibit-
ed for approval reasons (CE).
- The product must not be covered up
during use.
- Do not expose the product to rain or
damp weather or immerse it in water.
There is a danger of electric shock!
SAFETY INSTRUCTIONS
REGARDING RECHARGEA-
BLE BATTERIES
!
WARNING!
Fire and explosion haz-
ard! - Keep the product away
from heat sources and direct
sunlight: the battery may
explode if overheated. There is a risk
of injury.
- Do not operate the product in ist pack-
aging! There is a risk of fire!
!
WARNING!
Risk of injury!
Do not touch leaked batteries
with bare hands! There is a risk
of injury!
- Leaked or damaged batteries may
cause acid burns if they come into
contact with skin. Do not touch leaked
batteries with bare hands; therefore,
ensure that you wear appropriate pro-
tective gloves in such a case!
NOTE!
- This product has a built-in rechargea-
ble battery that cannot be replaced by
the user. In order to avoid hazards, the
battery may only be removed by the
manufacturer or its service agent or by
a similarly qualified individual.
- When disposing of the product, please
note that this product contains a re-
chargeable battery.
SAFETY INSTRUCTIONS
FOR THE PRODUCT
!WARNING!
Risk of explosion and
injury!
Risk of explosion and injury
when damaged pumps are
used!
- Pumps with damaged connecting
parts or other defects or damage may
no longer be used due to the danger
of explosion and injury.
- Defective pumps must be disposed of
properly. A repair is not possible.
- Only use accessories supplied and rec-
ommended by the manufacturer.
- Avoid excessive stress on the product.
The Compressed air hose with thread-
ed connection 2must not be kinked
during use.
!WARNING!
Risk of explosion!
Risk of explosion when exceed-
ing the maximum value!
- You can inflate all bicycle tyres,
car tyres and small volume inflation
articles up to the specified maximum
allowable pressure of the pump (max.
8.25 bar / 120 PSI) or up to the speci-
fied maximum air pressure of the tyre
manufacturer, article manufacturer.
You can usually find this on the side-
wall of the tyre, or in the technical data
of the inflation article. If you are not
sure, ask a professional.
- The indicated maximum values must
not be exceeded at any time!
- The product is not suitable for large
tyres such as tractor or truck tyres.
!WARNING!
Risk of burning!
The product becomes warm during op-
eration. Risk of burning!
- The front part of the product in par-
ticular, as well as the pump hose and
valve adapter, are heated up more the
longer the product pumps.
- Allow the product to cool down before
touching it again.
- Keep the openings for air intake clear
during operation. Do not block the
openings with hands or fingers.
- Do not put the product down during
operation. Hold the product at least
with one hand.
- Ensure that no sand, dust or other
small foreign bodies enter the open-
ings for air intake.
- If you notice a leakage or a strange
smell of the product or if the product
deforms, stop using it immediately
and contact the service address.
!CAUTION!
Risk of injury!
Risk of injury with incorrect tyre
pressure!
- The digital manometer with air
pressure display of the product is not
calibrated!
- For your own safety, please check the
air pressure using a calibrated pres-
sure gauge (e.g. at a petrol station).
START-UP
1. Remove all packaging materials.
2. Check whether all parts are available
and undamaged.
If this is not the case, notify the speci-
fied service address.
Legend
1Rechargeable compressor
2Compressed air hose with threaded
connection
2a Valve adapter
3USB charging cable
3a USB plug
4Car charging adapter
4a Plug
5Dunlop/Presta valve adapter
6Metal adapter for balls
7Plastic adapter for inflatable articles
8Storage bag
9On/Off button
10 Display
11 Battery indicator
12 Charge indicator
13 Charging plug
14 Socket
15 Pressure indicator
16 Setting button
17 Setting button
18 On/Off pressure switch
19 Auxiliary light
20 Light switch
21 Air slots

10 11
Start-up Use
XSchrader valve
YDunlop valve
ZPresta valve
Charging the battery
(Fig. B)
NOTE!
- The battery must be charged before
the first use.
- The battery must be charged as soon
as only 1 bar is left in the battery indi-
cator 11 .
- The auxiliary light 19 (see Fig. L) may
not be switched on during the charg-
ing process.
- During the charging process with the
USB charging cable 3, the product
cannot be used for pumping for safety
reasons. There is a risk of overheating.
Checking battery charge
level
(Fig. B)
1. Switch on the product by pressing the
on/off button 9.
- The display 10 switches on. The num-
ber of bars on the battery indicator 11 ,
indicate the charge level of the battery.
- When the battery is fully charged, 4
bars are displayed.
!WARNING!
Risk of injury from electric shock!
- Only charge the product in interi-
or spaces.
- If the product has become wet, you
must dry the product completely with
a dry cloth before charging. There is a
risk of short circuit.
NOTE!
- The battery is fitted with an automatic
switch-off device. This switches off the
charging process with a 100 % charge,
so that the battery cannot be over-
charged.
- It is best to charge the product every
4 weeks to prevent the battery cells
from discharging.
- Only use the USB charging cable 3or
the car charger 4supplied with the
product.
- Charge the battery only at an ambient
temperature between 0 °C and 50 °C.
- If the battery of your car is old, the bat-
tery should not be charged using the
car charger 4. It is possible that your
car will not start afterwards.
Charging battery with USB
charging cable
(Fig. C)
Connect the product to an appropriate
device 3using the USB charging cable.
You can charge the battery with a power
adapter with USB port, please refer to the
technical data.
The product can only be connected to a
control device with a SELV output and a
maximum working peak output voltage
(Uout) of 5 V.
- During the charging process, the
charging indicator 12 on the USB plug
3a lights up red.
- Once the battery is fully charged,
the charge indicator 12 lights up
green.
1. Switch off the product.
2. Plug the charging plug 13 into the
socket 14 .
3. Insert the USB plug 3a into the charg-
ing device.
4. When the charging process is com-
plete, remove the charging plug 13
from the socket 14 and the USB plug
3a from the charging device.
Charging the battery with
the car charging adapter
(Fig. D)
!WARNING!
Please note that while charging
with the the car charger 4, the
product should not be used for
continuous operation in order not to
overload the car battery and the product.
When charging using the car charger 4
, the charger 4must always be fully in-
serted into the car’s cigarette lighter. Oth-
erwise there is a risk of fire due to over-
heating.
1. Switch off the product.
2. Plug the charging plug 13 into the
socket 14 .
3. Insert the plug 4a of the car charger
4into the cigarette lighter socket.
4. When the charging process is com-
plete, remove the charging plug 13
from the socket 14 and the plug 4a
from the cigarette lighter.
USE
Screw the compressed air hose with
threaded connection 2into the prod-
uct, see Fig. E.
Using the adapters
For car tyres - Schrader valve X:
1. First, remove the dust cap.
2. Screw the valve adapter 2a on the
compressed air hose with threaded
connection 2to the Schrader valve
X, see Fig. F.
For bicycle tyres with Dunlop valve Y:
1. Screw the Dunlop/Presta Valve adapt-
er 5into the valve adapter 2a of the
compressed air hose with threaded
connection 2.
2. Remove the dust cap.
3. Screw the Dunlop/Presta Valve adapt-
er 5onto the Dunlop valve Y, see
Fig. G.
For bicycle tyres with Presta Valve Z:
1. Screw the Dunlop/Presta Valve adapt-
er 5into the valve adapter 2a of the
compressed air hose with threaded
connection 2.
2. Remove the dust cap.
3. Loosen the nut of the Presta Valve Z
(3.a-3.c).
4. Screw the Dunlop/Presta Valve adapt-
er 5onto the Presta Valve Z, see
Fig. H.
(Valves X, Y, and Znot included in
the scope of delivery)
For balls:
1. Screw the metal adapter for balls 6
into the valve adapter 2a of the com-
pressed air hose with threaded con-
nection 2, see Fig. I.
2. Now, insert the metal adapter 6into
the ball.
For small volume inflatable articles:
1. Screw the plastic adapter for inflata-
ble articles 7into the valve adapter
2a of the compressed air hose with
threaded connection 2
2. Insert the plastic adapter for inflatable
articles 7into the inflatable article,
see Fig. J.
Switching the product on/
off
!CAUTION!
Risk of injury!
The device generates a sound
pressure level of approx. 90 dB.
There is a risk of hearing dam-
age!
- Wear suitable hearing protection

12 13
Use Troubleshooting
when using the product.
(Fig. K)
To switch on, press the on/off button
9below the display 10 .
- The display 10 lights up.
- The last applied pressure indication,
PSI, BAR or KG/CM² is displayed.
To switch off, press the on/off button
9for approx. 3 seconds.
NOTE!
If the product is not operated for more
than 90 seconds, it switches off automat-
ically.
Measuring tyre pressure
NOTE!
Applies only to Schrader valve
X:
1. First, remove the dust cap.
2. Screw the valve adapter 2a on the
compressed air hose with threaded
connection 2to the Schrader valve
X, see Fig. F.
2. Switch on the product, see Fig. K.
3. The
10 display lights up and the last
set pressure indicator 15 PSI, BAR or
KG/CM² is displayed.
4. The pressure existing in the inflated
item is shown in the corresponding
pressure display.
Set pressure
(Fig. K)
1. Turn on the product as described
above.
2. By briefly pressing the on/off button
9you can set the desired pres-
sure to PSI, BAR or KG/CM².
The pressure display 15 shows the
value 0.00.
3. By pressing the setting buttons 16
or 17 you switch to the pressure
specification.
- The last set pressure is displayed and
flashes.
3. By pressing the setting buttons 16
or 17 you can now set the pressure
up to the max. pressure of 8.25 bar /
120 PSI / 8.41 KG/CM².
- If you press and hold down the setting
buttons 16 or 17 , the setting will
be accelerated.
4. When the desired pressure is set, wait
about 2 seconds.
- The display changes back to the pres-
sure indication. The pressure display
15 shows the value 0.00.
NOTE!
The set pressure is automatically convert-
ed into the other pressure values. For ex-
ample, if you set 2.5 BAR and then switch
to PSI, the value is automatically convert-
ed to 36 PSI.
Pumping process
!WARNING!
Risk of overheating
- The air slots 21 on the underside of
the product (Fig. M) must not be cov-
ered during the pumping process.
There is a risk of overheating.
(Fig. L)
1. When the product is off, turn the prod-
uct on as described above.
2. Now press the on/off button 18 on
the top of the product.
The built-in compressor starts and
runs until the set pressure is reached.
NOTE!
During the pumping process the current
pressure is displayed.
3. After reaching the set pressure, the
compressor stops pumping.
4. Press the on/off pressure switch 18
on the top of the product to switch off
the compressor.
NOTE!
- You can only activate the compressor
if the product has been switched on
using the on/off button 9.
- You can switch off the compressor be-
fore it reaches the set pressure. To do
this, press the on/off pressure switch
18 .
Note, that if you switch off the compres-
sor before reaching the set pressure, the
inflated item, e.g. a bicycle tyre, may not
meet the required specifications (tyre
pressure).
5. After the pumping process, unscrew
the compressed air hose with thread-
ed connection 2or any screwed-in
adapters 5, 6or 7from the valve.
6. If present, screw the dust cap onto the
valve.
NOTE!
Applies only to Presta valve Z:
Close the valve and screw on the dust cap.
NOTE!
Air can escape from the valve when the
compressed air hose with threaded con-
nection 2, or the previously described
adapters 5, 6or 7from the valve
is disconnected. Be sure to remove the
threaded air hose 2or adapters 56
7quickly.
Auxiliary light on/off
NOTE!
The LED lamp of the auxiliary light
is suitable for extreme tempera-
tures down to -21°C.
(Fig. L)
To switch on the auxiliary light 19 press
the light switch 20 .
To switch off, press the light switch 20
again.
The auxiliary light 19 can be used inde-
pendently of the product.
TROUBLESHOOTING
No reaction when the product is
switched on by pressing the on/off
button 9
- The battery is not charged. Charge
the battery.
No reaction when the compressor is
switched on by pressing the on/off
pressure switch 18
- The battery is not charged. Charge
the battery.
- The product is not switched on. Switch
on the product by pressing the on/off
button 9.
CLEANING AND CARE IN-
STRUCTIONS
!CAUTION!
Risk of injury!
Before cleaning, you must dis-
connect the charging plug. There
is a risk of electric shock!
- only clean with a dry cloth
- do not use any strong detergents and/
or chemicals
- do not immerse in water
- store in a cool, dry place and protected

14 15
Disposal
from UV light
- For storage, pack the product and its
accessories in the storage bag 8.
DISPOSAL
Disposal of the packaging
The packaging and
operating instructions
are made of 100 % en-
vironmentally friendly materials, which
you may dispose of at local recycling cen-
tres.
Not Recyclable - Soft plastic is not re-
cyclable at a MRF, and is not widely
collected at kerbside.
Disposal of the product
The product may not be disposed of
with normal household waste.
Please find out about disposal op-
tions for the product from your local au-
thority or town administration.
Disposal of the battery / rechargeable
batterie
- The product and the rechargea-
ble batterie may only be disposed
of by specialists.
- Defective or used rechargeable bat-
teries have to be recycled in accord-
ance with Directive 2006/66/EC and its
amendments.
- Batteries and disposable batteries are
not permitted to be disposed of with
household waste. They contain harm-
ful heavy metals. Marking: Pb (= lead),
Hg (= mercury), Cd (= cadmium). You
are legally obligated to return used
batteries and rechargeable batteries.
After use, you can either return batter-
ies to our point of sale or in the direct
vicinity (e.g. with a retailer or in munic-
ipal collection centres) free of charge.
Batteries and rechargeable batteries
are marked with a crossed-out waste
bin.
- Rechargeable batteries / accumu-
lators may only be disposed of in a
discharged state or must be secured
against short circuits (e.g. with insu-
lating tape) for disposal.

16
This manual suits for next models
1
Table of contents
Other ALDI Air Compressor manuals