ALDI SOHL Furniture Jenna GLS19745 User manual

1 of 19
ASSEMBLY INSTRUCTIONS
MODEL: GLS19745 PRODUCT CODE: 700314 04/2020
AFTER SALES SUPPORT
1300 777 137
service@unclebills.com.au
JENNA
Mirrored Shoe Cabinet
Assembly Instructions
ASSEMBLY INSTRUCTIONS
MODEL: GLS19745 PRODUCT CODE: 700314 04/2020
AFTER SALES SUPPORT
1300 777 137
service@unclebills.com.au

2 of 19
ASSEMBLY INSTRUCTIONS
MODEL: GLS19745 PRODUCT CODE: 700314 04/2020
AFTER SALES SUPPORT
1300 777 137
service@unclebills.com.au
Contents
Warranty Details 3
Assembly Tips 4
Using Cam Lock and Quickfit 5
Parts List 6
Assembly Instructions 8
Wall Mounting & Fixing Guide 18
Repair and Refurbished Goods or Parts Notice 19
Assembly requirements
Equipment: phillips head screwdriver, flat head screwdriver and hammer
2x adults required
1m x 2m assembly space required
1.5 hour assembly time

3 of 19
ASSEMBLY INSTRUCTIONS
MODEL: GLS19745 PRODUCT CODE: 700314 04/2020
AFTER SALES SUPPORT
1300 777 137
service@unclebills.com.au
Jenna Mirrored Shoe Cabinet
Warranty Details
REGISTER YOUR PURCHASE ATwww.aldi.com.au/en/about-aldi/product-registration/TO KEEP UP-TO-DATE WITH IMPORTANT PRODUCT INFORMATION
The product is guaranteed to be free from defects in workmanship and parts for a period
of 12 months (dependent on product) from the date of purchase. Defects that occur within this
warranty period, under normal use and care, will be repaired, replaced or refunded
at our discretion. The benefits conferred by this warranty are in addition to all rights and
remedies in respect of the product that the consumer has under the Competition and Consumer
Act 2010 and similar state and territory laws.
Our goods come with guarantees that cannot be excluded under the Australian Consumer Law.
You are entitled to a replacement or refund for a major failure and for compensation
for any other reasonably foreseeable loss or damage. You are also entitled to have the goods
repaired or replaced if the goods fail to be of acceptable quality and the failure
does not amount to a major failure.

4 of 19
ASSEMBLY INSTRUCTIONS
MODEL: GLS19745 PRODUCT CODE: 700314 04/2020
AFTER SALES SUPPORT
1300 777 137
service@unclebills.com.au
Assembly Tips
Important
• Please read these instructions carefully before use and keep for future
reference.
• This product is intended for domestic use only and is not designed for commercial use.
• Do not use this item if any components are missing or damaged.
• Assembly to be carried out by a competent adult only.
• During assembly children should be kept away from the product due to possible risk of
injury.
Tips before you start:
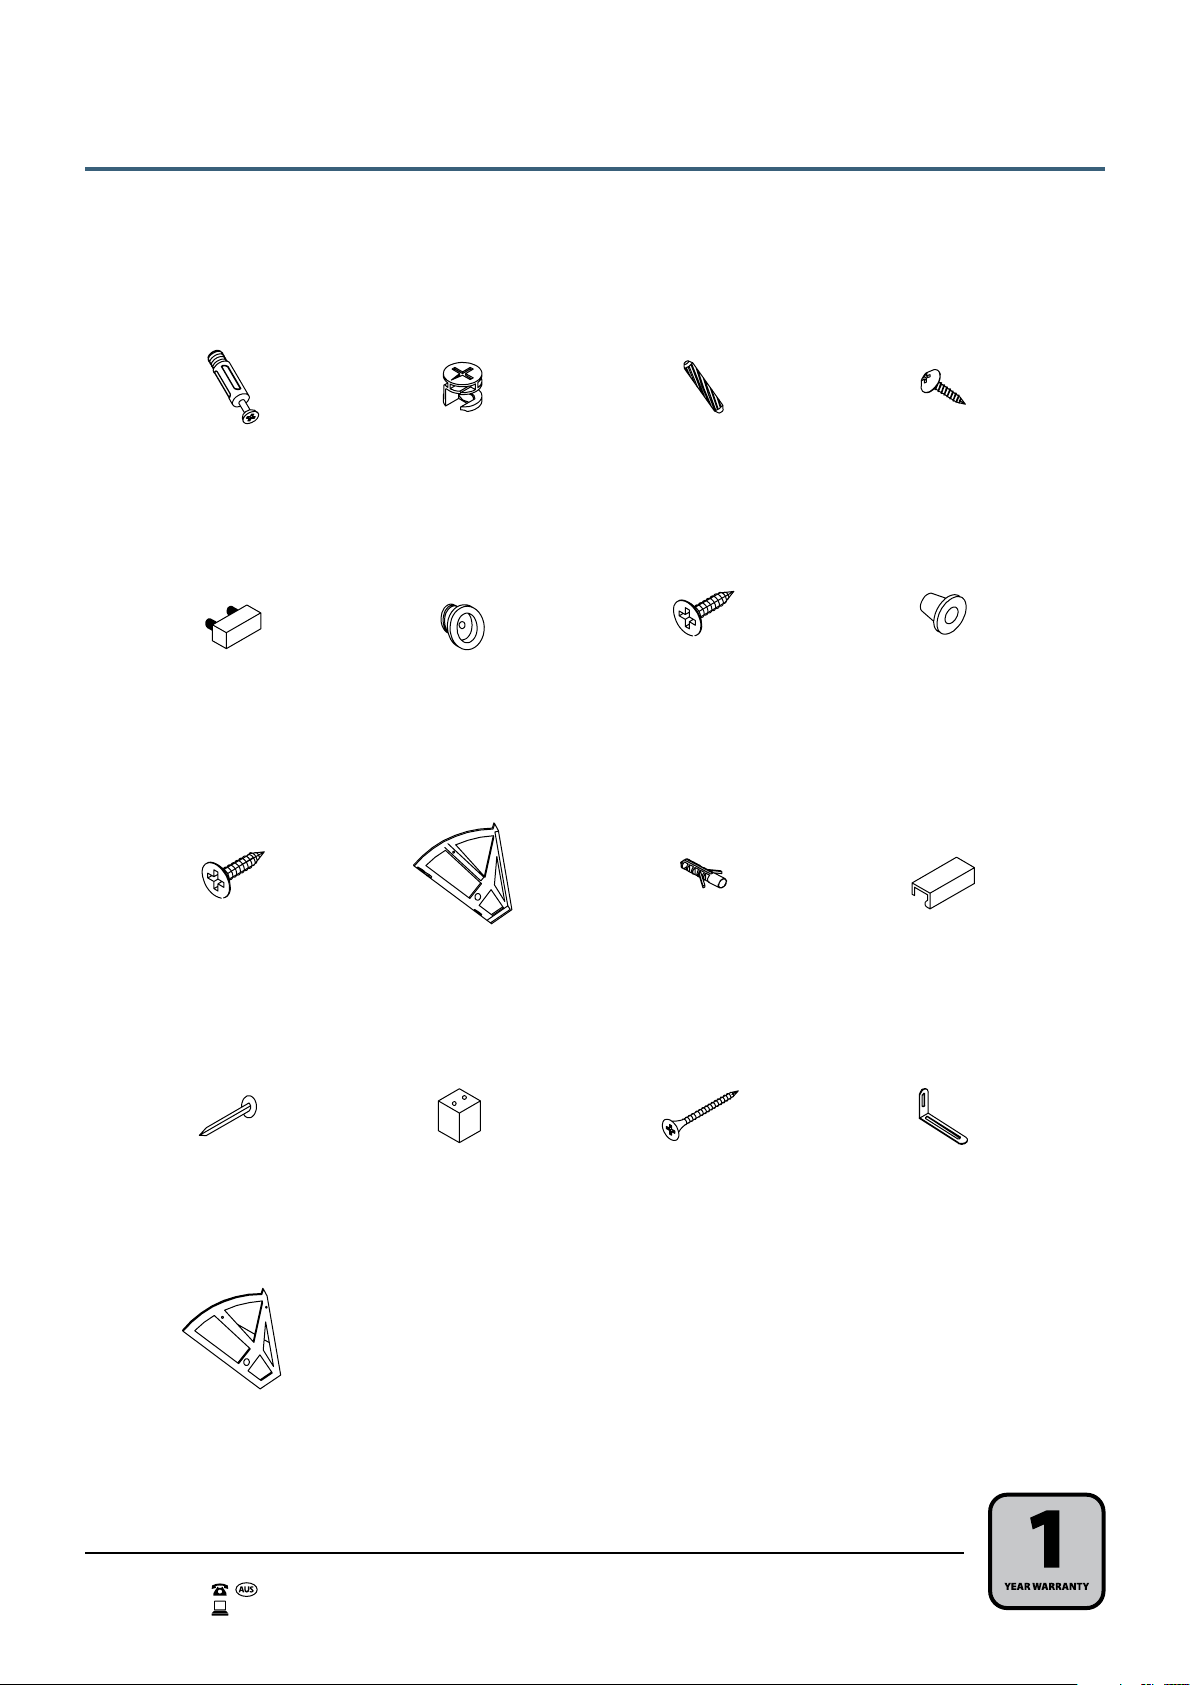
1. Please check that all parts are present before you start the assembly of your furniture.
2. For ease and speed of assembly, we recommend that before you commence each step of
the assembly, that you identify all the parts required for that step.
3. For larger items, please ensure that you have sufficient space and people to assemble your
product safely.
4. We recommend that, where possible, all items are assembled near to the area in which they
will be placed in use, to avoid moving the product unnecessarily once assembled.
5. For the protection of your furniture, we recommend that the product is placed on a
protected surface during assembly to prevent any damage.
6. During assembly please take care not to over-tighten any fittings, as this may damage the
product.
7. Always place the product on a flat, steady and stable surface.
8. Do not stand on the product. Do not use the product as a stepladder.
9. This product is intended for indoor, household use only as it is a non-industrial product.
10. Usage of power tools is not recommended for assembling this product.
11. Please use caution and care when lifting the product to avoid personal injury and/or
damage.
Care and Maintenance of your Furniture
;Regularly check all fastenings to ensure that they properly tightened.
;To clean your item, please use a damp cloth and wipe clean.
;Never allow any kind of liquid to remain on your furniture. Absorption can cause wood to
warp or finishes to de-laminate.
;Please do not place hot items (eg. hot drinks) directly on to the surface.
Please refer to separate Warranty Certificate for full warranty details and information.

5 of 19
ASSEMBLY INSTRUCTIONS
MODEL: GLS19745 PRODUCT CODE: 700314 04/2020
AFTER SALES SUPPORT
1300 777 137
service@unclebills.com.au
Using Cam Lock and Quickfit
QUICKFIT
Tighten quickfit until shoulder is flush with panel. Do not overtighten or undertighten.
CAM LOCK
When fitting cam lock, ensure starting position is correct before you insert connecting quickfit.
Quickfit head should be in the centre of the
cam lock when the two panels are joined.
Turn cam lock clockwise to tighten.

6 of 19
ASSEMBLY INSTRUCTIONS
MODEL: GLS19745 PRODUCT CODE: 700314 04/2020
AFTER SALES SUPPORT
1300 777 137
service@unclebills.com.au
4 x L
Handle
18 x M
Nail
5 x N
Foot
2 x P
Wall Bracket
8 x O
Screw
48 x G
Screw
8 x H
Screw Holder
8 x I
Screw
2 x K
Wall Plug
4 x Q
Right Bracket
4 x J
Left Bracket
10 x A
Quickfit Screw
10 x B
Cam Lock
16 x C
Wooden Dowel
8 x F
Screw Holder
8 x E
Stopper
20 x D
Screw
Parts List
Hardware

7 of 19
ASSEMBLY INSTRUCTIONS
MODEL: GLS19745 PRODUCT CODE: 700314 04/2020
AFTER SALES SUPPORT
1300 777 137
service@unclebills.com.au
3 - 1pc
10 - 4pcs
7 - 1pc
1 - 1pc
5 - 1pc 6 - 1pc
9 - 8pcs
2 - 2pcs
8 - 4pcs
4 - 1pc
Parts List
Parts

8 of 19
ASSEMBLY INSTRUCTIONS
MODEL: GLS19745 PRODUCT CODE: 700314 04/2020
AFTER SALES SUPPORT
1300 777 137
service@unclebills.com.au
Q
J
Q
J
G
G
J x 1
Q x 1
10
10
G x 2
Assembly Instructions
Step 1
DOORS
Fit part 10 into brackets J and Q.
Step 2
Fix brackets J and Q to part 10 using screws G.

9 of 19
ASSEMBLY INSTRUCTIONS
MODEL: GLS19745 PRODUCT CODE: 700314 04/2020
AFTER SALES SUPPORT
1300 777 137
service@unclebills.com.au
Q
J
GGG
GG
G
DD
Q
J
L
G
G
D x 2
L x 1
G x 2
8
9
8
G x 6
Repeat step 1 to 4 for the remaining doors.
Assembly Instructions (cont)
Step 3
Fix brackets J and Q to part 8 using screws G.
Step 4
Fix brackets J and Q to part 9 using screws G.
Fix handle L to part 8 using screws D.

10 of 19
ASSEMBLY INSTRUCTIONS
MODEL: GLS19745 PRODUCT CODE: 700314 04/2020
AFTER SALES SUPPORT
1300 777 137
service@unclebills.com.au
E x 8
F x 8
F
F
E
E
TOP
TOP
TOP
3
E
F
E
F
F
F
F
E
E
E
4
F
F
E
E
5
Assembly Instructions (cont)
Step 5
Fit stoppers E and screw holders F to parts 3, 4 and 5, as shown.
Please make sure the flat smooth side of parts E are assembled facing upwards
towards the top of the panels.

11 of 19
ASSEMBLY INSTRUCTIONS
MODEL: GLS19745 PRODUCT CODE: 700314 04/2020
AFTER SALES SUPPORT
1300 777 137
service@unclebills.com.au
B x 2
C x 2
A x 2
B
A
C
A
B
C
3
4
2
B x 2
C x 2
A x 2
B
B
A
A
C
C
4
3
2
5
Assembly Instructions (cont)
Step 6
Fit quickfit screws A and wooden dowels C to parts 3 and 4.
Insert cam locks B to part 2.
Fit parts 3 and 4 to part 2. Turn cam locks clockwise to tighten.
Step 7
Fit quickfit screws A and wooden dowels C to parts 4 and 5.
Insert cam locks B to part 2.
Fit parts 4 and 5 to part 2.
Turn cam locks clockwise to tighten.

12 of 19
ASSEMBLY INSTRUCTIONS
MODEL: GLS19745 PRODUCT CODE: 700314 04/2020
AFTER SALES SUPPORT
1300 777 137
service@unclebills.com.au
C x 6
O x6
C
C
C
C
C
CO
O
O
O
O
O
5
4
3
6
6
N
D
N
N
N
N
D
D
D
D
D
D
D
D
D
D x 10
N x 5
Assembly Instructions (cont)
Step 8
Fit wooden dowels C to parts 3, 4 and 5.
Fit part 6 to parts 3, 4 and 5 and secure with screws O.
Step 9
Fix feet N to part 6 using screws D.

13 of 19
ASSEMBLY INSTRUCTIONS
MODEL: GLS19745 PRODUCT CODE: 700314 04/2020
AFTER SALES SUPPORT
1300 777 137
service@unclebills.com.au
1
A
A
A
A
A
A
P
D
P
P
D
D
D x 2
P x 2
A x 6
B x 6
C x 6
CC
CC
CC
B
B
B
B
B
B
3
4
5
1
CC
B
B
CC
B
B
B
Assembly Instructions (cont)
Step 10
Fix quickfit screws A to part 1.
Fix wall brackets P to part 1 with screws D, as shown.
Step 11
Insert cam locks B and wooden dowels C into parts 3, 4 and 5.
Fit part 1 to the assembled unit and turn camlocks clockwise to secure.

14 of 19
ASSEMBLY INSTRUCTIONS
MODEL: GLS19745 PRODUCT CODE: 700314 04/2020
AFTER SALES SUPPORT
1300 777 137
service@unclebills.com.au
M x 18
MMMM
M
M
M
M
M
M
M
M
M
M
M
M
M
M
3
5
7
1
Assembly Instructions (cont)
Step 12
Fix back panel 7 to the assembled unit with nails M, as shown.
Note: please ensure you face the
white side in towards the cabinet.

15 of 19
ASSEMBLY INSTRUCTIONS
MODEL: GLS19745 PRODUCT CODE: 700314 04/2020
AFTER SALES SUPPORT
1300 777 137
service@unclebills.com.au
K x 2
O x 2
K
K
O
O
Assembly Instructions (cont)
Step 13
For extra stability, you must fix your cabinet
to the wall using the additional hardware K and O, as shown.
Screws O are fixed from inside the unit, through the brackets and into
the wall plugs K.
Should you choose not to affix the product to the wall, serious injury
may be caused if the product tips over.
Please consider the wall mounting & fixing
guide when securing your shoe cabinet.
WARNING
Serious or fatal crushing can occur from furniture tip over. To help
prevent tip over:
• Install all tip over restraints provided with your product.
• Place heaviest items inside the lower doors.
• Do not sit TV’s or other heavy objects on top of this product.
• Never allow children to climb or hang on drawers, doors, shelves.
• Never open more than one door at a time.
Use of tip over restraints may only reduce, but will not eliminate,
the risk of tip over.

16 of 19
ASSEMBLY INSTRUCTIONS
MODEL: GLS19745 PRODUCT CODE: 700314 04/2020
AFTER SALES SUPPORT
1300 777 137
service@unclebills.com.au
H x 8
I x 8
H
I
G
G
G x 8
9
G
G
H
I
Assembly Instructions (cont)
Step 14
Fix doors to the assembled unit, as shown.
One person holds the door in place,
while the other attaches the screws I
through screw holders H to secure.
Step 15
Slot shelf 9 into door and secure
with screws G, as shown.
Repeat for all drawers.

17 of 19
ASSEMBLY INSTRUCTIONS
MODEL: GLS19745 PRODUCT CODE: 700314 04/2020
AFTER SALES SUPPORT
1300 777 137
service@unclebills.com.au
Register your purchase at www.aldi.com.au/en/about-aldi/product-registration/
to keep up-to-date with important product information
Assembly Instructions (cont)
Step 16
Your mirrored shoe cabinet is ready for use.

18 of 19
ASSEMBLY INSTRUCTIONS
MODEL: GLS19745 PRODUCT CODE: 700314 04/2020
AFTER SALES SUPPORT
1300 777 137
service@unclebills.com.au
Wall Mounting & Fixing Guide
NOTE: Supplied wall plugs are only suitable for use in masonry walls.
If you have any doubts about using the correct plug for your wall, please seek professional advice.
Failure of the product due to using incorrect fixings is the responsibility of the installer.
IMPORTANT:
When drilling into walls, always check for hidden wires or pipes, etc.
Tips & Tricks
Make sure that the hardware used is suitable for supporting your unit.
Please consult a qualified tradesperson if unsure.
;If you are unsure, please select a larger screw and wall plug.
;Ensure that you use the recommended drill bit to match the wall plug and hole size.
;Take extra care when drilling high walls, ceiling and ceramic tiles. Ensure wall plugs are
inserted beyond the thickness of the ceramic tiles to avoid splitting or cracking.
;Ensure that wall plugs are well fitted and are a tight fit in the drilled hole.
Types Of Walls
Use one of the following types of wall plug (not included) if your walls are made of brick, breeze
block, concrete, stone or wood. Screws may be able to be fixed directly to solid wood walls as
they will provide a secure anchor point.
1. General Purpose Wall Plug
Generally, aerated blocks should not be used to
support heavy loads, use a specialist fitting in this
case. For light loads, general purpose wall plugs
can be used.
2. Plasterboard Wall Plug
For use when attaching light loads onto
plasterboard partitions.
3. Cavity Fixing Wall Plug
For use with plasterboard partitions or hollow
wooden doors.
4. Cavity Fixing Heavy Duty Wall Plug
For use when fitting or supporting heavy loads
such as shelving and wall cabinets.
5. Hammer Fixing Wall Plug
For use with concrete block or brick walls, or
walls stuck with plasterboard. The hammer fixing
allows it to be fixed to the wall rather than the
plasterboard. Always check the fixing is secure to
the retaining wall.
6. Shield Anchor Wall Plug Heavy Loads
For use with concrete or brick walls, or for use
with heavier loads such as TV & HiFi speakers and
satellite dishes, etc.

19 of 19
ASSEMBLY INSTRUCTIONS
MODEL: GLS19745 PRODUCT CODE: 700314 04/2020
AFTER SALES SUPPORT
1300 777 137
service@unclebills.com.au
Jenna Mirrored Shoe Cabinet
Repair and Refurbished
Goods or Parts Notice
Unfortunately, from time to time, faulty products are manufactured which need to be returned to
the Supplier for repair.
Please be aware that if your product is capable of retaining user-generated data (such as files
stored on a computer hard drive, telephone numbers stored on a mobile telephone, songs stored
on a portable media player, games saved on a games console or files stored on a USB memory
stick) during the process of repair, some or all of your stored data may be lost.
We recommend you save this data elsewhere prior to sending the product for repair.
You should also be aware that rather than repairing goods, we may replace them with
refurbished goods of the same type or use refurbished parts in the repair process.
Please be assured though, refurbished parts or replacements are only used where they meet
ALDI’s stringent quality specifications.
If at any time you feel your repair is being handled unsatisfactorily, you may escalate your
complaint. Please telephone us on 1300 777 137 or write to us at:
UNCLE BILL’S AUSTRALIA PTY LTD
48B Egerton Street Silverwater NSW 2128 Australia
1300 777 137
Opening Hours 9:00am - 4:30pm (Mon-Fri), 9:00am - 3:00pm (Sat)
This manual suits for next models
1
Table of contents
Other ALDI Indoor Furnishing manuals

ALDI
ALDI 4832109900HD User manual

ALDI
ALDI GARDENLINE ROCKING BISTRO SET 811944 User manual

ALDI
ALDI EASY HOME 44655 User manual

ALDI
ALDI COOL BAR User manual

ALDI
ALDI 44697 User manual

ALDI
ALDI Easy Home EHFMAU02WH User manual

ALDI
ALDI SOHL MCOFFT User manual

ALDI
ALDI 266EX341820HD Installation instructions
Popular Indoor Furnishing manuals by other brands

Regency
Regency LWMS3015 Assembly instructions

Furniture of America
Furniture of America CM7751C Assembly instructions

Safavieh Furniture
Safavieh Furniture Estella CNS5731 manual

PLACES OF STYLE
PLACES OF STYLE Ovalfuss Assembly instruction

Trasman
Trasman 1138 Bo1 Assembly manual

Costway
Costway JV10856 manual