Alesis GigaMix4CD User manual

Portable Powered Mixer with Built-in Digital Effects and CD Player
Owner’s Manual
Mezclador portátil con efectos digitales integrados y el lector de cd
Manual de usuario
(ESPAÑOL)
Tragbarer Powered Mixer mit eingebauten digitalen Effekten und CD-Spieler
Bedienungsanleitung
(DEUTSCH)
Console de mixage amplifiée avec effets numériques intégrés et le lecteur de CD
Guide de l’utilisateur
(FRANÇAIS)
Mixer portatile con effetti digitali incorporati ed il Lettore CD
Manuale d'uso
(ITALIANO)
CONTENUTO DELLA CONFEZIONE
•MIXER
•
C
AV
O
DI ALIMENTAZI
O
NE
CONTENU DE LA BOÎTE
•CONSOLE DE MIXAGE
•CÂBLE D’ALIMENTATION
SCHACHTELINHALT
•MISCHPULT
•NETZKABEL
CONTENIDOS DE LA CAJA
•MEZCLADOR
•CABLE DE ALIMENTACIÓN
BOX CONTENTS
•MIXER
•P
O
WER
C
ABLE


1
GIGAMIX 4CD OWNER’S MANUAL
Before making any power connections, make sure the GigaMix’s power switch is turned off.
• Plug the female end of the power cable into the GigaMix’s power socket.
• Plug the male (plug) end into a properly grounded power outlet.
Making Audio Connections
Start by making sure the GigaMix’s power switch is turned off. Then use either 1/4” or XLR
cables to connect your instruments and microphones to the GigaMix. After this, you may
connect speakers to the GigaMix. There are several ways to do this:
• Main (house) speakers. Connect two cables from the GigaMix’s two rear outputs to a
matched set of speakers. For optimal power output, the total rated load of the speakers
attached to these outputs should be 4 ohms.
Note: You may daisy-chain several speakers, if necessary, as long as the total rated load of
the speakers attached to this output is no lower than 4 ohms.
Note: the front panel Main Output jack is not powered. It may be used to run the Main
mix into another mixer for recording purposes.
• Unpowered monitors. If you want to use an external amplifier to power your monitors,
connect a cable from the GigaMix’s front-panel Monitor Output jack to a high-quality
amplifier. Then connect the output of that amplifier to one or more monitor speakers
according to the instructions in the amplifier’s manual.
Connecting a Tape Player
To connect a tape player or other device, plug the left and right audio outputs of your source
device into the 2-Track Return jacks. Control the level of the music with the 2-
TRACK/CD LEVEL knob in the Main section.
Note: Plugging cables into the 2-Track Return jacks will disable the built-in CD Player.
To capture the performance on a recording device, connect two cables from the 2-Track
Send jacks to the audio inputs of the destination device. Adjust the recording level using the
destination device’s input controls.
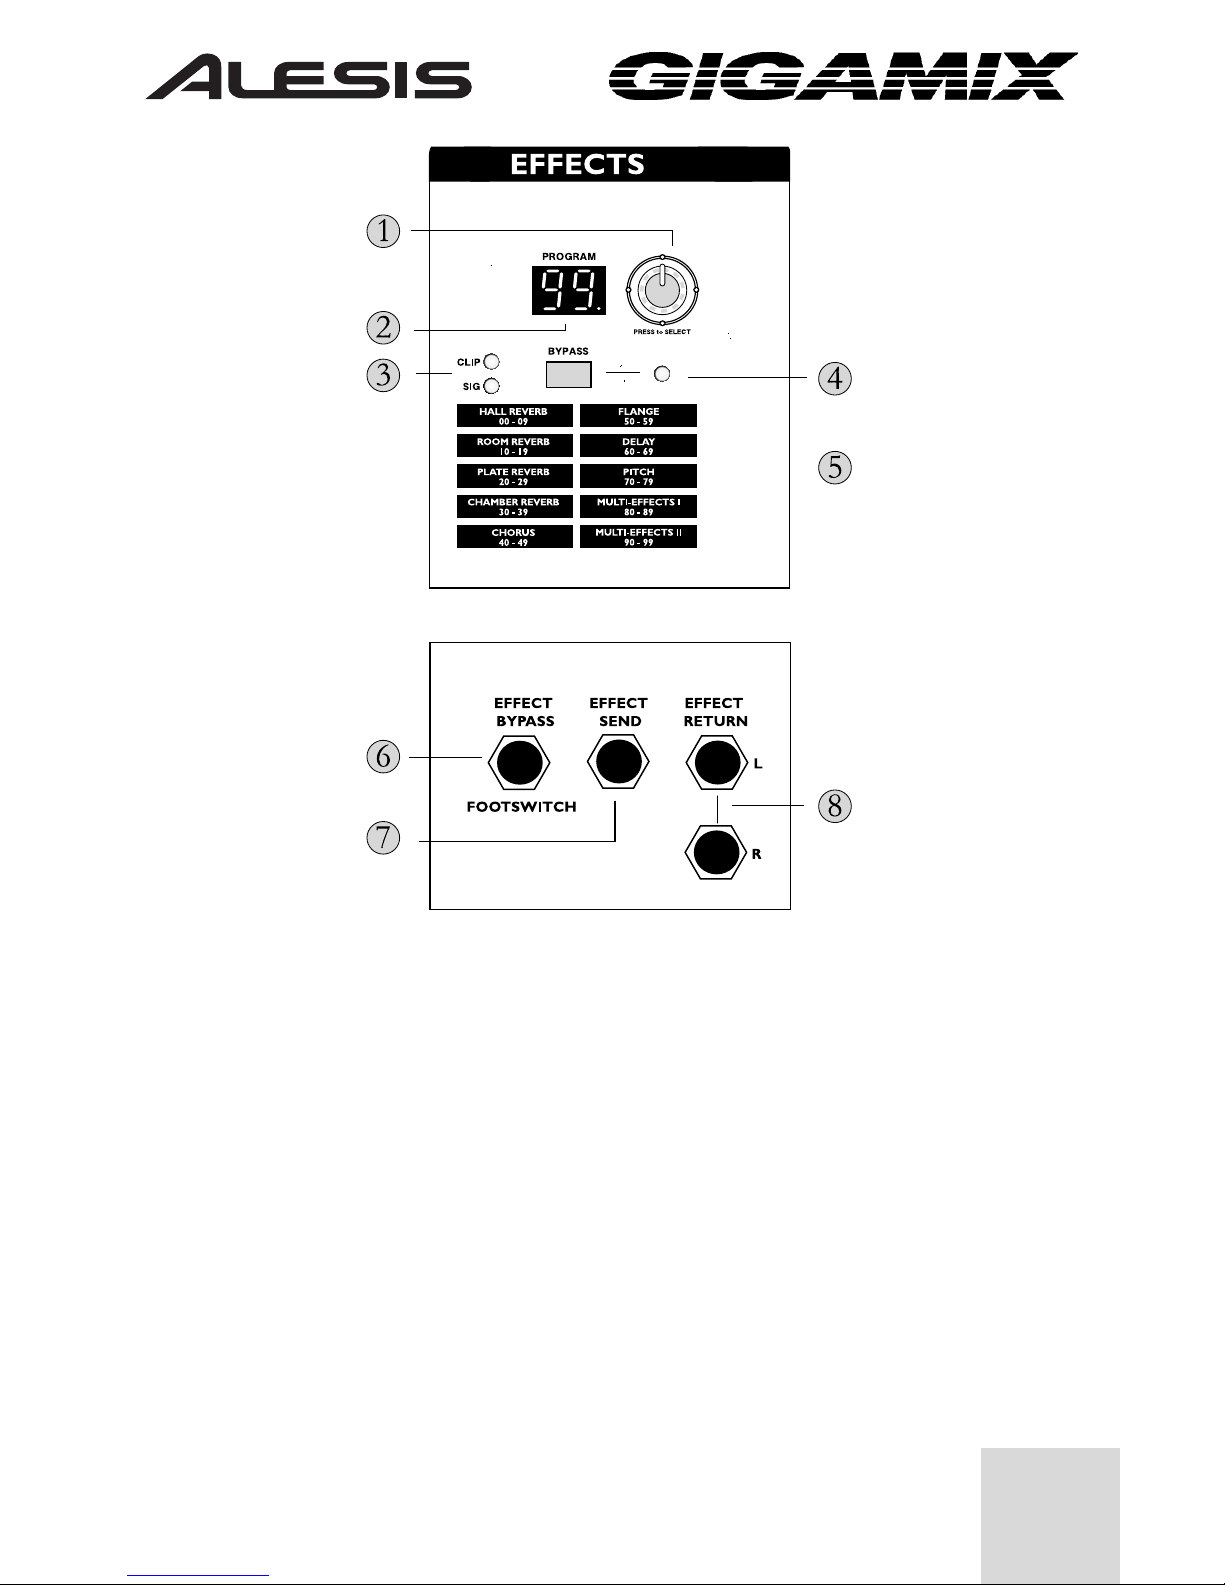
Connecting External Effects
To use an external effects device such as a reverb or chorus, connect an audio cable from
the Effects Send jack of the GigaMix to the input of the external effects device. Then run
an audio cable from the output of the effects device to one of the Effect Return input jacks
on the GigaMix. If your external effects device has stereo outputs, use two cables to connect
the left and right outputs of that device to the Effect Return jacks on the GigaMix.
The level sent to the external device is controlled by each channel’s EFFECT knob. The
amount of external effect coming back to the GigaMix is controlled by a combination of the
controls on the external effects device and the EFFECT RETURN controls for the Main
and Monitor sections of the GigaMix.
Note: Plugging a cable into the Effect Send jack will disable the built-in digital effects of the
GigaMix.

2
Channel Operation
Setting levels (mic/line channels). Plug the cable into the appropriate input jack. If you
are using a microphone or an instrument with a low output level (such as an acoustic guitar),
pressing the +30dB switch will give you an extra measure of pre-amplification. After this is
set properly, control the volume of the input with the LEVEL knob.
Setting levels (dual-line channels). Plug the cable(s) into the appropriate input jack(s).
After this is done, control the volume of the input with the LEVEL knob.
Effect level. Dial in the desired amount of effects (reverb, chorus, etc.) using the EFFECT
knob. The effects are post-fader, which means that as the input level is increased, the
amount of signal being sent to the effects will also increase. If you want to increase the level
of the instrument, you may need to turn down the EFFECT knob.
If you want to use an external effect device, plug a cable into the Effect Send jack. (This will
disable the built-in digital effects of the GigaMix.) Then connect the outputs of the external
device to the Effect Return jacks on the GigaMix.
Monitor level. To control the amount of a given channel being sent to the Monitor
Output jack, use the MON knob.
Equalizer controls. There are three knobs in the EQ section for each channel: HI,MID,
and LO. These give you the ability to shape the sound of each channel individually before it
is sent to the outputs.
Operating the Effects Section
Selecting the effects program. The GigaMix has 100 different effect programs from which
to choose. They are arranged into categories for ease of location. To select a new program,
turn the knob next to the PROGRAM display. When you reach the desired number, push
the knob to call up the new program.
Bypassing the effects. To hear what the mix sounds like without effects, press the
BYPASS button. The yellow LED will light to indicate that the effects are bypassed. To
bring the effects back in, press the button again.
Note: You may also use a footswitch to bypass the effects. To do so, plug a footswitch into
the EFFECT BYPASS/FOOTSWITCH jack at the bottom middle area of the front
panel.
Effects Clip/Signal LEDs. If you are using the built-in effects, make sure the combined
effect settings of each channel are lighting the green LED (Signal) but not lighting the red
LED (Clip). If the signal into the effects is clipping, reduce the setting of the EFFECT
knobs for one or more channels.

3
The Main Section
Controlling the master volume. The MAIN MIX knob is used to boost or reduce the
overall level being sent to the Main outputs of the GigaMix.
The graphic equalizer. In addition to the three bands of EQ possessed by each channel,
the Main section of the GigaMix has a 9-band graphic equalizer. This affects the overall
sound of the mix before it is sent to the Main outputs.
Controlling the master effects level. Use the EFFECT RETURN knob to adjust the
level of the effects for the entire mix.
Adjusting the CD/Tape volume. To raise or lower the volume of the incoming pre-
recorded music, use the 2-TRACK/CD LEVEL knob.
Phantom power. If you are using microphones that require phantom power, press the
PHANTOM POWER button. This will not affect microphones that do not use phantom
power.
Rumble filter. If you are experiencing excess microphone-handling noise or other low-
frequency noises bleeding into your microphones through the mic stands, for example, press
the RUMBLE FILTER button. It will reduce all frequencies below 75 Hz (which also can
help to reduce ground hum).
The Monitor Section
Controlling the monitor volume. The MONITOR MIX knob is used to boost or reduce
the overall level being sent to the monitors.
Controlling the monitor effects level. Use the EFFECT RETURN knob to adjust the
level of the effects for the entire monitor mix.
Adjusting the CD/Tape volume. To raise or lower the volume of the incoming pre-
recorded music, use the 2-TRACK/CD LEVEL knob.

4
1. Equalizer controls enable you to shape the sound of the channel before it is sent to the
outputs.
2. The MON knob controls the amount of a given channel being sent to the Monitor
Output.
3. The EFFECT knob helps you dial in the desired amount of effects for the channel.
4. The LEVEL knob controls the volume of the channel.
5. This jack is for connecting an instrument to the GigaMix using a 1/4” TS (Tip-Sleeve)
cable.
6. The +30dB button helps boost the volume of high-impedance/low-level sources.
7. The MIC input is a standard XLR connector for use with microphones and other sources.
8. Dual-line channels like this one allow two 1/4” TS connections to be used in one channel.

5
1. Use the Program Select knob to choose the desired effects program. Push it to call up a
new program.
2. The Program Number LED displays the number of the selected effects program.
3. The SIG and CLIP LEDs indicate that audio is present and whether it is clipping or not.
4. The BYPASS button allows you to shut off the effects. The LED lets you know if the
effects have been bypassed.
5. The names of all 100 programs are listed to make it easy to find the one you want.
6. The EFFECT BYPASS footswitch allows you to bypass the effects if your hands are not
free to push the button.
7. The EFFECT SEND jack is for sending audio signals to an external effects device.
8. The EFFECT RETURN jacks bring the audio from an external effects device back into
the GigaMix.

6
MAIN
1. The Graphic Equalizer shapes the sound of the Main mix before it is sent to the main
speakers.
2. The PHANTOM POWER button provides a 48-volt source for microphones.
3. The RUMBLE FILTER helps filter out unwanted low-frequency noise.
4. The LEVEL/CLIP LEDs give visual feedback about the overall volume of the GigaMix.
5. The EFFECT RETURN knob controls the level of the effects for the Main mix.
6. The MAIN MIX knob boosts or reduces the level of the signal being sent to the Main
outputs.
7. The 2-TRACK/CD LEVEL knob controls the Main level of the built-in CD player or of
the incoming 2-track signal, if cables are plugged in to the 2-TRACK RETURN jacks.
CD PLAYER
8. The built-in CD PLAYER can be used to play pre-recorded music. It is disabled if cables
are plugged in to the 2-TRACK RETURN jacks.

7
MONITOR
9. The EFFECT RETURN knob controls the level of the effects for the Monitor mix.
10. The MONITOR MIX knob boosts or reduces the level of the signal being sent to the
monitors.
11. The 2-TRACK/CD LEVEL knob controls the Monitor level of the built-in CD player
or of the incoming 2-track signal.
OUTPUT
12. The MAIN OUTPUT provides a non-powered version of the Main mix.
13. The MONITOR OUTPUT provides a non-powered version of the Monitor mix.
14. The 2-TRACK section provides inputs and outputs for connecting a CD player or tape
deck.
15. The POWER switch turns the GigaMix on and off.

8
Specifications
Frequency response @ rated power: 10Hz – 50kHz (+0/-3dB)
Signal to Noise Ratio @ rated power: >95dB (A-weighted)
THD @ rated power: <0.04%
(All measurements taken from microphone input to speaker output.)
Output Power (RMS) @ 1% THD (4 Ohm Load): 225 Watts
GigaMix 4CD Owner’s manual
Version 1.00 by Ben Ling, Randy Lee, and Fred Morgenstern
Copyright 2004, Alesis Distribution, LLC. All rights reserved.
Reproduction in whole or in part is prohibited.
Specifications subject to change without notice.
7-51-0185-A
2004/06/16

9
MANUAL DE USUARIO DE GIGAMIX
Antes de realizar cualquier conexión eléctrica, asegúrese de que el interruptor de
alimentación del Gigaix está apagado.
• Enchufe el extremo hembra del cable de alimentación a la toma de corriente de GigaMix.
• Enchufe el extremo macho (del enchufe) a una toma de corriente conectada a tierra
correctamente.
Conexiones de audio
Comience asegurándose de que el interruptor de alimentación del GigaMix está apagado. Y
use cables de 1/4” ó XLR para conectar sus instrumentos y micrófonos al Gigamix. Una vez
hecho esto, podrá conectar los altavoces al GigaMix. Existen varias maneras de hacer esto:
• Altavoces (para el hogar) principales. Conecte dos cables procedentes de las dos salidas
traseras del GigaMix a un juego de altavoces iguales. Para una salida de potencia óptima,
el total de la carga nominal de los altavoces conectados a estas salidas debe ser de 4
ohmios.
Nota: el/los conectores de la salida principal del panel frontal no reciben electricidad y
pueden ser usados para conectar la mezcla principal a otro mezclador para propósitos de
grabación.
Nota: Puede hacer una cadena tipo margarita con varios altavoces, si es
necesario, siempre que la carga nominal total de los altavoces conectados a esta
salida no sea menor de 4 ohmios.
• Monitores sin fuente eléctrica directa. Si desea utilizar un amplificador
externo para suministrar energía eléctrica a sus monitores, conecte un cable
desde el jack de salida del monitor del panel frontal de su GigaMix a un
amplificador de alta calidad. Ahora conecte la salida de ese amplificador a uno o
más altavoces del monitor según las instrucciones del manual del amplificador.
Conectando un reproductor de cinta
Para procesar música pregrabada a través del GigaMix hacia las salidas principales, enchufe
las salidas izquierda y derecha de audio de su dispositivo fuente en los jacks de retorno de 2
pistas. Controle el nivel de la música con el botón de NIVEL DE RETORNO DE 2
PISTAS en la sección principal.
Para captar el funcionamiento de un dispositivo de grabación, conecte dos cables de los jacks
de retorno de 2 pistas a las entradas de audio del dispositivo de destino. Ajuste el nivel de
grabación usando los controles de entrada del dispositivo de destino.

10
Conexión de efectos externos
Para usar un dispositivo de efectos externos como una reverberación o un coro, conecte el
cable de audio del jack de envío de efectos del GigaMix a la entrada del dispositivo de los
efectos externos. Luego conecte un cable de audio desde la salida del dispositivo de efectos a
uno de los jacks de entrada de Retorno de efectos en el GigaMix. Si su dispositivo de
efectos externos cuenta con salidas de estéreo, use dos cables para conectar las salidas de
derecha e izquierda de este dispositivo a los jacks de retorno de efectos del GigaMix.
El nivel enviado al dispositivo externo es controlado por el botón de EFECTOS
[EFFECT] de cada canal. La cantidad de efectos externos que vuelven al GigaMix es
controlada por una combinación de los controles en el dispositivo de efectos externos y en
los controles de RETORNO DE EFECTO para las secciones principales y del monitor
del GigaMix.
Nota: Si enchufa un cable en el jack de envío de efectos desactivará los efectos digitales que
vienen integrados en el GigaMix.
Funcionamiento de canales
Establecimiento de niveles (canales de mic/línea). Enchufe el cable al jack de entrada
correspondiente. Si está usando un micrófono o un instrumento con un nivel de salida bajo
——como una guitarra acústica—— pulsar el interruptor de +30dB le proporcionará una
medida extra de pre-amplificación. Una vez que esto
haya sido ajustado correctamente, controle el volumen de la entrada con el botón de
NIVEL.
Establecimiento de niveles (canales de línea dual). Enchufe el(los) cable(s) al(los) jack(s)
de entrada adecuado(s). Una vez que esto haya sido ajustado correctamente, controle el
volumen de la entrada con el botón de NIVEL.
Nivel de efecto. Ajuste la cantidad deseada de efectos (reverberación, coro, etc.) usando el
botón de efectos [EFFECT]. Los efectos son post-fader, lo cual significa que, a medida que
se aumenta el nivel de entrada también aumentará la cantidad de señal enviada a los efectos.
Si desea aumentar el nivel del instrumento, puede que tenga que bajar el botón de efectos
[EFFECT].
Si desea usar un dispositivo de efectos externos, enchufe un cable en el jack de envío de
efectos. (Esto desactivará los efectos digitales integrados del GigaMix.) Luego conecte las
salidas del dispositivo externo a los jacks de retorno de efectos del GigaMix.
Nivel del monitor. Para controlar la cantidad de un canal determinado que está siendo
enviada al jack de salida del monitor, use el botón MON. Si el botón de modo de
amplificación de potencia está posicionado en monitor principal MAIN-MON (arriba),
esta señal también será enviada al jack de la salida 2 (Output 2) del altavoz en el panel
trasero.
Controles del ecualizador. Existen tres botones en la sección del ecualizador [EQ] para
cada canal: HI (alto), MID (medio) y LO (bajo). Estos le dan la capacidad de dar forma al
sonido de cada canal individualmente antes de
que sea enviado hacia las salidas.

11
Funcionamiento de la sección de efectos
Selección del programa de efectos. El GigaMix contiene 100 programas de efectos
diferentes donde elegir. Están organizados en categorías para facilitar su ubicación. Para
seleccionar un nuevo programa, gire el botón junto a programa [PROGRAM]. Cuando
alcance el número que desea, pulse el botón para acceder al nuevo programa.
Desviación de los efectos. Para escuchar cómo sonará la mezcla sin efectos, pulse el botón
de desviación [BYPASS]. El LED amarillo se iluminará para indicar que los efectos han sido
desviados. Para hacer volver los efectos, pulse de nuevo el botón.
Nota: También puede usar un interruptor de pie (footswitch) para desviar los efectos. Para
hacer esto, enchufe un interruptor de pie en el jack de desviación de efectos/interruptor de
pie [EFFECT BYPASS/FOOTSWITCH]en la parte inferior central del panel frontal.
LED de Clip/Señal de efectos. Si está usando los efectos integrados, asegúrese de que los
ajustes de efectos combinados de cada canal están encendiendo el LED verde (señal) pero
no el LED rojo (Clip). Si la señal en los efectos está saturada o clipping, reduzca el ajuste de
los botones de efecto [EFFECT] para uno o más canales.
La sección principal
Control del volumen principal. El botón de la mezcla principal [MAIN MIX] se usa para
amplificar o reducir el nivel total enviado a las salidas principales del GigaMix.
El ecualizador gráfico. Además de las tres bandas de EQ de las que consta cada canal, la
sección principal del GigaMix cuenta con un ecualizador gráfico de 9 bandas. Esto afecta a
la totalidad del sonido de la mezcla antes de que sea enviada a las salidas principales.
Control del nivel principal (master) de los efectos. Use el botón del retorno de efectos
[EFFECT RETURN] para ajustar el nivel de los efectos para toda la mezcla.
Ajuste del volumen del CD/Cinta. Para subir o bajar el volumen de la música pre-grabada
de entrada, use el botón del nivel de retorno de 2 pistas [2-TRACK/CD LEVEL].
Potencia fantasma. Si está usando micrófonos que requieren potencia fantasma, pulse el
botón de potencia fantasma [PHANTOM POWER]. Esto no afectará a los micrófonos
que no usan potencia fantasma.
Filtro de ronroneo. Si experimenta un exceso de ruido en la manipulación del micrófono u
otros ruidos de baja frecuencia colándose en sus micrófonos a través de los pies de
micrófono, por ejemplo, pulse el botón de filtro de ronroneo [RUMBLE FILTER]. Este
reducirá todas las frecuencias inferiores a los 75 Hz (que puede también reducir el zumbido
de tierra).
La sección del monitor
Control del volumen del monitor. El botón de la mezcla del monitor [MONITOR MIX]
se usa para aumentar o reducir el nivel total enviado a los monitores.
Control del nivel de los efectos del monitor. Use el botón del retorno de efectos
[EFFECT RETURN]para ajustar el nivel de los efectos para la totalidad de la mezcla del
monitor.
Ajuste del volumen del CD/Cinta. Para subir o bajar el volumen de la música pre-grabada
de entrada, use el botón del nivel de retorno de 2 pistas [2-TRACK/CD LEVEL].

12
1. Los controles del ecualizador le permiten dar forma al sonido del canal antes que sea
enviado hacia las salidas.
2. El botón MON controla la cantidad de un canal determinado que es enviada a la salida
del monitor.
3. El botón de efecto [EFFECT] le ayuda a especificar la cantidad deseada de efectos para el
canal.
4. El botón de nivel [LEVEL] controla el volumen del canal.
5. Este jack se usa para conectar un instrumento al GigaMix usando un cable de ¼ pulgadas
de TS (Tip-Sleeve)
6. El botón de +30dB ayuda a aumentar el volumen de fuentes de alta impedancia/bajo
nivel.
7. La entrada de MIC es un conector de XLR estándar para uso con micrófonos y otras
fuentes.
8. Canales de líneas duales como éstos, permiten la utilización de dos conexiones de 1/4 de
TS en un solo canal.

13
1. Use el botón de selección de programa para seleccionar el programa de efectos que
desea. Púlselo para acceder a un nuevo programa.
2. El LED del número de programa muestra el número del programa de efectos que ha
sido seleccionado.
3. Los LED de [SIG] y [CLIP] indican que hay audio presente además de si se está
saturando o no.
4. El botón de desviación [BYPASS] le permite apagar los efectos. El LED le permite
comprobar si los efectos han sido desviados.
5. Los nombres de los 100 programas están enumerados para facilitarle la ubicación del que
está buscando.
6. El interruptor de pie para la desviación de efectos [EFFECT BYPASS] le permite desviar
los efectos si sus manos están ocupadas para pulsar el botón.
7. El jack de envío de efectos [EFFECT SEND] se utiliza para enviar señales de audio a un
dispositivo de efectos externo.
8. Los jacks de retorno de efectos [EFFECT RETURN] traen el audio de un dispositivo de
efectos externo de vuelta al GigaMix.

14
PRINCIPAL
1. El ecualizador gráfico le da forma al sonido de la mezcla principal antes de que sea
enviado a los altavoces principales.
2. El botón de potencia fantasma [PHANTOM POWER] proporciona una fuente de 48
voltios para los micrófonos.
3. El filtro de ronroneo [RUMBLE FILTER] ayuda a filtrar el ruido de baja frecuencia no
deseado.
4. Los LED de nivel/clip [LEVEL/CLIP] ofrecen una retroalimentación visual sobre el
volumen total del GigaMix.
5. El botón de retorno de efectos [EFFECT RETURN] controla el nivel de los efectos de
la mezcla principal.
6. El botón de la mezcla principal [MAIN MIX] aumenta o reduce el nivel de la señal
enviado a las salidas principales.
7. El botón del nivel de retorno para 2 pistas [2-TRACK/CD LEVEL] controla el nivel de
la señal de entrada de 2 pistas.

15
REPRODUCTOR DE CD
8. Reproductor del disco compacto.
MONITOR
9. El botón de retorno de efectos [EFFECT RETURN] controla el nivel de los efectos
para la mezcla del monitor.
10. El botón de la mezcla principal [MONITOR MIX] aumenta o reduce el nivel de la señal
enviada a los monitores.
11. El botón del nivel de retorno para 2 pistas [2-TRACK/CD LEVEL] controla el nivel
de la señal de entrada de 2 pistas.
SALIDA
12. La salida principal [MAIN OUTPUT] proporciona una versión de la mezcla principal
sin potencia.
13. La salida del monitor [MONITOR OUTPUT] proporciona una versión de la mezcla
del monitor sin potencia.
14. La sección de 2 pistas [2-TRACK] proporciona entradas y salidas para conectar un
reproductor de cinta.
15. El interruptor de alimentación [POWER] enciende y apaga el GigaMix.

16
Datos técnicos
Respuesta de frecuencia a la potencia asignada de: 10Hz – 50kHz (+0/-3dB)
Razón de señal a ruido a la potencia asignada de: >95dB (A ponderada)
THD a potencia asignada de: <0,04%
(Todas las medidas han sido tomadas desde la entrada de micrófono hasta la salida del
altavoz.)
Potencia de salida (RMS) a 1% THD (Carga de 4 ohmios): 225 vatios
GigaMix 4CD Owner’s manual
Version 1.00 by Ben Ling, Randy Lee, and Fred Morgenstern
Copyright 2004, Alesis Distribution, LLC. All rights reserved.
Reproduction in whole or in part is prohibited.
Specifications subject to change without notice.
7-51-0185-A
2004/06/16

17
GIGAMIX BEDIENUNGSANLEITUNG
Stellen Sie sicher, daß der Netzschalter des GigaMix ausgeschaltet ist, bevor Anschlüsse an
das Stromnetz hergestellt werden.
• Stecken Sie die Buchse des Netzkabels in den Netzanschluss des GigaMix.
• Stecken Sie das Steckerende des Netzkabels in eine vorschriftsmäßig geerdete Steckdose.
Ausführung der Tonverbindungen
Zuerst stellen Sie sicher, daß der Netzschalter des GigaMix ausgeschaltet ist. Verwenden Sie
dann entweder ein 6,3 mm- oder XLR-Kabel, um Ihre Instrumente und Mikrofone an den
GigaMix anzuschließen. Danach können Sie Ihre Lautsprecher an den GigaMix anschließen.
Hier gibt es verschiedene Möglichkeiten:
• Haupt-(house)Lautsprecher. Schließen Sie zwei Kabel von den zwei rückwärtigen
Ausgängen des GigaMix an ein gleichwertiges Paar von Lautsprechern an. Für ein
optimales Leistungsverhalten sollte die Gesamtnennbelastung der an diese Ausgänge
angeschlossenen Lautsprecher bei 4 Ohm liegen.
Hinweis: die an der Vorderseite des Geräts befindliche(n) Hauptausgangsbuchse (n)
wird (werden) nicht gespeist und kann (können) dazu benutzt werden, den Main-Mix in
ein anderes Mischpult zu Aufnahmezwecken einzuspeisen.
Hinweis: Sie können mehrere Lautsprecher in Serie verbinden, solange die
Gesamtnennbelastung der angeschlossenen Lautsprecher 4 Ohm nicht unterschreitet.
• Passiv-Monitore. Falls Sie zur Einspeisung Ihrer Monitore einen externen Verstärker
verwenden wollen, schließen Sie ein Kabel von der an der Vorderseite des GigaMix
befindlichen Monitorausgangsbuchse an einen leistungsfähigen Verstärker an.
Verbinden Sie dann den Ausgang dieses Verstärkers mit einem oder mehreren Monitoren
gemäß den Anweisungen in der Bedienungsanleitung des Verstärkers.
Anschluss eines Kassettendecks
Um vorher aufgenommene Musik durch den GigaMix an die Hauptausgänge zu senden,
stecken Sie die linken und rechten Tonausgänge Ihrer Signalquelle in die 2-spurigen
Empfangsbuchsen. Steuern Sie den Pegel der Musik mit dem 2-TRACK/CD LEVEL-
Regler im Hauptbereich.
Um die Ausgabe eines Aufnahmegeräts aufzuzeichnen, schließen Sie zwei Kabel von den 2-
spurigen Sendebuchsen an die Signaleingänge der Zielgeräte an. Stellen Sie den
Aufnahmepegel an der Eingabesteuerung des Zielgeräts ein.

18
Anschluss von externen Effekten
Um ein externes Effektgerät wie ein Reverb oder Chorus zu verwenden, schließen Sie ein
Tonkabel von der Effektausgangsbuchse des GigaMix an den Eingang des externen
Effektgeräts an. Verbinden Sie dann den Ausgang des Effektgeräts mit einer der
Effekteingangsbuchsen am GigaMix mit einem Tonkabel. Falls Ihr externes Effektgerät
Stereoausgänge besitzt, verwenden Sie zwei Kabel um den linken und rechten Ausgang
dieses Geräts mit den Effekteingangbuchsen des GigaMix zu verbinden.
Der Pegel, welcher an das externe Gerät gesandt wird, wird durch den EFFECT-Regler für
jeden Kanal gesteuert. Die Stärke des externen Effekts, welcher zum GigaMix zurückkehrt,
wird durch eine Kombination der Steuerungen am externen Effektgerät und den EFFECT-
RETURN-Reglern für die Haupt- und Monitorbereiche des GigaMix gesteuert.
Hinweis: Das Einstecken eines Kabels in die Effektsendebuchse sperrt die im
GigaMix eingebauten digitalen Effekte.
Table of contents
Languages:
Other Alesis Mixer manuals

Alesis
Alesis iMULTIMIX 9R User manual

Alesis
Alesis MultiMix 6 USB User manual

Alesis
Alesis ZoneMix6 Technical document

Alesis
Alesis Multimix 8 USB 2.0 FX User manual

Alesis
Alesis GIGAMIX Gigamix 4FX User manual

Alesis
Alesis 12, 16 User manual

Alesis
Alesis MultiMix8Line User manual

Alesis
Alesis MultiMix8FX XA1 User manual

Alesis
Alesis MULTIMIX 8 USB FX User manual

Alesis
Alesis iMultiMix9R User manual