Alessi MDL10 User manual

MDL10 - “Plissé”
Frullatore ad immersione - Hand blender
design Michele De Lucchi
2020
MDL10 Istruzioni versione 11-20.indd 1MDL10 Istruzioni versione 11-20.indd 1 26/11/20 11:2026/11/20 11:20

2
Français 22
Nederlands 54
Norsk 62
Português 70
Svenska 78
Suomi 85
日本語
日本語 93
Ελληνικά
101
中文 109
Русский
116
124
Český
132
Polski
140
Slovenščina
156
Slovenský
Deutsch 38
Italiano 6
English 14
Dansk 30
Español 46
MDL10 - MDL10S
148
Magyar
MDL10 Istruzioni versione 11-20.indd 2MDL10 Istruzioni versione 11-20.indd 2 26/11/20 11:2026/11/20 11:20

MDL10 - MDL10S
A C
fig. 1
B
D
E
F
G
H
Alessi S.p.a., via Privata Alessi, 6
Crusinallo di Omegna 28887 (VB) Italia
Prodotto fabbricato in Paesi extra UE
11/2020
MDL10
220-240V ~ 50-60Hz 420-500W
Model: Type:01
Alessi Spa Via privata Alessi Nr.6,
Crusinallo di Omegna, 28887 (VB) Italia
25 mm
9 mm
7mm
7mm
6mm
25 mm
9 mm
DATE CODE: YYWW
MDL10 Istruzioni versione 11-20.indd 3MDL10 Istruzioni versione 11-20.indd 3 26/11/20 11:2026/11/20 11:20

fig. 2
fig. 3 fig. 6 fig. 7
fig. 8 fig. 9 fig. 12 fig. 13
G1
G2
fig. 5
fig. 4
fig. 10
MDL10 Istruzioni versione 11-20.indd 4MDL10 Istruzioni versione 11-20.indd 4 26/11/20 11:2026/11/20 11:20

fig. 18 fig. 19 fig. 20
H1
H2
H3
fig. 14 fig. 15 fig. 16
fig. 17
H4
MDL10 Istruzioni versione 11-20.indd 5MDL10 Istruzioni versione 11-20.indd 5 26/11/20 11:2026/11/20 11:20

6
IMPORTANTI INFORMAZIONI
DI SICUREZZA
L’uso di apparecchi elettrici richiede sempre il rispetto delle precauzioni di sicurezza
generali al fine di ridurre il rischio di scossa elettrica e/o lesioni a persone
Tali precauzioni comprendono:
1. LEGGERE ATTENTAMENTE LE ISTRUZIONI PER INTERO PRIMA DI USARE IL
PRODOTTO.
2. Prima di utilizzare il frullatore a immersione, leggete e seguite attentamente le istruzioni
per l’uso. Conservatele e consultatele per tutto il periodo di utilizzo del prodotto.
3. Dopo aver disimballato l’apparecchio, smaltire correttamente le buste di plastica che
potrebbero rappresentare un pericolo per i bambini.
4. Non permettere ai bambini di utilizzare l’apparecchio o di giocare con l’apparecchio.
TENETE L’APPARECCHIO LONTANO DALLA PORTATA DEI BAMBINI.
5. Non utilizzate una tensione elettrica diversa da quella indicata sul prodotto.
6. Non usate adattatori e/o prolunghe.
7. Non tirare il cavo per rimuovere la spina dalla presa di corrente.
8. Per evitare lesioni gravi e di danneggiare l’apparecchio, non introdurre mai le mani o
utensili nel bicchiere graduato mentre il frullatore ad immersione è in funzione.
9. Non posizionare l’apparecchio sopra o vicino a fornelli gas o elettrici accesi, all’interno
di un forno o in prossimità di fonti di calore.
10. ATTENZIONE: LE LAME SONO AFFILATE E QUINDI TAGLIENTI.
È NECESSARIO PRENDERE DELLE PRECAUZIONI QUANDO VENGONO
MANEGGIATE E DURANTE LA PULIZIA.
11. Non toccate il prodotto con le mani bagnate.
12. Non usate il prodotto all’aperto.
13. Non immergete o risciacquate il blocco motore, l’attacco della frusta e l’attacco del
tritatutto nonché il cavo di alimentazione o la spina in acqua o in altri liquidi.
14. Staccate sempre la spina quando l’apparecchio rimane incustodito, per l’assemblaggio
delle parti/accessori, subito dopo l’utilizzo, prima di ogni operazione di pulizia, di
manutenzione o in caso di guasto.
15. Per evitare schizzi, specialmente quando si miscelano ingredienti liquidi caldi, utilizzare
un contenitore alto e lavorare solo piccole quantità alla volta.
16. Non riempite mai il bicchiere con ingredienti caldi. Lasciateli raffreddare.
17. Non utilizzate il prodotto per scopi diversi da quelli previsti. Alessi declina ogni
Italiano
MDL10 Istruzioni versione 11-20.indd 6MDL10 Istruzioni versione 11-20.indd 6 26/11/20 11:2026/11/20 11:20

7
responsabilità per danni causati da un uso improprio.
18. Usate solo accessori e ricambi garantiti originali Alessi.
19. In caso di malfunzionamento o danneggiamento del frullatore o del cavo non usate il
prodotto e rivolgetevi al vostro rivenditore Alessi di fiducia o direttamente Alessi SpA
20. Se il cavo di alimentazione è danneggiato, deve essere sostituito dal produttore, da un
centro di assistenza tecnica o da persone qualificate per evitare pericoli.
21. Non tentate mai di aprire il gruppo motore dell’apparecchio.
22. 1) Questo apparecchio può essere utilizzato da bambini che abbiano compiuto 8
anni di età e oltre e da persone con capacità fisiche, sensoriali o mentali ridotte o
mancanza di esperienza e conoscenza se sono state sottoposte a supervisione o
istruzioni sull’uso dell’apparecchio in modo sicuro da comprendere i pericoli.
I bambini non devono giocare con l’apparecchio. La pulizia e la manutenzione
dell’apparecchio non devono essere eseguite da bambini, a meno che non abbiano
più di 8 anni e sotto la supervisione di un adulto.
2) Tenere l’apparecchio e il cavo di alimentazione fuori dalla portata dei bambini con
età inferiore a 8 anni
23. Fate attenzione se un liquido troppo caldo viene versato nel frullatore perché potrebbe
uscire, a causa di un’ improvviso sbuffo di vapore.
24. Non usate l’apparecchio in modo continuativo per più di 2 minuti.
SORVEGLIARE I BAMBINI PER
ASSICURARSI CHE NON GIOCHINO
CON L’APPARECCHIO
L’APPARECCHIO È DESTINATO
ALL’USO DOMESTICO E INTERNO
CONSERVARE LE PRESENTI
ISTRUZIONI
WWW.ALESSI.COM
MDL10 Istruzioni versione 11-20.indd 7MDL10 Istruzioni versione 11-20.indd 7 26/11/20 11:2026/11/20 11:20

8
Progettato da Michele De Lucchi nel
2020, questo frullatore a immersione
è stato testato e certificato per garantire
la sicurezza del consumatore.
DESCRIZIONE
DEL FRULLATORE
AD IMMERSIONE
A-
Corpo motore in resina termoplastica
B-
Asta removibile in resina termoplastica
C- Tasto velocità 1
D- Tasto velocita 2 TURBO
E- Lama rotante in acciaio
F- Bicchiere graduato in resina
termoplastica trasparente
(PCTG) con capacità ml 700
la versione con accessori comprende :
G- Frusta in acciaio
G1 - attacco/adattatore della
frusta in resina termoplastica.
G2 - frusta in acciaio.
H- Tritatutto in resina termoplastica
e lame in acciaio.
H1 - attacco/adattatore del trita-
tutto in resina termoplastica.
H2 - gruppo lame del tritatutto
in acciaio.
H3 - contenitore in resina termo-
plastica (PCTG) capacità
400 ml (livello massimo
300 ml).
H4 - anello in gomma antiscivolo.
Il PCTG, materiale con cui sono
realizzati il bicchiere graduato e il
contenitore del tritatutto è BPA free.
(fig. 1)
ATTENZIONE!
• Questo apparecchio è destinato
a usi domestici e simili come:
- nei negozi, anche da parte di
utenti non specializzati;
- nelle piccole imprese;
- nelle fabbriche;
- da parte di clienti in hotel,
motel e altri ambienti residenziali;
- in ambienti tipo bed and
breakfast.
PRIMO UTILIZZO
Dopo aver tolto il frullatore dall’im-
ballaggio, controllate che sia integro in
ogni sua parte.
• Lavate i componenti lavabili (asta
removibile con lama, bicchiere
graduato) con acqua calda e
detersivo liquido per piatti.
• Passate il corpo motore SOLO
con un panno umido per togliere
eventuali residui di polvere. (fig. 2)
USO DEL FRULLATORE
A IMMERSIONE
Verificate che la tensione del vostro
impianto elettrico corrisponda a quel-
la indicata per il frullatore a immer-
sione.
• Utilizzate il frullatore su una
superficie piana, lontano da
materiali infiammabili.
• Il frullatore a immersione può
essere utilizzato per preparare
zuppe o pappe per i bambini,
frappè e passati di verdura.
Può essere utilizzato con alimenti
ATTENZIONE!
TENETE L’APPARECCHIO
FUORI DALLA PORTATA
DEI BAMBINI. QUESTO
PRODOTTO È DESTINATO
ESCLUSIVAMENTE
ALL’USO DOMESTICO.
MDL10 Istruzioni versione 11-20.indd 8MDL10 Istruzioni versione 11-20.indd 8 26/11/20 11:2026/11/20 11:20

9
caldi o freddi ma non con
alimenti troppo secchi o duri che
potrebbero danneggiare la lama.
• Inserite l’asta removibile nel corpo
motore e ruotate in senso orario
fino a quando si blocca. (fig.3)
Il posizionamento corretto è
evidenziato dall’allineamento dei
2 segni presenti sul corpo motore
e sull’adattatore (fig.4)
• Introdurre il frullatore a
immersione nel bicchiere
graduato o in un altro recipiente
sufficientemente largo e profondo
per contenere gli ingredienti da
miscelare. (fig.5)
• NON immergete il frullatore per
tutta la lunghezza dell’asta ed in
particolare NON oltre il punto di
unione tra asta e corpo motore.
(fig. 5)
• La capacità massima del bicchiere
graduato è di 700 ml.
Non superate i 2/3 di riempimento
per evitare eventuali fuoriuscite
degli ingredienti.
• Non riempite mai il bicchiere con
ingredienti caldi.
Lasciateli raffreddare.
• Inserite la spina nella presa di
corrente.
• Tenete ben fermo il contenitore
con una mano. (fig. 6)
• Premete il tasto 1 (C) per frullare
più lentamente, il tasto 2 TURBO
(D) per frullare più velocemente.
• Tenete premuto il tasto durante
l’uso, fino a quando il composto
non ha raggiunto la consistenza
desiderata.
• Per una miscelazione ottimale
vi suggeriamo di tenere l’asta
leggermente inclinata all’interno
del contenitore e di fare un
movimento circolare all’interno
del composto (fig. 6)
• Al termine della miscelazione
rilasciate il pulsante.
• Prima di togliere il frullatore dal
composto assicuratevi che la lama
sia ferma per evitare schizzi.
ATTENZIONE!
Nel caso di utilizzo direttamente
nella pentola durante la cottura
(per esempio per la preparazione
del passato di verdura), spostate
la pentola dalla fonte di calore per
proteggere l’asta removibile dal
surriscaldamento. Prestate attenzione
a non riempire la pentola oltre i 2/3
della capacità per evitare che gli
ingredienti fuoriescano.
ATTENZIONE!
Staccate la spina dalla presa di
corrente non appena avete terminato
il lavoro e prima di ogni operazione
di manutenzione e pulizia.
Attendete sempre che la lama sia
ferma.
CONSIGLI
Se non indicato diversamente sulla
ricetta, iniziate sempre con la velocità
1, la più bassa, ed eventualmente
aumentatela successivamente.
Muovete il frullatore in senso orario e
dall’alto verso il basso mantenendolo
leggermente inclinato.
PULIZIA
Terminata la lavorazione, attendete
che la lama abbia cessato di ruotare,
staccate la spina dalla presa di cor-
rente, quindi togliete l’asta removibile
ruotandola in senso antiorario e tiran-
dola verso il basso. (fig. 7)
• Corpo motore: pulite il corpo
motore SOLO con un panno umido.
MDL10 Istruzioni versione 11-20.indd 9MDL10 Istruzioni versione 11-20.indd 9 26/11/20 11:2026/11/20 11:20

10
• Asta removibile: lavatela con acqua
calda e detersivo liquido per piatti.
L’asta può essere lavata in lavasto-
viglie ma posizionata nel cestello
superiore per evitare contatti con
le resistenze.
Asciugatela accuratamente.
Se utilizzate alimenti particolar-
mente salati, risciacquate la lama
immediatamente dopo l’utilizzo.
Nel caso residui di alimenti restino
attaccati alla lama, rilasciate il tasto
di funzione, attendete che si sia
fermata e staccate la spina.
Rimuovete i pezzi utilizzando un
utensile e non le dita.
NON toccate le lame perché
potreste tagliarvi.
• Bicchiere graduato: lavatelo a
mano con acqua calda e detersivo
liquido per piatti. Il bicchiere può
essere lavato in lavastoviglie ma
posizionato nel cestello superiore
per evitare contatti con le
resistenze.
Il bicchiere graduato è adatto all’uso
nel microonde.
ACCESSORI
G- Frusta
H- Tritatutto
NON sono presenti nella confezione
della versione base ma acquistabili
presso i rivenditori Alessi.
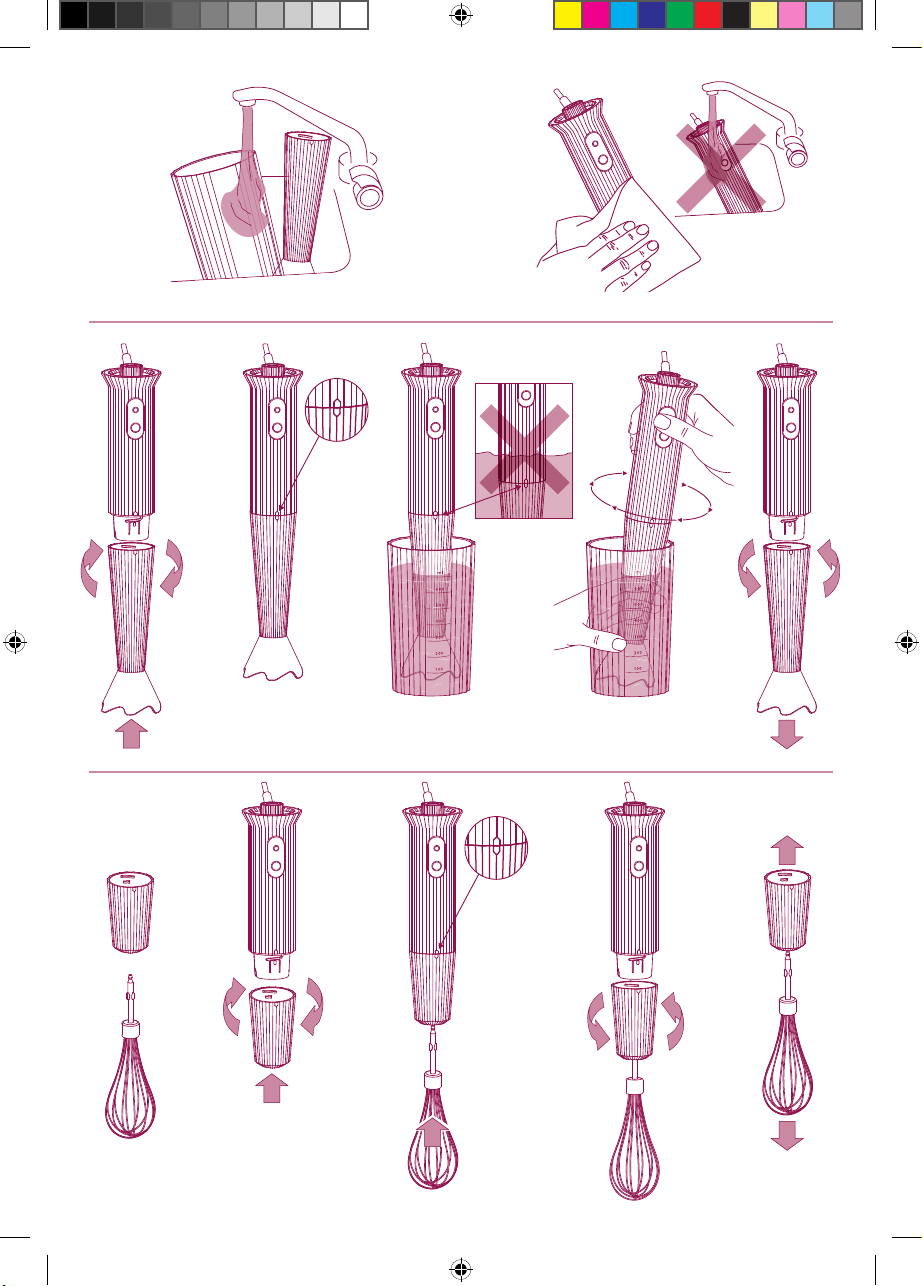
USO DELLA FRUSTA
I componenti della frusta sono :
G1 - attacco/adattatore della frusta in
resina termoplastica. (fig. 8)
G2 - frusta in acciaio. (fig. 8)
Questo accessorio serve per montare
a neve panna e albumi, mescolare
preparati per dessert, mousse e budini
e preparare la maionese.
• Fissate l’adattatore della frusta al cor-
po motore e ruotate in senso orario
fino a quando si blocca. (fig. 8)
Il posizionamento corretto è
evidenziato dall’allineamento dei 2
segni presenti sul corpo motore e
sull’adattatore (fig. 10)
• Inserite la frusta in acciaio
nell’apposito foro dell’adattatore
spingendo con forza. Le due alette
presenti sull’asta della frusta vi
guideranno nell’ inserimento
nelle scanalature presenti sul foro
dell’adattatore (fig. 11)
• Mettete la frusta in un recipiente
alto dove già avete messo gli
ingredienti da lavorare e premere il
tasto velocità 1 (C).
• Terminato l’utilizzo togliere la
frusta dal composto.
• Per evitare spruzzi introducete la
frusta nel composto prima di accen-
dere il frullatore e spegnete il frulla-
tore prima di togliere la frusta dal
composto.
• Prima di smontare la frusta
ricordate sempre di togliere la
spina dalla presa di corrente.
• Per togliere la frusta, tenete con una
mano il corpo motore e con l’altra
ruotare in senso antiorario l’adattatore
fino al completo sgancio.(fig. 12)
• Per separare l’adattatore dalla
frusta, tenete con una mano
l’adattatore e con l’altra tirate con
forza la frusta. (fig. 13)
• Non utilizzate la frusta all’interno
di pentole teflonate perché la parte
metallica della frusta potrebbe
danneggiare la finitura superficiale.
• Dopo l’uso, la frusta in acciaio può
essere lavata sia a mano con acqua
calda e detersivo liquido per piatti
o in lavastoviglie.
• Il corpo motore e l’adattatore della
frusta dovranno essere SOLO
puliti con un panno umido e poi
asciugati con un panno morbido.
Per un risultato migliore vi
consigliamo:
- di non utilizzare il bicchiere graduato
ma un contenitore più grande.
MDL10 Istruzioni versione 11-20.indd 10MDL10 Istruzioni versione 11-20.indd 10 26/11/20 11:2026/11/20 11:20

11
- di partire con una velocità bassa per
poi aumentarla in un secondo tempo.
- di muovere la frusta in senso orario
tenendola leggermente inclinata.
- di non montare quantità eccessive
di panna o uova.
USO DEL TRITATUTTO
I componenti del tritatutto sono:
H1 - attacco/adattatore del tritatutto
in resina termoplastica.
H2 - gruppo lame del tritatutto in
acciaio.
H3 - contenitore in resina termopla-
stica (PCTG) capacità 400 ml
(livello massimo 300 ml).
H4 - anello in gomma antiscivolo.
(fig.14)
Il tritatutto è indicato per tritare
carne, formaggio, verdure e erbe aro-
matiche, noci, nocciole e ghiaccio.
Per un risultato migliore e per salva-
guardare le lame, vi consigliamo :
- di pre tagliare gli ingredienti in
pezzi non troppo grandi e di
controllare che la quantità da
tritare non sia eccessiva.
- di rimuovere le parti dure di frutta
e verdura (es. bucce o noccioli).
- di rimuovere le parti dure della
carne (es. cartilagini o pelle).
Prestate attenzione a NON tagliarvi.
NON toccate mai con le dita le lame
perché sono molto affilate.
Il blocco con le lame deve essere sem-
pre preso dal perno in plastica.
• Mettete il blocco lame sul perno
centrale all’interno del contenitore
trasparente e spingetelo in basso.
• Mettete il cibo da tritare nel
contenitore, prestando attenzione
a NON superare il livello massimo
del contenitore.
• Inserite l’adattatore del tritatutto
sul contenitore. (fig. 15)
• Fissate il corpo motore del
frullatore all’adattatore del
tritatutto girando in senso orario
fino a quando si blocca. (fig. 16)
Il posizionamento corretto è
evidenziato dall’allineamento dei 2
segni presenti sul corpo motore e
sull’adattatore. (fig. 17)
• Inserite la spina nella presa di
corrente.
• Premete il pulsante velocità 1 (C).
• Durante il funzionamento, tenete
il corpo motore con una mano e
con l’altra tenete il contenitore del
tritatutto. (fig. 18)
L’anello antiscivolo (H4) posto
sotto al contenitore faciliterà la
tenuta del contenitore sul piano di
lavoro.
Alla fine dell’utilizzo, togliete la spina
dalla presa di corrente prima di effet-
tuare qualsiasi operazione di apertura
del tritatutto
PULIZIA
• Rimuovete il corpo motore
dall’attacco del tritatutto girando
in senso antiorario. (fig. 19)
• Rimuovete l’attacco del tritatutto
dal contenitore. (fig. 20)
• Rimuovete con attenzione il blocco
lame, sollevandolo dal perno e
senza toccare le lame con le dita.
• Togliete il cibo lavorato dal
contenitore aiutandovi con un
cucchiaio o con una spatola di
plastica o legno
• Dopo l’uso risciacquate sempre
tutti i componenti con acqua calda
• Contenitore: può essere lavato
a mano con acqua calda e
detersivo per piatti e asciugato
accuratamente. Il contenitore può
essere lavato in lavastoviglie ma
posizionato nel cestello superiore
per evitare contatti con le
resistenze.
MDL10 Istruzioni versione 11-20.indd 11MDL10 Istruzioni versione 11-20.indd 11 26/11/20 11:2026/11/20 11:20

12
Il contenitore del tritatutto NON è
adatto all’uso nel microonde.
• Blocco lame: può essere lavato
a mano utilizzando una spugna
e prestando attenzione a non
toccare le lame con le dita o messo
in lavastoviglie ma posizionato
nel cestello superiore per evitare
contatti con le resistenze
Prestate attenzione a non toccare
le lame quando mettete e togliete
il blocco lame dalla lavastoviglie
perché potreste tagliarvi.
• Il corpo motore e l’adattatore del
tritatutto dovranno essere SOLO
puliti con un panno umido e poi
asciugati con un panno morbido.
RICAMBI
In caso di usura, smarrimento o
danneggiamento, potete acquistare
presso il vostro rivenditore Alessi di
fiducia i seguenti ricambi:
B - asta removibile con lame;
F - bicchiere graduato;
G - attacco/adattatore frusta e frusta
H- attacco/adattatore del tritatutto,
contenitore e lame
H2 - lame del tritatutto
GARANZIA
Questo prodotto è coperto da una
garanzia di due anni dalla data di
vendita.
La garanzia copre tutti i difetti di fab-
bricazione, sono pertanto
esclusi i danni provocati da urti acci-
dentali e da cattivo uso.
Alessi declina ogni responsabilità per
danni dovuti ad uso improprio.
Garanzia inserita nella confezione.
SMALTIMENTO
Al termine del suo ciclo di vita, non
disperdete l’apparecchio
nell’ambiente ma rivolgetevi ad un
centro specifico per lo smaltimento.
Disassemblate i suoi componenti per
poterli eliminare secondo le norme di
smaltimento vigenti nel vostro paese.
Non tentate mai di forzare il gruppo
motore per aprirlo.
RAEE (WEEE) inserita nella confe-
zione.
ALIMENTARIETÀ
I materiali utilizzati per la realizzazio-
ne di questo apparecchio sono desti-
nati al contatto con prodotti alimen-
tari e sono conformi alle prescrizioni
di legge.
COME PREPARARE LA
MAIONESE
Ingredienti:
- 200-250 ml olio di oliva
- 1 uovo a temperatura ambiente
- 1 cucchiaio da tavola di succo di
limone
- sale q.b.
Mettere un uovo intero nel bicchiere
graduato con il sale, il succo di limone
e poco olio.
Introdurre il Frullatore nel bicchiere
graduato fino a toccarne il fondo.
Premere il tasto 1.
Quindi aggiungere il resto dell’olio
versandolo a filo.
Continuare a frullare velocemente
finché la maionese raggiunge il grado di
omogeneità desiderato.
MDL10 Istruzioni versione 11-20.indd 12MDL10 Istruzioni versione 11-20.indd 12 26/11/20 11:2026/11/20 11:20

13
TABELLA QUANTITÀ/TEMPI/VELOCITÀ
Ingredienti Quantità Tempo
velocità 1 Tempo velocità
2/TURBO
Asta
removibile
Carne
Verdura
Frutta
100 gr 20 sec. 10 sec.
Asta
removibile Minestra 1,3 litro
(in pentola) 90 sec. 60 sec.
Asta
removibile Frullato 250 ml 30 sec. 15 sec.
Asta
removibile Maionese 1 uovo 60 sec.
Tritatutto
Carne
Verdura
cruda
Alimenti
secchi
100 gr 20 sec. 10 sec.
Tritatutto Frutta 100 gr 30 sec. 15 sec.
Frusta Panna 200 ml 90 sec.
BISCOTTI CON FARINA
DI FARRO E MELE
Ingredienti:
- 150gr di farina di farro
- 3 mele renette,
- 80 gr. maltosio
- 1 bustina di lievito per dolci
- cannella q.b.
Frullare le mele, sbucciate e detorsolate,
aggiungere 80 gr. di maltosio e la
cannella.
In una ciotola versare il composto,
aggiungere la farina di farro, il lievito
ed impastare fino a formare un’impasto
omogeneo.
L’impasto risulterà morbido e pronto
per formare i biscotti.
Infornare per 40 minuti a 165° C.
MDL10 Istruzioni versione 11-20.indd 13MDL10 Istruzioni versione 11-20.indd 13 26/11/20 11:2026/11/20 11:20

14
IMPORTANT SAFEGUARDS
The use of electrical appliances always requires compliance with general safety precautions
in order to reduce the risk of electric shock and/or injury to persons.
A list of such precautions follows:
1. READ THE INSTRUCTIONS THOROUGHLY BEFORE USING THE PRODUCT.
2. Before using the immersion blender read and follow the instructions in the user manual.
Save the instructions and refer to them for as long as the product is used.
3. After having removed the appliance from its packaging, dispose of the plastic bags
correctly. They may cause hazard for children.
4. Do not allow children to use the appliance or play with the appliance.
KEEP THE APPLIANCE OUT OF THE REACH OF CHILDREN.
5. Do not use with a mains voltage different from the one specified on the label of the
product.
6. Do not use adaptors and/or extension cables.
7. Do not pull on the cable when removing the plug from the socket.
8. To avoid the risk of serious injury and to avoid damaging the appliance, never place
your hands or any utensil in the measuring cup while the immersion blender is in
operation.
9. Do not place the appliance on or near gas or electric burners or in an oven or near any
sources of heat.
10. WARNING: THE BLADES ARE SHARP.
SPECIAL CARE MUST BE TAKEN WHEN HANDLING THEM DURING
CLEANING OPERATIONS.
11. Do not touch the appliance with wet hands.
12. Do not use the product outdoors.
13. Do not rinse or immerse the motor unit, the whisk attachment, the attachment for the
mincer, the power cable or the plug in water or other liquids.
14. Always remove the plug from the socket when the appliance is left unattended, when
assembling parts/accessories, immediately after use, before any cleaning or maintenance
operations, or in the event of a malfunction.
15. To avoid splattering, especially when blending hot ingredients, use a tall container and
only process in small quantities.
16. Never fill the cup with hot ingredients. Let the ingredients cool
17. Only use the product for its intended purpose. Alessi declines any responsibility for
damage caused by improper use.
English
MDL10 Istruzioni versione 11-20.indd 14MDL10 Istruzioni versione 11-20.indd 14 26/11/20 11:2026/11/20 11:20

15
18. Only use Alessi guaranteed spare parts and accessories.
19. In the event of damage to the blender or the cable or a malfunction do not use the
product and contact your trusted Alessi retailer or Alessi SpA at the mail address :
20. If the power cable is damaged, it must be replaced by the manufacturer, by a service
centre or by a qualified person to avoid any hazards.
21. Never try to open the appliance’s motor unit.
22. 1) This appliance can be used by children aged from 8 years and above and persons
with reduced physical, sensory or mental capabilities or lack of experience and
knowledge if they have been given supervision or instruction concerning use of the
appliance in a safe way and understand the hazards involved. Children shall not play
with the appliance. Cleaning and user maintenance shall not be made by children
unless they are older than 8 and supervised.
2) Keep the appliance and its cord out of reach of children less than 8 years.
23. Be careful if hot liquid is poured into the blender as it can be ejected out of the
appliance due to a sudden steaming.
24. Do not use the appliance for more than 2 minutes consecutively
SUPERVISE CHILDREN TO BE SURE
THAT THEY DO NOT PLAY WITH THE
APPLIANCE
THE PRODUCT IS FOR INDOOR
HOUSEHOLD USE ONLY
SAVE THESE INSTRUCTIONS
WWW.ALESSI.COM
MDL10 Istruzioni versione 11-20.indd 15MDL10 Istruzioni versione 11-20.indd 15 26/11/20 11:2026/11/20 11:20

16
MDL10 “Plissé” Hand blender
Designed by Michele De Lucchi in
2020, this hand blender has been
tested and certified to guarantee con-
sumer safety.
DESCRIPTION
OF THE HAND BLENDER
A- Motor unit in thermoplastic resin
B- Detachable shaft in thermoplastic
resin
C- Speed 1 button
D- Speed 2 TURBO button
E- Steel spinning blade
F- Measuring jug in transparent
thermoplastic resin (PCTG),
700 ml (24 oz - 3 cups) capacity
the version with accessories includes:
G- Steel whisk
G1 - attachment/adapter for the
whisk in thermoplastic resin.
G2 - steel whisk.
H- Chopper in thermoplastic resin
with steel blades.
H1 - attachment/adapter for the
chopper in thermoplastic resin.
H2 - steel blades for the chopper.
H3 -
container in thermoplastic resin
(PCTG) 400 ml capacity
(max level 300 ml - 10 oz -
1¼ cup).
H4 - non-slip rubber ring.
PCTG, the material used for the
measuring jug and the chopper con-
tainer, is BPA free (fig. 1).
ATTENTION!
KEEP THE APPLIANCE
OUT OF THE REACH OF
CHILDREN.
THIS PRODUCT IS FOR
HOUSEHOLD USE ONLY.
ATTENTION!
• This appliance is meant for
household and similar uses
such as:
- in stores, including by non-
specialised users;
- in small businesses;
- in factories;
- by clients in hotels, motels and
other residential type environments;
- in bed and breakfast type
environments.
BEFORE USING
THE HAND BLENDER
After having taken the hand blender
out of its packaging, check that it is in
perfect condition.
• Wash all washable components
(detachable shaft and blade,
measuring jug) using warm water
and washing-up liquid.
• To remove any dust, wipe the
motor unit with a damp cloth
ONLY (fig. 2)
USING
THE HAND BLENDER
Check that your mains voltage
matches the specifications for the
hand blender
• Use the blender on a flat surface,
far from flammable materials.
• The hand blender can be used
to prepare soups, baby food,
milkshakes and vegetable puree.
• It may be used with both hot and
cold foods but not with foods that
are too dry or hard, which could
damage the blade.
Insert the detachable shaft into
the motor unit and turn clockwise
until it locks in place. (fig. 3)
When the correct position has
MDL10 Istruzioni versione 11-20.indd 16MDL10 Istruzioni versione 11-20.indd 16 26/11/20 11:2026/11/20 11:20

17
been reached the 2 marks present
on the motor unit and the adapter
will be line up. (fig. 4)
• Insert the hand blender into the
measuring jug or other container of
sufficient width and depth used to
hold the ingredients. (fig. 5)
• Do NOT insert the full length of
the shaft and especially do not
immerse the hand blender past the
point where the shaft connects to
the motor unit (fig. 5)
• The maximum capacity of the
measuring jug is 700 ml. To keep
ingredients from spilling out, do
not fill past 2/3 of maximum
capacity.
• Never fill the jug with hot
ingredients. Let the ingredients cool.
• Insert the plug into the power socket.
• Hold the container firmly with one
hand. (fig. 6)
• Press button 1 for slower mixing,
button 2 TURBO for faster mixing.
• Continue pressing on the button
throughout use, until you achieve
the desired consistency.
• For optimal blending, we
recommend holding the shaft at
a slight angle inside the container
and to move through the mix in a
circular manner (fig. 6)
• After mixing release the button.
• To avoid splattering, be sure the
blade has stopped moving before
removing the hand blender from
the preparation.
ATTENTION!
If you use the hand blender to
blend foods in a pan right after
cooking (e.g. for a vegetable
puree), be sure to take the pan
off the heat source first to avoid
overheating the mixer’s detacha-
ble shaft. Be careful not to fill the
pan over 2/3 capacity to keep the
food from spilling over.
ATTENTION!
Remove the plug from the socket
immediately after you finish using
the appliance and before any clea-
ning or maintenance operation.
Always wait for the blade to stop
moving.
ADVISE
Unless the recipe specifies otherwise,
always start at speed 1, the lowest
setting, and then increase the speed as
necessary. Move the mixer clockwise
and from top to bottom keeping it at
a slight angle.
HOW TO CARE
FOR THE HAND BLENDER
After you finish mixing, wait for the
blade to stop spinning, remove the
plug from the socket and then remo-
ve the detachable shaft by turning
anticlockwise and pulling down. (fig. 7)
• Motor unit: Clean the motor unit
with a damp cloth ONLY.
• Detachable shaft: Wash the shaft
with warm water and washing-up
liquid. The shaft can be washed in
the dishwasher, but place it in the
top rack to avoid contact with the
heating elements. Dry carefully.
If you use particularly salty foods,
rinse the blade immediately after use.
If food items cling to the blade,
release the button, wait for the
blade to stop spinning and unplug
the mixer.
Use a tool – not your fingers – to
remove the pieces of food.
To avoid cuts, do NOT touch the
blades.
• Measuring jug: Wash by hand with
warm water and washing-up liquid.
MDL10 Istruzioni versione 11-20.indd 17MDL10 Istruzioni versione 11-20.indd 17 26/11/20 11:2026/11/20 11:20

18
The jug can be washed in the
dishwasher but place it in the top
rack to avoid contact with the
heating elements. Dry carefully.
The measuring jug is suitable for use
in the microwave.
ACCESSORIES
G - Whisk
H - Chopper
These are NOT included in the basic
version. They can be purchased sepa-
rately from your Alessi dealer.
USING THE WHISK
The components of the whisk are:
G1 - attachment/adapter for the whisk
in thermoplastic resin (fig 8)
G2 - steel whisk (fig. 8)
This accessory is used for whipping
egg whites and whip cream, mixing
ingredients for pudding, mousse or
other desserts and making mayonnaise.
• Attach the whisk adapter to the
motor unit and turn clockwise
until it locks (fig. 8). When the
correct position is reached the 2
marks present on the motor unit
and the adapter will be line up.
(fig. 10)
• Insert the steel whisk in the
appropriate slot on the adapter and
press firmly.
• The two fins on the whisk shaft
will guide you as you insert them
into the slots on the adapter.
(fig. 11)
• Put the whisk into the tall
container with the ingredients that
need blending and press the speed
1 button (C).
• After use, remove the whisk from
the preparation.
• To avoid splattering, insert the
whisk into the preparation first and
only then turn on the mixer. After
blending, first switch the blender
off and then remove the whisk
from the preparation.
• Always remember to unplug the
appliance before disassembling the
whisk.
• To remove the whisk, hold the
motor unit with one hand and
turn the adapter anticlockwise
with the other until it disconnects
completely (fig. 12).
• To separate the whisk from the
adapter, hold the adapter with one
hand and use the other hand to
pull firmly on the whisk. (fig. 13)
• Do not use the whisk in pans that
have a Teflon coat; the metal part
of the whisk could damage the
surface finish.
• After use, the steel whisk can be
washed either by hand with warm
water and washing-up liquid or in
the dishwasher.
• The motor unit and the whisk
adapter must ONLY be cleaned
using a damp cloth and then dried
with a soft cloth.
For optimal results, we recommend:
- not using the measuring jug, use a
larger container instead.
- starting at low speed and only later
increasing the speed.
- moving the whisk clockwise while
holding it at a slight angle.
- not whipping excessive quantities
of eggs or whip cream.
USING THE CHOPPER
The components of the chopper are:
H1 - attachment/adapter for the
chopper in thermoplastic resin.
H2 - steel blades for the chopper.
H3 - container in thermoplastic resin
(PCTG) 400 ml capacity (max
level 300 ml 10 oz – 1 ¼ cup).
H4 - non-slip rubber ring.
(fig.14)
MDL10 Istruzioni versione 11-20.indd 18MDL10 Istruzioni versione 11-20.indd 18 26/11/20 11:2026/11/20 11:20

19
The chopper can be used to mince
meat, cheese, herbs and vegetables,
walnuts, hazelnuts and ice.
For optimal results and to safeguard
the blades, we recommend:
- chopping up the ingredients
into fairly small chunks and not
mincing an excessive quantity.
- removing the harder parts from
fruit and vegetables (e.g. peels or
seeds).
- removing the harder parts from
meat (e.g. skin or cartilage).
Be careful NOT to cut yourself.
NEVER touch the blades with your
fingers. They are very sharp
The unit with the blades must always
be picked up by the plastic knob.
• Place the unit with the blades
on the central shaft inside the
transparent container and push
down.
• Put the food to be minced into the
container, being careful NOT to fill
past the max level of the container.
• Insert the chopper adapter on the
container. (fig. 15)
• Attach the motor unit to the
chopper adapter and turn
clockwise until it locks in place.
(fig. 16). When the correct position
has been reached the 2 marks
present on the motor unit and the
adapter will be line up. (fig. 17)
• Insert the plug into the power
socket.
• Press the speed 1 button (C).
• When the chopper is in operation,
hold the motor unit with one hand
while holding the container with
the other. (fig. 18).
• The non-slip ring (H4) located
under the container will help keep
the container on the work table.
After use, remove the plug from the
socket before opening the chopper.
CLEANING
• Remove the motor unit from the
chopper attachment by turning
anticlockwise. (fig. 19)
• Remove the chopper attachment
from the container. (fig. 20)
• Carefully remove the blade unit.
Use the shaft to lift the unit and be
sure to not touch the blades with
your fingers.
• Remove the processed food from
the container with the help of
a spoon or a wooden or plastic
spatula.
• Always rinse all components with
warm water after use.
• Container: can be washed by hand
using warm water and washing-up
liquid and then dried carefully. It
can be washed in the dishwasher
but place it in the top rack to avoid
contact with the heating elements.
Dry carefully.
The chopper container is NOT suita-
ble for use in the microwave.
•Blade unit: can be washed by hand,
using a sponge and being careful
not to touch the blades with
one’s fingers, or washed in the
dishwasher so long as it is placed in
the top rack, to avoid contact with
the heating elements.
Be careful not to touch the blades
when putting the blade unit in the
dishwasher; you might cut yourself.
• The motor unit and the chopper
adapter must ONLY be cleaned
using a damp cloth and then dried
with a soft cloth
SPARE PARTS
In the event of wear, loss or damage,
you can purchase the following spare
parts from your trusted Alessi dealer:
MDL10 Istruzioni versione 11-20.indd 19MDL10 Istruzioni versione 11-20.indd 19 26/11/20 11:2026/11/20 11:20

20
B- detachable shaft with blades;
F- measuring cup;
G- whisk attachment/adapter and
whisk;
H- chopper attachment/adapter,
container and blades;
H2 - chopper blades;
WARRANTY
This product is covered by a two-year
warranty from the moment of sale.
The warranty covers all manufac-
turing defects; damage caused by
accidental impact or improper use is
therefore excluded.
Alessi declines any responsibility for
damage caused by improper use.
WARRANTY inside the packaging.
DISPOSAL
At the end of the product’s life cycle,
be sure to dispose of the device pro-
perly by contacting a specific waste
disposal centre.
Disassemble all components to dispo-
se of them in compliance with any
applicable laws in your country.
Never use force to attempt to open
the motor unit.
WEEE inside the packaging.
FOOD SAFETY
This appliance is made with materials
designed for contact with food pro-
ducts and is compliant with applica-
ble laws.
HOW TO PREPARE
MAYONNAISE
Ingredients:
- 200-250 ml olive oil
- 1 egg at room temperature
- 1 tablespoon lemon juice
- salt to taste.
Place a whole egg in the measuring cup
with salt, lemon juice
and a little oil. Insert the hand blender
into the measuring cup until your reach
the base. Press button 1.
Then slowly pour in the rest of the oil.
Continue blending quickly until
the mayonnaise takes on a uniform
appearance.
COOKIES WITH SPELLED
FLOUR AND APPLES
Ingredients:
- 150gr of spelled flour
- 3 rennet apples
- 80 gr maltose
- 1 sachet of baking powder
- cinnamon
Blend the apples, peeled and cored, add
maltose and cinnamon.
Pour the mixture into a bowl, add the
spelled flour and yeast and mix until it
forms a homogeneous mixture.
The dough will be soft, to form the
biscuits.
Bake for 40 minutes at 165° C
MDL10 Istruzioni versione 11-20.indd 20MDL10 Istruzioni versione 11-20.indd 20 26/11/20 11:2026/11/20 11:20
Other manuals for MDL10
1
This manual suits for next models
1
Table of contents
Languages:
Other Alessi Blender manuals
Popular Blender manuals by other brands

Bosch
Bosch MMB43...GB series instruction manual

Fusion Xcelerator
Fusion Xcelerator FX770 owner's manual

Breville
Breville Moda CBL25 Instructions for use

Black & Decker
Black & Decker BX275 Instructions for use

Black & Decker
Black & Decker BX650G Original instructions

Clatronic
Clatronic SM 3282 instruction manual