Alfresco Chef NAPLES Guide

PLEASE RETAIN THIS MANUAL FOR FUTURE REFERENCE
Alfresco chef ® is a registered trademark of Innovative Food Ingredients Ltd.
naples
MANUAL & USER GUIDE

2
Contents
2. Technical Data
3. Components
4. Assembly Instructions
11. Safety Information
12. Use & Maintenance
15. Trouble Shooting
16. Warranty & Oven Registration
17. Customer Service
Size: 1970cm x 74cm x 70cm
Weight: 66kg
Cooking Floor: 60cm x 55cm
Fire Brick Tiles:
• 2 x 25cm x 30cm
• 2 x 30cm x 30cm
ESSENTIAL ITEMS FOR
YOUR WOOD FIRED OVEN
• 2pc Peel & Brush Set
• Naples Oven Cover
Find your local stockist at
www.thealfrescochef.co.uk
TECHnICAL Data

3
COMPONENTS
1 Base Shelf 1
2 Left Leg – Front 1
3 Left Leg – Back 1
4 Right Leg – Front 1
5 Right Leg – Back 1
6 Wheel 2
7 Axle 1
8 Sleeve 2
9 Top Frame 1
10 Fixing Plates 4
No. Part Quantity
11 Handle 1
12 Oven Body 1
with Fire Brick Tiles
13 Chimney 1
14 Chimney Cap 1
15 Door 1
A M6*12 Screws 27
B M6 Lock Nuts (for wheels) 2
C OD18*ID6.5 T1.0 Washers 2
D M6*38 Screws 4
No. Part Quantity

4
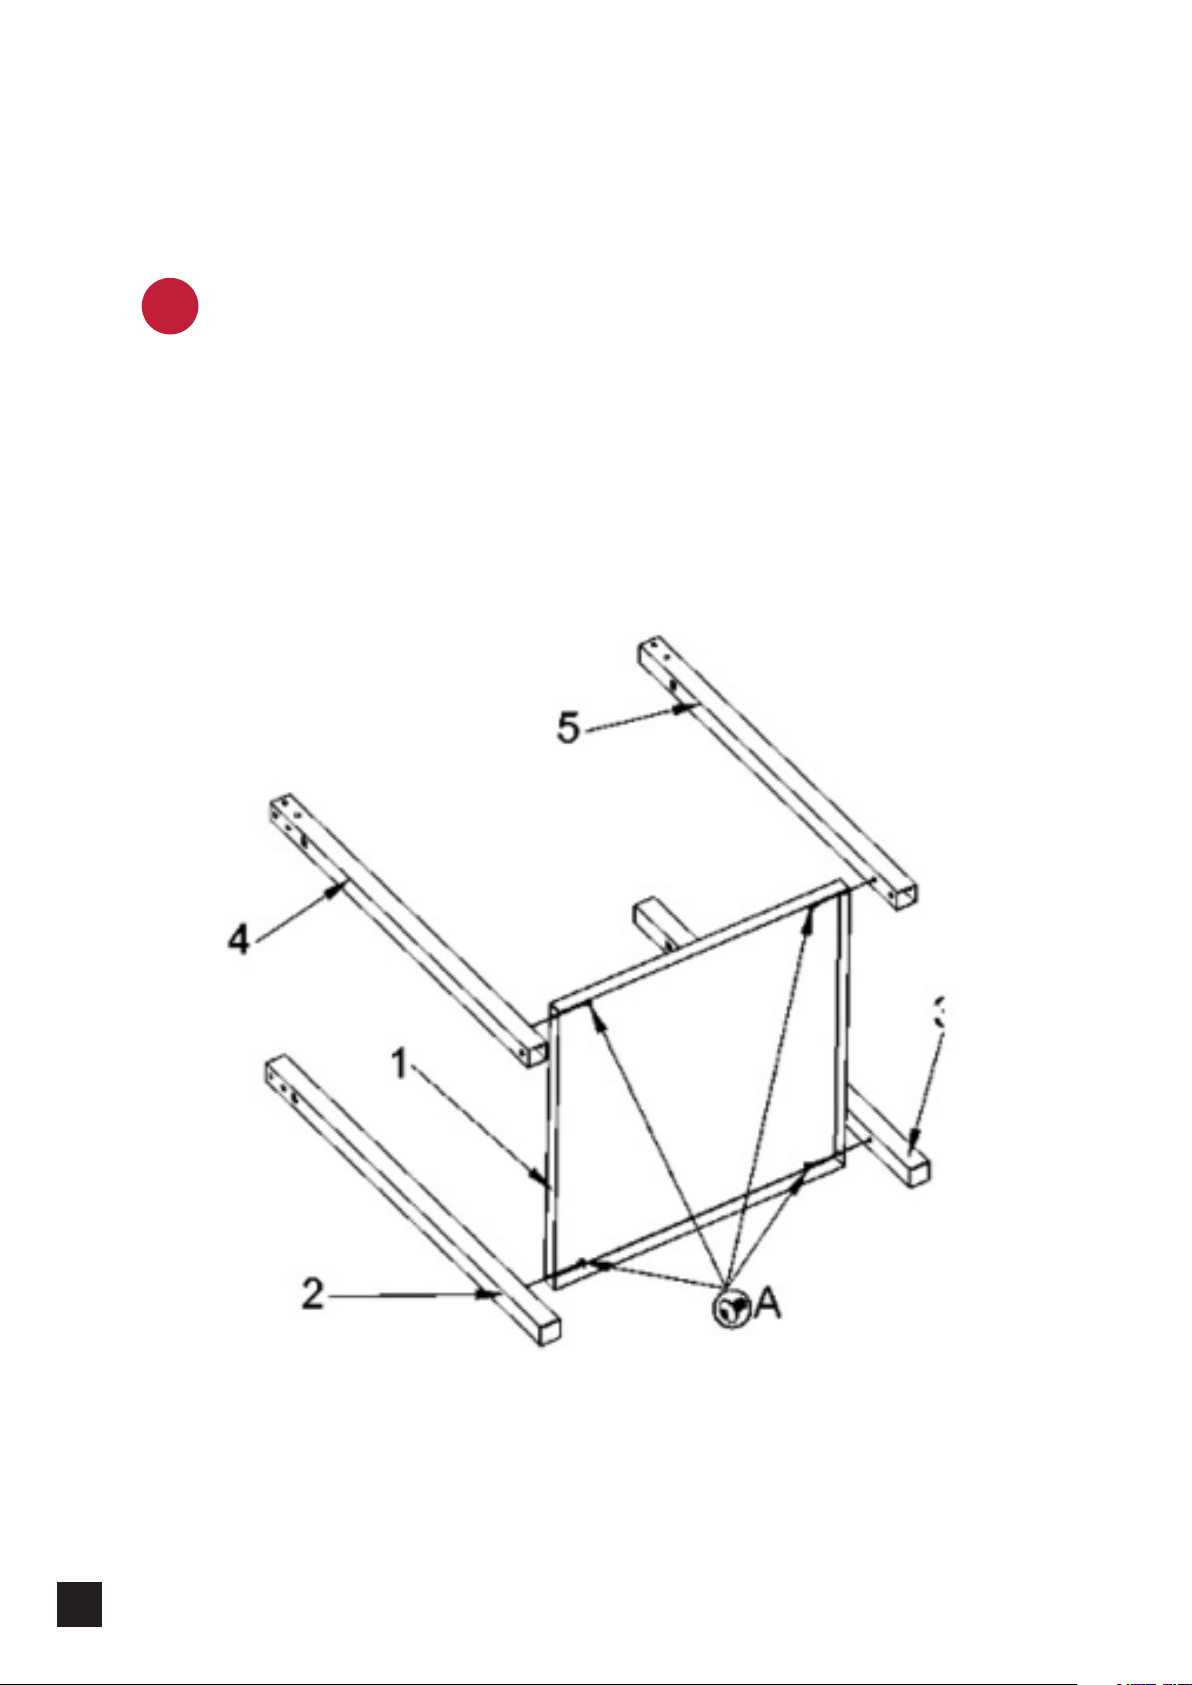
ASSEMBLY INSTRUCTIONS
Attach the front left leg (2) to the base shelf (1) with a M6 x 12 Screw (A)
Attach the left back leg (3) to the base shelf (1) with a M6 x 12 Screw (A)
Attach the front right leg (4) to the base shelf (1) with a M6 x 12 Screw (A)
Attach the right back leg (5) to the base shelf (1) with a M6 x 12 Screw (A)
Tighten each screw with a screwdriver.
1

5
Slide the axle (7) through legs (4 and 5).
Place the sleeve (8) into the wheel (6) and slide onto the axel.
Add washer (C) onto the axel ends.
Thread 2 x M6 lock nuts (B) onto each long end and tighten with a
wrench.
The wheels should spin and not wobble.
2

6
Slide the top frame (9) onto the top of the legs.
Fix the 4 x fixed plates (10) onto the top frame with 16 x M6*12
screws (A) and tighten.
Fixed plates hold the oven when on the stand. Ensure these are in
the upright position and stand proud above the top frame (9).
3

7
Attach the handle (11) onto the left legs (2,3) with 4 x M6*12 screws
(A) and tighten.
4

8
Lift the oven body (12) onto the top frame (9)
5

9
Attach the chimney cap (14) to chimney (13) with 3 x M6*12 screws (A)
6

10
Attach the chimney to the body of the oven with 4 x M6*38 screws (D)
Add the oven door.
7

11
INTENDED USE:
Alfresco Chef Ovens are intended for outdoor use only.
• Do not use ovens indoors. Keep away from buildings, structures or
proximity to any enclosed area.
• Position the oven on a flat, hard, stable surface. Keep it clear and free from
flammable or combustible materials, gasoline or other flammable liquids.
• Do not use flammable liquids or any fuels that have been presoaked in
flammable liquid, around the oven whilst it is lit.
• Only use kiln dried hardwood.
• Do not exceed temperate above 450°C. Exceeding this temperature could
lead to personal injury and/or damage to the oven that is not covered by
warranty.
• Do not operate in high winds.
• Always wear heat resistant protective gloves when handling the oven.
• The oven will be extremely hot during use. Use caution when adding
hardwood to the fire.
• Do not touch oven body or chimney when in use.
• Do not move the oven when in use.
• Do not leave oven unattended when in use.
• Keep children, pets and combustible items away from oven when in
operation.
• Only use tools and utensils that are resistant to high temperatures.
• Allow oven to fully cool before cleaning, moving or putting under cover.
• Do not modify the oven or fittings.
WARNING! improper installation, adjustment, alteration, service or
maintenance can cause property damage, injury or death.
Read and follow all safety warnings and instructions before assembling and
using this oven.
SAFETY INstRUCTIONS

12
READ ALL SAFETY NOTES ABOVE BEFORE USING THE OVEN
WOOD
Use a kiln dried hardwood with a moisture content of 10% or less.
Using softwood or hardwood with a high moisture content will limit the
performance significantly and could damage your oven.
DOOR
Use the door when heating up, baking and roasting. It can also be used
between pizzas to maintain temperature. Always take care to use an oven
mitt when holding the door handle.
FIRE BRICK TILES
Be careful of the tiles when moving the oven. Spare tiles are available from
the manufacturer at an additional cost.
DAMPER
Use the damper on the chimney to measure airflow through the oven. The
more air flowing through the oven the hotter the oven will be. To roast and
bake, close the damper when the wood has burnt to embers. Always allow
wood to burn before closing the damper, otherwise it may smoke heavily.
It is recommended that a fire extinguisher is kept nearby at all times.
INstRUCTIONS for use

13
LIGHTING THE OVEN
Place a natural fire starter inside
the centre of the oven. We
recommend using a Woodson
Firestarter.
1
Place two medium sized logs
either side of the fire starter, and
two smaller ones directly above a
natural fire starter. You may need
to use some kindling around the
base of the fire too.
2
Light the fire starter, ensuring
that the kindling and/or logs start
to burn well. The wood should
not smoulder or smoke before
catching fire. If it does, use wood
that has less moisture.
3
Once the fire is established, keep
adding small and medium pieces
of wood to ensure that the dome
and tiles heat through well. Use
the door with a sizeable gap to
retain more heat and speed up
the heating process.
4

14
PIZZAS
Once the oven reaches 350°C, use an ember rake to push the wood to one
side, then brush off the ash with the brass brush. Add more wood to push the
temperature to 400°C.
You can now start to place pizzas on the opposite side to your fire. Again,
use the door to maintain/recover heat to cooking temperature (370°C+) if
necessary.
To ensure an even bake, use turning peel or pizza peel to rotate pizza
throughout the cook.
BAKING & ROASTING
Follow instructions until the end of step 2. Add logs until the temperature
is above your target cooking temperature, then allow the logs to burn to
embers. Have the door slightly open to maintain the temperature inside the
oven as the wood burns down.
Once the wood has burned to embers, control the temperature of the oven by
using the damper and the door.
If the oven cools, use small pieces of wood to restore the temperature,
opening the door and damper to allow the wood to burn fully before closing
again.
It may be useful to spread the embers along the back of the oven for a more
uniform heat.
oven maintenance
STORING THE OVEN
To prevent rusting and weather damage, we recommend that your oven is
kept under a waterproof cover when not in use.
When not in use for long periods of time, it is recommended that your oven
is stored under a cover in a garage or shed.

15
CLEANING THE OUTSIDE OF THE OVEN
1. Allow oven to cool down completely.
2. Use warm soapy water or BBQ cleaner to clean the exterior of the oven
after every use. Do not use oven cleaner under any circumstances.
3. Use metal protectors, such as WD40, to protect the oven when not in use.
4. If the oven is used regularly, the chimney should be removed and washed
out every 4 weeks to rinse off the soot layer.
CLEANING THE INSIDE OF THE OVEN
1. Always allow ash and wood residue to cool before being removed from the oven.
2. Use a stainless-steel bristle brush to remove debris. Where possible, avoid
fatty liquids coming into contact with the tiles.
3. Do not empty hot ash or debris into waste disposal containers.
TROUBLE SHOOTING
IF YOU ARE HAVING TROUBLE LIGHTING THE OVEN
This is a common occurrence on start up until the wood is fully ignited. If
this continues follow these helpful tips:
- Ensure that there is enough space around the logs to enable vivid flames
in order to avoid choking the fire.
- Check that the flue damper is fully open and remove the oven door to
allow maximum air flow to the fire. This is especially important when
lightening the fire.
- The wood may be too moist, may have become damp or be an unsuitable
species of wood for wood fired cooking (eg: a soft wood). This will also
cause a heavy amount of smoke. Once the oven is lit and increasing in
temperature you should see very little visible smoke.
IF THE FIRE GOES OUT OR A FRESH PIECE
OF WOOD DOES NOT IGNITE
- Ensure you are refuelling the oven throughout the cook to maintain an
even temperature.
- Adding smaller pieces of wood will avoid large spikes in temperature and
will be less likely to smother the fire.
- When refuelling with wood, ensure that there is sufficient space above and
around the embers to allow maximum air flow to ignite the fresh wood.

16
The Alfresco Chef guarantee the wood fired oven and its components to be
free from defects in materials and workmanship for up to 3 years.
Please retain your receipt, invoice or any other proof of purchase for the
duration of your ownership and register your oven online at
www.thealfrescochef.co.uk
In the unlikely event that something does go wrong, we will endeavour to
- Repair or replace faulty component parts.
- If the fault cannot be repaired, we will replace the whole oven.
- In the event the oven is replaced, we require the existing oven to be returned.
To make a warranty claim, please contact our customer support team by email
info@thealfrescochef.co.uk. Please note, proof of purchase will be required at
the time of contact.
EXCLUSIONS
The following exclusions apply to the warranty.
• Where the oven has not been used and installed as described in this manual.
• This includes the use of anything other than untreated hardwood for fuel
and burning the oven at excessive temperatures over 450°C
• Where the oven has been subject to normal wear and tear (e.g. oven tiles
and thermometer)
• Discoloration or heat tarnishing.
• Water damage
• Surface rust
• Minor distortion or warping caused by prolonged exposure to heat, where
warping does not prevent use of the oven.
• If the oven has been altered or modified and is no longer in the condition
detected at delivery of the product.
• If the damage is the result of the use of chemicals inside or outside the oven.
• Damage to parts not functional and decorative that do not affect the
normal use of the oven, including scratches and colours differences
Spare parts are available from the Alfresco Chef.
WARRANTY

17
CUSTOMER SERVICE
For questions on handling and functionality of our products, please contact
our customer service team:
Email: info@thealfrescochef.co.uk Website: www.thealfrescochef.co.uk
Alfresco Chef ® is a registered trademark.
Distributed in the UK by Innovative Food Ingredients Ltd, SK16 4RE.
www.thealfrescochef.co.uk
Other Alfresco Chef Kitchen Appliance manuals