Alien Skylark WMU2000 User manual
SKYLARK
USER GUIDE

2
INDEX
31 PRECAUTION BEFORE USE
3 PRODUCT COMPONENTS 5
4 PART NAMES 6
2 OTHER PRECAUTIONS 5
95 POWER ON
11 LANGUAGE SETTING 13
12 KEYBOARD SETTING 16
6 POWER OFF
8 CHARGING WITH CRADLE
9 CHARGING GUN BATTERY WITH CRADLE
7 CHARGING WITH USB CABLE
10 HOW TO REPLACE THE BATTERY 12
14 TIME SETTING 22
13 Wi-Fi SETTING 19
SPECIFICATION 25
9
10
10
11

3
1 PRECAUTION BEFORE USE
Do not wipe the product direct spraying water or
cleaning with benzene, thinner etc.,
as there is a danger of electric shock, re or discoloration.
Cleaning the device while it is connected to power
could cause electric shock or re.
Do not place the product in a dusty or chemical environment
may cause an electric shock, re or decrease in
product performance.
Do not disassemble the product, as it may cause electric shock,
re or damage on the product.
It must not be used near devices with strong magnetic elds;
it may cause the failure on the product.
This product is supplied with a charging adapter and
recommends using this one. There is a risk of electric shock,
re or product failure if use unauthorized adapter.
Do not use a damaged power plug or loose outlet,
which may result in electric shock or re.
Do not touch the power plug with wet hands.
There is a danger of electric shock or re
when touching the power plug with wet hands.
Do not spray insecticide or chemicals on the product.
This may cause re or discoloration of the product.
Do not place in direct sunlight or near heat sources.
There is a risk of re, explosion or discoloration
when placed in direct sunlight or close to
the heating appliances.
Do not pull out the power cord.
There is a danger of electric shock or re
when the power cord is pulled out.

4
This device complies with part 15 of the FCC Rules.
Operation is subject to the following two conditions:
(1) This device may not cause harmful interference, and
(2) this device must accept any interference received, including
interference that may cause undesired operation.
The User's Manual or User's Manual for the intentional or
unintentional radiator warns the user that a change or change
that is not explicitly approved by the party responsible for
compliance may invalidate the user's authority to operate the
equipment. If the manual is provided in a form other than
paper, such as through a computer disk or the Internet, the
information required by this section may be included in the
documentation, provided that it is reasonably possible to
expect users to have access to that type of information.
15B : NOTE: This equipment has been tested and
found to comply with the limits for a Class
A digital device, pursuant to part 15 of the
FCC Rules. These limits are designed to provide
reasonable protection against harmful
interference when the equipment is operated
in a commercial environment. This equipment
generates, uses, and can radiate radio
frequency energy and, if not installed and
used in accordance with the instruction
manual, may cause harmful interference to
radio communications. Operation of this
equipment in a residential area is likely to
cause harmful interference in which case the
user will be required to correct the interference
at his own expense.

2 OTHER PRECAUTIONS
Battery Precautions:
Recommend fully charge the battery after purchase.
The battery’s lifespan varies depending on the usage and
usage time gradually decreases after.
If the battery will not be used for a long time, keep it separate
from the product. The warranty of the battery is six months from
the date of shipment. Since batteries are consumable, please contact
the authorized dealer if a problem arises.
Type of Unrepairable:
Faults caused by using unauthorized charger cannot be repaired.
If the product and battery are disassembled arbitrarily,
cannot be repaired.
※ Service related to life safety is not available due to the possibility of radio
interference.
3 PRODUCT COMPONENTS
Body Sync Cable Cradle Adaptor User Guide
5
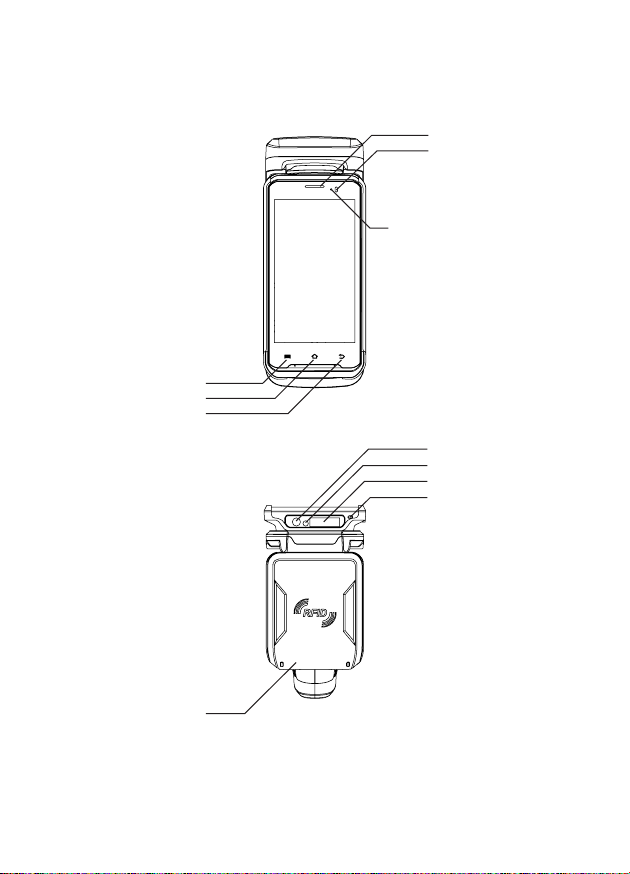
4 PART NAMES
Receiver
Charging LED
RED - Low level
(Charging)
ORANGE - Charging
GREEN - Charging
Complete
Illumination
Sensor
Menu Button
Home Button
Cancle Button
Antenna
Scanner
Camera
Hand Strap Hole
Flash
6
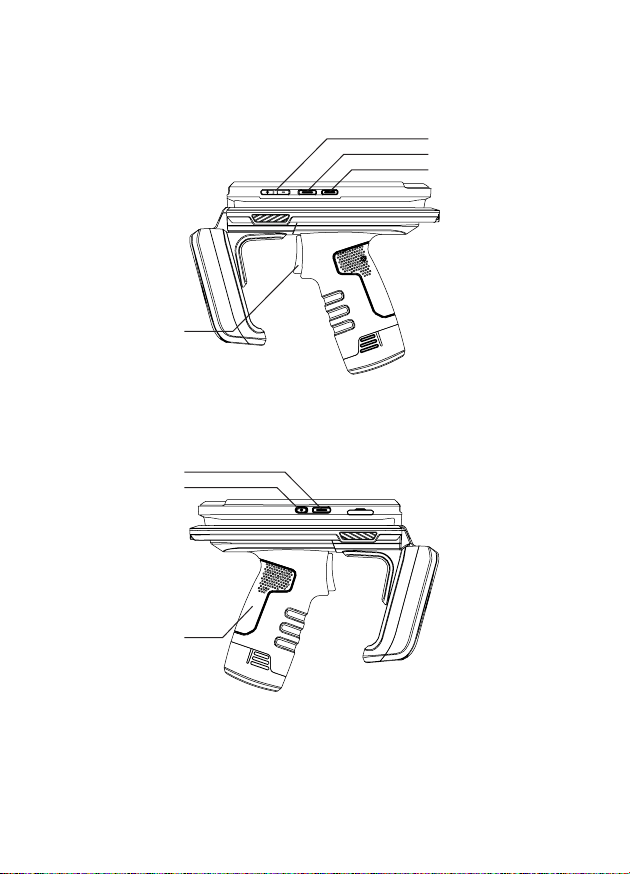
Function Key
Scan Key
Volume Key
GUN Handle
Trigger
Press the power key
for more than 10 seconds
to reset the product.
Power Key
Scan Key
7

PDA Sync Cable
Connector
SLED Sync Cable
Connector
Hand Strap Hole
Cradle Connector
8

5 POWER ON
Power Key
Press the power key to turn on the power.
When the power is on uccessfully, the screen of the device appears.
6 POWER OFF
Press the power key while the product is powered on.
Select Power Off on the screen then the screen turns off.
Power Key
9
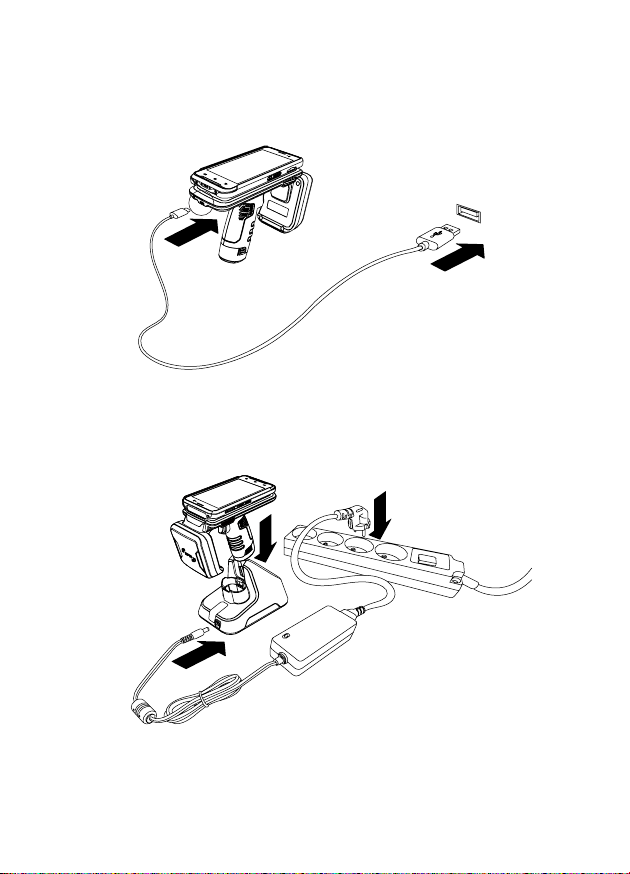
8 CHARGING WITH CRADLE
1. Insert the charging adapter into the charging cradle.
2. Plug the charging adapter into a power outlet.
3. Insert the product into the charging cradle to charge.
3
2
1
7 CHARGING WITH USB CABLE
1. Connect the sync cable to the SLED sync cable connector.
2. Connect the USB part of the sync cable to USB adaptor or PC.
1
2
* When the product is completely discharged, PDA powers on automatically
after a certain time when charging started.
10
Table of contents
Other Alien Card Reader manuals


