all-clad PC8-Precision User manual

www.all-clad.com
www.all-clad.ca
E
FR
ES
PC8-PRECISIO
STOVETOP PRESS RE COOKER
ser Guide
Guide de l'utilisateur
Guía del usuario

F
a
c
e
c
ô
t
é
c
o
u
v
e
r
c
l
e
FD
AC
A
K
N
D
L
M
Component parts illustration / Schéma descriptif / Imágenes de los componentes
Top view of lid / Vue de dessus
Imagen de la tapa
Underside view of control module
Vue de dessous / Imagen de la tapa trasera
Control panel / Module de commande / Panel de control:
F
H
O
I
J
A
B
C
E
D
P
MAX
G

MIN 1 cup
2
3
1
2
Fig. 1 Fig. 2 Fig. 3 Fig. 4
Fig. 5 Fig. 6 Fig. 7 Fig. 8
Fig. 9 Fig. 10 Fig. 11 Fig. 12
Fig. 13 Fig. 14 Fig. 15 Fig. 16
Fig. 17 Fig. 18 Fig. 19 Fig. 20
MIN 3 cups

IMPORTA T SAFEGUARDS
W en using pressure cookers, basic safety precautions s ould always be
followed:
1. Read all instructions.
2. Do not touc ot surfaces. Use andles or knobs.
3. Close supervision is necessary w en t e pressure cooker is used near
c ildren.
4. Do not place t e pressure cooker in a eated oven.
5. Extreme caution must be used w en moving a pressure cooker
containing ot liquids.
6. Regularly c eck t at t e andles of t e pressure cooker are tted
correctly. Tig ten t em if necessary.
7. Do not use pressure cooker for ot er t an intended use.
8. is appliance cooks under pressure. Improper use may result in
scalding injury. Make certain unit is properly closed before
operating. See “Operating Instructions.”
9. Do not ll t e unit over ⅔ full. W en cooking foods t at expand
during cooking suc as rice or dried vegetables, do not ll t e unit
over ½ full. Over lling may cause a risk of clogging t e vent pipe
and developing excess pressure. See “Food Preparation Instructions.”
10. Be aware t at certain foods, suc as applesauce, cranberries, pearl
barley, oatmeal or ot er cereals, split peas, noodles, macaroni,
r ubarb, or spag etti can foam, frot , and sputter, and clog t e
pressure release device (steam vent). ese foods s ould not be
cooked in a pressure cooker.
11. Always c eck t e pressure release devices for clogging before use.
12. Never make a recipe wit milk in your pressure cooker.
13. Do not use rock salt in your pressure cooker, but rat er add table
salt w en t e cooking is nearly nis ed.
14. Alco ol vapors are ammable. Bring to a boil for about 2 minutes
before placing t e lid on. Watc your appliance w en preparing
alco ol-based recipes.

15. Do not open t e pressure cooker until t e unit as cooled and all
internal pressure as been released. If t e andles are difficult to
pus apart, t is indicates t at t e cooker is still pressurized – do not
force it open. Any pressure in t e cooker can be azardous. See
“Operating Instructions.”
16. Do not use t is pressure cooker for pressure frying wit oil.
17. W en t e normal operating pressure is reac ed, turn t e eat down
so all t e liquid, w ic creates t e steam, does not evaporate.
18. Always pour a minimum amount of a liquid of at least 8.5 oz in t e
unit. See "Operating Instructions".
SAVE THESE I STRUCTIO S.
1
E

2
Description
Characteristics of PC8-PRECISIO
Standards information
• Hig est operating pressure limit: 85 kPa. (12 psi).
• Maximum safety pressure limit: 120 kPa. (17 psi).
Compatible heat sources
• PC8-PRECISION can be used on all eat sources,
including induction.
• W en using an electric otplate or induction, make
sure t at t e size of t e ot plate does not exceed t e
size of t e PC8-PRECISION base.
• On a ceramic or alogen, always make sure t at t e
PC8-PRECISION base is clean and dry.
• On a gas burner, t e flame s ould not exceed past
t e diameter of t e PC8-PRECISION base.
A. Steam release outlet
B. Automatic air ventilation system
C. Smart Timer®
D. Pressure indicator
E. Opening/Closing andle
F. Cooking program selector
G. Crown
H. Silicone gasket
I. Steaming basket
J. PC8-PRECISION pot
K. Steam release outlet gasket
L. Operating valve
M. Safety valve
N. Control panel mounting pin
O. Decompression valve
P. Basket trivet
Capacity Cooker
diameter Base
diameter PC8-PRECISION
reference Material body
and lid
8.4qt/8L 9.8" (25 cm) 7.9" (20 cm) P42314 Stainless steel
GAS SOLID
HOTPLATE
CERAMIC
HALOGEN
INDUCTION ELECTRIC
COIL
Never heat your
PC8-PRECISION
when it is empty or
you may damage it.

• On all burners, make sure t at PC8-PRECISION
is properly centered.
All-Clad spare-parts
• Spare-parts (lid gasket (reference SS-980919) timer,
basket and ot er parts) are available at your local All-Clad
approved service center.
• To ave repairs performed, please call your local All-Clad
approved service center.
• Only use All-Clad genuine parts designed for your
product model.
Operating Instructions
T is appliance cooks under pressure. Improper use may result in scalding injury.
Make certain unit is properly closed before operating.
Always pour a minimum amount of a liquid of at least 1 cup in t e unit.
Opening
• Make sure t at t e cooking program selector (F) is
in t e PRESSURE RELEASE - Fig. 8 position
and t at t e pressure indicator is down.
• Move t e andle from t e orizontal to t e
vertical position (t e jaws open): Fig. 1
• Lift t e lid. Closing
• Make sure t at t e cooking program Selector (F) is in t e
PRESSURE RELEASE position and t e Opening/Closing
andle (E) is in t e vertical position.
• Place t e lid on t e pressure cooker, taking care to ensure
t at it is correctly positioned.
• Move t e Open/Close andle from t e vertical to t e
orizontal position. Fig. 2
• Apply a little force at t e end w en closing to trigger t e
locking mec anism.
• Once in t e closed position, it is normal t at t e lid can
turn freely on t e PC8-PRECISION pot.
If you cannot close the lid:
• C eck t at t e Open/Close andle is in t e vertical
position.
• C eck t at t e gasket is in place properly.
E
3
During
Opening/Closing
operations, the control
panel must be in place on
the lid.
The jaws must be
in contact with
the edge of the
lid.

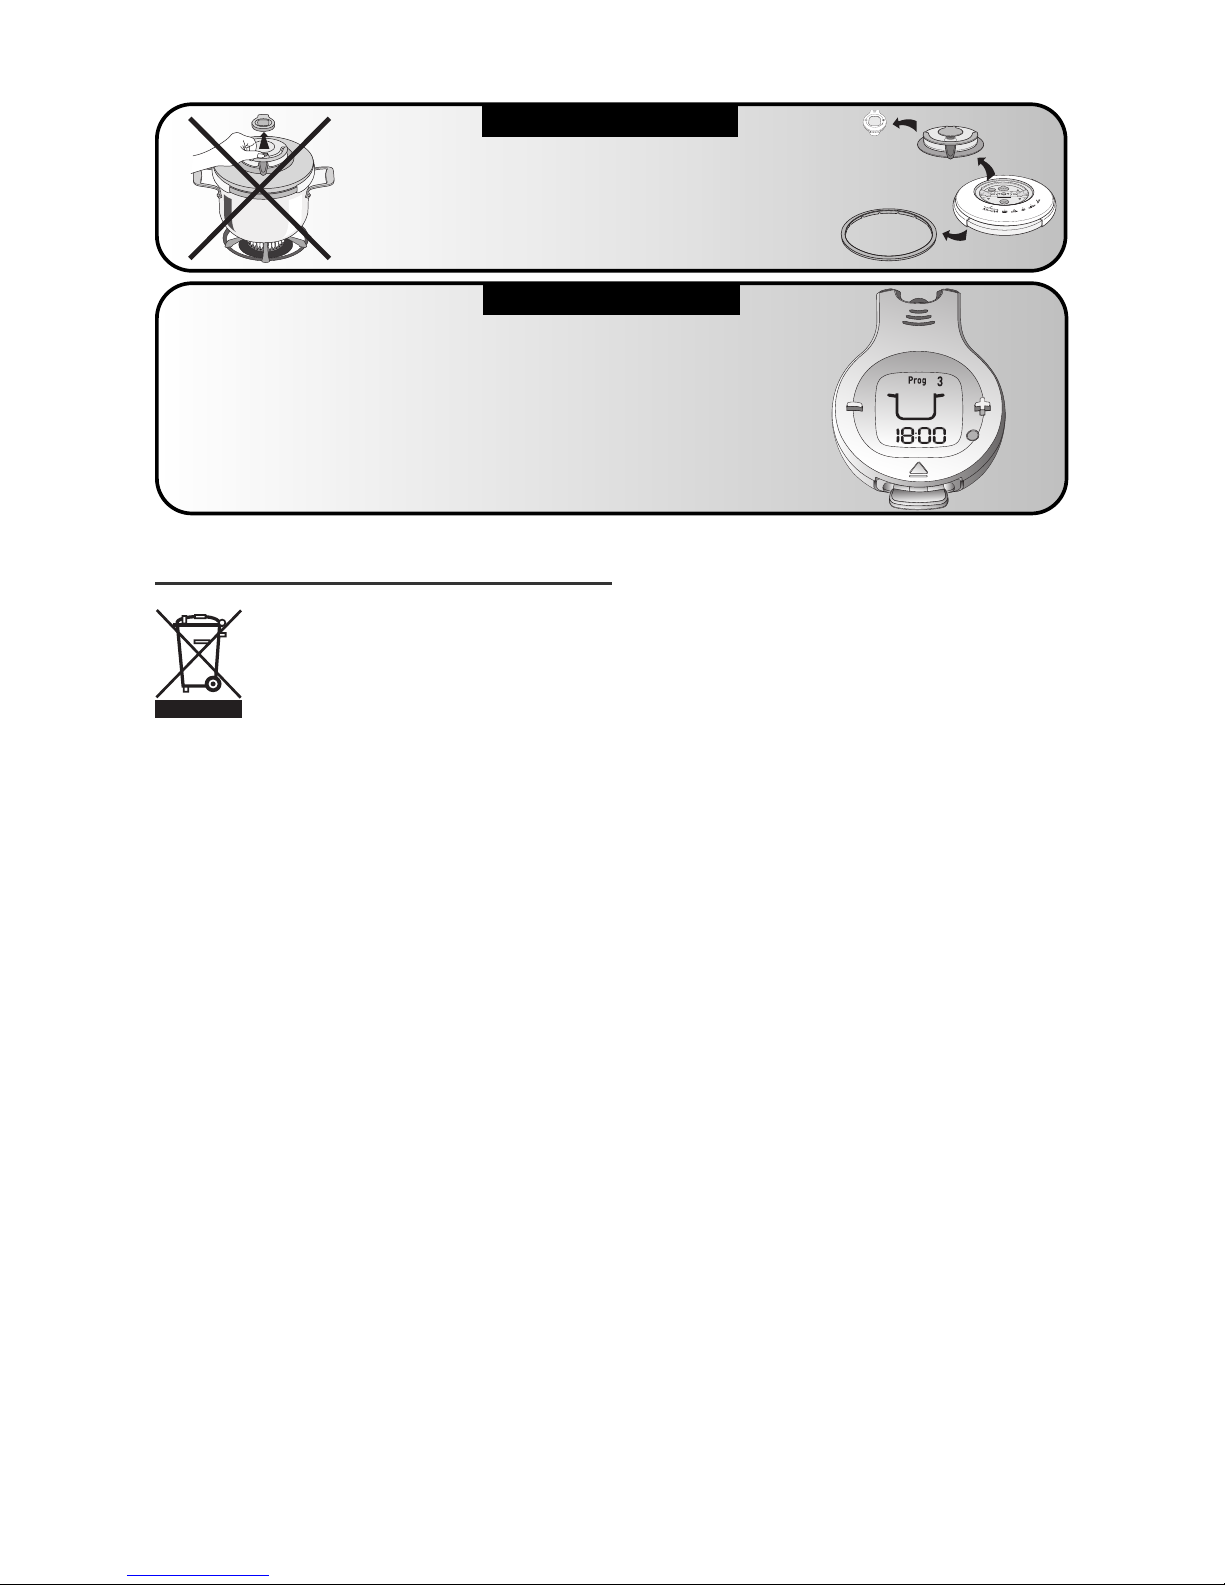
Control panel
• T e removeable control panel is designed to make it
easier to clean your PC8-PRECISION.
• T e pot and lid are dis was er safe once you remove
t e Smart Timer®, t e control panel and t e gasket.
• T e control panel comprises all of t e components
needed for your PC8-PRECISION to operate.
Once mounted on t e lid, your PC8-PRECISION
can be used normally.
To remove the control panel from the lid:
• Turn t e lid over.
• Unscrew t e module retaining nut using a coin,
w ile olding t e module in t e ot er and.
• Turn t e lid over and remove t e control panel.
To fit the control panel on the lid:
• Position t e crown on t e lid, wit t e vent for t e
automatic air ventilation system (B) aligned over t e
grey valve.
• Position t e module, wit t e andle down, on t e lid.
• Turn t e complete assembly over w ile olding t e
module against t e lid and tig ten down t e
retaining nut using a coin.
The crown and control panel will only fit one way.
Never use PC8-PRECISION without the crown.
Food Preparation Instructions
Do not fill t e unit over ⅔ full. W en cooking foods t at expand during cooking
suc as rice or dried vegetables, do not fill t e unit over ½ full. Over filling may
cause a risk of clogging t e vent pipe and developing excess pressure.
Minimum filling
When coo ing directly in the coo er:
• Always pour a minimum amount of liquid of at least 1 cup
into t e PC8-PRECISION. Fig. 3
For steaming:
• At least 3 cups of water must be poured in.
• Place your steaming basket filled wit food into t e
bottom of t e pot. Fig. 5
If your PC8-PRECISION was heated without any liquid
inside:
• Have your PC8-PRECISION inspected by a All-Clad
approved service center.
4
Food placed in
the steaming
bas et must not
touch the
PC8-PRECISION
lid.

Maximum filling
• Never fill your PC8-PRECISION more t an two-
t irds full (t e maximum mark). Fig. 4
For some food
• For food t at expands during cooking, like rice, dried
vegetables, or stewed fruit, never fill your
PC8-PRECISION more t an alf full. Fig. 6
Using the steaming basket:
• Pour 3 cups of water into t e cooker.
• Put t e trivet (P) under t e steaming
basket (I).
• Place t e steaming basket into t e
bottom of t e cooker. Fig. 5.
Using the program selector
• T e recipe book t at comes wit your PC8-PRECISION
s ows you w ic program to select for eac recipe.
• Generally, t e cooking programs correspond to:
• However, for some recipes t at mix multiple families of foods,
t e program as been c osen and validated by our C ef to
provide you t e best texture and taste.
• If you wis to innovate and create your own recipes or cook
ingredients t at are not listed in t e tables given at t e end of
t is manual, we recommend you follow t ese instructions:
"PROG 1" for vegetables, "PROG 2" for starc y foods (or
recipes containing at least one starc y food), "PROG 3" for
meat and "PROG 4" for seafood and desserts.
• Depending on t e cooking program c osen, t e soft steam
p ase lasts: "PROG 1" = 4 min. , "PROG 2" = 6 min. ,
"PROG 3" = 10 min. , "PROG 4" = 4 min.
• Cooking wit frozen ingredients as no effect on t e cooking
program.
• For soups, we recommend t at you c oose "PROG 2".
E
5
PROG 1 PROG 2 PROG 3 PROG 4
VEGETABLES GRAINS MEAT/POULTRY SEAFOOD

6
Using the Smart Timer®
• PC8-PRECISION is not an ordinary pressure cooker,
for All-Clad as innovated ow best to preserve t e
food's nutritional qualities and especially ow to bring
out t e full taste of every dis prepared.
• Every cooking program includes a soft steam p ase w ile
finis ing cooking, to bring out t e taste in t e food. T e
steam is fast and powerful at t e beginning of cooking
and becomes mild and moderate towards t e end.
• T e two cooking p ases limit t e possibility of
overcooking, to ensure perfect cooking wit t e best taste
and texture.
• To make it easier to use your PC8-PRECISION, t e
timer will elp and guide you t roug your recipes.
Fitting, removing and operating
the timer
• To fit t e Smart Timer®(C) Fig. 7, first insert t e
rear part, t en clip down t e front part.
• To remove t e Smart Timer®(C), press t e tab
and lift it.
Coo ing always ta es place in two phases:
• T e duration of t e first pressure p ase is directly
linked to t e c osen recipe or t e kind of
ingredients to be cooked, and t is is t e time you
need to program on t e Smart Timer®using t e –
and + buttons.
• T e second soft cooking p ase is pre-programmed
into t e Smart Timer®and is set automatically.
• You can switc t e Smart Timer®off at any time
by simultaneously pressing bot buttons.
• During cooking you can c ange t e cooking time
only if t e Smart Timer®is positioned on t e
PC8-PRECISION. During t e soft steam p ase,
you cannot modify t e cooking time.
Rear part
Front part
Tab
Never open your
PC8-PRECISION before
the end of the soft coo ing
phase, as you could stop the
coo ing process before the
ingredients are fully coo ed.
Refer to the "Finishing
coo ing" heading.

E
7
Close
PC8-PRECISION®
Select a program
Program the
cooking time
Turn the heat
to full power
0MAXI
Programmed
time set
Heat source
at maximum
level
Put in the
ingredients
12
4
3
Turn the heat to low
so there is a constant,
yet gentle & steady
release of steam.
0MAXI
Phase 1 (steam cooking)
starts:
The Smart Timer(R)beeps
indicating the PC8 has
entered the first cooking
phase and is now under
pressure.
Heat source
at reduced level
Cooking time
counts down
Turn off
the heat
0MAXI
Phase 1 ends:
The Smart Timer(R) beeps
indicating the PC8 is
now automatically
entering the second
cooking phase
Display
flashes
Heat
source
turned off
Phase 2 (soft cooking) starts:
Phase 2 will start automatically,
(take no action). Do not open the
PC8 until the end of phase 2.
Countdown for soft
cooking phase starts
automatically
open
PC8-PRECISION
ever force the pressure cooker open,
make sure the pressure indicator is
down in the normal position.
Phase 2 ends:
The Smart Timer(R) beeps
to indicate cooking is
finished. To stop the
beeping, simultaneously
press the + and - buttons.
Move selector to
PRESSURE RELEASE.
Hot steam will escape
from the steam outlet.
PC8-PRECISION Quick Start Guide
Replacing the batteries
• T e battery life depends on ow often t e timer is used.
However, w en t e display is completely or partially lost make
sure to replace t e battery.
• In an effort to be friendly to t e environment, do not t row
t e battery away wit general ouse old waste but rat er at a
collection center. T e timer battery is a lit ium manganese
button battery.
• You can replace battery (reference CR2032) or ave it
replaced by a retailer aut orized for t is type of service.
• To remove t e battery from t e timer, open t e battery
compartment. Fig. 11
• Always gently close t e battery cover, never forcing past its
stop. Fig. 11
Recommendations for use
• Never force down t e battery cover w en closing it.
• If you lose t e cover, you can obtain a replacement from all
All-Clad approved service centers.
8
If the Smart Timer®
flashes continuously
with rapid beeps
Make sure that:
- The Smart Timer®is in place
on the PC8-PRECISION
- A cooking program has been selected
- When storing the lid upside down, the lid
does not press on the + and - buttons.
ERROR MESSAGE
IMPORTA T
F
a
c
e
c
ô
t
é
c
o
u
v
e
r
c
l
e
Remember to remove the
Smart Timer®, the control
panel and the gasket
when cleaning the lid.
Never remove
the Smart Timer®
from its housing
during cooking.
Before First use
• Put t e trivet (P) under t e steaming basket (I).
• Place t e steaming basket in t e PC8-PRECISION.
• Fill t e PC8-PRECISION to t e two-t irds mark
(t e maximum mark) wit cold water.
• Close t e PC8-PRECISION.
• Move t e pressure selector to "prog 4".
• Set t e Smart Timer®for 20 minutes.
• Place t e PC8-PRECISION on a eat source set to
full power.
• W en t e Smart Timer®beeps, t is indicates to turn
t e eat to low so t ere is a constant, yet gentle &
steady release of steam. Fig. 12
The steam coo ing with pressure phase starts.
• Once t e steam cooking p ase is finis ed, t e Smart
Timer®beeps indicating to turn off t e eat and
move t e program selector (F) to PRESSURE
RELEASE - Fig. 8
• Hot steam, and possibly droplets of water, escape from
t e steam outlet (A) in a vertical direction.
The soft coo ing phase starts (this time is already
programmed).
• W en t e soft cooking p ase is finis ed, t e Smart
Timer beeps indicating t at cooking is finis ed . To
stop beeping, simultaneously press t e + and - buttons.
• C eck t at t e pressure indicator (D) as dropped
back down.
• Raise t e Open/Close andle to t e vertical position
to open t e lid. Fig. 1
• Remove t e Smart Timer®, was and dry t e
PC8-PRECISION.
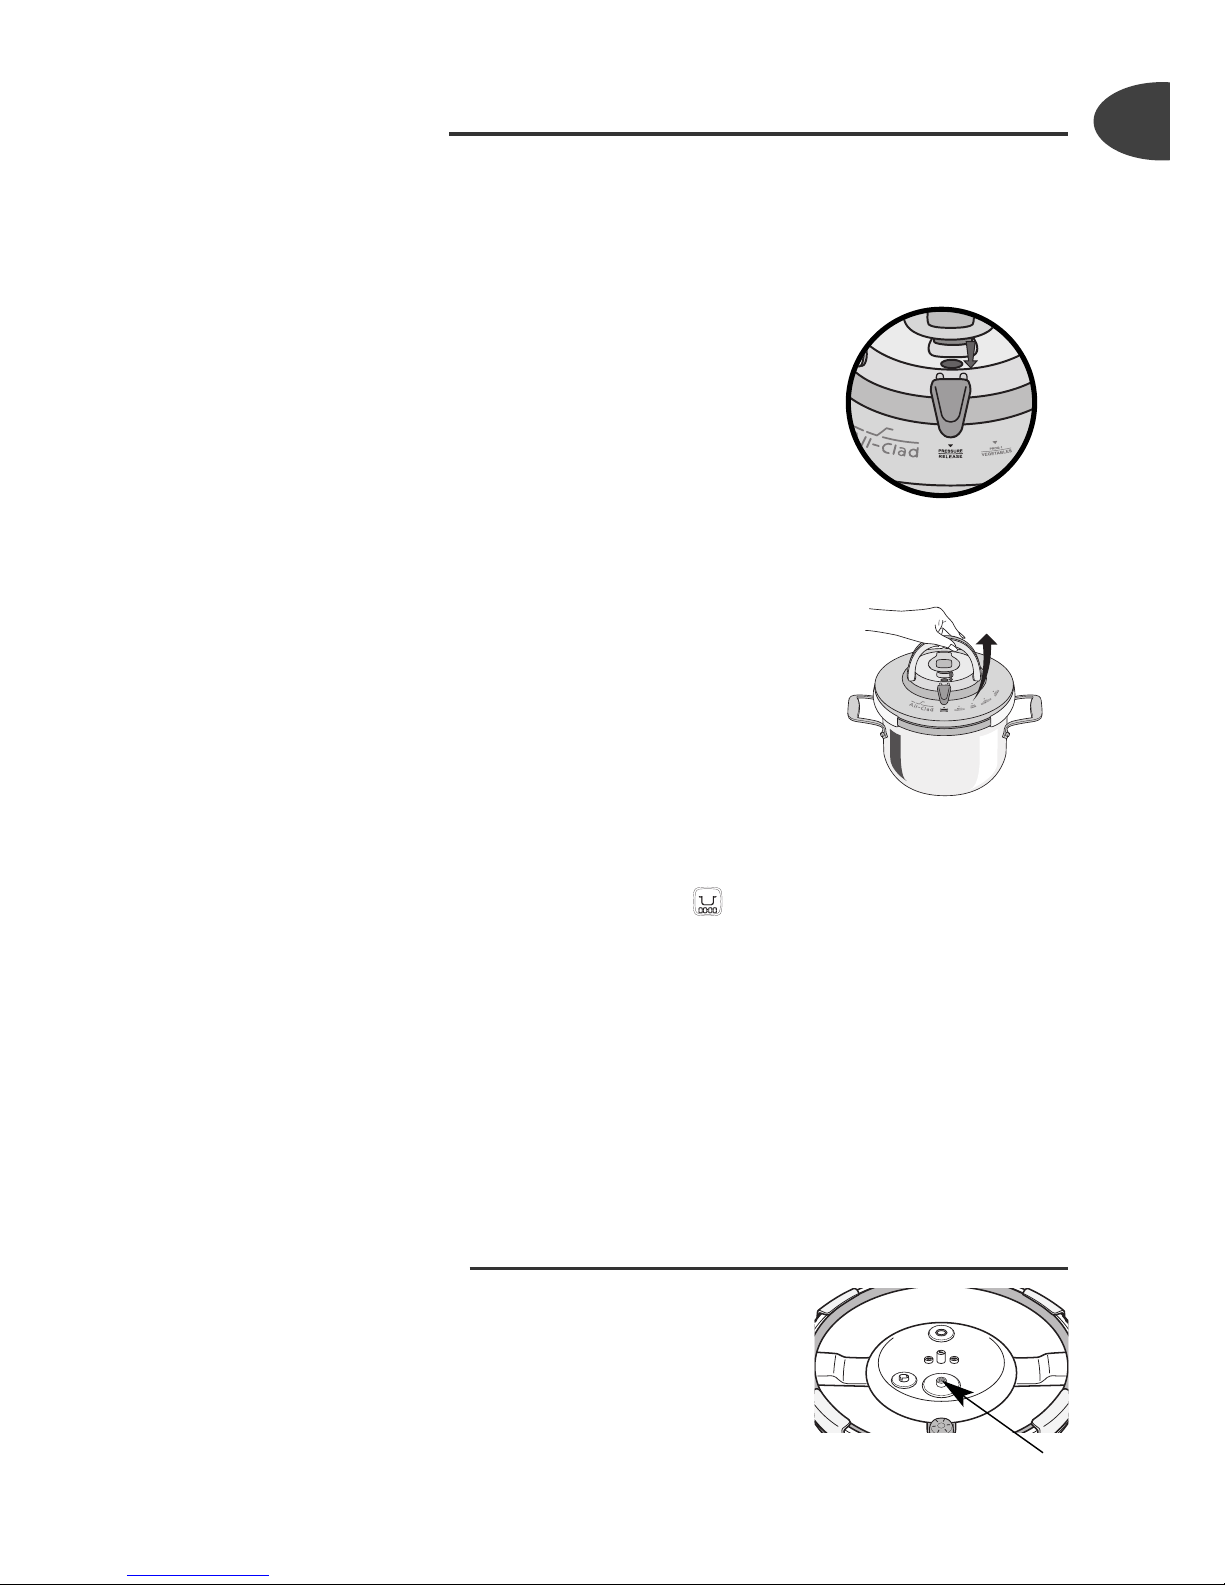
Using PC8-PRECISIO
Before cooking
• Every time you use your PC8-PRECISION, first
c eck t at t e control panel is correctly fitted and
tig tened (using a coin) and c eck t at t e operating
valve (L) located inside t e lid can move, by moving
t e program selector (F) to "prog 1" and pressing t e
valve wit your finger. Fig. 17
E
9
Always position the
PC8-PRECISION
so that the selector
faces you.
Never force the
pressure coo er open,
ma e sure the pressure
indicator is down in
the normal position.
decompression valve
Open my
PC8-PRECISION®

10
Always position the
PC8-PRECISION
so that the program
selector (F) faces you.
• Also c eck t at t e safety valve (M) can move: see
Fig. 18 and refer to t e "Cleaning and Maintenance"
eading.
• Add your ingredients and t e liquid.
• Close t e PC8-PRECISION.
• Move t e selector to one of t e programs as s own
in your recipe book. Fig. 9
• Program t e Smart Timer®for t e cooking time
s own for your recipe. Fig. 10
• Place t e PC8-PRECISION on a eat source set to
full power. During cooking
• T e first audible signal, tells you to reduce t e
eat.
PC8-PRECISION steam coo ing with pressure
starts and the Smart Timer®counts down.
• At t e end of t e pressure cooking stage, on t e
second acoustic signal, t e timer tells you to switc
off t e eat and set t e cooking program selector
to PRESSURE RELEASE. Fig. 8
• A jet of ot steam, and possibly droplets of water,
escapes from t e steam outlet (A) in a vertical
direction.
The soft coo ing phase starts (this time is ready
programmed).
• If you accidentally open your PC8-PRECISION
during t e soft cooking p ase, close it back up
immediately, and t is will ave no effect on
cooking.
• Never remove t e Smart Timer®during t e
pressure cooking or soft pressure cooking p ases.
Finishing cooking
• At t e end of t e cooking time at low pressure,
t e t ird acoustic signal emitted by t e timer
indicates t at cooking as ended.
• C eck t at t e pressure indicator (D) as
dropped back down.
• Raise t e Open/Close andle to t e vertical
position to open t e lid. Fig. 1
Just li e for any other
coo ing appliance, always
pay close attention to it,
especially when using
PC8-PRECISION near
children.
The steam jet coming
from the steam release
outlet (A) is very hot.
The pressure indicator (D)
prevents pressure from
rising in the pressure
coo er if it is not properly
closed.
To move
PC8-PRECISION, use
the carrying handles on
the side of the coo er.
The pressure indicator
(D) prevents the pressure
coo er from being
opened if it is still under
pressure.

Cleaning and Maintenance
• For best operation, be sure to follow t ese cleaning
and maintenance recommendations every time t e
PC8-PRECISION is used.
• After eac use always was t e PC8-PRECISION
as directed below.
• Never use bleac or c lorine products as t ese could
permanently damage t e stainless steel.
• Do not use steel wool.
To clean the pot of the PC8-PRECISIO
• Clean it wit a scouring pad and dis was ing liquid.
• If t e inside of t e stainless steel cooker s ows iridescent
reflections, or w ite spots left by ard water, clean wit
a solution of equal parts water and vinegar. Leave for
10 minutes. Rinse and dry completely.
• You can was t e PC8-PRECISION pot in t e
dis was er.
• Clean it wit a sponge and dis was ing liquid.
• For toug staining on t e outside of
PC8-PRECISION use a special stainless steel
polis er and cleanser.
• Was t e basket in warm water wit a little
dis was ing liquid.
To clean the PC8-PRECISIO lid
• Remove t e Smart Timer®.
• Clean t e lid wit a sponge and dis was ing liquid.
• You can was t e lid in t e dis was er after first
removing t e Smart Timer®, t e control panel and t e
gasket.
• To clean t e steam release valve: remove t e control
panel and clean t e lid under running water. Visually
c eck t at t e operating valve outlet is not blocked by
olding it up to t e lig t. Fig. 14
• If you accidentally remove t e base of t e automatic
air removal system, refit it by pressing and turning it
simultaneously.
E
11
Never place the
timer under running
water or in the
dishwasher.
Automatic air
release system base

To clean the lid gasket
• After using t e PC8-PRECISION,
always clean t e gasket (H) and its
groove.
• Was t e gasket using a sponge
and dis was ing liquid.
• To refit t e lid gasket, refer to t e
drawing Fig. 15and ensure t at t e
words "face côté couvercle" (side
facing t e lid) are against t e lid.
To clean the control panel
and the valves
• Remove t e control panel from t e lid and remove
t e Smart Timer®: see t e "Control panel" eading.
• Remove t e Smart Timer®.
• Was t e panel under a gentle flow of running water.
• Visually c eck t at t e steam release outlet (A) is
not blocked by seeing lig t t roug it as s own in
Fig. 16. If it is blocked, clean it under running water.
Refit t e control panel.
• C eck t at t e operating valve (L) located inside t e
lid is mobile, by moving t e program selector to
"Prog 1" and pressing wit a finger: Fig. 17. You can
only do t is w en t e panel is fitted on t e lid!
• You can clean t is valve under running tap water.
• Also c eck t at t e safety valve (M) works properly
by using a cotton swab (for example) to press down
ard on t e center of t e pipe, a part t at s ould
move: see Fig. 18. You can clean t is valve under
running tap water.
• C eck t at t e steam release outlet gasket (K) is in
place. If t is gasket is missing or as been damaged,
leaks may appear under t e panel w en your
PC8-PRECISION is in use. T e s ape of t e gasket
lets you easily remove and refit it. If necessary, you
can get replacement seals from an All-Clad approved
service center.
• C eck t at t e pressure indicator (D) is clean. It can
be cleaned under running tap water.
12
Never dismantle the
control panel.
Don’t forget to
remove the Smart
Timer®before
cleaning the control
panel by hand or in
the dishwasher.
Never use a cutting or
pointed object to
clean the safetly valve
(M).
Never wash the gas et in the dishwasher.

To clean the timer
• Use a clean dry clot .
• Never use solvents.
• Never place t e Smart Timer®under water.
To store your PC8-PRECISIO
• Turn t e lid over and place it on t e PC8-PRECISION body.
Safety
• Your PC8-PRECISION is provided wit a number of safety mec anisms.
Lid closure safety
• T e jaws s ould be in contact wit t e lid edge. If t is
is not t e case, t en steam will leak from around t e unit.
T e pressure indicator and PC8-PRECISION will
never come up to pressure.
Opening safety
• W ile PC8-PRECISION is under pressure, t e
open/close andle cannot be activated as t e
mec anism is locked down by t e pressure indicator.
• In t is case, never attempt to force t e
PC8-PRECISION open, but move t e selector to
PRESSURE RELEASE so t e pressure indicator
drops (D) back down before opening your
PC8-PRECISION.
Excess pressure safety features
• PC8-PRECISION as two excess pressure safety
features:
• First feature: t e safety valve (M) releases pressure
and t e steam will escape under t e control panel.
Fig. 19
• Second feature: t e gasket (H) lets steam escape
between t e lid and t e base. Fig. 20
• If one of the two excess pressure safety systems is
triggered:
- Turn off t e eat.
- Do not move t e cooker or turn t e program selector (F)
to t e steam release position.
E
13
Never place the Smart
Timer®in the
dishwasher.

14
- Allow t e PC8-PRECISION to cool down completely
by standing at room temperature.
- Open it up.
- C eck and clean t e operating valve (L), t e steam
release oultet (A), t e safety valve (M) and t e gasket
(H).
Care and safety during use
1 - Steam is very hot when it comes out of the pressure coo er,
so be careful not to burn yourself. Wear gloves if necessary.
2 - As soon as the pressure indicator rises, you can no longer
open your PC8-PRECISION. Never tamper with this
pressure indicator.
3 - Just li e any other coo ing appliance, always pay close
attention to your PC8-PRECISION during use in the
presence of children.
4 - To move your PC8-PRECISION, always use both of the
carrying handles on the side.
5 - Never leave food in your PC8-PRECISION.
6 - Never use bleach or chlorine products as they could affect
the finish of the stainless steel.
7 - Never leave the lid to soa in water.
8 - Do not soa the lid in water.
9 - Always have your PC8-PRECISION chec ed by an
All-Clad approved service center after ten years of use.
10 - Never force on the opening/closing handle to open
PC8-PRECISION.
Regulation markings
Mar ing Location
Manufacturer's identification
or trademark. Decorative crown.
Year of manufacture,
Equipment identification /
model reference.
On t e top of a jaw, visible w en t e cover is
in t e "Open" position.
Max. operating pressure
Max. safety pressure. On t e control panel, w en t e module is
removed from t e lid.
Capacity. On t e bottom of t e PC8-PRECISION
pot.

All-Clad answers your questions
E
15
Problems Recommendations
If you cannot close the
lid:
C eck t at t e Open/Close andle is in t e vertical
position.
C eck t at t e gasket is fitted correctly, see t e
"Cleaning and Maintenance" eading.
If the PC8-
PRECISION has heated
up under pressure with
no liquid inside:
Have your PC8-PRECISION inspected by an
All-Clad approved service center
If the pressure indicator
did not rise and nothing
escapes from the valve
during coo ing:
C eck t at:
- T e cooking program selector is set to one of t e
cooking programs.
- Your PC8-PRECISION is properly closed.
If the pressure indicator
has risen but still nothing
escapes from the valve
during coo ing:
T is is normal for t e first few minutes.
If t e problem persists, select t e PRESSURE
RELEASE program. Wait for t e pressure indicator
to drop t en move t e Open/Close andle to t e
vertical position.
Clean t e operating valve and steam release outlet
under running water and c eck t at t e safety valve
moves: Fig. 17. See t e "Cleaning and Maintenance"
eading.
If steam escapes from
around the lid, chec :
- T at t e lid is properly closed.
- T e position of t e lid gasket is correctly fitted.
- T at t e gasket is in good condition, and if
necessary, replace it by contacting an All-Clad
approved service center.
- T at t e lid, t e gasket, and its surrounding area
are clean.
T at t e edge of t e PC8-PRECISION pot is in
good condition.

16
Problems Recommendations
If steam escapes from
around the lid together
with a piercing noise,
chec :
T at t e gasket is not caug t between t e body and
t e lid.
If you cannot open the
lid:
C eck t at t e selector is set to PRESSURE
RELEASE.
C eck t at t e pressure indicator is down.
If not, release pressure by moving t e program
selector to PRESSURE RELEASE Fig. 8.
Never tamper wit t is pressure indicator.
If food is not coo ed or
has burnt, chec :
T e cooking time is correct.
T e eat level was eit er too low or too ig .
T at t e cooking program selector was in t e rig t
position.
T e amount of liquid was sufficient for t e cooking
time.
If food has burnt in the
PC8-PRECISION:
Fill t e pot wit water and leave t e
PC8-PRECISION to soak for a w ile before
was ing.
Never use bleac or c lorine products.
If one of the safety
systems is triggered:
Turn off t e eat.
Leave PC8-PRECISION to cool down wit out
moving it or turning t e program selector (F) to t e
steam release positon and do not open it until it as
completely cooled.
C eck and clean t e operating valve, t e steam
release outlet, t e safety valve and t e gasket.
If t e fault persists, ave your PC8-PRECISION
inspected by an All-Clad approved service center.
If the decompression
valve (O) is
disassembled:
Have your PC8-PRECISION inspected by an
All-Clad approved service center.
Environment protection first!
iYour appliance contains valuable materials w ic can be
recovered or recycled.
‹ Leave it at a local civic waste collection point
Table of contents
Languages:
Other all-clad Electric Pressure Cooker manuals


