Allegro BIONOVA X NOVAX-1001 User manual


1
Contents
1. Safety and compliance...............................................................................................................................2
1.1 General safety information ................................................................................................................. 2
1.2 Protective equipment ..........................................................................................................................3
1.3 Opening the product and service ........................................................................................................ 3
2. Specifications ............................................................................................................................................. 4
2.1. BIONOVA XTM Model D Diagram.........................................................................................................4
2.2. Technical Specifications ......................................................................................................................5
3. Getting started with BIONOVA XTM Model D .............................................................................................6
3.1. Unpacking and installation ................................................................................................................. 6
3.2. Contents of the box............................................................................................................................ 6
4. Your first bioprint with BIONOVA XTM Model D .........................................................................................7
4.1. Setting up BIONOVA XTM Model D ......................................................................................................7
4.2. Loading bioprinting probe.................................................................................................................. 8
4.3. Preparing and loading bioink ..............................................................................................................8
4.4. Setting up a bioprinting project..........................................................................................................9
4.5. Retrieving the bioprinted samples................................................................................................... 14
4.6. Powering off the printer ................................................................................................................... 14
5. Consumables ............................................................................................................................................15
5.1. Bioprinting probes ............................................................................................................................ 15
5.2. Multi-well plates ...............................................................................................................................16
5.3. Bioinks ...............................................................................................................................................17

2
1. Safety and compliance
Before you start using your BIONOVA X Model NOVAX-1001, please carefully review the entire manual.
Improper operations of the bioprinter can lead to serious personal injury and equipment damage.
1.1 General safety information
Keep your workplace tidy. Do not operate the BIONOVA X Model NOVAX-1001 in the presence of
flammable liquids, gases, or dust. The BIONOVA X Model NOVAX-1001 should be operated by the
trained personnel, who are aware of the risks and dangers that can be induced to themselves and the
staff in close proximity to the bioprinter. The staff involved in the installation or maintenance of the
system, or a part of the system, must be qualified through appropriate training. Use the instrument only
for its intended purpose as described in the documentation. Do not modify the instrument, sub-
components, or accessories.
WARNING!
● Please do not refit the BIONOVA X Model NOVAX-1001 plug.
● Please do not use the BIONOVA X Model NOVAX-1001 in damp or wet locations.
● Please unplug the BIONOVA X Model 3 D printer if you do not intend to use it for a long period
of time to prevent uncertain accidents.
● Never reach into the bioprinter while it is in operation. BIONOVA X Model 3 D printer has many
different moving parts that can cause serious personal injuries.
● Do not leave the printer unattended while it is in operation.
● Always wear protective gear including gloves and eye protection when using the printer or
handling hazardous materials.
● Before cleaning, inspecting, adjusting, repairing, or disassembling the instrument or the
dispensing units, stop the instrument, turn off the main switch, and disconnect it from its
electrical power source.
● Verify that all connections are properly connected and all components are properly mounted or
installed before using the bioprinter.
● Only use consumables that are designed for and compatible with the BIONOVA X Model NOVAX-
1001.

3
1.2 Protective equipment
WARNING!
● Always wear protective goggles and gloves, and make sure the environment around the
instrument is secure from other personnel while operating the printer.
● Always wear protective goggles and gloves while handling dangerous materials that can be
absorbed by the skin or which are toxic, strike-attractive, corrosive, allergy inducing,
carcinogenic, reproduction-endangering, or mutagenic to humans.
● Always read the safety data sheets, packing labels, and manufacturer’s catalogue before use,
and make sure to use adequate safety equipment.
● Please keep your hair, clothing, and gloves away from moving parts.
1.3 Opening the product and service
WARNING!
● The BIONOVA XTM Model D SHOULD NOT be taken apart. Doing so endangers both the users and
the equipment, which will also void the warranty.
● Never use the device for illegal activities.
4
2. Specifications
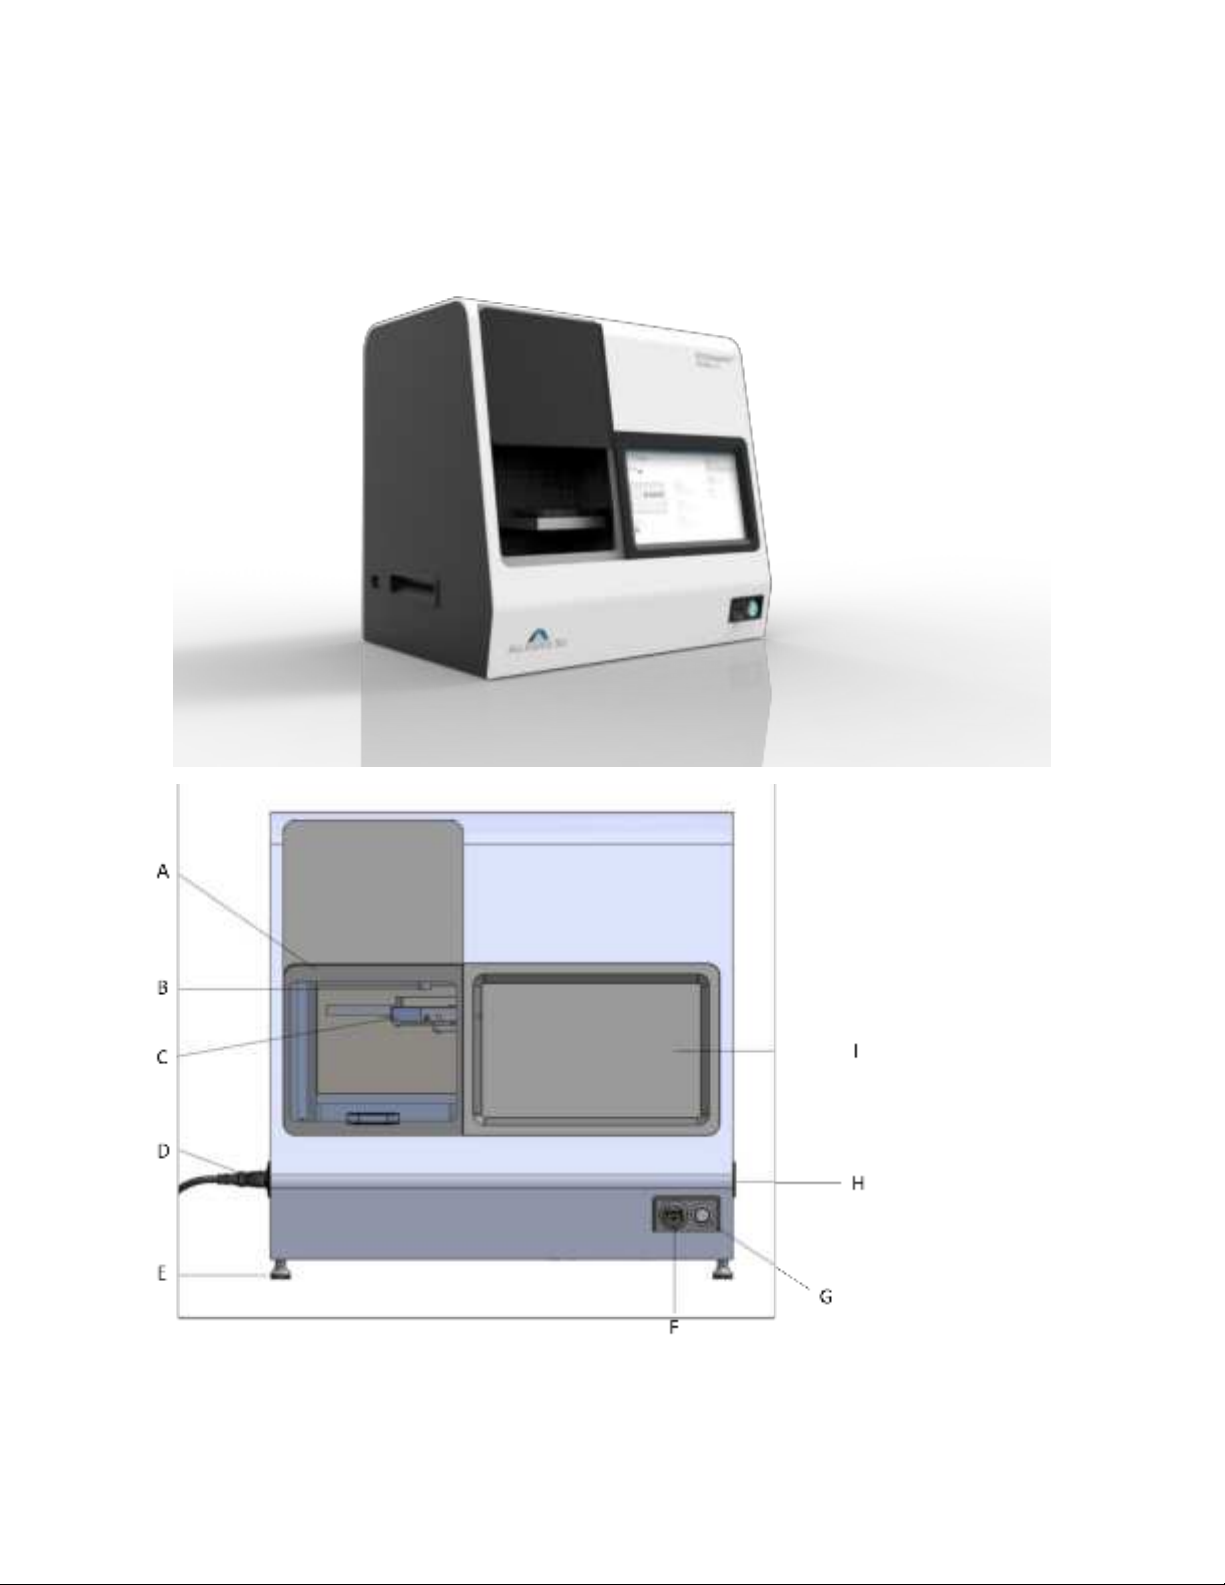
2.1. BIONOVA XTM Model D Diagram
A. Sliding door
B. Printing probe
C. Well plate tray
D. Power supply
E. Adjustable legs
F. USB port
G. Power button
H. Recessed handle
I. 10” touch screen
5
2.2. Technical Specifications
Bioprinting technology
Digital light projection based stereolithography system
Dimensions
20.3” (W) x 15” (D) x 17.4” (H)
515 mm (W) x 380 mm (D) x 441 mm (H)
Weight
90 lbs (41 kg)
Resolution
10 μm
LED wavelength
405 nm
Heater temperature
Room temperature to 60 °C
Well plate format
24 well plate, 12 well plate, 6 well plate
Support file types
.stl, .png, .bmp, .jpg
Connectivity
1x USB port
Display
10” touch screen, glove friendly
Power supply input
100-240 VAC, 50/60 Hz, 200 W

6
3. Getting started with BIONOVA X
3.1. Unpacking and installation
1. Carefully open the crate and remove the printer from the packaging by grasping the printer firmly
from the bottom with two people.
2. Set the printer on a leveled and steady table or biosafety cabinet surface.
3. Use the power cord to connect the printer to a power supply via the port located on the left side of
the printer.
4. Power on the printer by pushing the power supply switch located on the side of the printer.
5. Power on the computer by pushing the power button located in the front of the printer.
3.2. Contents of the box
1x BIONOVA X 3 D printer
1x Power cord
1x User manual
(Optional) Consumables box containing:
1x SteminkTM PEGDA [Poly(ethylene glycol) diacrylate] Sterile Starter Bioink, 50ml
2x Probes for 6-Well Plate
2x Probes for 12-Well Plate
2x Probes for 24-Well Plate
3x 6-Well Plates
3x 12-Well Plates
3x 24-Well Plates
7
4. Your first bioprint with BIONOVA X
4.1. Setting up BIONOVA X
1.. Power on the printer by pushing the power supply button located on the side of the printer.
2. Power on the computer by pushing the power button located in the front of the printer. The printer
will initialize the software and the position of the well-plate tray. After initialization, the software
interface will load the blank Project page as shown below.
3. Make sure the sliding door is closed.
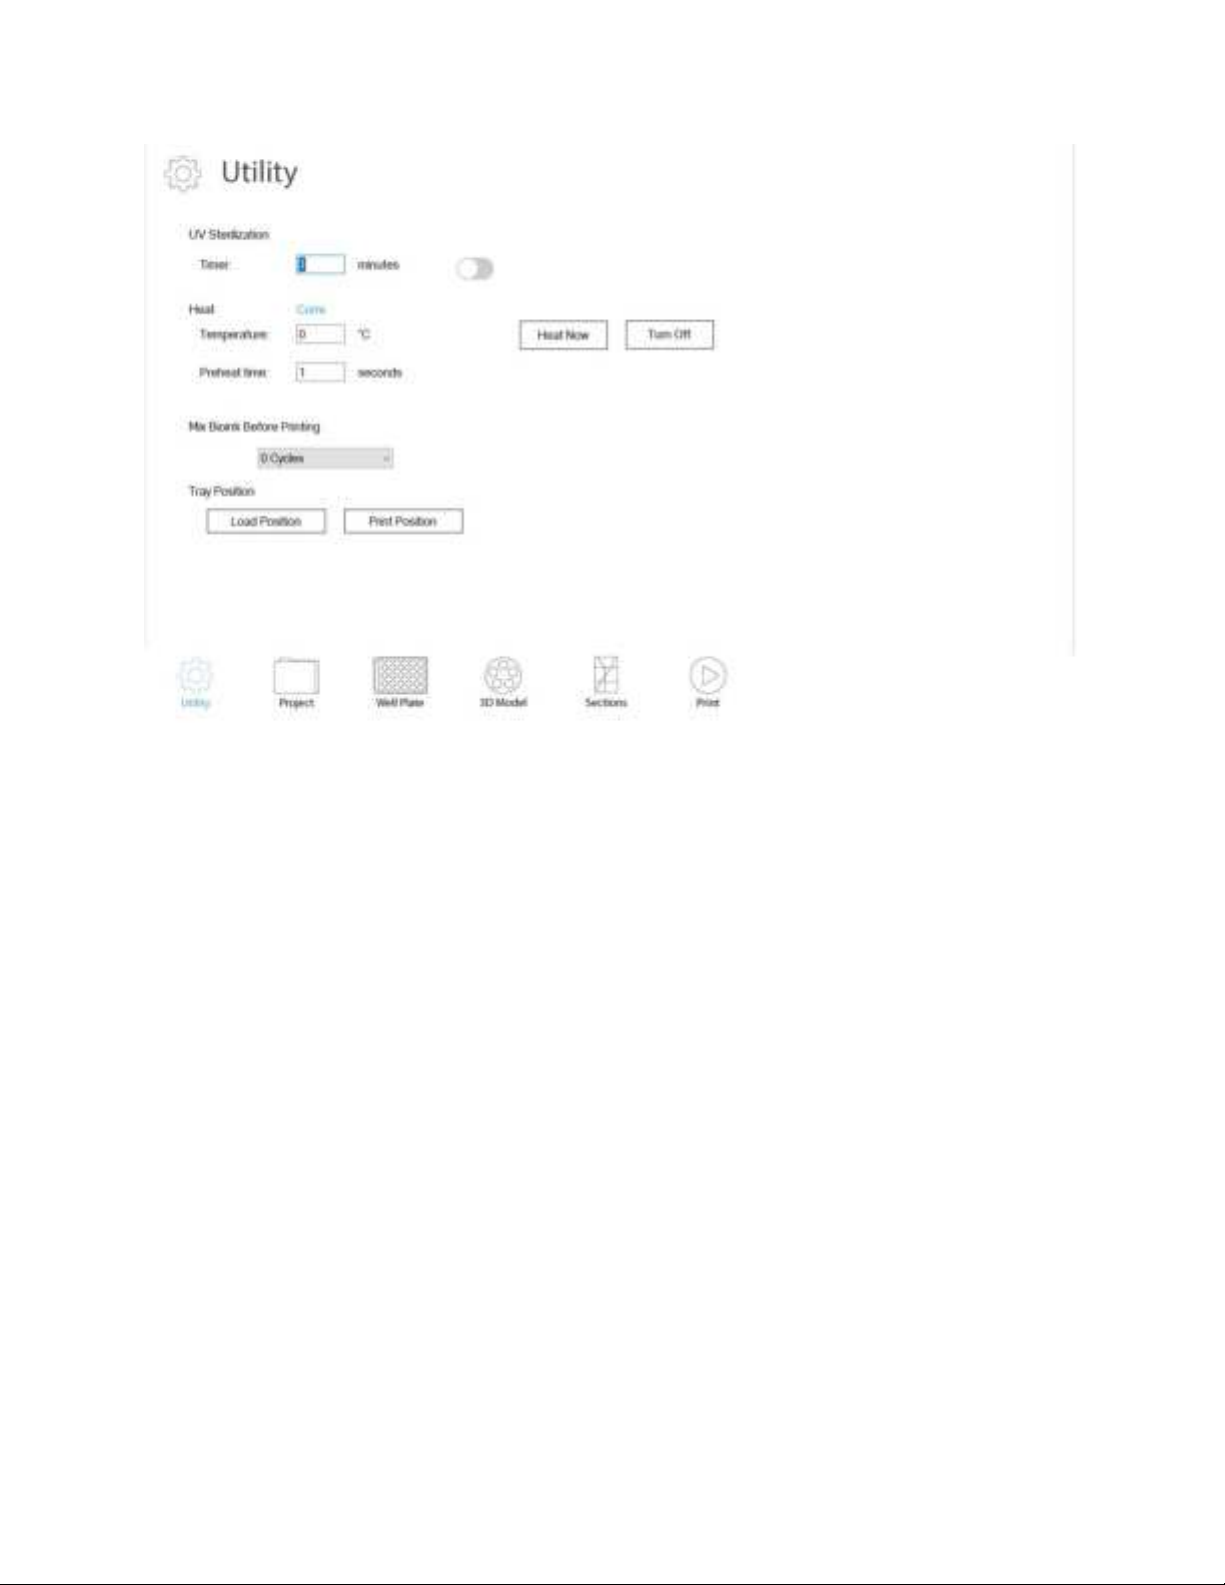
4. Go to the Utility page and turn on the UV sterilization for the desired time period.
8
4.2. Loading bioprinting probe
1. Once the UV sterilization is completed, open the sliding door.
2. Remove the provided printing probe from the sterile packaging in a biosafety cabinet.
Caution: choose the right printing probe (i.e., 6, 12, or 24-well probe) to match the well plate (i.e., 6, 12,
or 24-well plate) to be used for printing.
3. Carefully retrieve the probe adapter from above the well-plate tray. Mount the probe to the adapter
of the BIONOVA X by pressing the large end of the probe into the adapter and then mount the adapter
with the probe onto the printer. Make sure the probe is mounted properly and tightly.
Caution: pay attention to not touch the well-plate tray when inserting or removing the printing probe.
4.3. Preparing and loading bioink
1. Choose the provided well plate to match the loaded printing probe.
2. Remove the well plate from the sterile packaging in a biosafety cabinet.
3. Load the bioink to the well plate and do not exceed the maximum volume suggested in the following
table.
9
4. Press the Load Position button on the Utility page and carefully load the well plate onto the tray after
it is moved to the load position.
Caution: please make sure the well plate is placed in the right orientation as shown on the Project page
and secure the well plate in the tray using the clamp.
Printing probe and well
plate used
6-well probe and 6-
well plate
12-well probe and 12-
well plate
24-well probe and 24-
well plate
Maximum volume of
bioink for each well (ml)
8.6
3.4
1.3
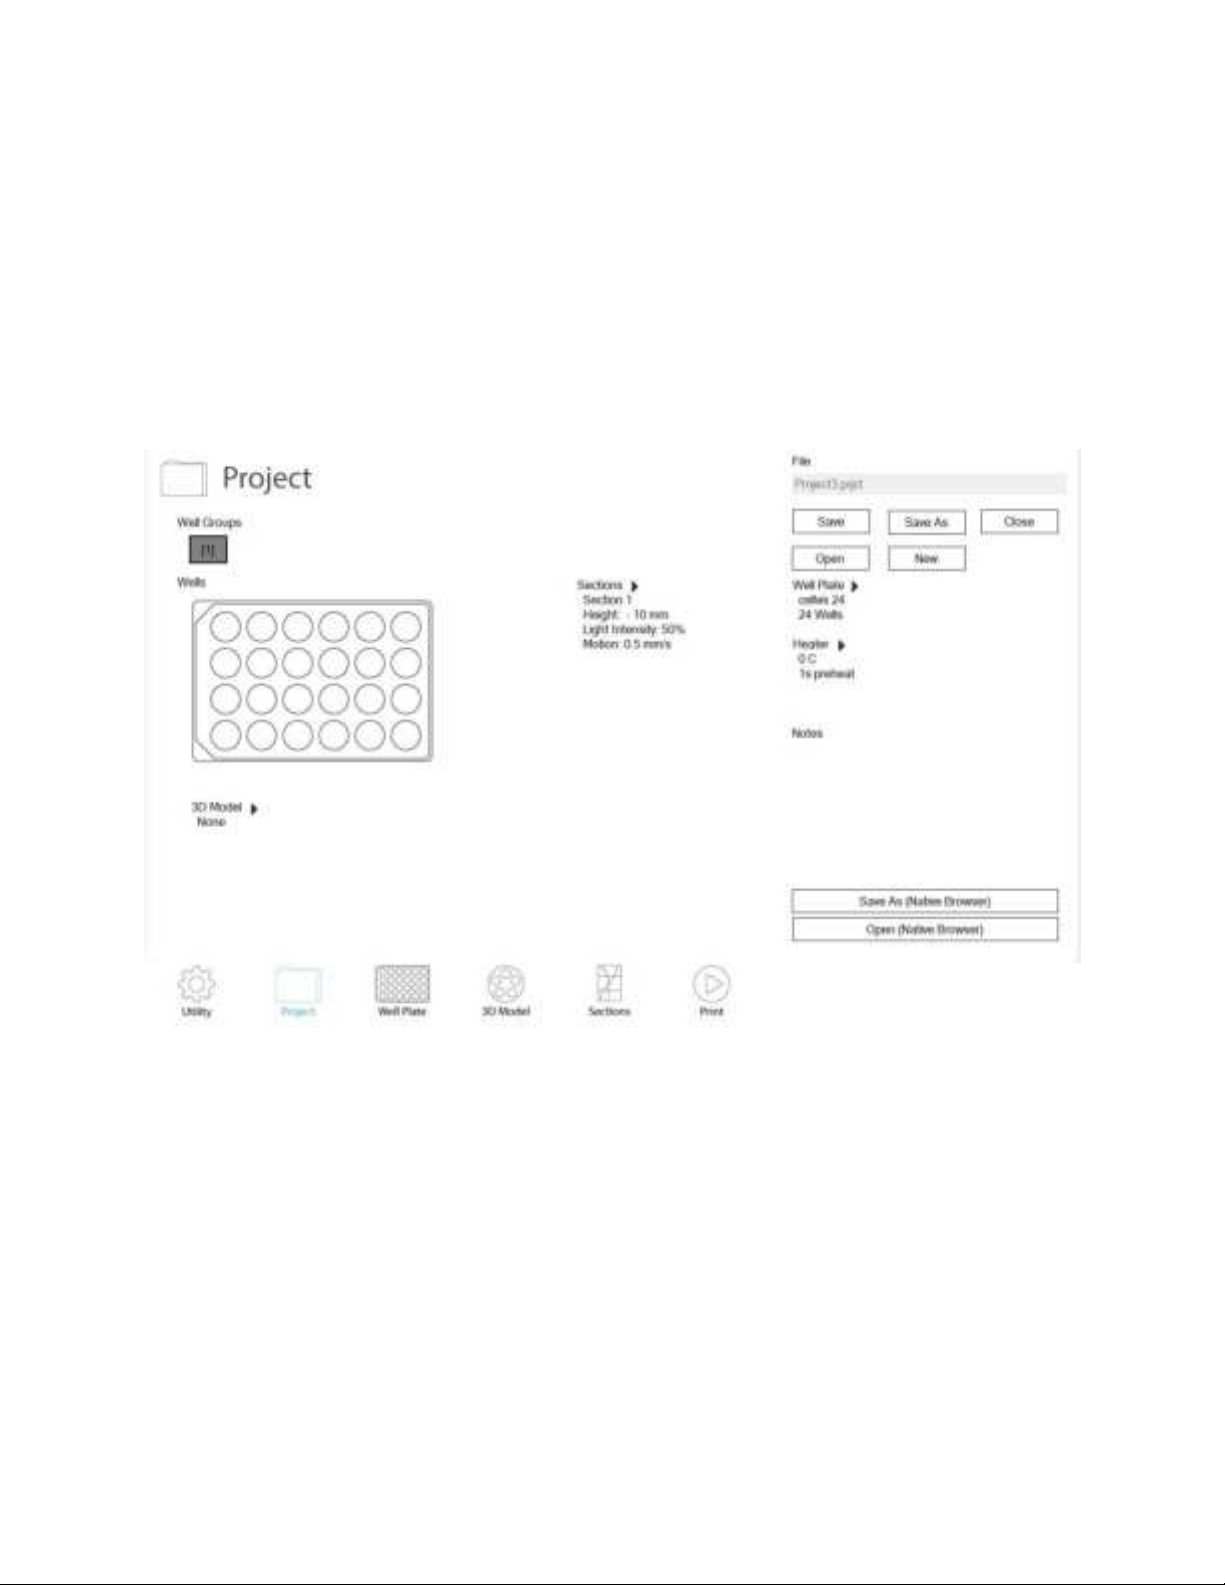
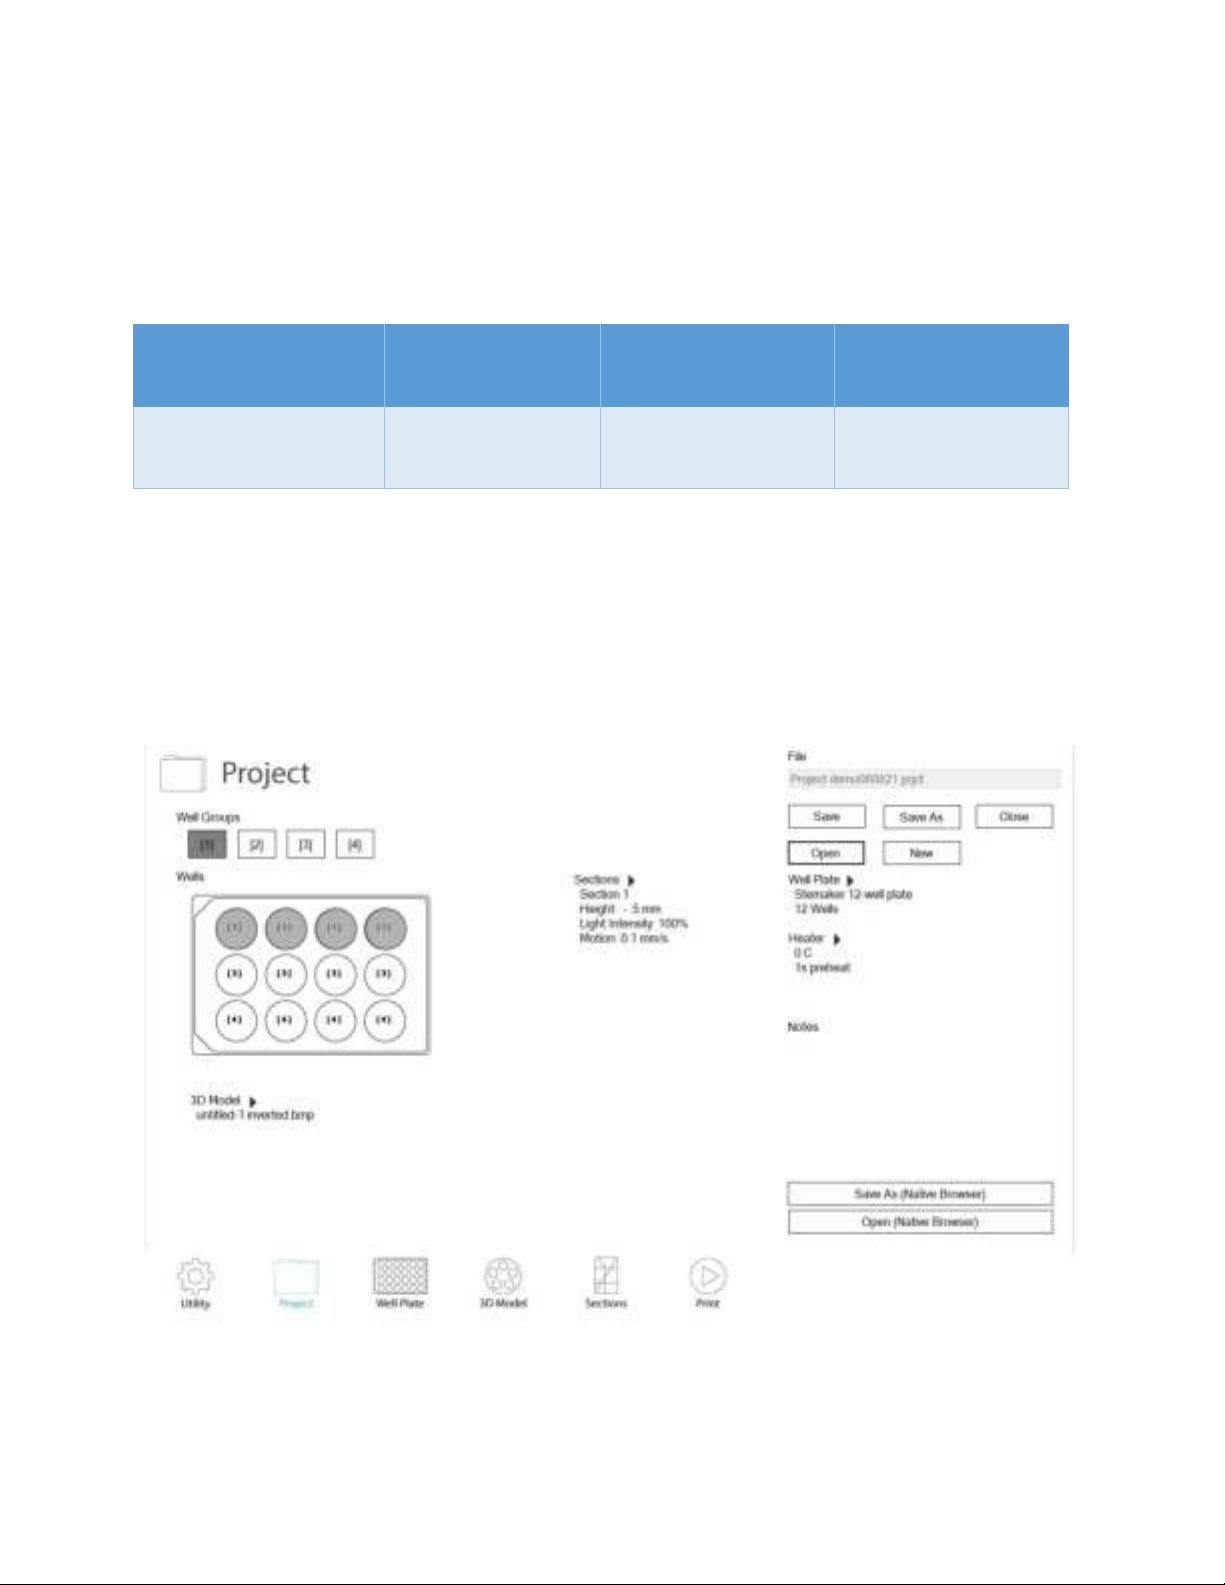
4.4. Setting up a bioprinting project
1. Go to the project page and press New to start a new printing project. The Project page provides an
overview of the bioprinting project and settings.
2. You can save the project using Save or Save As at this step or later.
3. You can also Open a previously saved project.
4. If heating or mixing of the bioink is needed, go to the Utility page and change the desired settings.

10
5. Go to the Well Plate page and choose the desired well plate type from the drop-down menu.
6. Well groups can be added or deleted. Wells can be assigned to or removed from each well group by
selecting or deselecting the wells when the target well group is highlighted on the right panel.

11
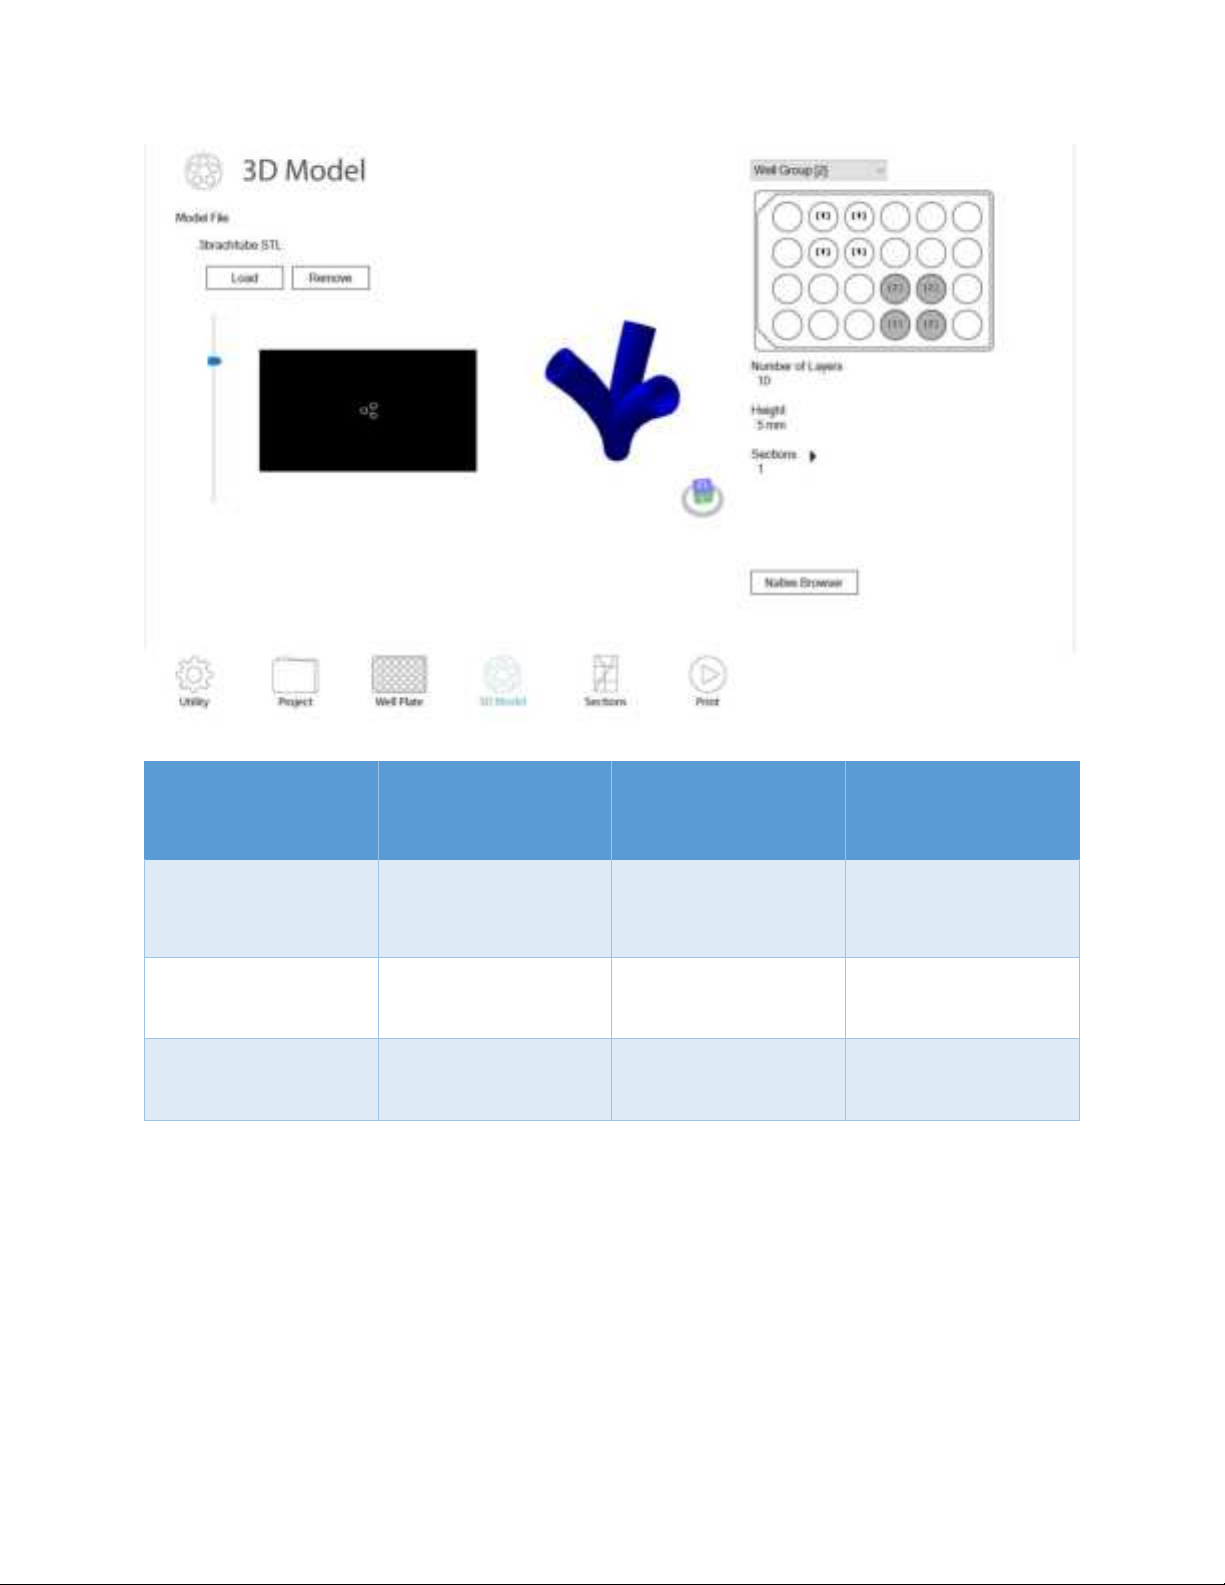
7. 3D models (.stl files) or 2D image files (.png, .jpg, .bmp files) can be loaded for each well group on the
3D Model page. When loading 3D models, the software will ask for the maximum dimensions in x, y, z
directions and the number of layers to be sliced. When loading 2D image files, the software will only ask
for the dimension in z direction as the x, y dimensions are set by the 2D image design. The table below
provides the maximum dimensions that can be printed in x, y, z directions for each combination of
printing probes and well plates.
12
Printing probe and
well plate used
6-well probe and 6-
well plate
12-well probe and 12-
well plate
24-well probe and 24-
well plate
Maximum dimension
in X direction (mm)
19.2
9
7
Maximum dimension
in Y direction (mm)
10.8
9
7
Maximum dimension
in Z direction (mm)
9
9
6.5
8. For each 3D model or 2D image loaded for each well group, you can set one single section or multiple
sections with variable printing parameters (i.e., light intensity, motion speed, section height) in the
Sections page.

13
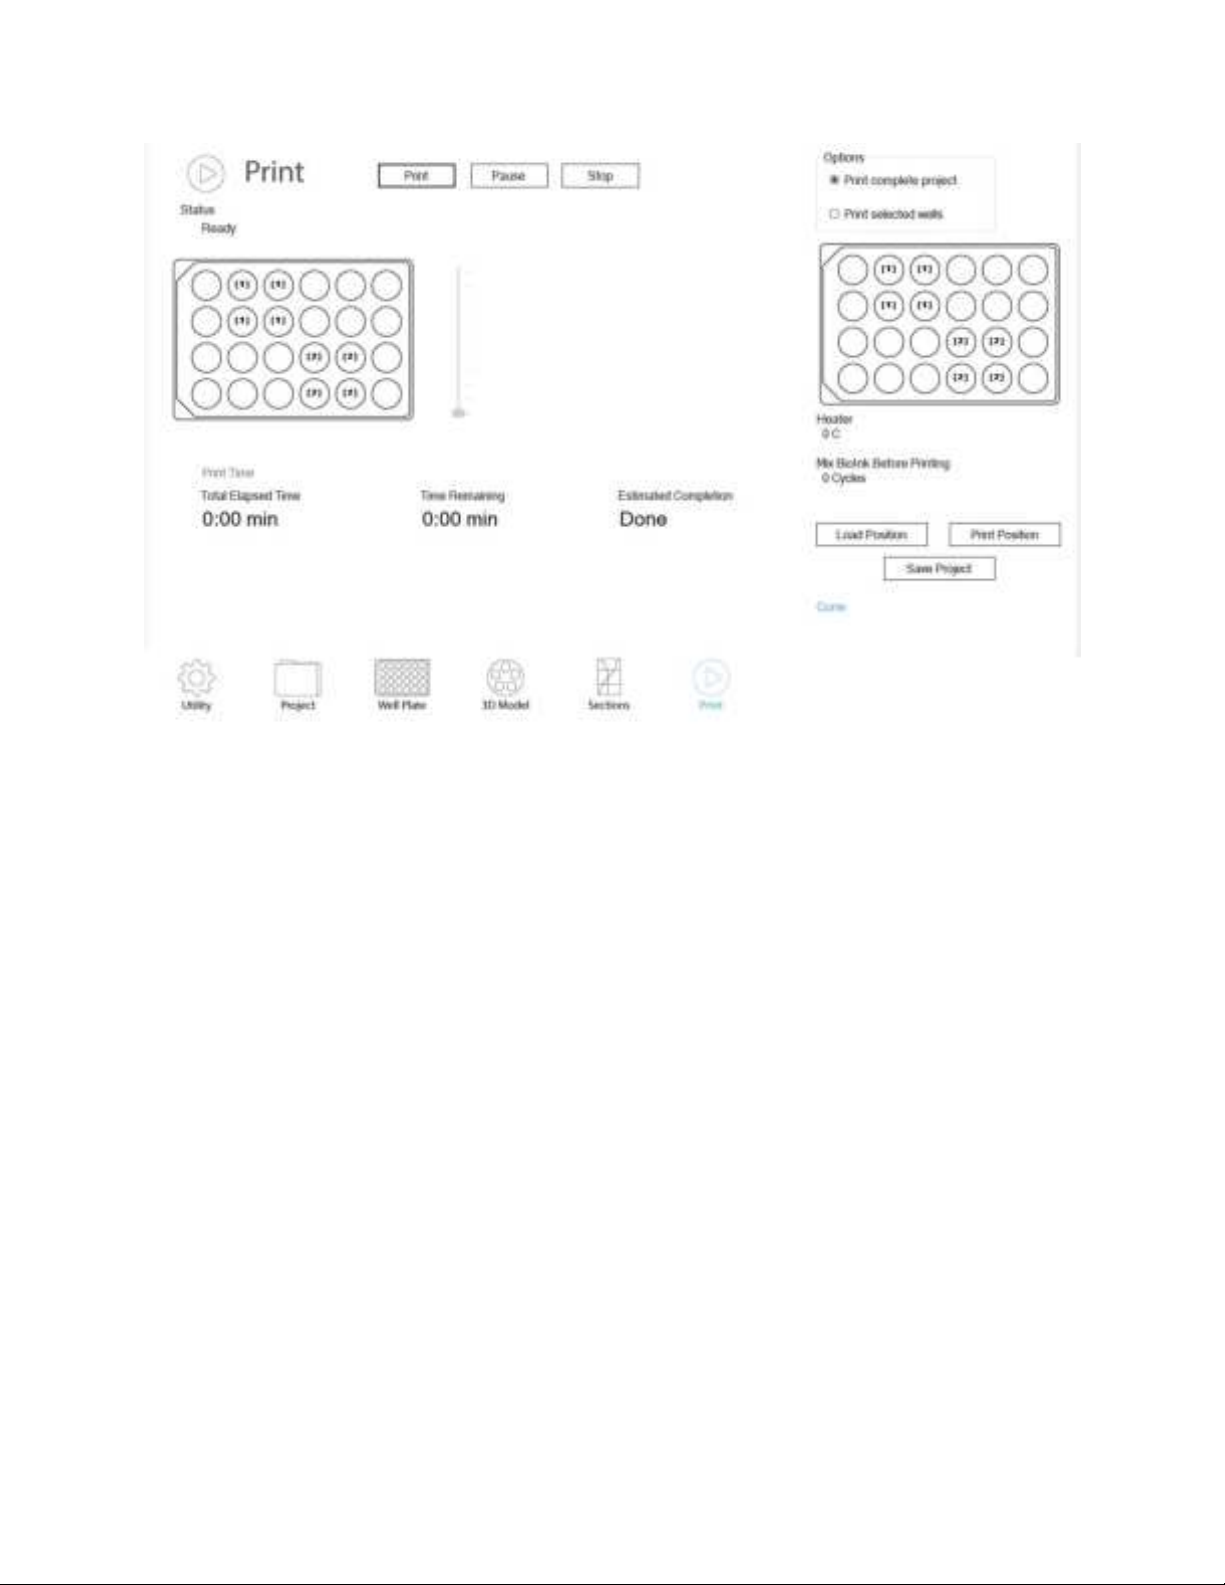
9. Once all the parameters are set, you can choose to print the complete project or only selected wells in
the Print page. Start printing by pushing the Print button. The finished wells will be labeled as green, the
ongoing well will be labeled as red, and the selected wells to be printed are labeled as grey.
10. You can pause or stop the printing at any time during the printing.
11. Once the printing is stopped or completed, the well plate tray will automatically return to the load
position.
14
4.5. Retrieving the bioprinted samples
1. Please make sure the tray is in the load position before retrieving the well plate or the printing probe.
2. Open the sliding door and carefully remove the well plate from the tray. The bioprinted samples are
ready for culturing, imaging or assaying.
3. Carefully retrieve the printing probe without touching the well plate tray. Clean and store the printing
probe in a sterile container for later use.
4. Close the sliding door.
4.6. Powering off the printer
1. After the printing is finished, turn off the computer by pressing the power button in the front of the
printer.
2. Turn off the power supply of the printer by pushing the power switch on the side of the printer.
Caution: When an emergency stop is needed, push the power switch on the side of the printer directly
to shut down the printer.

15
5. Consumables
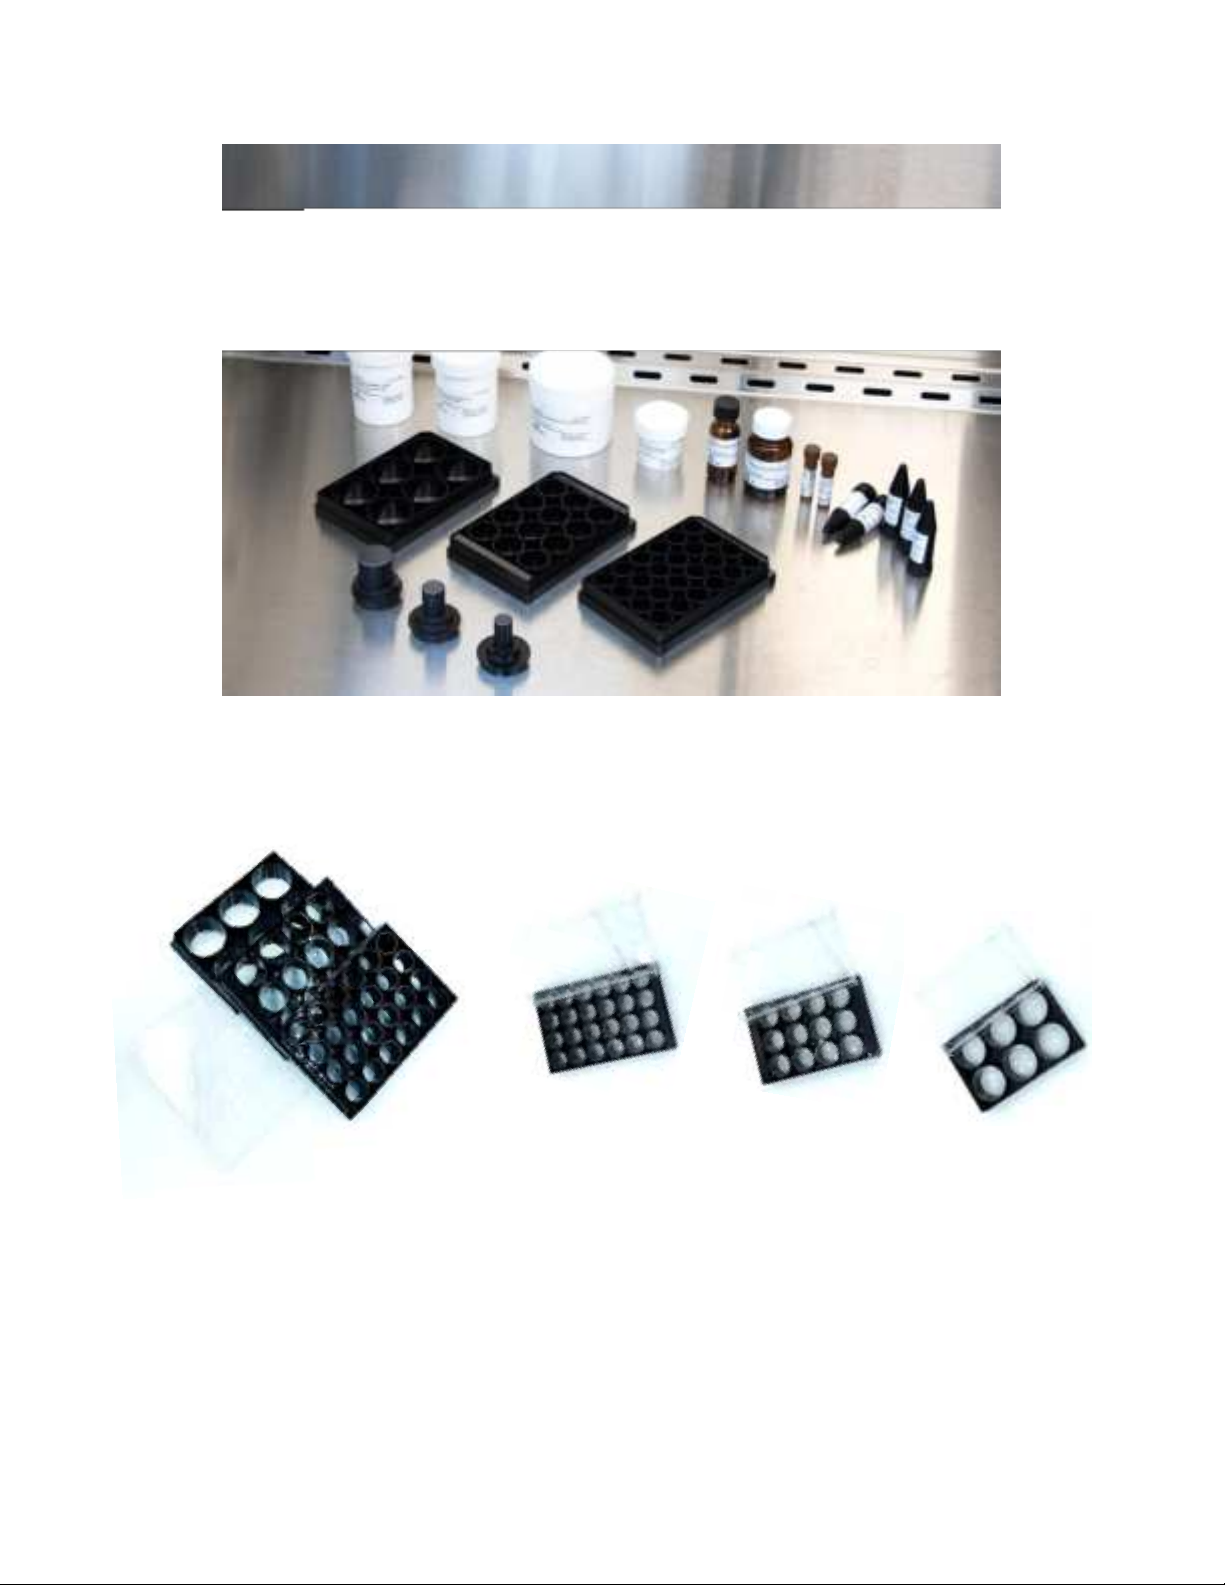
5.1. Bioprinting probes
Our probes are specially designed for our BIONOVA X 3 D printer to print directly into multi-well plates
(24, 12, and 6-well plate). The probe tips are specially coated to prevent adhesion of 3D printed
scaffolds to the probe during printing.
Our probes are available in three tip sizes, small, medium and large, which are designed specifically to
work with our 24-well plate, 12-well plate and 6-well plate.
To use the bioprinting probe
● Choose the appropriate bioprinting probe for different multi-well plates. For example, use the probe
with small tip for the 24-well plate, the probe with medium tip for the 12-well plate, and the probe
with large tip for the 6-well plate.
● The new probe is sterile and comes in a sterile plastic bag. The new probe can be used directly for
bioprinting. The probe can be reused. Replace the probe with a new one when there is any mark on
the tip of the probe.
● To use the probe, mount the probe to the adapter of the BIONOVA XTM Model 3 D printer by pressing
the large end of the probe into the adapter and then mount the adapter with the probe onto the
printer. Make sure the probe is mounted properly and tightly.
● After use, gently detach the probe from the adapter and clean the probe tip with DI water or 70%
Ethanol.
● Before reuse of the probe, please properly sterilize the probe, especially the probe tip. The probe can
be sterilized by UV light or 70% Ethanol.
● We don’t recommend using the same probe for printing with different bioinks due to the possibility
of cross-contaminations.
16
5.2. Multi-well plates
Our multi-well plates (24, 12, and 6-well) are compatible with our BIONOVA X 3 D printer and printing
probes. Our multi-well plates with high performance #1.5 cover glass (~0.170 mm) are suitable for high
resolution imaging systems. The glass bottom is specially coated to enhance adhesion of 3D printed
tissues and avoid tissue detachment during medium change.

17
● Choose the appropriate bioprinting probe for different multi-well plate. For example, use the probe
with small tip for the 24-well plate, the probe with medium tip for the 12-well plate, and the probe
with large tip for the 6-well plate.
● The new multi-well plate is sterile and comes in a sterile plastic bag. The new multi-well plates can be
used directly for bioprinting.
● To use the multi-well plate, remove the lid of the multi-well plate and load the multi-well plate to the
plate holder of the BIONOVA XTM Model 3 D printer. Make sure the multi-well plate is mounted to the
plate holder properly, tightly, and well leveled.
Warning: Inappropriate mounting of the multi-well plate may cause the failure of the printing or
even damage of the printer.
● After use, remove the multi-well plate off the plate holder of the printer.
5.3. Bioinks
Allegro 3D provides a whole series of SteminkTM bioinks with various material properties. Please visit our
website at https://allegro3d.com for details and application notes of the SteminkTM bioinks products.
Before printing on BIONOVA X 3 D printer, load appropriate amount of SteminkTM bioink solution to our
multi-well plate. Please refer to the table in Section 4.3 for maximum bioink load volume for each type
of well plate. Overloading of the bioink solution will cause spills. Protect bioink solution from light when
it is not used in printing.
Make sure the bioink solution is sterile before mixing with cells for cell-laden structure printings.
We do not recommend reusing the excess bioink solutions left in the multi-well plate after bioprinting.

18
Table of contents


