Allmand PORT-A-LITE PAL 2000W4 User manual
Not for
Reproduction

Not for
Reproduction
Products Covered by This
Manual
The following products are covered by this manual:
PAL 2000W4, PAL 2500W4
Manual Contents:
Introduction...........................................................................2
Safety......................................................................................2
Features and Controls..........................................................5
Set-Up.....................................................................................6
Operation...............................................................................7
Maintenance...........................................................................9
Troubleshooting..................................................................12
Specifications......................................................................12
Wiring Diagrams..................................................................14
Introduction
About This Manual
TAKE TIME TO READ THIS MANUAL THOROUGHLY
This instruction manual provides necessary instructions for the
Allmand PAL 2000W4, PAL 2500W4 Portable Work Light.
The information found in this manual is in effect at the time of
printing. Allmand Bros Inc. may change contents without notice
and without incurring obligation.
The images throughout this manual are representative, and
may differ from your model.
Any reference in this manual to left or right shall be determined
by looking at the trailer from the rear.
If uncertain about any of the information in the manual, contact
the Allmand service department at 1-800-562-1373, or contact
us through the Allmand website, www.allmand.com.
Save these original instructions for future reference.
Safety
Safety Definitions
For your safety, the safety of others, and to protect the
performance of equipment, follow the precautions listed
throughout the manual before operation, during operation and
during periodic maintenance procedures.
Indicates a potential personal injury hazard.
DANGER
Indicates a hazardous situation which, if not avoided, will result
in death or serious injury.
WARNING
Indicates a hazardous situation which, if not avoided, could
result in death or serious injury.
CAUTION
Indicates a hazardous situation which, if not avoided, could
result in minor or moderate injury.
NOTICE
Indicates a situation which can cause damage to the equipment,
personal property and/or the environment, or cause the
equipment to operate improperly.
Safety Precautions
The following section contains general safety precautions and
guidelines that must be followed to reduce risk to personal
safety. Special safety precautions are listed in specific
procedures. Read and understand all of the safety precautions
before operating or performing repairs or maintenance.
2

Not for
Reproduction
DANGER
Electrocution Hazard
• Always place the portable work light on a dry surface and
away from areas where water might flow or accumulate.
•Do not stand on a wet surface or in water when connecting
the portable work light to a power source such as a wall
socket or outlet on a power generator, or when operating
the light switch.
• Always check for overhead wires or obstructions before
raising or lowering the mast.
• Always follow the rules or instructions for your work site
and state, province and national electric code for
maintaining a safe distance from overhead wires.
• High voltage is present when the unit is plugged into a
wall socket or outlet on a power generator. Never attempt
to service electrical components while the portable work
light is connected to a power source.
• Do not operate the portable work light if the insulation on
the power cord or other electrical wiring is cut or worn, or
if bare wires are exposed. Repair or replace damaged
wiring before connecting to a power source.
WARNING
Unsafe Operation Hazard
• Never permit anyone to operate the equipment without
proper training.
• Read and understand this Operator’s Manual before
operating or servicing the work light to ensure that safe
operating practices and maintenance procedures are
followed.
• Safety signs and decals are additional reminders for safe
operating and maintenance techniques.
WARNING
Modification Hazard
• Never modify the equipment without written consent of
the manufacturer. Any modification can effect the safe
operation of the equipment.
WARNING
Rollover Hazard
•Do not raise, lower or use the work light unless positioned
on firm ground.
• Never move or reposition the work light while the mast is
fully extended.
WARNING
Burn Hazard
•Light fixtures become very hot during operation and shortly
after shutdown.
• Handle hot components, such as light fixtures, with heat
resistant gloves.
NOTICE
• Any part which is found defective as a result of inspection
or any part whose measured value does not satisfy the
standard or limit MUST be replaced.
•Always tighten components to the specified torque. Loose
parts can cause equipment damage or cause it to operate
improperly.
• The use of authorized Allmand replacement parts is
encouraged. The warranty does not cover damage or
performance problems caused by the use of parts that
are not authorized replacement parts.
• Clean all accumulated dirt and debris away from the body
of the equipment and its components before you inspect
the equipment or perform preventative maintenance
procedures or repairs. Operating equipment with
accumulated dirt and debris will cause premature wear
of equipment components.
• Retrieve any tools or parts that may have dropped inside
of the equipment to avoid improper equipment operation.
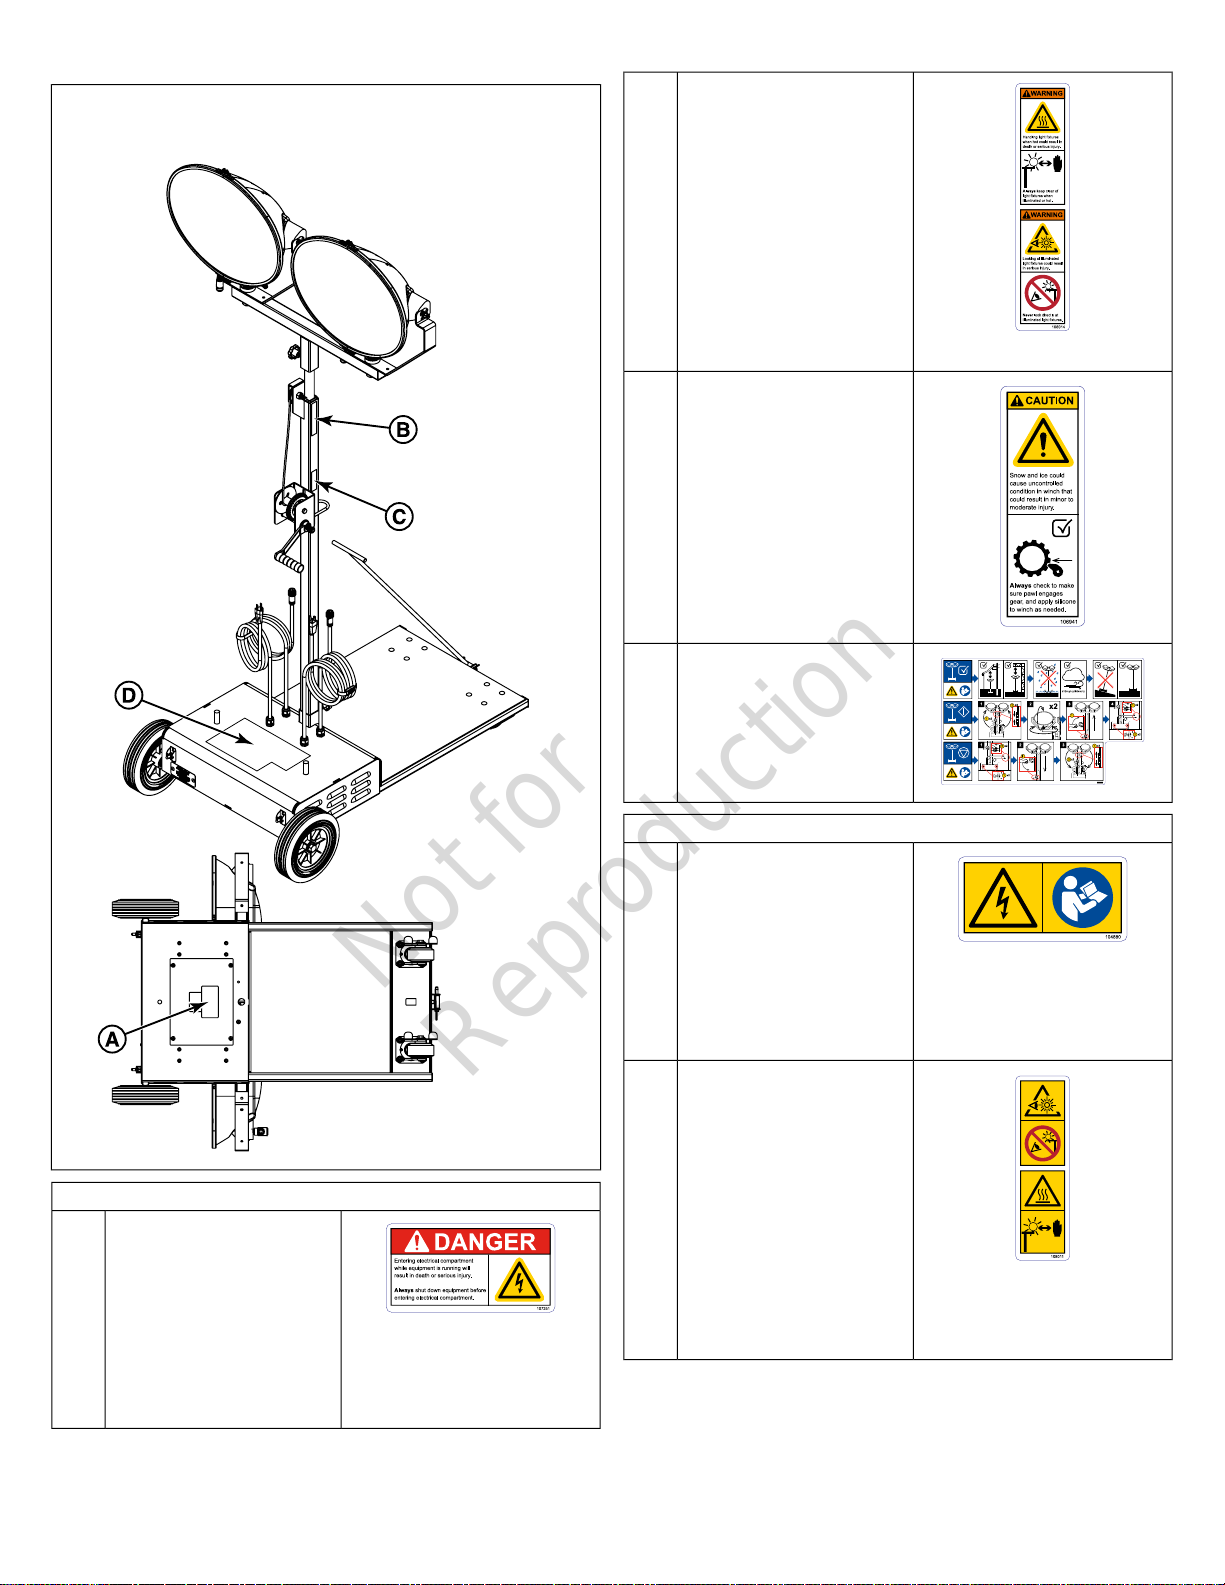
Safety Decals
Before operating your unit, read and understand the following
safety decals. The cautions, warnings and instructions are for
your safety. To avoid personal injury or damage to the unit,
understand and follow all the decals.
Keep the decals from becoming dirty or torn, and replace them
if they are lost or damaged. Also, if a part needs to be replaced
that has a decal attached to it, make sure to order the part and
decal at the same time.
Compare Figure 1 with the tables following.
3
Not for
Reproduction
1
Domestic Models
DANGER
Electrocution Hazard.
Entering electrical compartment
while equipment is operating will
result in death or serious injury.
Always shut down equipment
before entering electrical
compartment.
Part No. 107251
A
WARNING
Burn Hazard.
Handling light fixtures when hot
could result in death or serious
injury. Always keep clear of light
fixtures when illuminated or hot.
Unsafe Operation Hazard.
Looking at illuminated light
fixtures could result in serious
injury. Never look directly at
illuminated light fixtures.
Part No. 108014
B
CAUTION
Snow and ice could cause
uncontrolled condition in winch
that could result in minor to
moderate injury.
Always check to make sure pawl
engages gear, and apply silicone
to winch as needed.
Part No. 106941
C
Operating Instructions
Part No. 108810
D
International Models
DANGER
Electrocution Hazard.
Entering electrical compartment
while equipment is operating will
result in death or serious injury.
Always shut down equipment
before entering electrical
compartment.
Part No. 104480
A
WARNING
Unsafe Operation Hazard.
Looking at illuminated light
fixtures could result in serious
injury. Never look directly at
illuminated light fixtures.
Burn Hazard.
Handling light fixtures when hot
could result in death or serious
injury. Always keep clear of light
fixtures when illuminated or hot.
Part No. 108011
B
4

Not for
Reproduction
CAUTION
Snow and ice could cause
uncontrolled condition in winch
that could result in minor to
moderate injury.
Always check to make sure pawl
engages gear, and apply silicone
to winch as needed.
Part No. 107532
C
Operating Instructions
Part No. 108810
D
Operation Icons
The following table contains operation icons that may be found
on the unit, along with the meaning of each icon.
MeaningIcon
Power On
Power Off
Work Light
Features and Controls
Allmand Port-A-Lite® PAL 2000W4 / PAL 2500W4 portable
work lights are intended for use as a stationary light source.
They may to be used indoors on dry surfaces, and may be used
outdoors on dry surfaces and in weather conditions when wind
or precipitation are not present.
The Allmand Port-A-Lite® PAL 2000W4 / PAL 2500W4 portable
work lights require an external power source and may be
plugged into a wall socket or an outlet on a portable generator.
(A portable generator to power the lights may be placed on the
flat area of the base assembly behind the handle.)
Identify the features and controls of the machine by comparing
Figure 2 with the table following.
2
DescriptionRef
Lamp Fixture (2)A
Lamp Fixture Cord (2)B
3/4" Flat Washer (2)C
Plastic Washer (2)D
Handle Nut (partially hidden) (2)E
Light Bar KnobF
Light BarG
Lamp Fixture Yoke (2)H
Mast WinchI
Lamp Cable (2)J
Power Cord (2)K
Base Assembly Stud (2)L
Power Switch (2)M
Base AssemblyN
Mast Socket Knob (partially hidden)O
Hook and Loop Cable Tie (2)P
HandleQ
Outer MastR
5

Not for
Reproduction
DescriptionRef
Inner MastS
Set-Up
Preparing For Set-Up
Allmand Port-A-Lite® PAL 2000W4 / PAL 2500W4 portable
work lights are shipped in four cartons, and require assembly
before use. Upon receiving the Port-A-Lite®, remove each piece
from the shipping cartons and inspect the parts for damage.
Contact your dealer or Allmand if parts were damaged during
shipping.
Set-Up Instructions
1. Loosen the mast socket knob (A, Figure 3).
2. Insert the outer mast (B, Figure 3) in the socket, and tighten
the knob.
3. Make sure the inner mast (C, Figure 3) is completely
lowered. If additional lowering is needed, crank the mast
winch (D) counterclockwise until completely lowered.
4. Attach the light bar (E, Figure 3) to the inner mast, securing
with the light bar knob (F).
5. Remove the handle nuts (G, Figure 3) and flat washers (H)
from the studs (I) on the base assembly, leaving the plastic
washers (J) in place.
6. Place the center hole of each lamp fixture yoke (K, Figure
3) onto the stud on the base assembly, and secure with the
handle nut and flat washer removed in Step 5.
Note:
Position the lamp fixtures onto the base assembly so they
face each other.
7. Install the handle (L, Figure 3) onto the front of the base
assembly, securing with the locking pin (M).
8. Coil the power cords (N, Figure 3) and lamp cables (O),
and secure with the hook and loop cable ties (P).
3
6
Not for
Reproduction
Operation
Preparing The Port-A-Lite For Use
WARNING
Unsafe Operation Hazard.
Operating the unit with worn, damaged or missing parts can
result in death or serious injury. Always replace worn,
damaged or missing parts promptly. Do not operate this unit
until all worn, damaged or missing parts have been replaced,
and proper operation of unit has been verified.
NOTICE
We encourage the use of authorized Allmand replacement
parts. The warranty does not cover damage or performance
problems caused by the use of parts that are not authorized
replacement parts.
1. Check that a copy of the Operators Manual is with the unit.
2. Check that all safety decals are legible and in place on the
unit. See
Safety Decals
in the
Safety
section of this
manual.
3. Check the unit for proper operation. (See
Operating The
Port-A-Lite
for detailed information on operating
procedures.)
• Check that the mast winch operates properly, and that
the inner mast extends and retracts properly.
• Check that the lamp glass lenses are not cracked or
broken, and that it is a frosted lens.
• Check that the power cords, lamp cables and lamp
fixture cords are not frayed or damaged, and that the
power plugs and lamp cable connectors are not
damaged.
• Check that the mast socket knob securing the outer
mast to the base assembly is tightened.
• Check that the light bar knob is tightened.
• Check that the handle nuts securing the lamps to the
base assembly are tightened.
•Check the condition of the wheels and casters, and that
they roll freely.
4. Connect the lamp cords to the lamp fixture cords. Plug the
power cords into a wall socket. See
Specifications
for
detailed information on power requirements.
5. Turn each power switch to the ON position to check the
bulbs. The bulbs should come to full brightness in 5 to 8
minutes at room temperature. See
Maintenance
for detailed
information on replacing bulbs and ballast if the bulbs do
not light. When finished, set the power switches to the OFF
position, disconnect the power cords from the wall outlet
and disconnect the lamp cords from the lamp.
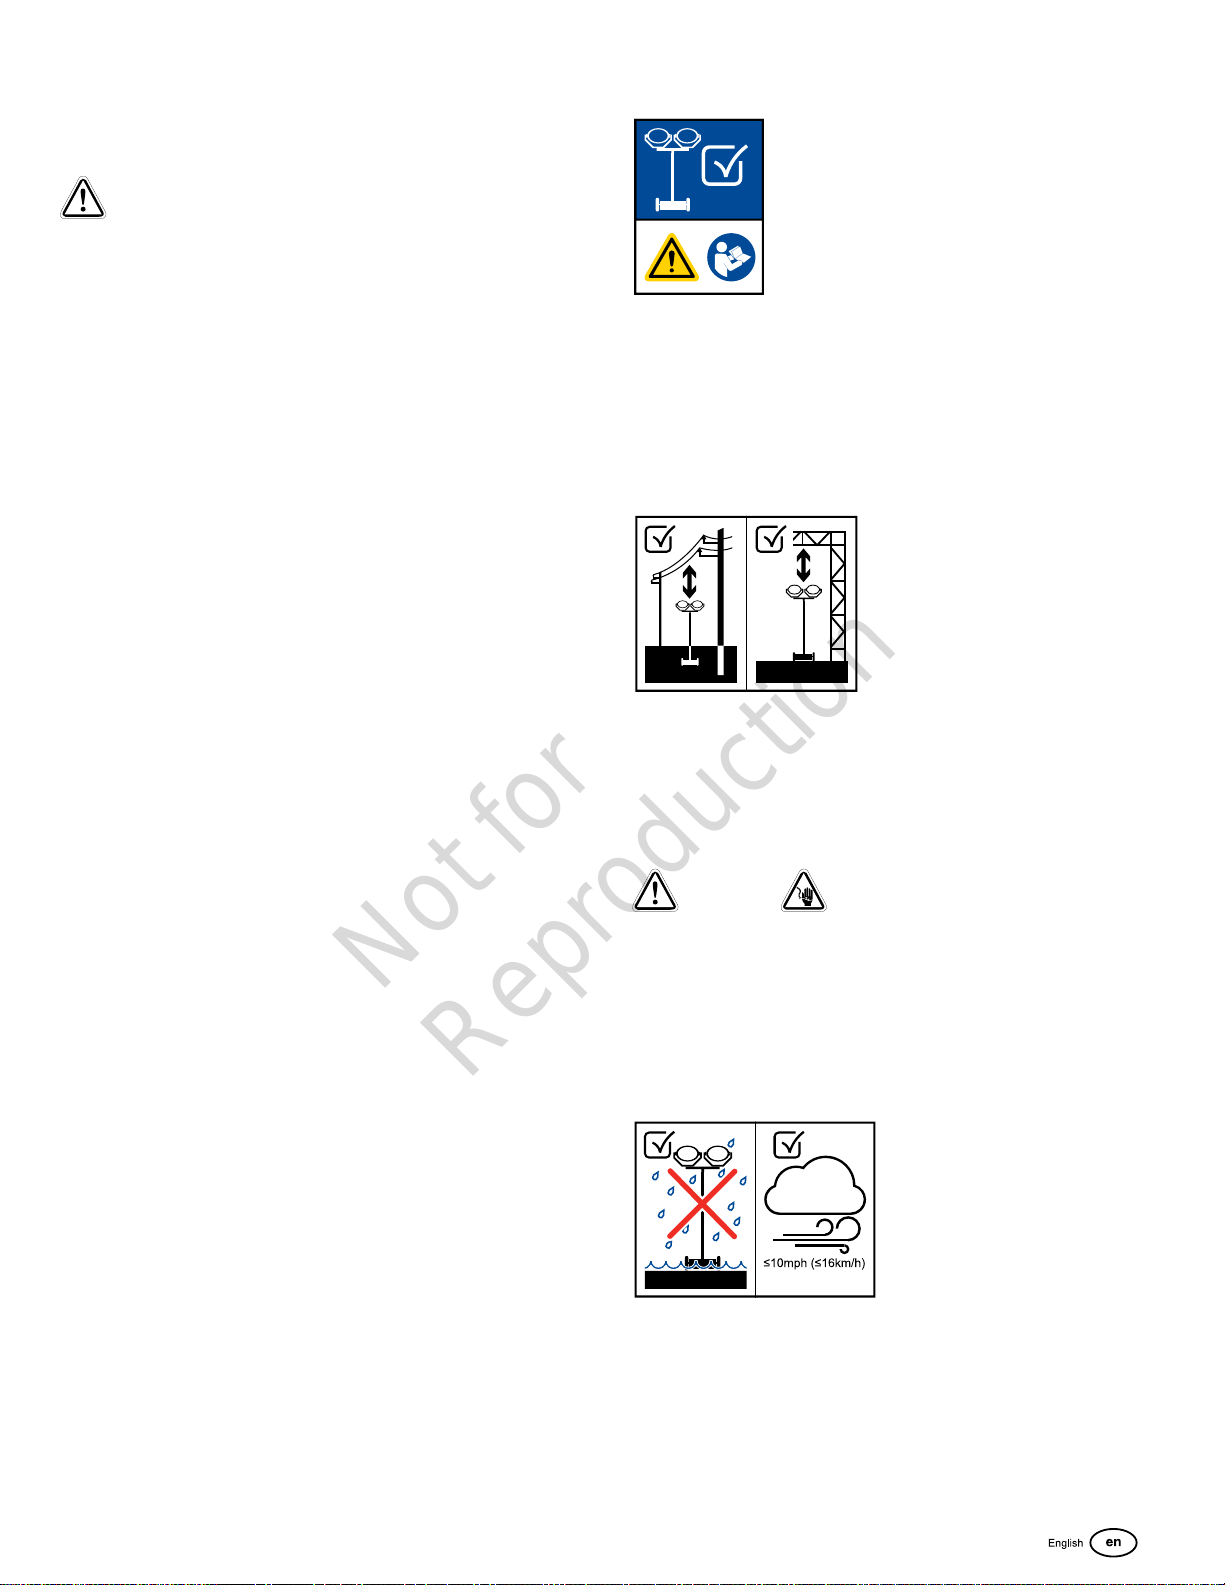
Work Site Considerations
Prior to setting up and operating the work light, the operator
must determine where to place it on the work site. It is the
operator's responsibility to ensure that the work light is properly
and safely positioned on at the work site. Be sure to follow rules
or instructions for your work site, and any state, province and
federal rules that may apply.
Overhead Obstructions
Always keep well clear of any overhead power wires. Make sure
there are no overhead obstructions where you intend to place
the portable work light. Keep clear of any loose cables, ropes
or obstructions that could ensnare the mast or lamp fixture.
When the mast is fully elevated, the portable work light stands
12.0 feet (3.7 m) from ground level to the top of the lamp fixture.
DANGER
Electrocution Hazard.
Contact with overhead electrical wires will result in death or
serious injury. Always follow the rules or instructions for your
work site, and the state, province and federal rules for
maintaining a safe distance from overhead wires.
Wetness & Wind
The portable work light must be placed on a dry surface away
from areas that might become wet.
7
Not for
Reproduction
WARNING
Shock Hazard.
Positioning a portable work light on a wet surface or in water
will result in death or serious injury. Always position the work
light on a dry surface away from areas where water may flow
or accumulate.
Do not set up the work light in an area where winds exceed 10
mph (16 km/h).
WARNING
Unsafe Operation Hazard.
Operating the portable work light with the mast fully elevated
in winds exceeding 10 mph (16 km/h) can cause work light
tip over resulting in death or serious injury. Always fully lower
the mast when winds are expected to exceed 10 mph (16
km/h).
Work Surface
The portable work light must be placed on a firm, stable surface
capable of supporting the total weight of the work light. The
surface should be level, and must not exceed a grade of 5%
(2.8° incline) in any direction. Be sure to chock the front casters
and rear wheels before using the work light.
WARNING
Rollover / Tipover Hazard.
Positioning the portable work light on soft or unstable ground
could cause work light rollover resulting in death or serious
injury. Always position the work light on a firm, level and stable
surface.
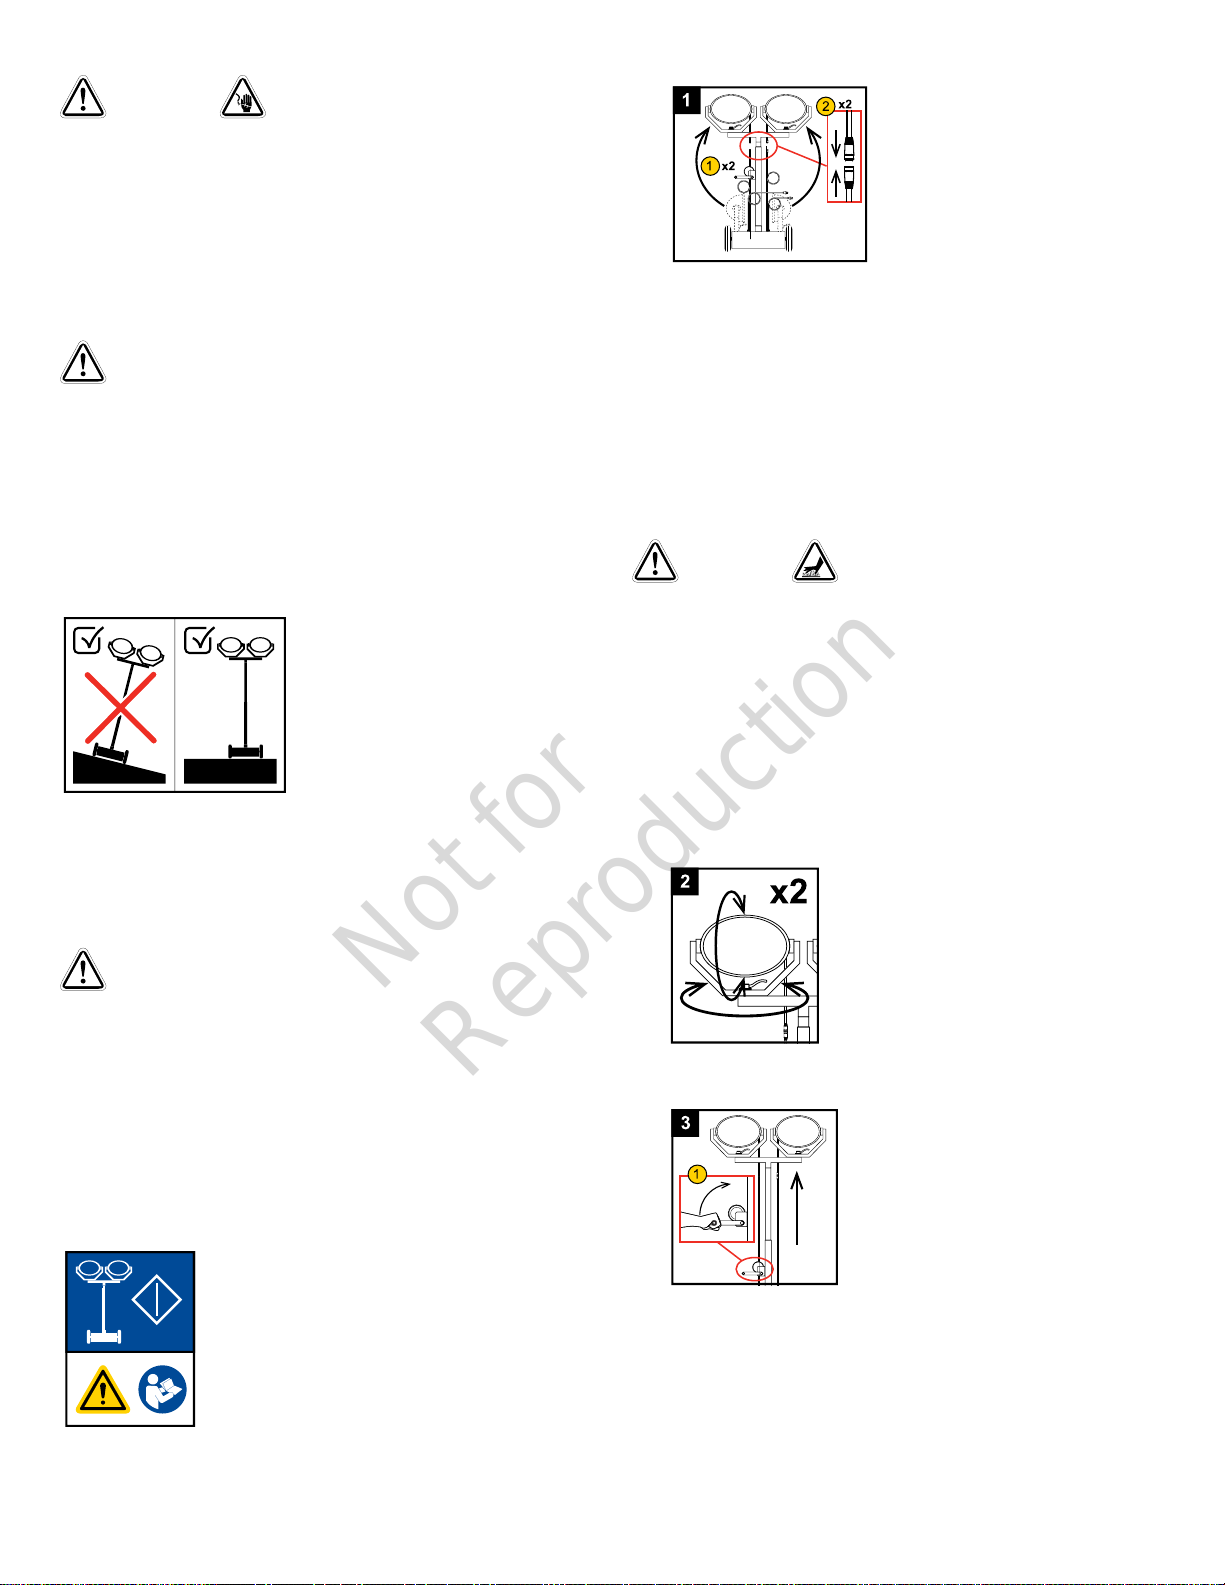
Operating The Port-A-Lite
To Operate The Port-A-Lite
1. Install and connect the lamp fixtures.
1. Remove the handle nuts and flat washers from the studs
on the base assembly, and remove the lamp fixtures
from the studs. Remove the plastic washers from the
studs on the base and install onto the studs on the light
bar. Place the center hole of each lamp fixture yoke
onto the stud on the light bar, and secure with the flat
washer and handle nut.
Note:
Do not attempt to use the lamp fixtures while fastened to
the base assembly, or as a hand held light source.
WARNING
Burn Hazard.
Handling light fixtures when they are hot could result in death
or serious injury. Always keep clear of light fixtures when
illuminated or hot.
2. Loosen the hook and loop cable ties securing the cords.
Route the lamp cables up through the metal loop behind
the winch, then connect the lamp cables to the lamps.
2. Position the lamp fixtures. The lamp fixtures may be
rotated left / right, and up / down.
3. Raise the mast to the desired height.
1. Crank the mast winch handle clockwise to raise the
inner mast to the preferred height.
4. Connect the power cords and turn on the work lights.
8

Not for
Reproduction
1. Connect each of the two power cords to a wall socket
or outlet on a power generator.
Note:
If an extension cord is required, use an extension cord
rated for the current required by the work light. See
Specifications
for detailed information on power requirements.
2. Move each of the two power switches to the ON
position.
To Shut Down The Port-A-Lite
1. Shut off the work lights and disconnect the power
cords.
1. Move each of the two power switches to the Off position.
2. Disconnect the two power cords from the wall socket
or outlet on a power generator.
2. Lower the mast.
1. Crank the mast winch handle counterclockwise until
the inner mast is completely lowered.
3. Disconnect and stow the lamp fixtures.
1. Disconnect the lamp cables from the lamps. Coil the
power cords and lamp cables and secure with the hook
and loop cable ties.
2. Remove the handle nut and flat washer from one of the
studs on the light bar, and remove the lamp fixture from
the stud. Remove the plastic washer from the stud on
the light bar, and install onto the stud on the base
assembly. Place the center hole of the lamp fixture yoke
onto the stud on the base assembly, and secure with
the flat washer and handle nut. Repeat for other lamp
fixture.
Maintenance
Location Of Serial Number Plate
The serial number plate for the work light is located on the end
of the base near the power switch.
Location Of Weight And Power Information
Information on the weight of the work light is located on top of
the base near the mast.
Information on the electrical requirements for the work light is
located above the serial number plate on the unit base.
Diagnostics
If the bulb does not light after about 10 minutes when the work
light is properly connected and the power switch turned on,
determine whether the bulb is burnt out or if the ballast has
failed. The easiest way is to replace the bulb with one that you
know works. If the replacement bulb does not light, the ballast
must be replaced.
WARNING
Burn Hazard.
Handling light fixtures when hot could result in death or serious
injury. Always keep clear of light fixtures when illuminated or
hot.
The ballast consists of a ballast transformer, and a capacitor.
Generally, the capacitor will be the cause of a ballast problem.
9

Not for
Reproduction
DANGER
Shock Hazard.
Capacitors are capable of discharging high voltage that will
result in death or serious injury. Always turn off the power
switch, unplug the power cord and allow capacitors time to
discharge before servicing.
To check whether the ballast transformer or capacitor has failed:
1. Turn off the power switches, and unplug the power cords
from the wall socket or outlet.
2. Allow capacitors time to discharge.
3. Tip the base up on the wheels so that the mast is on the
ground, and the bottom of the base is vertical.
CAUTION
Tipping the base up without assistance could result in mild to
moderate injury. Assistance is recommended when tipping
the base up.
4. Remove the screws (A, Figure 4) and cover (B) from the
bottom of the base.
5. Check the ballast transformer of each lamp.
1. Connect the power cord to a wall socket or outlet, and
turn on the power switch.
2. Using an AC voltmeter capable of safely measuring up
to 1,000 volts, connect one probe of the voltmeter to
the ground screw (C, Figure 4), and the other probe to
the input side (white wire) of the respective capacitor
(D).
3. The voltmeter should read 550 to 600 volts.
4. Turn off the power switch, and unplug the power cord
from the wall socket or outlet.
5. If the voltage is not in this range, replace the ballast
transformer (E, Figure 4). Contact your authorized
Allmand dealer or the Allmand Service Department for
information on replacing the ballast transformer.
6. Repeat Steps 5-1 through 5-5 for the other ballast
transformer.
6. Check the capacitor of each lamp.
1. Disconnect the lamp fixture cord from the lamp fixture.
2. Connect the power cord to a wall socket or outlet, and
turn on the power switch.
3. Using an AC voltmeter capable of safely measuring up
to 1,000 volts, connect one probe of the voltmeter to
the ground screw, and the other probe to the output
side (black wire) of the respective capacitor (D, Figure
4).
4. The voltmeter should read 360 to 440 volts.
5. Turn off the power switch, and unplug the power cord
from the wall socket or outlet.
6. If the voltage is not in this range, replace the capacitor.
See
Ballast Capacitor Replacement
.
7. Repeat Steps 6-1 through 6-6 for the other capacitor.
7. Complete replacement of failed part(s).
8. Re-install the cover to the bottom of the base, as removed
in Step 4.
9. Tip the mast up on the wheels so that the base is on the
ground.
10. Test the new ballast transformer and / or capacitor to ensure
proper operation.
4
If you have difficulty in performing this procedure, or if the results
of this procedure do not match those described, contact your
Allmand Dealer or the Allmand Service Department.
Lamp Bulb Replacement
WARNING
Burn Hazard.
Handling light fixtures when hot could result in death or serious
injury. Always keep clear of light fixtures when illuminated or
hot.
1. Turn off the light, and unplug the power cord from the wall
socket or outlet.
10

Not for
Reproduction
2. Allow 20 minutes for the lamp fixture and bulb to cool.
3. If the lamp fixture is on the mast in the raised position, lower
the mast.
4. Loosen the lens channel screws (E, Figure 5) to allow
removal of the lens channel (F).
5. Remove the silicone gasket (G, Figure 5) and lens (H).
6. Remove the screws and nuts (A & X, Figure 5) holding the
lamp tip support (B), and remove the lamp tip support.
7. Carefully remove the old bulb (C, Figure 5).
8. Clean the reflector (D, Figure 5) and lens (H).
9. Install the correct replacement bulb. See
Specifications
.
10. Install the lamp tip support and hardware removed in Step
6.
11. Install the silicone gasket on the lens. Replace the gasket
if worn or damaged.
12. Install the lens channel and tighten the lens channel screws.
13. Test the new bulb to ensure proper operation.
5
Ballast Capacitor Replacement
The work light utilizes metal halide bulbs, which require a ballast
transformer and capacitor to operate. See
Specifications
for
the correct ballast transformer and capacitor for your work light.
DANGER
Shock Hazard.
Capacitors are capable of discharging high voltage that will
result in death or serious injury. Always turn off the power
switch, unplug the power cord, and allow capacitors time to
discharge before servicing.
1. Turn off the light, and unplug the power cord from the wall
socket or outlet.
2. Allow capacitor time to discharge.
3. Tip the base up on the wheels so that the mast is on the
ground, and the bottom of the base is vertical.
CAUTION
Tipping the base up without assistance could result in minor
to moderate injury. Assistance is recommended when tipping
the base up.
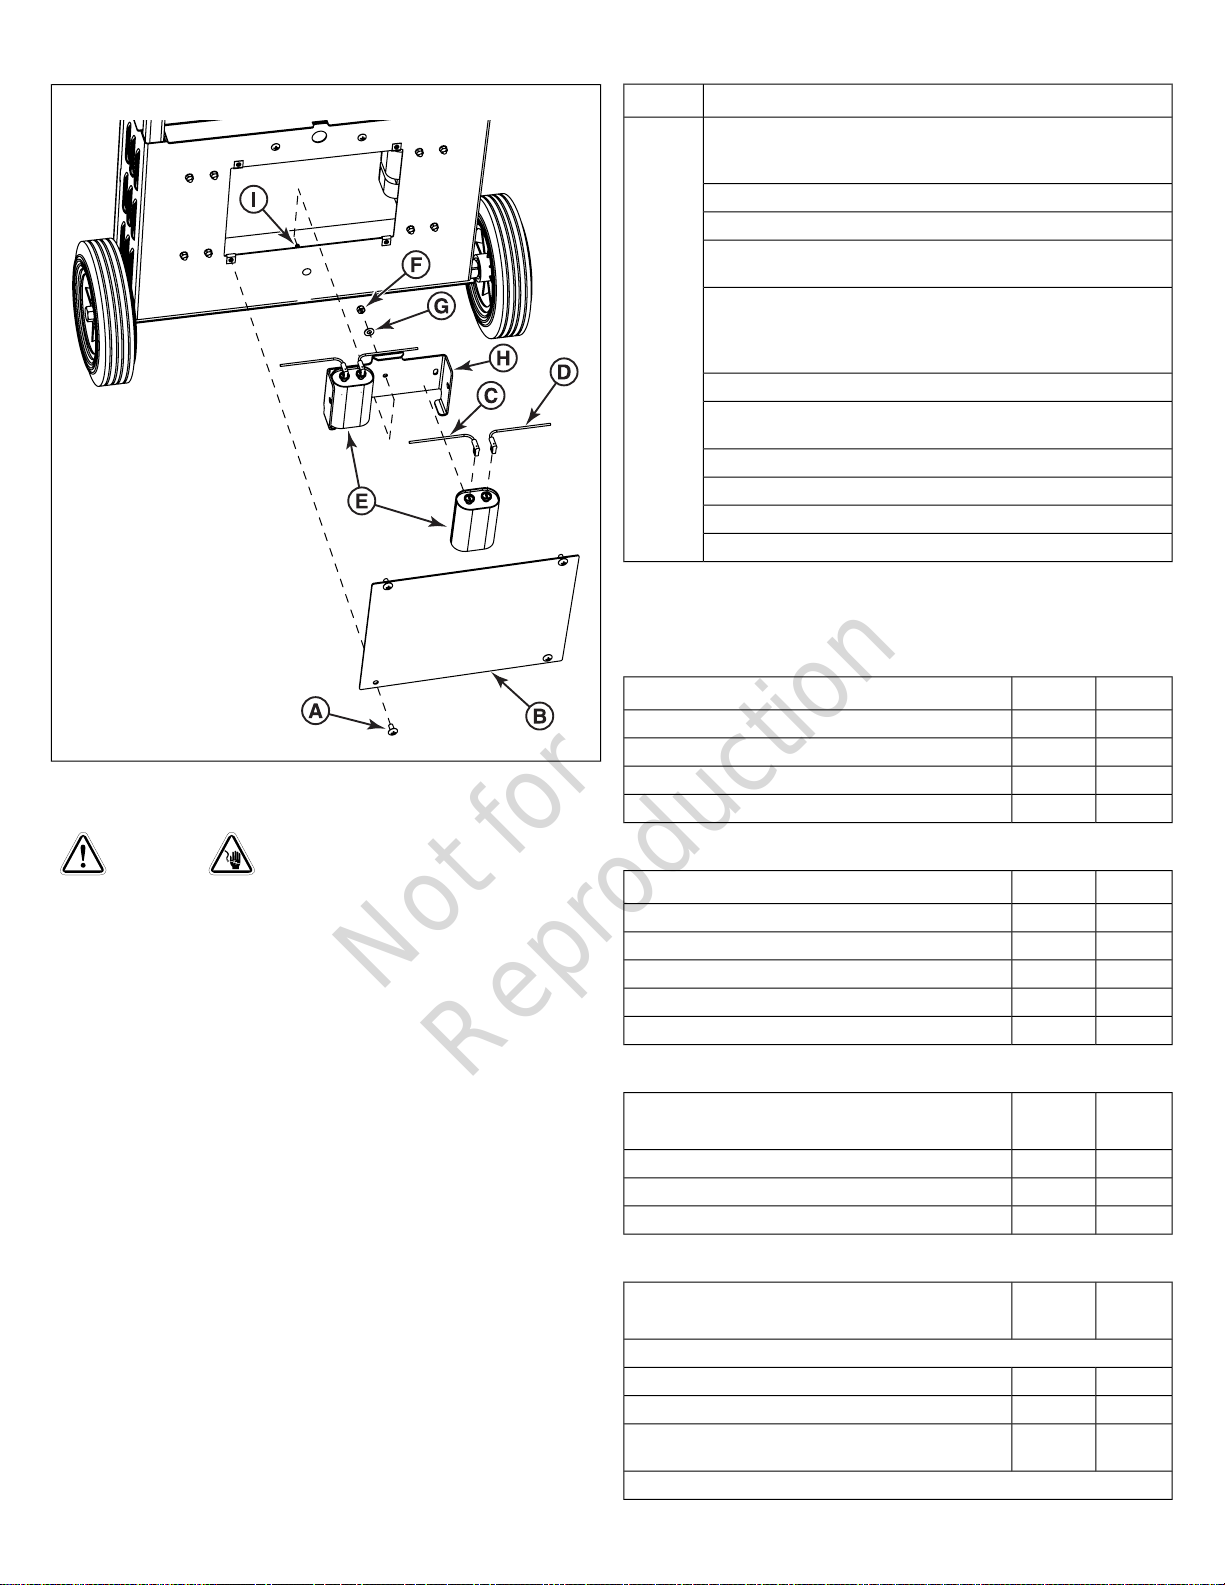
4. Remove the screws (A, Figure 6) and cover (B) from the
bottom of the base.
5. Remove the white wire (D, Figure 6) and black wire (C) from
the capacitor (E).
Note:
Wires may not be routed or connected as shown. Be sure
to route and connect wires as they are on the unit.
6. Remove the nut (F, Figure 6), washer (G), capacitor clamp
(H) and capacitor (E). Properly dispose of the capacitor,
following the national, state or province environmental
regulations.
7. Place the new capacitor in the capacitor clamp, and install
on the carriage bolt (I, Figure 6). Secure with the washer
and nut.
8. Re-connect the white and black wires to the capacitor.
Note:
Wires may not be routed or connected as shown. Be sure
to route and connect wires as they are on the unit.
9. Re-install the cover to the bottom of the base, as removed
in Step 4.
10. Tip the mast up on the wheels so that the base is on the
ground.
11. Test the new capacitor to ensure proper operation.
11
Not for
Reproduction
6
Troubleshooting
DANGER
Shock Hazard.
• Capacitors are capable of discharging high voltage that
will result in death or serious injury. Always turn off the
power switch, unplug the power cord and allow capacitors
time to discharge before servicing.
• Contact with wires that have been made bare by
damaged, cut or worn insulation will result in death or
serious injury. Always replace damaged wiring before
operating the unit.
Possible CauseProblem
1. Bulbs have not been allowed time to cool after last being lit.
Allow 15 minutes between the time the light is shut off and the time
they are restarted.
No light
2. The bulb is burnt out or broken.
3. The bulb is not screwed in securely.
4. The connector at the lamp fixture is not pushed together tightly
and locked.
5. The temperature of the ballast is below -20° F (-29° C), thus the
efficiency of the capacitor is not enough to ignite the bulb. When
operating where the temperature of the ballast falls below -20° F
(-29° C), some means of warming the ballast must be used.
6. Low electrical system voltage.
7. A loose connection in the back of the lamp socket in the lamp
holder.
8. Circuit breaker for the socket or outlet has tripped.
9. Wrong replacement bulb or ballast has been installed.
10. Ballast capacitor or transformer has failed.
11. Corrosion has occurred on the bulb base.
Specifications
Dimensions
CmInDescription
125.449.4Overall Length
113.944.8Overall Width
240.096.0Overall Height (Fully Lowered)
370.0144.0Overall Height (Fully Extended)
Weight
KgLbDescription
103.9229Overall
72.6160Base
13.630Mast
3.27Light Bar
7.316Lamp Fixture (each)
Power Requirement
PAL
2500W4
PAL
2000W4
Description
6050Frequency - Hertz
120220Volts
209Amps
Lamp & Ballast
PAL
2500W4
PAL
2000W4
Description
Lamp (each)
12501000- Watts
BT37BT37- Bulb Shape
Mogul
(E39)
Mogul
(E39)
- Base
Ballast (each)
12

Not for
Reproduction
PAL
2500W4
PAL
2000W4
Description
- Capacitor
525525- - Voltage - AC Volts (Nominal)
2826- - Capacitance - Microfarads (µf)
- Transformer
PAL
2500W4
PAL
2000W4
Description
120 / 220
/ 240
120 / 220 /
240
- - Input Voltage - AC Volts
6050- - Frequency - Hertz
9.3 / 5.0 /
4.5
9.3 / 5.0 /
4.5
- - Line Current - Amps
13
Not for
Reproduction
Wiring Diagrams
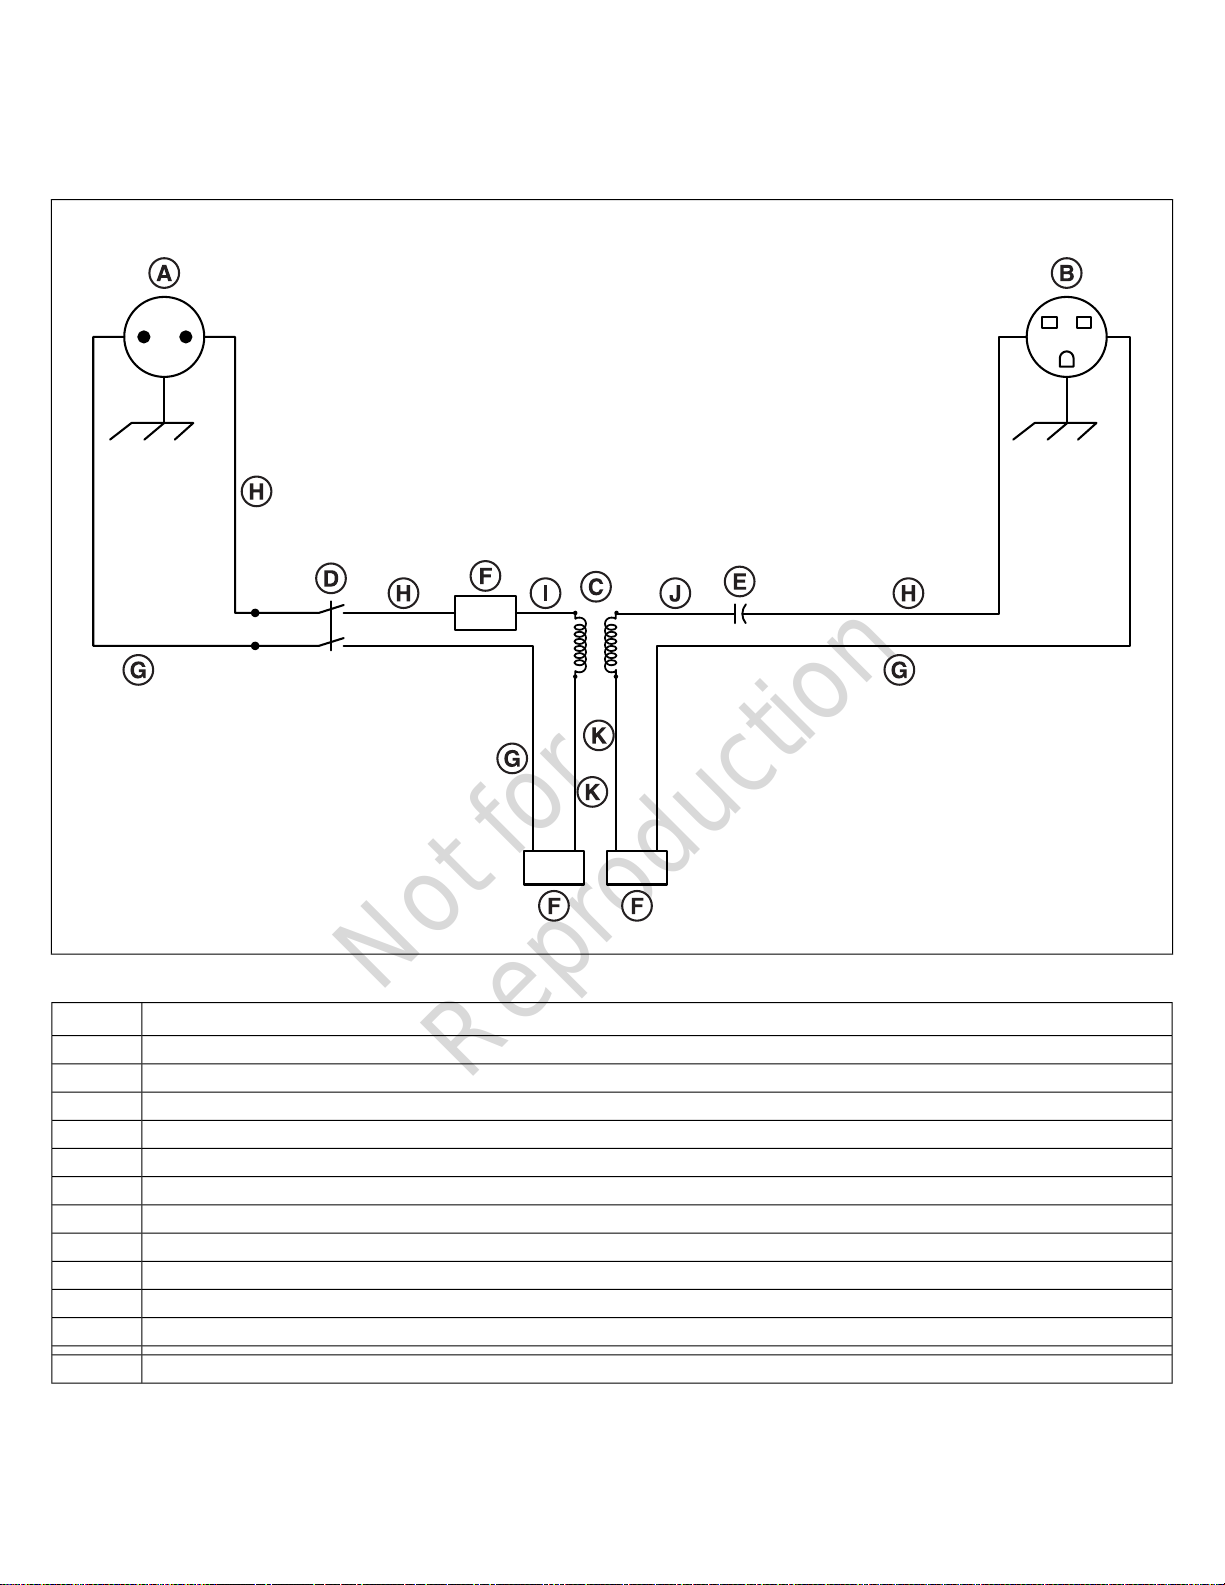
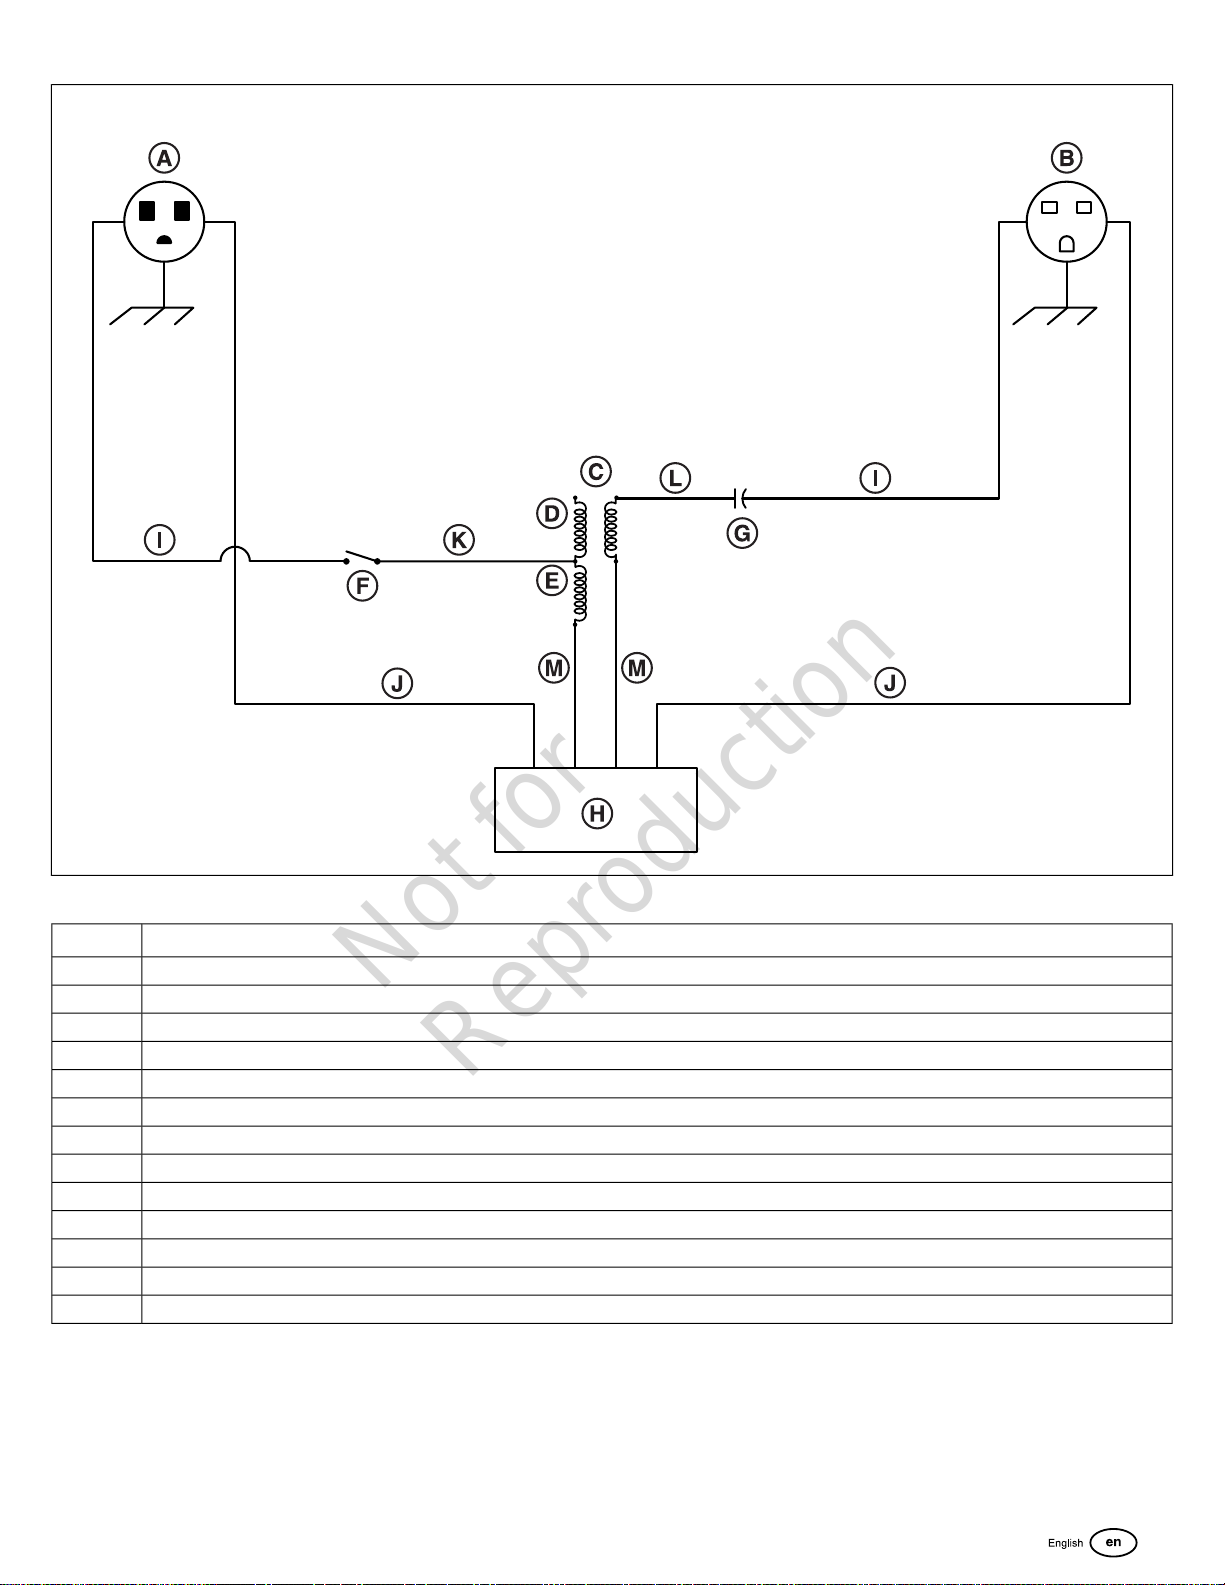
Compare Figures 7 through 9 with the tables following.
Note:
Diagrams represent one lamp.
7
PAL 2000W4 Base (x2)
DescriptionRef
220 Volt Male PlugA
Female Quick ConnectorB
Ballast TransformerC
On / Off SwitchD
CapacitorE
2-Port Lever Lock ConnectorF
White WireG
Black WireH
White Wire Labeled '220' *I
White Wire Labeled 'Cap' ('Capacitor')J
White Wire Labeled 'Com' ('Common')K
* for 220 Volt Tap. 120 Volt Tap and 240 Volt Tap not used.
14
Not for
Reproduction
8
PAL 2500W4 Base (x2)
DescriptionRef
120 Volt Male PlugA
Female Quick ConnectorB
Ballast TransformerC
240 Volt Tap (Not Used)D
120 Volt TapE
On / Off SwitchF
CapacitorG
5-Port Lever Lock ConnectorH
Black WireI
White WireJ
White Wire Labeled '120' (120 Volt Tap)K
White Wire Labeled 'Cap' ('Capacitor')L
White Wire Labeled 'Com' ('Common')M
15

Not for
Reproduction
9
PAL 2000W4 / PAL 2500W4 Lamp (x2)
DescriptionRef
Lamp CableA
White WireB
Black WireC
Green WireD
Female Quick ConnectorE
Male Quick ConnectorF
2-Port Lever Lock ConnectorG
LampH
16

Not for
Reproduction

Not for
Reproduction
Productos cubiertos por este
manual
Los siguientes productos se cubren en este manual:
PAL 2000W4, PAL 2500W4
Índice de contenidos:
Introducción...........................................................................2
Seguridad...............................................................................2
Características y controles..................................................5
Instalación..............................................................................6
Operación...............................................................................7
Mantenimiento.......................................................................9
Solución de problemas.......................................................12
Especificaciones.................................................................13
Diagramas de cableado......................................................14
Introducción
Acerca de este manual
TÓMESE EL TIEMPO DE LEER COMPLETAMENTE ESTE
MANUAL
Este manual de instrucciones proporciona las instrucciones
necesarias para la Allmand PAL 2000W4, PAL 2500W4 Portable
Work Light.
La información que encuentre en este manual está vigente a
partir del momento de la impresión. Allmand Bros. puede
cambiar el contenido sin previo aviso ni incurrir en obligaciones.
Las imágenes en todo este manual son representativas y
pueden ser distintas a su modelo.
Toda referencia “hacia la derecha” o “hacia la izquierda” que
se haga en este manual, deberá determinarse mirando el
remolque desde la parte posterior.
Si no está seguro acerca de la información de este manual,
comuníquese con el Departamento de Mantenimiento de
Allmand al 1-800-562-1373, o bien, comuníquese con nosotros
en el sitio web de Allmand, www.allmand.com.
Conserve estas instrucciones originales para consultas a
futuro.
Seguridad
Definiciones de seguridad
Para su seguridad, la seguridad de los demás y para proteger
el rendimiento del equipo, siga las precauciones que se indican
de en todo el manual antes de la operación, durante la
operación y durante los procedimientos de mantenimiento
periódico.
Indica un posible peligro de lesiones corporales.
PELIGRO
Indica una situación peligrosa que, si no se evita, provocará
lesiones graves o la muerte.
ADVERTENCIA
Indica una situación peligrosa que, si no se evita, podría
provocar lesiones graves o la muerte.
ATENCIÓN
Indica una situación peligrosa que, si no se evita, podría
provocar lesiones leves o moderadas.
AVISO
Indica una situación que puede provocar daños a los equipos,
a la propiedad personal o al ambiente, o que puede provocar
que el equipo funcione indebidamente.
Precauciones de seguridad
La siguiente sección contiene precauciones y pautas generales
de seguridad que se deben obedecer para reducir el riesgo
para la seguridad personal. Las precauciones especiales de
seguridad se indican en procedimientos específicos. Lea y
comprenda todas las precauciones de seguridad antes de
operar o realizar reparaciones o mantenimiento.
2

Not for
Reproduction
PELIGRO
Peligro de electrocución
•Siempre coloque la luz de trabajo portátil en una superficie
seca y alejada de las áreas donde pueda fluir o
acumularse agua.
•No se ponga de pie en una superficie mojada o en el agua
cuando conecte la luz de trabajo portátil a una fuente de
energía, como un enchufe de pared o un tomacorriente
de un generador de energía, o cuando opere el interruptor
de la luz.
• Siempre revise si hay cables aéreos u obstrucciones
elevadas antes de elevar o bajar el mástil.
• Siempre siga las reglas o instrucciones de su lugar de
trabajo y el código eléctrico estatal, provincial o nacional,
para mantener una distancia segura de los cables aéreos.
•Hay alto voltaje cuando la unidad se conecta a un enchufe
de pared o a un tomacorriente de un generador de
energía. Nunca intente realizar mantenimiento a los
componentes eléctricos mientras la luz de trabajo portátil
esté conectada a una fuente de energía.
• No haga funcionar la luz de trabajo portátil si el
aislamiento en el cable de alimentación u otro cableado
eléctrico presenta cortes o desgaste o bien, si hay cables
desnudos expuestos. Repare o reemplace el cableado
dañado antes de conectarlo a una fuente de energía.
ADVERTENCIA
Peligro de operación no segura
• Nunca permita que alguien opere el equipo si no cuenta
con la capacitación adecuada.
• Lea y comprenda este Manual del operador antes de
hacer funcionar o realizar mantenimiento a la luz de
trabajo, para garantizar que se sigan los procedimientos
de mantenimiento y prácticas de operación seguros.
• Las calcomanías y señales de seguridad son
recordatorios adicionales para las técnicas de
mantenimiento y operación seguras.
ADVERTENCIA
Peligro de modificación
• Nunca modifique el equipo sin el consentimiento por
escrito del fabricante. Cualquier modificación puede
afectar la operación segura de equipo.
ADVERTENCIA
Peligro de vuelco
• No eleve, baje ni use la luz de trabajo a menos que esté
colocada sobre un suelo firme.
• Nunca mueva ni cambie la posición de la luz de trabajo
mientras el mástil esté completamente extendido.
ADVERTENCIA
Peligro de quemaduras
• Las luminarias se calientan mucho durante la operación
y seguirán calientes poco después de apagarlas.
•Manipule los componentes calientes, como las luminarias,
con guantes resistentes al calor.
AVISO
• Se DEBE reemplazar toda pieza que se compruebe que
está defectuosa a raíz de una inspección, o cualquier
pieza cuyo valor medido no satisfaga la norma o el límite.
• Siempre apriete los componentes con la torsión
especificada. Las piezas sueltas pueden provocar daños
en los equipos o causar que funcionen de manera
incorrecta.
• Se recomienda el uso de repuestos autorizados de
Allmand. La garantía no cubre daños ni problemas de
rendimiento provocados por el uso de piezas que no sean
los repuestos autorizados.
• Limpie toda la suciedad y los residuos acumulados del
cuerpo del equipo y sus componentes antes de
inspeccionarlo o de realizar procedimientos de
mantenimiento preventivo o reparaciones. Operar los
equipos con suciedad o residuos acumulados provocará
el desgaste prematuro de los componentes del equipo.
• Saque todas las herramientas o piezas que pueda haber
dejado caer en el interior del equipo para evitar un
funcionamiento indebido del mismo.
Calcomanías de seguridad
Antes de operar su unidad, lea y comprenda las siguientes
calcomanías de seguridad. Los avisos de atención, las
precauciones, las advertencias y las instrucciones son para su
seguridad. Para evitar lesiones corporales o daños a la unidad,
comprenda y obedezca todas las calcomanías.
Evite que las calcomanías se ensucien o se rompan, y
reemplácelas si se pierden o se dañan. Además, si necesita
cambiar las piezas que tienen una calcomanía, asegúrese de
pedir la pieza nueva y la calcomanía al mismo tiempo.
Compare la Figura 1 con las siguientes tablas.
3

Not for
Reproduction
1
Modelos domésticos
PELIGRO
Peligro de electrocución.
Ingresar al compartimiento
eléctrico mientras el equipo está
en funcionamiento provocará
lesiones graves o la muerte.
Siempre apague el equipo antes
de ingresar al compartimiento
eléctrico.
N.º de pieza 107251
A
ADVERTENCIA
Peligro de quemaduras.
Manipular las luminarias cuando
estén calientes podría provocar
lesiones graves o la muerte.
Siempre manténgase alejado de
las luminarias cuando estén
encendidas o calientes.
Peligro de operación no
segura.
Mirar las luminarias encendidas
podría provocar lesiones graves.
Nunca mire directamente las
luminarias encendidas.
N.º de pieza 108014
B
ATENCIÓN
La nieve y el hielo pueden
provocar una condición de
pérdida de control en el
cabrestante que podría provocar
lesiones leves a moderadas.
Siempre revise para asegurarse
de que el trinquete se enganche
en el engranaje y aplique silicona
en el cabrestante según sea
necesario.
N.º de pieza 106941
C
Instrucciones de operación
N.º de pieza 108810
D
Modelos internacionales
PELIGRO
Peligro de electrocución.
Ingresar al compartimiento
eléctrico mientras el equipo está
en funcionamiento provocará
lesiones graves o la muerte.
Siempre apague el equipo antes
de ingresar al compartimiento
eléctrico.
N.º de pieza 104480
A
ADVERTENCIA
Peligro de operación no
segura.
Mirar las luminarias encendidas
podría provocar lesiones graves.
Nunca mire directamente las
luminarias encendidas.
Peligro de quemaduras.
Manipular las luminarias cuando
estén calientes podría provocar
lesiones graves o la muerte.
Siempre manténgase alejado de
las luminarias cuando estén
encendidas o calientes.
N.º de pieza 108011
B
4
This manual suits for next models
1
Table of contents
Languages:
Other Allmand Heater manuals


