Allterco Robotics Shelly Bulb User manual

Power supply :
110-230V ±10%
50/60Hz AC
Socket:
E27
Power Rating:
•RGB: 6W
•Warm White: 9W
Brightness:
•Red: 220-244 LM
•Green: 200-220 LM
•Blue: 200-220 LM
•Warm White: 750-800
LM
Color Temperature:
3000K-6500K
Beam Angle:
270°
Working temperature:
From -25°C to 55°C
2
Specification
Complies with EU standards:
•RE Directive 2014/53/EU
•LVD 2014/35/EU
•EMC 2004/108/WE
•RoHS2 2011/65/UE
Radio signal power:
1mW
Radio protocol:
WiFi 802.11 b/g/n
Frequency :
2400 –2500 MHz;
Operational range (depending on
local construction):
•up to 15 m outdoors
•up to 8 m indoors
Dimensions:
117 x 67 x 42 mm.
Electrical consumption:
< 1 W
SAR:
1.10 W/Kg
USER GUIDE
Smart WiFi RGB+W
Light Shelly®
The Shelly ® Smart WiFi RGB+W Light by Allterco Robotics is intended to
be installed into a standar d light socket (E27) in o rder to control the color
and to dim the light.Shelly may work as a standalone dev ice or as an
accessory to She® or another home automation controller.
Technical Information
•Control through WiFi f rom a mobile phone, tablet, PC, automation
sy stem or any other dev ice supporting HTTP and/or UDP protocol.
•Microprocessor management.
•Controlled elements: multiple white and colour (RGB) LED diods.
•Shelly may be controlled by an external switch.
CAUTION! Danger of electrocution. Plugging the dev ice to the
power grid
has to be perf ormed with
caution.
CAUTION! Do not allow children to play with the dev ice. Keep the
dev ices f or remote control of Shelly (mobile phones, tablets, PCs)
away f rom
children.
CAUTION! Please handle with care! The
Shelly
3
®Smart Light is
FRAGILE
Introduction to Shelly®
Shelly ® is a f amily of innov ativ e dev ices, which allow remote control of
electric applianc es throu gh mobile p hone, PC or home automation
sy stem. Shelly ® uses WiFi to connect to the dev ices controlling it. They
can be in the same WiFi network or they can use remote access
(through the intern et). Shelly ® may work standalone, without bei ng
managed by a hom e autom ation contr oller, in the local W iFi net work, as
well as through a cloud serv ice, f rom ev ery where the User has Internet
access.
Shelly ® has an integrated web serv er, through which the User may adjust,
control and m onitor the Dev ice. Shelly ® has two WiFi modes - Access
Point (AP) an d Client Mode (C M). To ope rate in Client Mode, a WiFi
router must be loc ated within the range of the dev ice. Shelly ® dev ices
can communicate di rectly with other WiFi dev ices through HTTP
protocol.
An API can be prov ided by the Manuf acturer. Shelly ® dev ices may be
av ailable f or monitor and c ontrol ev en if the User is outside the r ang e of
the local WiFi net work, as long as the WiFi router is connected to th e
Internet. The Shelly Cloud f unction could be used, which is activ ated
through the web serv er of the Dev ice or through the settings in the
Shelly Cloud mobile application.
The User can register and access the Shelly Cloud, using either Android
or iOS mobile applications, or any internet browser and the web site:
https://my.shelly.cloud/.
Installation
Instructions
CAUTION! Danger of electrocution. Bef ore installing the Dev ice
into the light socket please check if it has been powered of f .
CAUTION! Bef ore beginning the installation please read the
accompany ing documentation caref ully and completely . Failure to
f ollow recommended
procedures could lead to malf unction, danger to y our lif e or v iolation of
the law.
Allterco Robotics is not responsible f or any loss or damage in case of
incorrect
installation or operation of this
dev ice.
CAUTION! Use the Dev ice only with power grid which comply with
all applicable regulations. Short circuit in the power grid
connected to the
Dev ic
e
may damage the
Dev ice.
RECOMMENDATION: The Dev ice may be connected to and may
control electric circuits and light sockets only if they comply with
the respectiv e
4
standa
r
ds and saf ety
norms.
Initial Inclusion
Install the Shelly to the light socket. Press the switch/button to which
Shelly is connected. The Shelly should turn on. Press the switch/button
again and Shelly will turn of f .
You may choose if y ou want to use Shelly with the Shelly Cloud mobile
application and Sh elly Cloud serv ice. Y ou can also f amiliarize y ourself
with the instructions f or Management a nd Control thr oug h the embedded
Web interf ace.
Factory Reset
You can return y our Shelly Bulb to its Factory Settings by pressing 5
consecutiv e times the button/switch f or control.
Upon successf ul f actory reset Shelly will turn Blue.
Control your home with your voice
All Shelly dev ices are compatible with Amazon Echo and
Google Home. Please see our step-by -step guide on:
https://shelly.cloud/compatibility/Ale
xa
https://shelly.cloud/compatibility/Ass
istant

MOBILE
APPLICATION
FOR SHELLY®
Allterco Robotics
EOOD Sof ia, Bulgaria ©
March, 2017
5
The Shelly
Cloud mobile
application
Shelly Cloud giv es y ou the
opport unity to control and adjust
all Shelly ® dev ices f rom any where
in the world.
All y ou need is an Internet
connection and our m obile
application, installed on y our
smartphone or tablet.
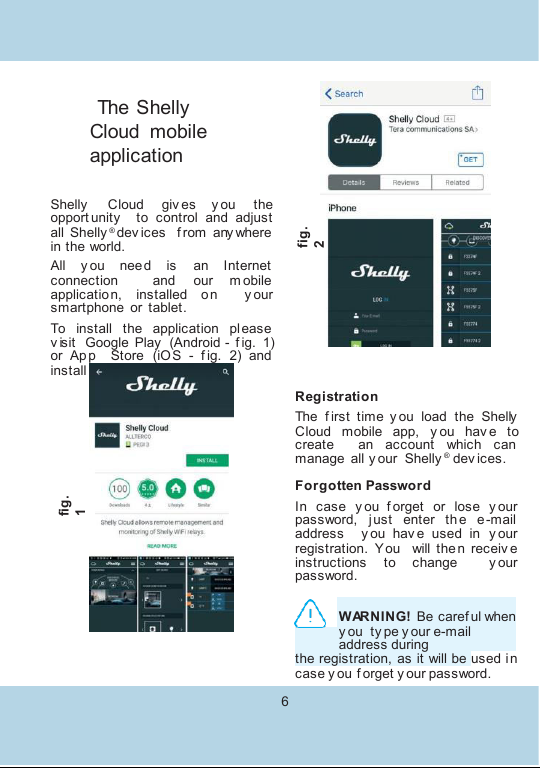
To install the application please
v isit Google Play (Android - f ig. 1)
or App Store (iOS - f ig. 2) and
install the Shelly Cloud app.
Registration
The f irst time y ou load the Shelly
Cloud mobile app, y ou hav e to
create an account which can
manage all y our Shelly ® dev ices.
Forgotten Password
In case y ou f orget or lose y our
password, just enter th e e -mail
address y ou hav e used in y our
registration. Y ou will then receiv e
instructions to change y our
password.
WARNING! Be caref ul when
y ou ty pe y our e-mail
address during
the registration, as it will be used in
case y ou f orget y our password.
6
fig.
2
fig.
1
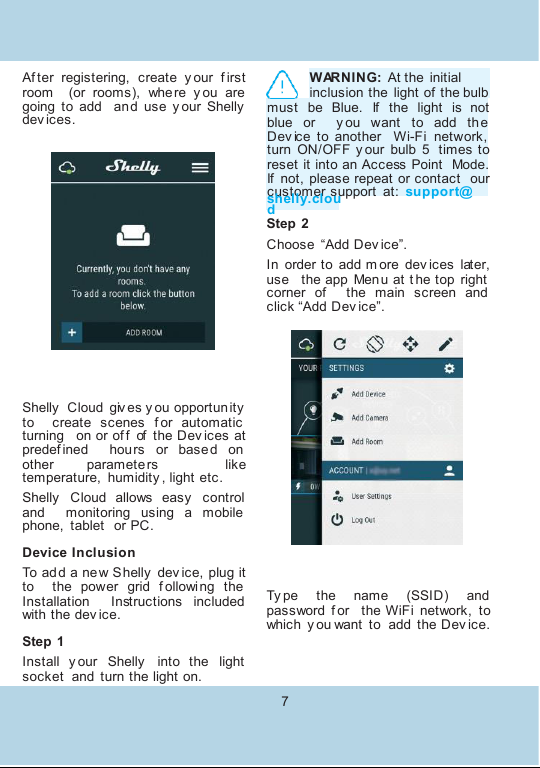
Af ter registering, create y our f irst
room (or rooms), where y ou are
going to add and use y our Shelly
dev ices.
Shelly Cloud giv es y ou opportun ity
to create scenes f or automatic
turning on or of f of the Dev ices at
predef ined hours or base d on
other parameters like
temperature, humidity , light etc.
Shelly Cloud allows easy control
and monitoring using a mobile
phone, tablet or PC.
Device Inclusion
To add a new Shelly dev ice, plug it
to the power grid f ollowing the
Installation Instructions included
with the dev ice.
Step 1
Install y our Shelly into the light
socket and turn the light on.
WARNING: At the initial
inclusion the light of the bulb
must be Blue. If the light is not
blue or y ou want to add the
Dev ice to another Wi-Fi network,
turn ON/OFF y our bulb 5 times to
reset it into an Access Point Mode.
If not, please repeat or contact our
customer support at: support@
shelly.clou
d
Step 2
Choose “Add Dev ice”.
In order to add m ore dev ices later,
use the app Menu at t he top right
corner of the main screen and
click “Add Dev ice”.
Ty pe the name (SSID) and
password f or the WiFi network, to
which y ou want to add the Dev ice.
7
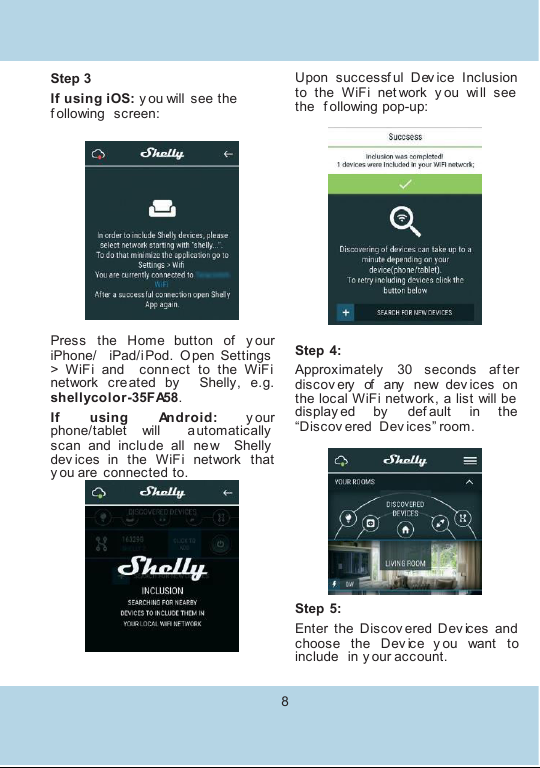
Step 3
If using iOS: y ou will see the
f ollowing screen:
Press the Home button of y our
iPhone/ iPad/iPod. O pen Settings
> WiFi and conn ect to the WiFi
network created by Shelly, e.g.
shellycolor-35FA58.
If using Android: y our
phone/tablet will automatically
scan and include all new Shelly
dev ices in the WiFi network that
y ou are connected to.
Upon successf ul Dev ice Inclusion
to the WiFi net work y ou will see
the f ollowing pop-up:
Step 4:
Approximately 30 seconds af ter
discov ery of any new dev ices оn
the local WiFi network, аlist will be
display ed by def ault in the
“Discov ered Dev ices” room.
Step 5:
Enter the Discov ered Dev ices and
choose the Dev ice y ou want to
include in y our account.
8

Step 6:
Enter a name f or the Dev ice (in
the Dev ice Name f ield). Choose a
Room, in which the dev ice has to
be positioned. You can choose an
icon or add a picture to make it
easier to recognize. Press “Sav e
Dev ice”.
Step 7:
To enable connectio n to the Shelly
Cloud serv ice f or remote control
and monitoring of the Dev ice,
press “y es” on the f ollowing pop-
up.
9
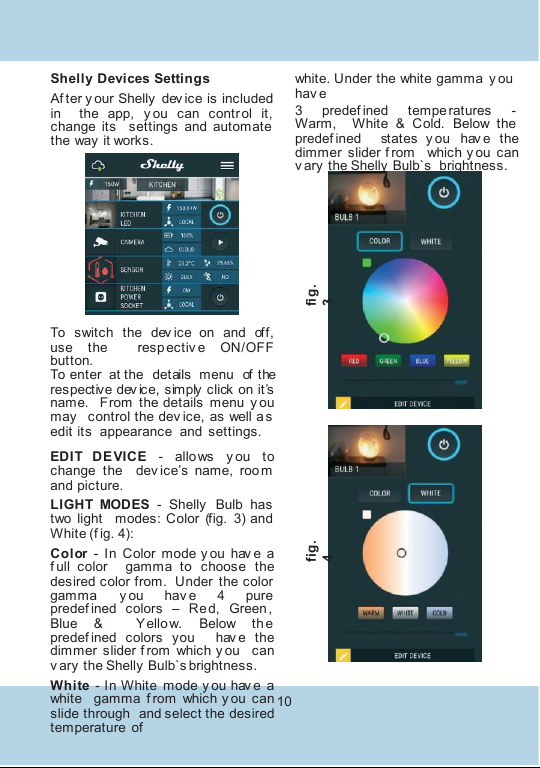
Shelly Devices Settings
Af ter y our Shelly dev ice is included
in the app, y ou can contr ol it,
change its settings and automate
the way it works.
To switch the dev ice on and off,
use the respectiv e ON/OFF
button.
To enter at the details menu of the
respective dev ice, simply click on it’s
name. From the details menu y ou
may control the dev ice, as well as
edit its appearance and settings.
EDIT DEVICE - allo ws y ou to
change the dev ice’s name, roo m
and picture.
LIGHT MODES - Shelly Bulb has
two light modes: Color (fig. 3) and
White (f ig. 4):
Color - In Color mode y ou hav e a
f ull color gamma to choose the
desired color from. Under the color
gamma y ou hav e 4 pure
predef ined colors –Re d, Green ,
Blue & Yellow. Below th e
predef ined colors you hav e the
dimmer slider f rom which y ou can
v ary the Shelly Bulb`s brightness.
White - In White mode y ou hav e a
white gamma f rom which y ou can
slide through and select the desired
temperature of
white. Under the white gamma y ou
hav e
3 predef ined tempe ratures -
Warm, White & Cold. Below the
predef ined states y ou hav e the
dimmer slider f rom which y ou can
v ary the Shelly Bulb`s brightness.
fig.
3
10
fig.
4
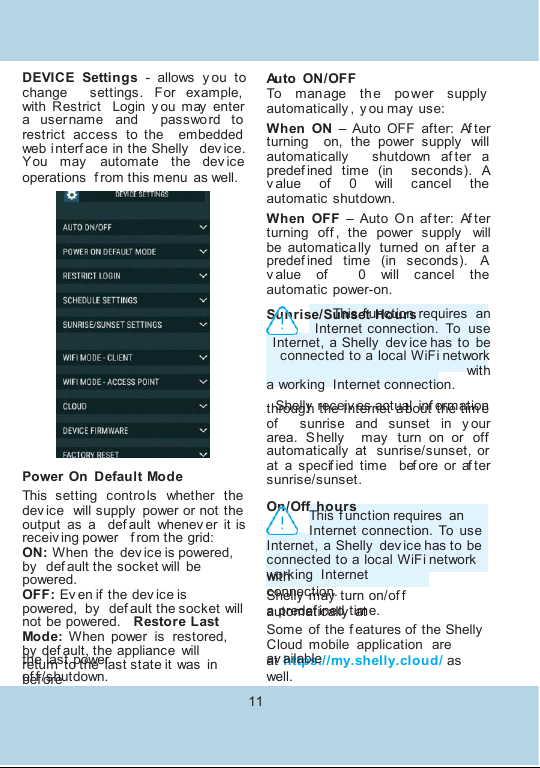
DEVICE Settings - allows y ou to
change settings. For example,
with Restrict Login y ou may enter
a username and password to
restrict access to the embedded
web interf ace in the Shelly dev ice.
You may automate the dev ice
operations f rom this menu as well.
Power On Default Mode
This setting contro ls whether the
dev ice will supply power or not the
output as a def ault whenev er it is
receiv ing power f rom the grid:
ON: When the dev ice is powered,
by def ault the socket will be
powered.
OFF: Ev en if the dev ice is
powered, by def ault the socket will
not be powered. Restore Last
Mode: When power is restored,
by def ault, the appliance will
return to the last state it was in
bef ore
Auto ON/OFF
To manage the po wer supply
automatically , y ou may use:
When ON –Auto OFF after: Af ter
turning on, the power supply will
automatically shutdown af ter a
predef ined time (in seconds). A
v alue of 0 will cancel the
automatic shutdown.
When OFF –Auto On af ter: Af ter
turning off , the power supply will
be automatica lly turned on af ter a
predef ined time (in seconds). A
v alue of 0 will cancel the
automatic power-on.
Sunrise/Sunset Hours
This f unction requires an
Internet connection. To use
Internet, a Shelly dev ice has to be
connected to a local WiFi network
with
а working Internet connection.
Shelly receiv es actual inf ormation
through the Internet about the tim e
of sunrise and sunset in y our
area. Shelly may turn on or off
automatically at sunrise/sunset, or
at a specif ied time bef ore or af ter
sunrise/sunset.
On/Off hours
This f unction requires an
the last power
of f /shutdown.
at https://my.shelly.cloud/ as
well.
11
Internet connection. To use
Internet, a Shelly dev ice has to be
connected to a local WiFi network
with
working Internet
connection.
Shelly may turn on/of f
automatically at
a predef ined time.
Some of the f eatures of the Shelly
Cloud mobile application are
av ailable


The Embedded Web Interface
Ev en without the mobile app the Shelly dev ice can be set and controlled
through a browser and WiFi connection of a mobile phone, tablet or PC.
ABBREVIATIONS USED:
Shelly-ID –the unique name of the dev ice. It consists of 6 or more
characters. It may include numbers and letters, f or example 35FA58.
SSID –the name of the WiFi network, created by the dev ice, f or
example
shellycolor-35FA58.
Access Point (AP) –the mode in which the dev ice creates its own WiFi
connection point with the respectiv e name (SSID).
Client Mode (CM) –the mode in which the dev ice is connected to
another WiFi network.
Installation/Initial
inclusion Step 1
Install Shelly Bulb into the light socket and turn the light on.
WARNING:
At the initial inclusion the light of the bulb must be
Blue.
If the
light
is not blue or y ou want to add the Dev ice to another Wi-Fi
network,
turn
ON/OFF
y our bulb 5 times to reset it into an Access Point (AP)
Mode.
If not,
please repeat
or contact our customer support at:
support@shelly.cloud
Step 2
When the light turns on, Shelly has created an o wn WiFi net work ( own
AP), with name (SSID) such as shellycolor-35FA58. Connect to it with
y our phone, tablet or PC.
Step 3
Ty pe 192.168.33.1 into the address f ield of y our browser to load the web
interf ace of the Shelly dev ice.
General - Home Page
This is the home page of the embedded web interf ace. If it has been set
up is correctly , y ou will see inf ormation about:
•Current electrical consumption
•Settings menu button
•Current state (on/of f )
•Present time
13
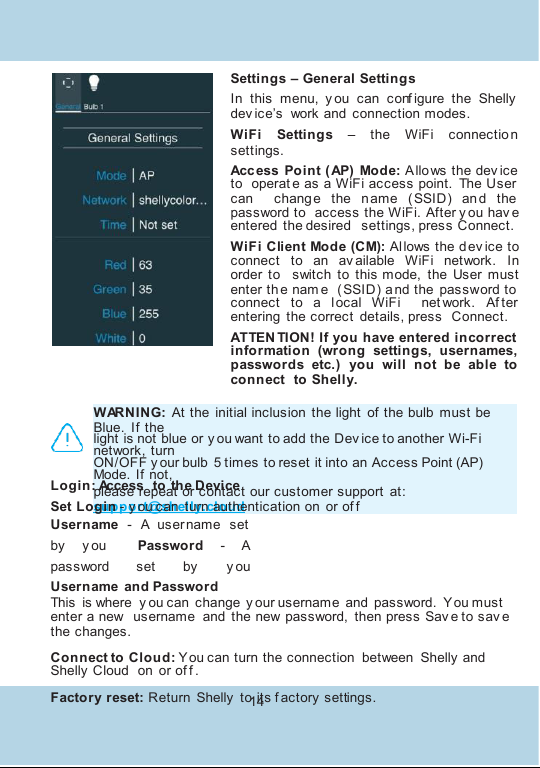
Settings –General Settings
In this menu, y ou can conf igure the Shelly
dev ice’s work and connection modes.
WiFi Settings –the WiFi connectio n
settings.
Access Point (AP) Mode: A llows the dev ice
to operat e as a WiFi access point. The User
can change the n ame ( SSID) an d the
password to access the WiFi. After y ou hav e
entered the desired settings, press Connect.
WiFi Client Mode (CM): Al lows the dev ice to
connect to an av ailable WiFi network. In
order to switch to this mode, the User must
enter the nam e ( SSID) a nd the password to
connect to a l ocal WiFi net work. Af ter
entering the correct details, press Connect.
ATTEN TION! If you have entered incorrect
information (wrong settings, usernames,
passwords etc.) you will not be able to
connect to Shelly.
WARNING:
At the initial inclusion the light of the bulb must be
Blue.
If the
light
is not blue or y ou want to add the Dev ice to another Wi-Fi
network,
turn
ON/OFF
y our bulb 5 times to reset it into an Access Point (AP)
Mode.
If not,
please repeat
or contact our customer support at:
support@shelly.cloud
Login: Access to the Device
Set Login - y ou can turn authentication on or of f
Username - A user name set
by y ou Password - A
password set by y ou
Username and Password
This is where y ou can change y our username and password. Y ou must
enter a new username and the new password, then press Sav e to sav e
the changes.
Connect to Cloud: You can turn the connection between Shelly and
Shelly Cloud on or of f .
Factory reset: Return Shelly to its f actory settings.
14

Firmware Upgrade: Shows present f irmware
v ersion. If a newer v ersion is av ailable,
off icially announced and published by the
Manuf acturer, y ou can update y our Shelly
dev ice. Click Choose File y ou to choose the
prev iously downloade d f irmware update f ile.
Then click the Upl oad File to install it to y our
Shelly dev ice.
Device Reboot: Reboots the dev ice.
Managing the Shelly
Device Bulb Screen
In this screen y ou can control, monitor and
change the settings f or turning the light on
and of f .
You can also see the current status (on/of f )
of Shelly , Buttons Settings, ON and OFF.
To control Shelly press Bulb 1:
To turn Shelly on press “Turn
ON”. To turn Shelly off press
“Turn OFF”
Press the icon > to go to the prev ious menu.
Shelly Power Management Settings
Each Shelly dev ice can be conf igured indiv idually . This lets y ou
personalize each Shelly dev ice in a unique manner, or consistently , as
y ou choose.
Power On Default State
This setting controls whether the dev ice will supply power or not the
output as a def ault whenev er it is receiv ing power f rom the grid:
ON: When the dev ice is powered, by def ault the socket will be powered.
OFF: Ev en if the dev ice is powered, by def ault the socket will not be
powered.
Restore Last State: When power is restored, by def ault, the appliance
will return to the last state it was in bef ore the last power of f /shutdown.
15
Auto ON/OFF
Automatic powering/shutdown of the bulb:
Au to OFF aft er: Af ter turning on, the power supply will be automatically
shut down af ter a predef ined time (in seconds). A v alue of 0 will cancel
the automatic shutdown.
Auto ON after: Af ter turning of f , the power supply will be automatically
turned on af ter a predef ined time (in seconds). A v alue of 0 will cancel
the automatic start.
Sunrise/Sunset hours
This f unction requires an Internet connection. To use Internet, a
Shelly dev ice has to be connected to a local WiFi network with а
working Internet
conne
c
tion
.
Shelly receiv es actual inf ormation through the Internet about the time of
sunrise and sunset in y our area. Shelly may turn on or off automatically
at sunrise/sunset, or at a specif ied time bef ore or af ter sunrise/sunset.
On/Off hours
This f unction requires an Internet connection. To use Internet, a
Shelly dev ice has to be connected to a local WiFi network with
working Internet
16
conne
c
tion
.
Shelly may turn on/of f automatically at a predef ined time.
Additional Features
Shelly allows control v ia HTTP f rom any other dev ice, home automation
controller, mobile app or serv er.
For more inf ormation about the REST control protocol, please v isit:
www.shelly.cloud or send a request to developers@shelly.cloud.

Warranty Terms
1.The Dev ice’s warranty term is 24 (t wenty f our) months, beginning since
the date of purchase by the End User. The Manuf acturer does is not
responsible f or extra warranty terms by the Еnd Seller.
2. The Warranty is v alid f or the territory of EU.
The warranty is applicable in compli ance with all relev ant laws and users’
rights protections. The purchaser of the Dev ice is entitled to exercise
his/her rights in accordance with all applicable laws and regulations.
3.Warranty terms are prov ided by Allterco Robotics EOOD (ref erred
hereinaf ter as the Manuf acturer), incorp orated un der the Bulgarian law,
with address of registration 109 Bulgari a Blv d, f loor 8, Triaditsa Region,
Sof ia 1404, Bulg aria, r egistered with the Commercial Register k ept by
the Bulgarian Ministry of Justice’s Registry Agency under Unif ied Identity
Code (UIC) 202320104.
4.Claims regarding the Conf ormity of the Dev ice with the terms of the
contract of sale shall be addressed to the Seller, in accordance with its
terms of sale.
5. Damages such as death or body injury, deterioration or damages to
objects diff erent f rom the def ectiv e product, caused by a def ectiv e
product, are to be claimed against the Manuf acturer using th e contact
data of the Manuf acturer’s company .
6.The User may contact the Manuf acturer v ia e-mail at
support@shelly.cloud f or operatio nal pro blems that may be resolv ed
remotely . It is recommended that the User contact the Manuf acturer
bef ore sending the dev ice f or serv icing.
7.The terms of remov ing def ects depends on the commercial terms of
the Seller.The Manuf acturer is not responsible f or untimely serv icing of
the Dev ice or f or f aulty repairs carried out by unauthorized serv ice.
8. When exercising thei r rights under this warranty , the User must prov ide
the dev ice with the f ollowing documents: receipt and v alid warranty card
with date of purchase.
9.Af ter a warranty repair has been carr ied o ut, the warranty period is
extended only f or that period.
10. The warranty does NOT cov er any damages to the dev ice which
occur in the
17
f ollowing circumstances:
•When t he Dev ice has been used or wired inappro priately , including
inappro priate f uses, ov erpassing maximal v alues of load and cur rent,
electric shock, short circuit or other problems in the power supply , the
power grid or the radio network.
•When there is a non -compliance bet wee n warranty card and/or without a
purchase receipt, or attem pted f orgery of these documents, includin g
(but not limited to) the warranty card or the documents prov ing the
purchase.
•When there has been a self -repair attempt, (de)installation,
modif ication, or adaptation of the Dev ice by unauthorized persons.
•Intentional or negligent im pro per handling, stori ng or transport ation of
the dev ice, or in the ev ent of non-observ ance of the instructions
included in this warranty .
•When a non-standard power supply , network, or f aulty dev ices hav e
been used.
•When dama ges occur which wer e cause d regardless of the
Manuf acturer, including but not limited to: f loods, storms, f ire, lightning,
natural disasters, earthqu akes, war, civ il wars, other f orce majeure,
unf oreseen accidents, robb ery , water d amage, any damages ma de by
ingress of liquids, weat her co nditions, solar heating, a ny damages
made by intrusion of sand, humidity , high or low temperatu re, or air
pollution.
•When there are other reasons bey ond manuf acturing def ect, including
but not limited to: water d amag e, ingress of liquid into the d ev ice,
weather conditions, solar ov erheating, intrusion of sand, humidity, low
or high temperature, air pollution.[u1]
•When there hav e been mechanic al damages (f orced openin g,
breaking, cracks, scratches or def ormations) caused by a hit, f all, or
f rom another object, wrong use, or caus ed by not f ollowing the
instructions f or use.
•When dama ge h as bee n cause d by exposing th e dev ice to sev ere
outdoor conditions such as: hig h humi dity , dust, too low or too high
temperature. Terms of prop er storage are specif ied in the User
Manual.
•When d amage has been caused by lack of maintenance by the User,
as specif ied in the User Manual.
•When damage has been caused by f aulty accessories, or those not
recommended by the Manuf acturer.
•When damage has been caus ed by the use of non- origin al spare parts
or accessories not suitable f or the specif ied Dev ice model, or af ter
18
•When dam age has been caused by the use of f aulty dev ices and/or
accessories.
•When damage has b een caused by f aulty sof tware, a computer v irus
or other harmf ul behav iour on the Inte rnet, or by lack of sof tware
updates or inco rrect updates by a method not prov ided by either the
Manuf acturer or by the Manuf acturer’s sof tware.
11. The range of warranty repairs does not include perio dical maintenance
and inspections, particularly cleaning, adjustme nts, checks, bug f ixes or
program parameters an d other activ ities that must be perf ormed by the
User (Buy er). The warra nty does not cov er wear of the Dev ice, because
such elements hav e a limited lif espan.
12. The Manuf acturer is not respo nsible f or any prope rty damage caused
by a def ect in the Dev ice. The Manuf acturer is not liable f or indirect
damages (inclu ding but not limited to loss of prof its, sav ings, lost prof its,
claims by third parties) in connection with any def ect of the Dev ice, nor
f or any property damage or personal injury arising out of or related to
the use of the Dev ice.
13. The Manuf acturer is not responsible f or damage caused by
circumstances indepe ndent of the Manuf acturer, including but not limited
to: f loods, storms, f ire, lightning, natural disasters, earthqu akes, war, civ il
unrest and other f orce majeure, unf oreseen accidents, or thef t.
Environmental Protection
This marking on the dev ice, accessories, or documentation
indicates that the dev ice and its electronic accessories (charger,
USB cable) must be disposed only in specially designated
locations.
This markin g on the battery , the instruction manual, the saf ety
instructions, the warranty card or the packaging indicates that the
battery in the dev ice must be disposed only in specially
designated locations.
Please f ollow the i nstructions f or env ironmental protection and proper
disposal of the Dev ice, its accessories, and its packaging f or the
recy cling of the materials f or their f urther usage and to keep the
env ironment clean!
19

Warranty Card
Shelly® Smart WiFi RGB+W Light
........................................................... ...........................................................
Serial number:
........................................................... ...........................................................
Date of purchase:
........................................................... ...........................................................
Signature of Merchant (Seller):
Please save this part of the Warranty card. For carrying out the rights
under the current warranty, you need to provide an original invoice
and/or receipt, proving your purchase was valid.
Manufacturer: Allterco Robotics EOOD
Address: Sofia, 1404, 109 Bulgaria Blvd., fl. 8
Tel.: +359 2 988 7435
E-mail: support@shelly.cloud
http://www.shelly.cloud
The Declaration of Conf ormity is av ailable at:
https://Shelly.cloud/declaration-of-conformity/
Changes in the contact data are published by the Manuf acturer at the
of f icial website of the Dev ice: http://www.shelly.cloud
The User is obliged to stay inf ormed f or any amendments of these
warranty terms bef ore exercising his/her rights against the Manuf acturer.
All rights to trademarks She® and Shelly ®, and other intellectual rights
associated with this dev ice belong to Allterco Robotics EOOD.
IP20
2017/12/v0
2
Table of contents
Popular Lighting Equipment manuals by other brands


Pfannenberg
Pfannenberg PY L-S-TL operating instructions

Light Sky
Light Sky E180B user manual

Lights.com
Lights.com LC003669 installation instructions

enviroswim
enviroswim ES-3 installation guide

CREE LIGHTING
CREE LIGHTING ZR Series installation instructions

Fly Dragon
Fly Dragon LIGHT SKY TX0610 user manual

TONIN CASA
TONIN CASA Dali 9116 A Assembly instructions

Akurat lighting
Akurat lighting mix3a manual

Exo Terra
Exo Terra SOLAR GLO installation instructions

Good Earth Lighting
Good Earth Lighting RE1254-WHG-06LF1-G quick start guide

Chauvet
Chauvet Legend 230SR Beam Quick reference guide

Goobay
Goobay 71360 user manual