manuals.online logo
Brands
  1. Home
  2. •
  3. Brands
  4. •
  5. ALLTO SOLAR
  6. •
  7. Solar Panel
  8. •
  9. ALLTO SOLAR AS-20W-M User manual

ALLTO SOLAR AS-20W-M User manual

Please read all of the installation instructions carefully before installing the product. Improper installation will void
manufacturer’s warranty. The installation instructions are written as guidelines to assist in installing the system.
Please contact us with the email if you are not comfortable installing the product. Prior to using and installing the
solar battery charger, please read the safety information provided in this user manual. Be sure to use the product as
outlined in this user manual. Altercation or modifications carried out without appropriate authorization may invalidate
the user's right to operate the equipment.
20W Mono Solar Panel Kit
User Manual
1.0 Introduction
This manual provides safety and installation instructions for charge controller. Allto Solar assumes no responsibility for
loss, damage or expense resulting from improper installation, handling, or use.
2.0 Safety Precautions
Before installing this product, read all safety instructions in this document.
• All installations must be performed in compliance with any applicable local codes.
• The batteries must be same of type, make and age if you connect several batteries in parallel or series.
• Avoid exposing solar panel to partial sunlight or shadows, partial sunlight can cause hot spot on the solar panel.
• Ensure input voltage does not exceed 30 VDC to prevent permanent damage.
• The charge controller is powered by sunshine, minimum voltage for the solar panel is 15V.
• Designed for 12V battery, do not use it for 6V or 24V battery. (two 6V batteries also can be used if connected in series;
multiple 12V batteries also can be used if connected in parallel).
• Do not attempt to recharge non-rechargeable battery, converse with your battery dealer for more info before usage.
• Ensure the polarity is correct when connecting the charge controller to battery and solar panel.
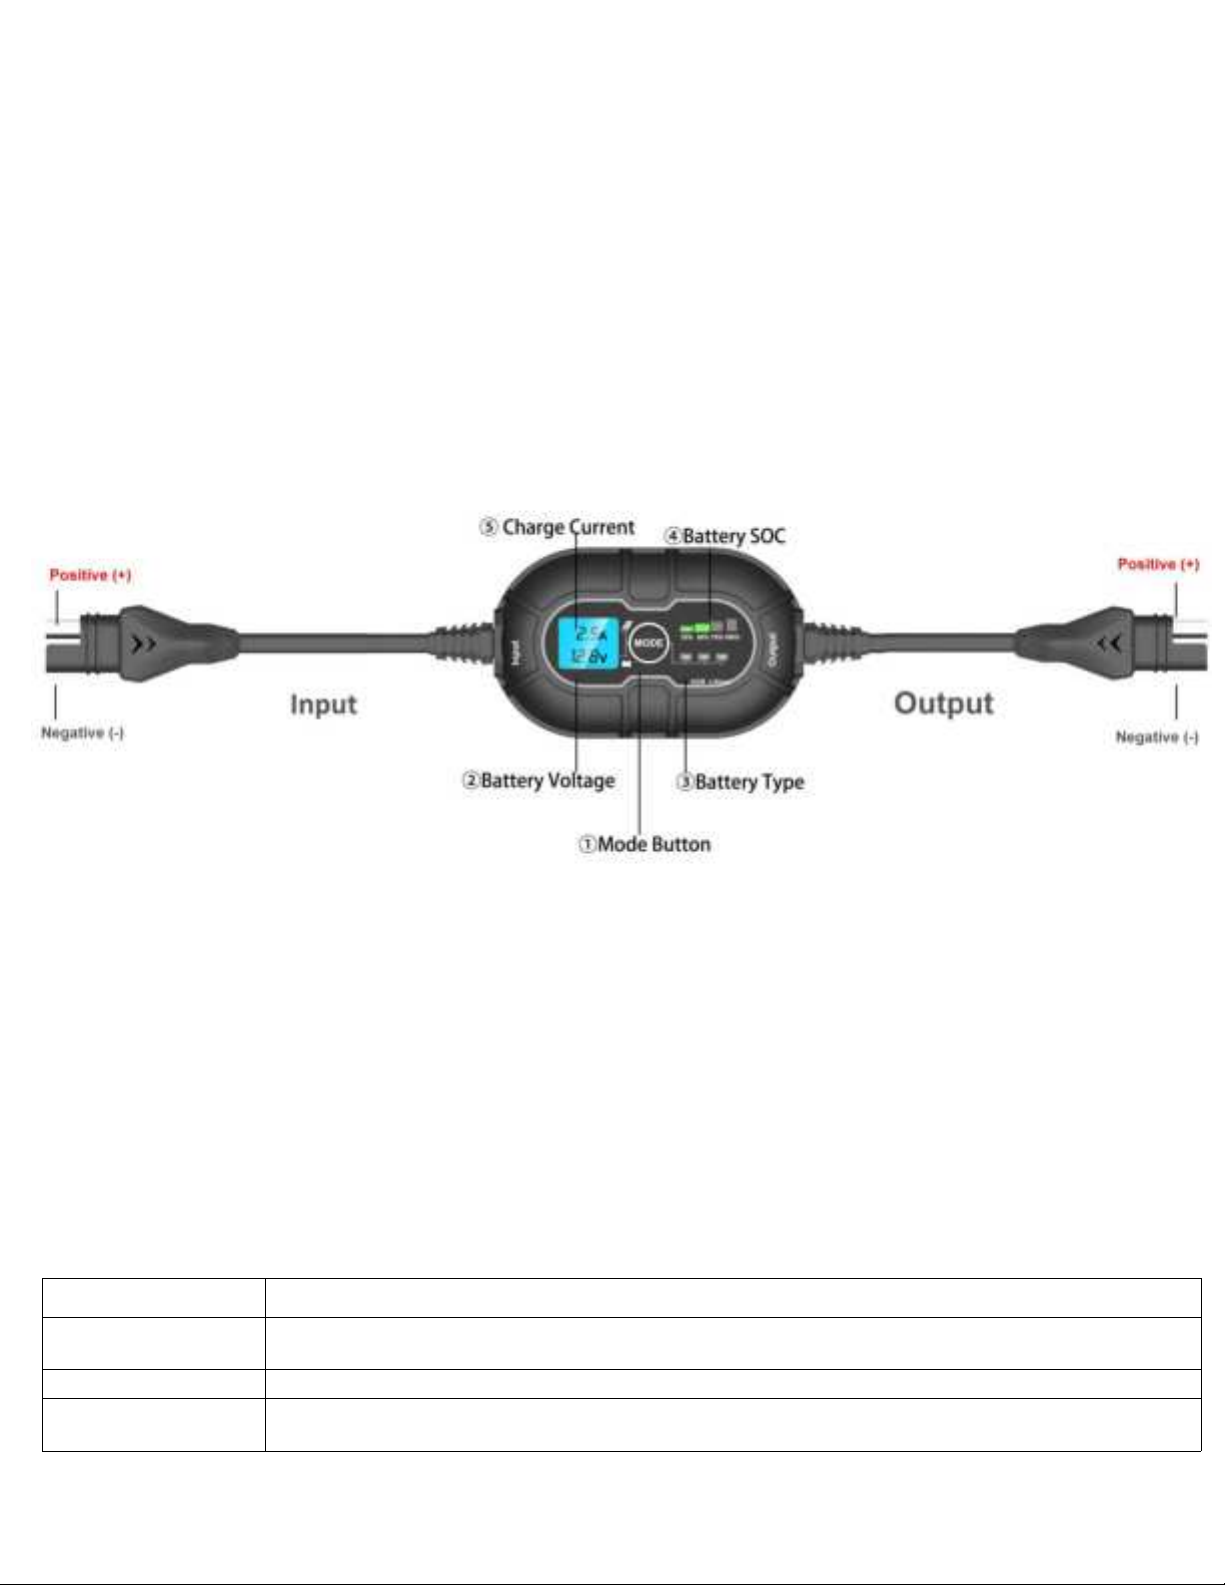
3.0 Features
①Mode button: Push to cycle battery types
②Battery Voltage: Indicates battery voltage
③Battery Type: Illuminates solid Green when battery is selected
④Battery SOC: Indicates the connected battery(s) state-of-charge.
⑤Charge Current: Indicates solar charge current.
Input & Output: male SAE plug is positive(+) and female SAE plug is negative (-)
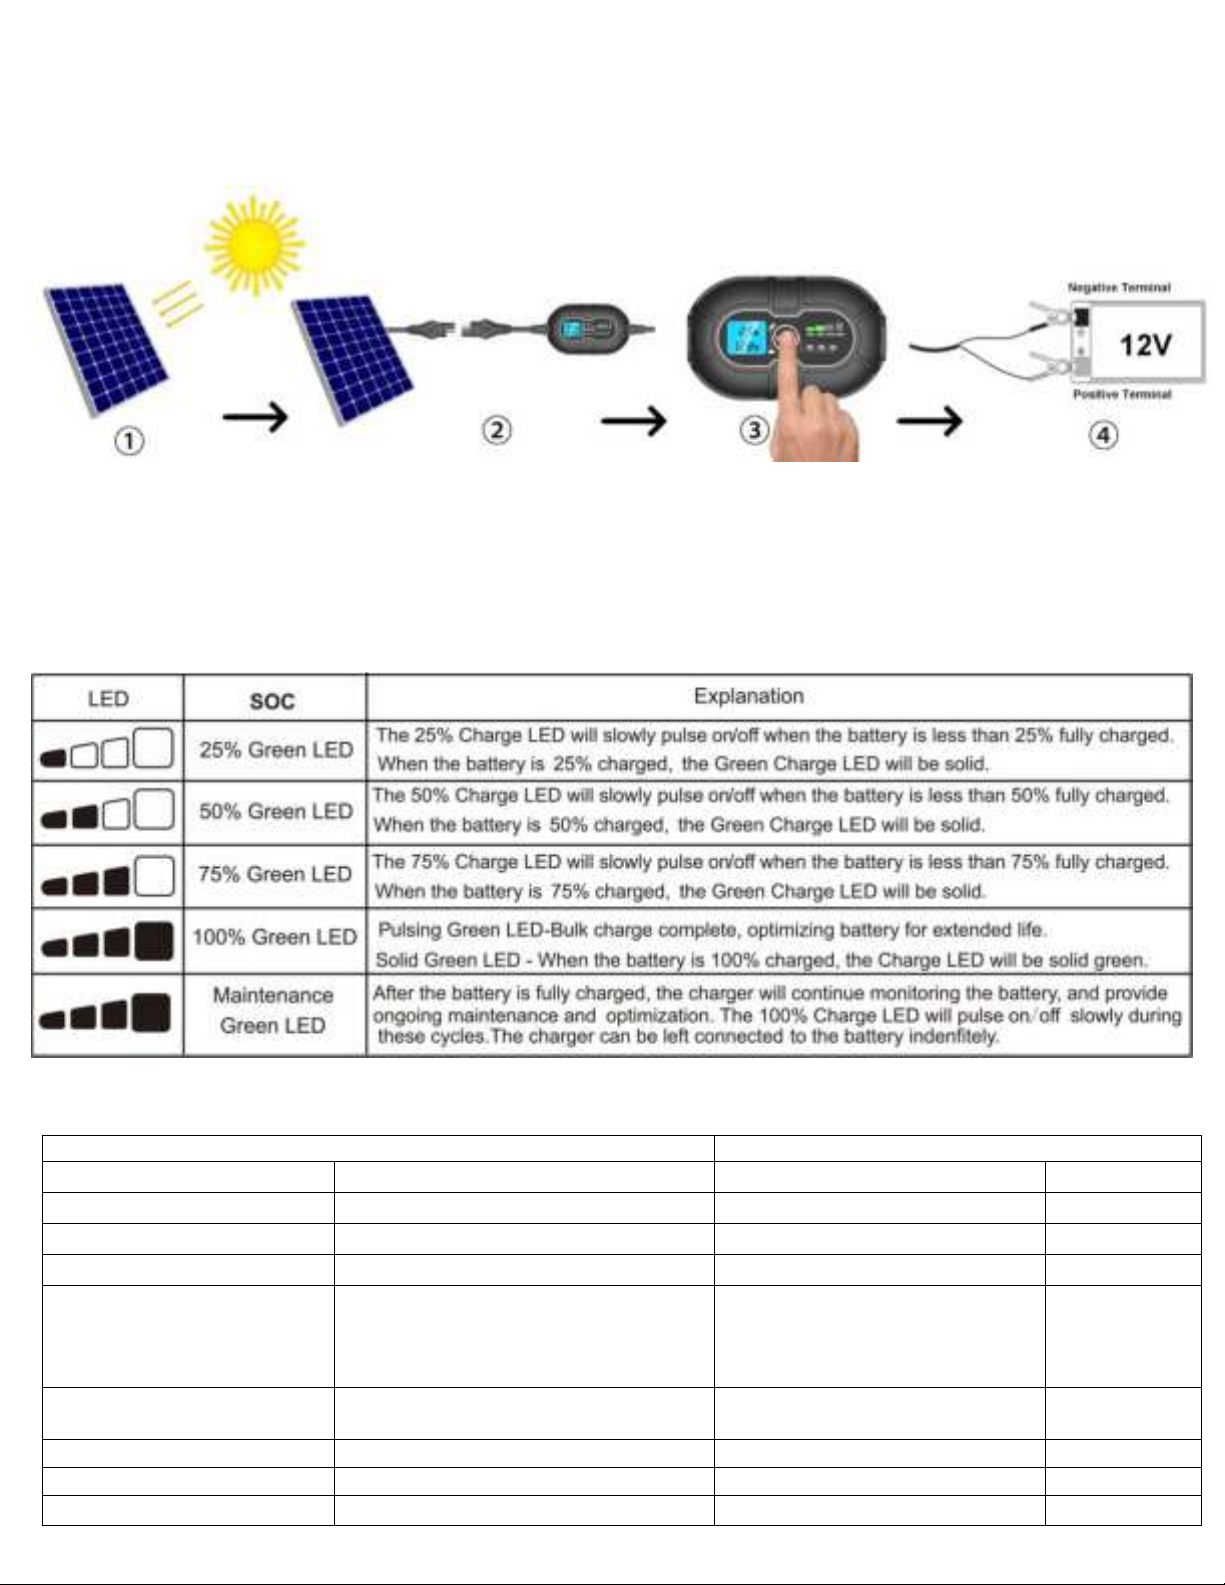
4.0 How to Install
The charge controller has 3 modes: 12V, 12V AGM, 12V Lithium, It is important to understand the differences and
purpose of each charge mode. Always check with battery manufacturer to confirm the right charge mode for your
specific battery. Do not operate the charger until you confirm the appropriate charge mode for your battery. Below is a
brief description of the charge mode:
Mode
Explanation
12V
For charging 12-volt Wet Cell, Gel Cell, Enhanced Flooded, Maintenance-Free and Calcium
batteries. When selected, the 12V LED will illuminate
12V AGM
For charging 12-volt AGM batteries. When selected, the 12V AGM LED will illuminate.
12V Lithium
For charging 12-volt lithium-ion batteries, including lithium iron phosphate. When selected, the
12V Lithium LED will illuminate.
Caution*****Use 12V Lithium mode with extreme care, this mode should only be used with 12 volt lithium batteries that
have a built-in battery management system(BMS). Lithium-ion batteries are made and constructed in different ways and
some may or may not contain a battery management system(BMS). Consult the lithium battery manufacturer before
charging. Some lithium-ion battery may be unstable and unsuitable for charging.
4.1 Connecting to Solar Panel and Battery.
Do not connect the charge controller until all other connections are made. Identify the correct polarity of the solar panel
and battery terminals. The male SAE connector is positive and female SAE connector is negative, the positive battery
terminal is typically marked by these letters or symbol (POS,P,+). The negative battery terminal is typically marked by
these letters or symbol (NEG,N,-). Do not make any connections to the carburetor, fuel lines, or thin, sheet metal parts.
1) Expose the solar panel to full sun without shade.
2) Connect solar panel to charge controller, the LED screen will illuminate and display PV charge voltage and no current.
3) Press the mode button to toggle to the appropriate battery types, the battery LED will illuminate the selected mode
4) Connect the charge controller to battery terminals, Wait 5-10s, the charge controller will enter charging mode once it
recognizes the battery. The SOC indicator will illuminate and LED screen will display the battery voltage and charge
current.
4.2 Understanding Charge LEDs.
5.0 Technical Parameters
10A Charge Controller Parameters
Solar Panel Parameters
Rated Current
10A
Power Output
20W
Nominal System Voltage
12V DC
Power Tolerance
±5%
Max PV Input Voltage
15-30V
Open Circuit Voltage
21.6V
Max PV Input Power
120W
Short Circuit Current
1.17A
Electronics Protections
Reverse battery polarity, Reverse
PV polarity, PV over-voltage
Battery over-voltage, PV over-
current, Battery over-current
Maximum Power Voltage
18.0V
Battery Type
Wet Cell, Gel Cell, Flooded,
Maintenance-free, AGM, Lithium
Maximum Power Current
1.12A
Controller Terminals
1.5mm2/16AWG
Current Temp Coefficient
0.1 %/°C
Power Indicator
25%-50%-75%-100%
Voltage Temp Coefficient
-0.37 %/°C
Standby Current
0 mA(No discharge from battery)
Power Temp Coefficient
-0.45 %/°C
Adjustable Flat Mount Bracket
Adjustable Flat Mount
Working Temperature
-40℃~80℃
Max.Snow/Wind load
2400 Pa
Storage Humidity
10%-90%, no condensation
Max System Voltage
1000V DC
Measurements
87*54*26mm
Measurements
420*335*18m
m
Weight
0.35kg
Cable Diameter/Length
20AWG/3m
Battery Type
Wet,Gel
Cell/Flooded/
Maintenance-
free
AGM
Lithium
Protection Grade
IP65
N.W
1.45KGS
Boost Charge Voltage
14.2V
14.6V
14.6
Standard Test Condition
25℃,
1000W/M2
1.5 Air Mass
Float Charge Voltage
13.8V
13.8V
/
Boost Charge Recovery
13.0V
13.0V
13.0V
Boost Duration
2 Hours
2 Hours
2 Hours
6.0 Status Troubleshooting
Description
Explanation
Troubleshooting
LED screen doesn’t
illuminate
sunshine is not
effective
The charge controller is powered by sunshine, if the sunlight is
weak, the charge controller would not light up. Simply expose
the solar panel to FULL SUN, see if the LED screen comes on
No solar Input
Double check if the polarity is correct when connecting solar
panel to charge controller, positive to positive and negative to
negative.
LED screen illuminates, no
charge current
No battery is
recognized
Check if the polarity is correct when connecting charge
controller to battery terminals
Check if the fuse is blow or not
Check if the battery connection is loose
LED screen turn on/off
frequently
sunshine is not
stable
check if the solar panel is receiving enough sunlight
6.1 Package List
1x 20W Solar Panel
1 x10A MPPT Charge Controller
1 x Battery clamp cable
1 x User Manual
7.1 Other Accessories you may need (Not Included)
8.0 Warranty
Thank you for purchasing the solar panel, should you experience any defect due to the manufacturer of this product, you
are entitled to get a replacement or refund. If You have any questions, feel free to sent us email
support-us@alltosolar.com, we will get back to you within 24h.
www.alltosolar.com
ALLTO SOLAR TEAM
Extension Cable
Upgraded Z-Brackets
Adjustable Pole Mount Bracket
5-Way Adapter

Other ALLTO SOLAR Solar Panel manuals

ALLTO SOLAR SE-US-120W-F User manual

ALLTO SOLAR

ALLTO SOLAR SE-US-120W-F User manual

ALLTO SOLAR AS-US-5W-EC User manual

ALLTO SOLAR

ALLTO SOLAR AS-US-5W-EC User manual

Popular Solar Panel manuals by other brands

Panasonic EverVolt EVPV Series General installation manual

Panasonic

Panasonic EverVolt EVPV Series General installation manual

Grape Solar GS-1080-KIT Quick connect guide

Grape Solar

Grape Solar GS-1080-KIT Quick connect guide

EcoFlow 160W user manual

EcoFlow

EcoFlow 160W user manual

Hyundai HIS-M210RF installation manual

Hyundai

Hyundai HIS-M210RF installation manual

Solar Arc Smartpool S204 Installation and instruction manual

Solar Arc

Solar Arc Smartpool S204 Installation and instruction manual

Samlexpower ADJ-28 owner's manual

Samlexpower

Samlexpower ADJ-28 owner's manual

Conrad 11 07 00 operating instructions

Conrad

Conrad 11 07 00 operating instructions

LG LG N9C-G4 Series installation instructions

LG

LG LG N9C-G4 Series installation instructions

FuturaSun Energy Station Plus user manual

FuturaSun

FuturaSun Energy Station Plus user manual

Optex EcoOnline user manual

Optex

Optex EcoOnline user manual

SunWare 20 series installation manual

SunWare

SunWare 20 series installation manual

Anslut 014400 operating instructions

Anslut

Anslut 014400 operating instructions

Apricus etc Installation & operation manual

Apricus

Apricus etc Installation & operation manual

Phaesun Semiflex quick start guide

Phaesun

Phaesun Semiflex quick start guide

XCell 148134 Operation manual

XCell

XCell 148134 Operation manual

Aleo X63 installation manual

Aleo

Aleo X63 installation manual

EPS EPS-100W-KIT user manual

EPS

EPS EPS-100W-KIT user manual

Adventure Kings 160W Folding Solar Panel user manual

Adventure Kings

Adventure Kings 160W Folding Solar Panel user manual

manuals.online logo
manuals.online logoBrands
  • About & Mission
  • Contact us
  • Privacy Policy
  • Terms and Conditions

Copyright 2025 Manuals.Online. All Rights Reserved.