ALP K2 WS-720 User manual

ЛL「 K=°
SeⅣice Manual
for DigitBI Blood nЮ sswe Modtor
MIodel NooWS‑720

WS‐720‐ 12jtd
INDEX
1.DESCRIPTION..… ………
…
…
……………
…
…
・
………
……
……………
・2
2.SPECIFICATIONS.… …
…
……………
…………………
…………………
・3
3.PRINCIPLE OF OPERATION.… …
………
……………
…
…
………
6
4.OPERATING INSTRUCTION.… ……
…
…
…
…………
…
…………
11
5.ERROR DISPLAY
6.OUTSIDE DRAWING
6‑1.MAIN UNIT.… …
…………
.… …
…
……………
……
・
………
……
…
6‑2.CUFF UNIT.… …
…
…………
……………………
……………………
・
PRODUCTION PROCESS TABLE.… ……
……
……
…
………
PRESSURE SENSOR.… ……………
………………
…
…………………
19
7.
8.
9.
10.
0
1
2
3
4
2
2
2
2
2
PRESSURE ACCURACY TEST
EXPLODED VIEWS
10‑1.Main Unit..… ……………
……
Ⅲ
…………
…………
……
・25
10‑2.Cuff Unit.… …
.… .…・
……………
…
……
・
…………
…
¨
…
…
・
…26
10‑3.PACKING.… ………
……
…………
……
……………
……
……………… 27
11.PARTS LIST.… …
…
……………
…
……………
……
……………
……
………… 28
12.TROUBLESHOOTING CHART ..… ………
…
…………
…
…
…29

WS‐720‐ 12jtd
lo DESCRIPTION
l.The lodcl urs720 isを vl Auto lnflationヽ Ⅳrist Digital Blood Pressure rv10nitor.
Every process of the mcasurementis automatically donc as‖ O/ "buttOn is pressed.
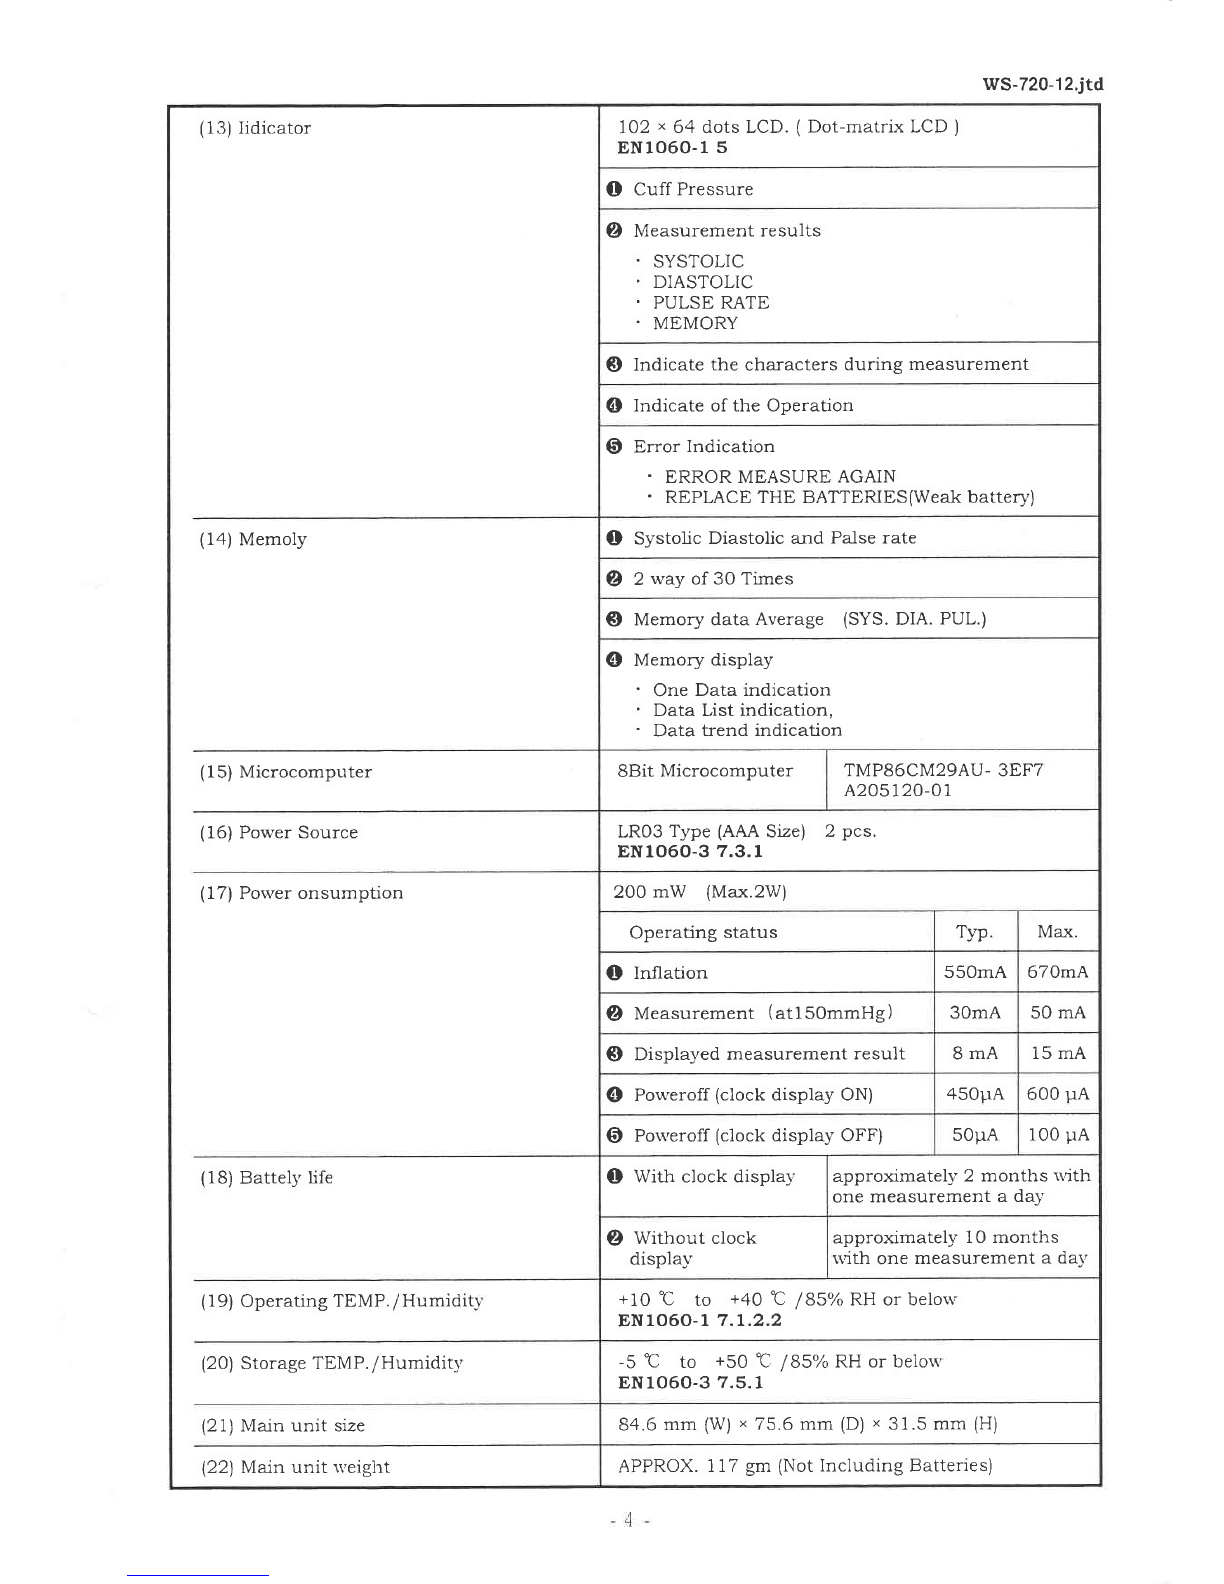
2 The readings in each function are digital displaved on Dot― A/1atrix LCD panel.
3.LCD is constructed、 vith 64 x 102 dots
LCD sho、vs pressure value during a lneasurcrncnt and shov′ s lneasurerncnt results,
memo■′
data and also symbol characters and short rncssages which describc inflation,
deflation, palpatory、 vave,weak battew and etc.
4.Reliable rncasurement is constantly possible、 vith WS‑720 since this device sho、vs
measurement crror symbol character and rncssagc if any extraordinarア eVent happens
during a lneasurement
5.Thc Modcl Ⅵ
rS‑720 is an Auto lnflation Wrist Digital Blood Pressurc lonitor.Eveヮ
proccss of the mcasurement is automatically done as‖ O/1‖ buttOn is pressed.
6.A/1icroprocessor supervises thc batte■ /power and when itisjudged to be running down,
the weak battery symbol character and inessage are shown on the displQみ
7.The language for lnessages sho、 vn on the displ賀 ′
can be selccted from English, French)
German,Italian or Spanish
8.The unit call be set to display time v′ hen the po、ver is turned off.
9.There are 4 buttons to operate this unit:‖ O/1"buttOn,MENU button,
MEMORY(+)buttOn and MEMORY(― )buttOn
10.The unit holds such rnernow function that recalls 30 1neasurcmcnt results and thcir
average stored in t、 vo accounts.
11.The storcd data can be displε ved in three wtts:Single data displり , liSt display and
trend graph displそも
′
.
12.The units functions such as inflation valuc can be set up in MENU scction.
(1)SelecdOn ofthe lnemory acCOunt
(2)Preset pressure set― up
(3)Memoり dear
(4)Language selectlon
(5)Clock attuStment
(6)Contrast ad」 ustment for the LCD
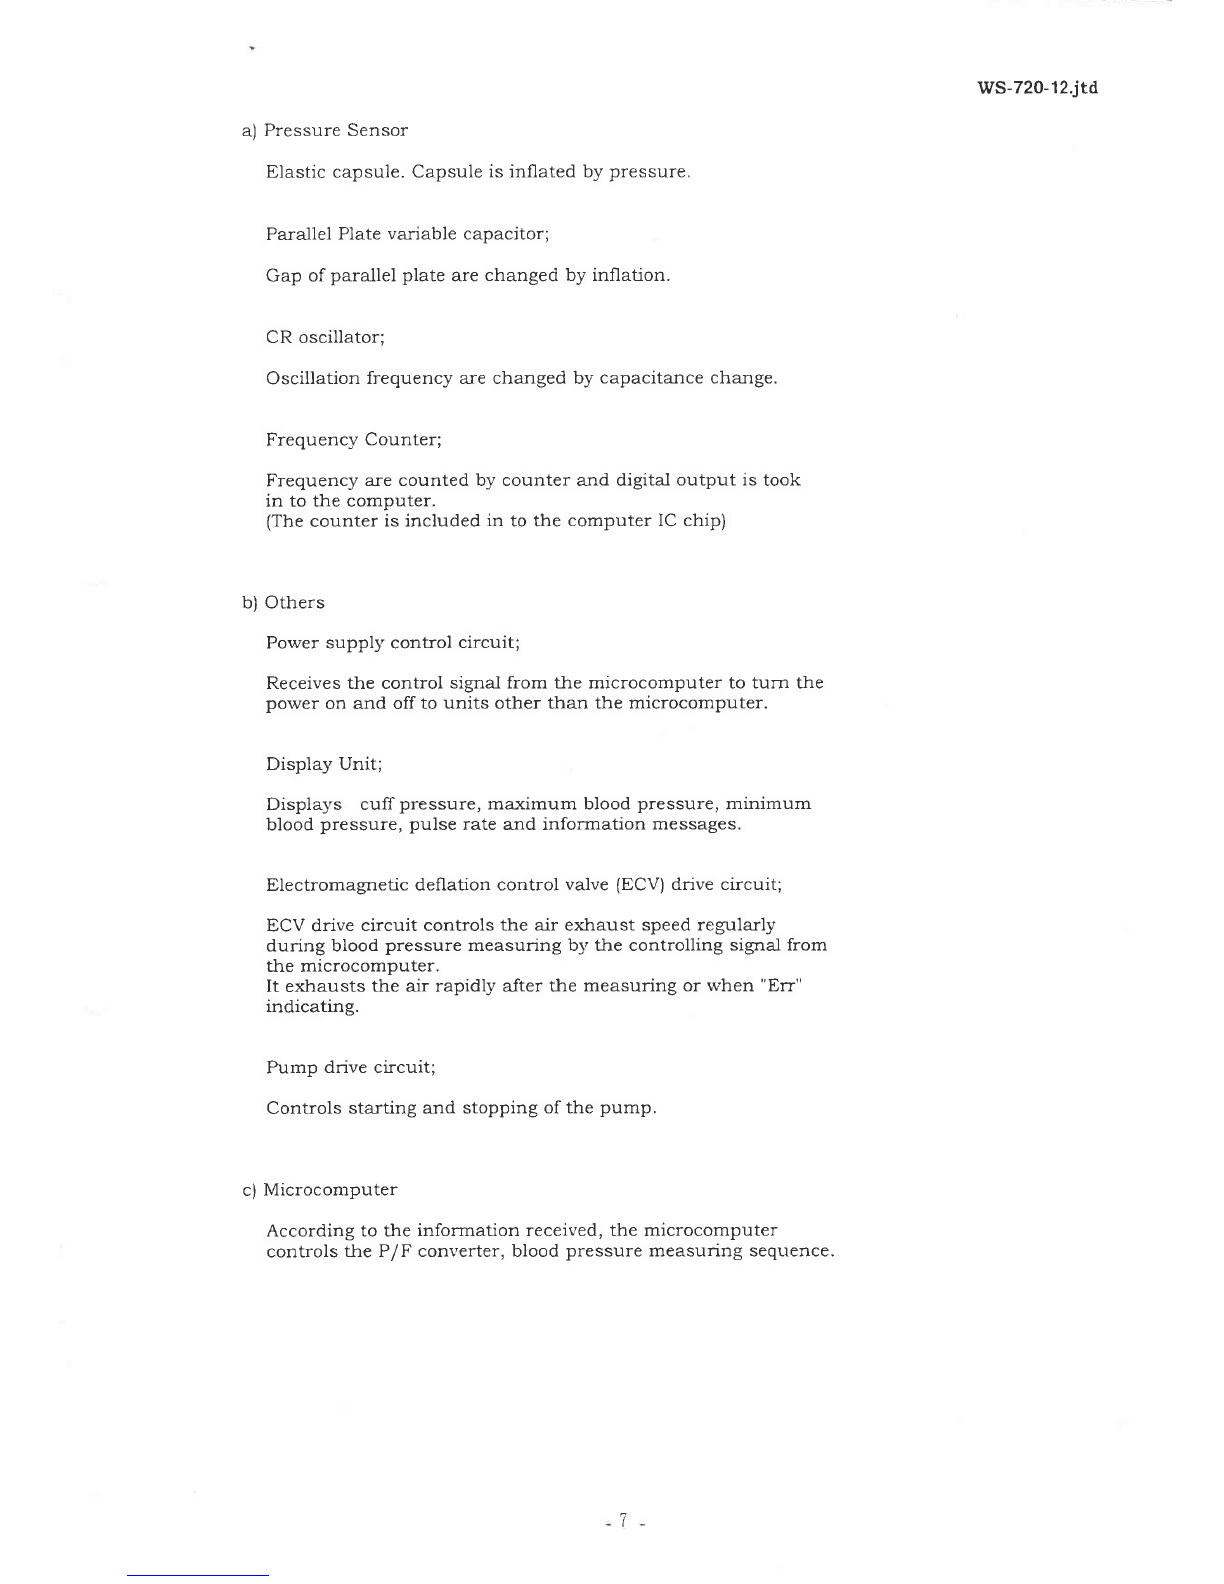
13.Thc inflation and deflation of the cuff are automatically done、 vith air pump and electric
control valve.
14.The clectric control valve is supcAア iscd by thc lnicrocomputcr
The reliability of the incasurement is high since the deflation rate is constantly kept at the
appropriate spccd.
15.Thc unit、vill automaticallv turn offifit is not opcratcd for about 180 scconds or rnore.
2

WS‐720‐ 12jtd
2.SPECIFICATIONS
2‑1 ヽ
ノ
lodel WS‑720‐ 12
2‑2 Classiflcation CLASS Ⅱa
2‑3.Function O Blood Pressure lⅥ easuring
②Pulse Ratc Measuring
O Automatic Power Shut Off(3 min.)
0 2 Error lndication
2‑4.BP.M.Speciflcations
(1)MCasuring Method Cuff Oscillo― Metric
(2)Measuring Position ヽVst
(3)Coverage wnst circumference 125mm〜 205mm
(4)PresSure detectlon Pressure to Frequency Converter
(5)PresSure indicaung
(Cuff Pressure) O Units mmHg
EN1060‑16
②Range 0‑300 mmHg
EN1060‑37.7.1
O Resolution lmmHg
EN1060‐37.7.2
④Zero setting Automatic zero setting
EN1060‑37.4.4
(6)Mcasu ng range O Systolic 50‑ 250 mmHg Cuff Pressure
②Diastolic 40‑180 rnmHg Cuff Pressure
SYS―DIA>10mrnHg
O Pulse Rate 40 160 Beat/Min.
(7)Accuracy O Pressurc ±
3 mmHg
EN1060‑17.1。 1
②Pulse rate ±50/O of Reading
(8)Cuff inaation Automatic lnnation syStem(Air Pump)
(9)Preset pressure 150to 300 mmHg(10mmHg Step)
(10)Cuff deflation Electromagnetic deflation Control Valve(ECV)
(10)Deflation rate 5.5〜 7.5 mmHg/Sec.
(11)Rapid Exhaust Automaic Exhaust(ECV)
EN1060‑37.4.3
(12)Cuff SyStellll O Cuff of Wrist
②Lock■ ng Mech―Velcro uith spring
O Bladder slze 52mm(W)X128mm(D)
④ Cuff Size 66mm(W)× 280mm(D)
3

WS‐720‑12.jtd
(13)IidiCatOr 102× 64 dots LCD。 (Dot― matrix LCD)
EN1060‐ 15
O Cuff Pressure
②Mcasurement results
・
SYSTOLIC
o DIASTOLIC
・
PULSE RATE
・
MEMORY
O Indicate the characters during measurement
④lndicate Ofthe Operation
O Error lndication
・
ERROR MEASURE AGAIN
・
REPLACE THE BAttERIES(ヽ Veak batte17)
(14)Memoly O SystoLc Diastolic and Palse rate
②2wtt of30 Times
O Memo■/data Average (SYS.DIA.PUL)
O Mcmow displ響
・
One Data indication
・
Data nst indication,
・
Data trend indication
(15)MicrOCOmputer 8Bit Microcomputer TMP86CM29AU‑3EF7
A205120‑01
(16)Power SOurce LR03 Type(Aん へSレe)2 pcs.
EN1060‐37.3.1
(17)Power Onsumpuon 200 mW (Max.2W)
Operating status Typ A/1ax.
●Innadon 550mA 670mA
②Measurement(at150mmHg) 30mA 50 mA
O Displtted measurement result 8 mA 15 mA
④ PowerOff(C10Ck displtt ON) 45011A 600,A
O Po、ア
erOff(clock diSplε りOFF) 50,A 10011A
(18)Batte15ア fe 0 ヽVith clock display approxillnately 2 months、 ith
one rneasurement a day
②ヽVithout clock
displav approxilnately 1 0 1nonths
with onc lneasurement a dav
(19)Operating TEMP/Humidiり +10℃ to +40℃ /85%RH or below
EN1060‑17.1.2.2
(20)Storage TEMP./Humidity ‑5℃ to +50℃ /85%RH or below
EN1060‐37.5.1
(21)Maln unit sレe846 mm(W)× 756 mm(D)× 315 mm(H)
(22)Mn unit Weight APPROX.117 gm(Not lncluding Batteries)

WS‑720‐ 12.jtd
2‑5. SaFety system Cuff Pressure> 330mmHg →Rapid Exhaust
2‑6.Electrical safeサ EN1060‑17.2.1
2‑7.Resistans to vibration&shock EN1060‐ 17.2.2
2‑8.Air Leakage EN1060‐ 37.4.1
2‑9.Electromagnetic compatlbility EN1060‐ 37.5。3
2‑10.Stability of the cu∬ pressure indication EN1060‐ 37.6
2‑11.Overall systern accuracy EN1060‐ 37.9
2‑12.Lay a pipe system See‖ 10.Exploded Views 10‑1.lvIAIN UNIT"P25
2‑13 0perating manual English/French/German/1talian/spallish
2‑14.Accessories Non
2‑15 Life 5 Year
5

WS‐720‑12.jtd
3.PRINCIPLES OF OPERATION
3‐ 1。 Operation of Each Unit
These units operatc as follo、 vs:
P/F Converter l
C.PU
―ECV:Electromagnetic deflation Control Valve
FIG.3‑l Block Diagralln
Pressure―
Frequency
Converter
Micro―
Computer
(C P U)
A/D
Displεッ
(Dot mattt LCD)
(Including driver IC)
Memow Read l■ )SIVltCh
Memoly Read(― )SWitCh
MENU S型、itch
START(POヽⅣER)S、vitCh
(Batte巧 ″Weak Detector)
Pump
Drlve
Circuit Pump
Batt(
‖
Aんヘ
2pcs
│ヮ Power
Circuit ECV
Dve
Circuit ECV
For other
Circuits
DC/DC
へじ
Ь
u■ '
3 Volt
P/F Converter
6

WS‑720‑12jtd
a)PreSSure Sensor
Elastic capsule.Capsule is inflated by pressure.
Parallel Plate vanable capacitor;
Gap of parallel plate are changed by infladon
CR oscillator;
Oscillation frequency are changed by capacitance change
Frequency Counter;
Frequency are counted by counter and digital outputis took
in to the computer.
(The COunter is included in to the computer IC chip)
b)Others
Po、ver supply control circuit;
Receives the control signal from the lnicrocomputer to tum the
po、ver on and offto units other than the inicrocomputer.
Displaり Unit;
Displays cuff pressure,maxilnulln blood pressure,mlllimum
blood pressure,pulse rate and infomation messages
ElectromattedC denaton control valve(ECV)d Ve circuit;
ECV d ve circuit controls the dr exhaust speed re,■ larサ
dung blood pressure rneasu ng by the controlling signal from
uhe rnicrocomputer.
It exhausts the alr rapidし after the measu ng or when"Err‖
hdicating.
Pump dve cicuit;
Controls starting and stopping of the pump.
C)MiCrOcOmputer
According to the infonna■ on received,the l■ icrocomputer
controls thc P/F converter,blood pressure lneasu ng sequence.
7

WS‑720‐ 12jtd
3‑2 Flow Chart of Operation
Clock di
ECV ON
Po、ver on Message Displayed
Pressure"0‖ set
Pressure displayed
Magnet valve ON
InnadOn tlmer start
Innation tlmer counter>5
Pressure>501■ mHg?

WS‐720‐ 12.jtd
ECV OFF
Yes
Yes
YES
ECV OFF
No
Maximum blood
pressure
decisive condition
satisfled ?
Minilnum blood pressure
decisive condi■ on satisfled?
員ett"] ヽVeak Check
Each Part
(150to 300 mmHg)
sure>330 1nm
Magnet valve OFF ssure≧ Preset Pressu
tion timer counter>10
Pump stop
ERROR"
Displε ッ
ed Pump stop
eset Pressure>300rnln
Displεり
ed
Hcart Mark" Preset pressure
l step increments
Pumo Start
Pulse rate mcasu
Mattlet Valve OFF
easurement result displaved
3 minutes ther start
minutes'
=er key ON
Magnet Valve OFF
Pump stopped
Batten'Mark Display
Each P
YES art

WS‑720‐ 12.itd
3‑3 Air Circuit;
The 8 r circuit is composed of the fo1lolvlng;
Pump :Used during an increase of pressure.
Electromagnetic deflation
Cuff
Pressure Sensor
control valve
:Used for constant alr exhaustion at the
dme of measurement.
:Used after the measurement.
:To tighten the left or ght Ⅵ
rist.
:Frequency are changed by pressure
Pump
Wst
Cuff
ECV:Electromagnedc denatlon control valve
FIG.3‑2 Air Circuit
Pressure
Sensor

4。 OPERATIONS INSTRUCTION
4… l Battery lnstallation
l)Remove the battev cOVer in the arrow direction
2)Install tWo LR‑03 type alkaline d,cells in the batte10‐
compartment,glving attention to their polarltv
The calls can bc easily installed by pushing their()side
agalnst the spring.
3)Replace the battew cover on the unit
WS‐720‑12jtd
4‑2 Language and clock set‐ up after battery replacement
Set the language and the clock after replacing batte es or、vhen installing batteries
for the flrst t e
l)The rlrst display when batte es are installed is the language set― set up lnenu.
・
Language set― up lnenu is to chosc the language for llnessages sho、 v■ on the display、vhile
operating this unit.(ChOSe One oftl■ e fo1lo、 、
ing languages:English,Gerlnan,French,Italian
and Spanish.)
・
The language initially selected is English
・Select18mguage with either MEMORY(+)or(― )buttOn.
・
Complete the set― up■vith MENU button or POヽ VER/START button.
/0 0︲
LANGUAGE
■
ENGLISH
DEUTSCH
FRANCAIS
ITALIANO
ESPANOL
FEB 15 2001
2口121
NOTE ヽ
〃henever you Mだ ビlt to change the selected language,
refer to‖ 4‑7MENU/3)―d)LANGUAGE".
The language can be reset up anytilnc and al■ y numbcr
of tlmes.
2)Attust the clock
The display after the lanttage Set―up rnenu is the clock set― up rIIlenu
・
The ad」 ustrnent of the clock is necessay to store the measured result along、 v■ th the date
and tirlle correctly so that the lnemonZ can show、 rhen and、vhat tilne a lncasurement v′ as
made.
NOTE:
When the clock displε り
is set to(DN,the battev
life、、
■1l be short
ltis suggested to usc set the clock display to OFF
DISPLnΥ
ON
Procedures
2)‑l Set the clock in the order ofyear,month,d勢 ち
hour and llninute
2)‑2 The article to be ad」 usted flashes
2)3 Ad」 ust、ith MEMORY(+)or(―)buttOn.
2)‑4 A/1ε よe conflrrllation by pressingヽ /1ENU button and the next article to be sct up flashes
2)‑5 Repeat 2)‑3 al■ d2)‑4 steps
2)‑6 Press POヽ VER/START button、'hen every ariCle is ad」 u sted
2)‑7 The time is displ〔 、
ア
ed、
「
hen the clock set― up is completed
NOTE The clock on this unit is only a supplement and therefore the clock lllay go ahead or
behind the time ln such cases,refer to・ 4‑7MENU/3)c)CLOCK SETH.
ll

4‑3 Measurement Procedures
l)`Vrapping the CuFf around your、 Tlst
l‑1)`Vith the palrn of your left hand up,put the cuff on your、 ゃ
Tist so that
the rnain body is on the salne side as your palln
l‑2)Adlust the cuff, ■、
ith your palln up, until its edge is positioned
about 5 〜
10 1nm frorn the lo、 ア
est part of your palin
l‑3)Fasten the cuff around your、 vnst so that there is no space bet、 ハ′
cen
the cuff and your uTist The cuff should flt snugl)L
Press the surface of the cuffto lnake sure thatit is attached
securelv
・
Attach the cuff next to the skln
・
Take care that your clothes are not caught by the cuff
・
Do not push the POヽ VER button before the cuffis completely wound
ヽ
Vhen thier is no table available
Sit on chalr.
Ad」 ust the cuff to the sarne height as your heart by lightly applying 57our
left aln to vour breast.
Lightly support 57our a― by your ght hand du ng ineasurement
WS‑720‑12.jtd
く
ヽVhen the cuffcannot be put on vourleft、 ャ
Tist〉
Ifit is irnpossible to put the cu∬ on your left、、
嘲st,use your
ght、、
Tist for measurement.
2)CoreCt pOSture during lvleasurement
2‑1)Sit On a chalr
2‑2)Lightly open your left hand, v.nth yOur palln up, and put your
elbo、v on a table or stand
2‑3)Ad」 ust the cuffto the salnc height as your heart
1
2
3)
。
M〔邊dng a rneasurementin bed
l)Lie on)アour back
2)Attust the cuffto the sarnc height as your heart
Breathe deeply 5 or 6 times to relax beforc
measurement.
・
Ivlcasured data rlla、 'vav slightly depending on the posture during lneasurement
o Measurements should be rnade、 ith the salne、 、Tist in the sarlle position,
・
If the cuffis lower(higher)in position than the healt,the lneasured reading tends to
become lalger(smalle→
12

WS‑720‐ 12jtd
4… 4 Measuring Method
Startingト ノ
leasurement Let yourself relax!
1)PreSS thC POWER/START Button
lf you hold the POM′ ER/START button too long(mOre than approxirl■ ately 2 sec.),the apparatus
、、■1l be in the"chec ng l■ ode・ or the poM′ er、v■ 1l be turned off ln such cases,、 =hich do not
indicate any problems,press the POヽ VER/START button again to start the measurernent
Set the inflation value
The priotty set pressure is 180 rnlnHg.Set the inflation valuc approxirnately 40 to 50 11nlnHg
higher than)7our Systolic blood pressure if you already kno、 /the value.You can leave the preset
pressure at 180 1nmHg ifyou do not know your systolic pressure.
Refer to‖ 4‑7 MENU/3)― b)PRESET PRESSURE"to set the inflation valuc.
2)PresS the POヽ VER/START Button.
"READYm message、vhich suggests you that the lncasurement is about to startヽ ヽ■1l appear on the
display folloning the"HELLO‖ message when you press POWER/START button
2 scc
2 sec.
Then the unit automadcally starts inflatlon
Displε ッdung indation
112mmHョ RELRX 156mm‖ ョ
RELRX
3)PresSure starts to descend.Please do not lnove your bodv.
4)While Cuff pressure decreases,heart lnark flashes as pulse wa、 7e is detected
5)ヽVhen pressure reaches lllinillltlΠ l blood pressure,tlle heart rnark disappeals
13

WS‐720‑12.jtd
6)MeasLlrement is completed above all steps.Then the unit、 ll automatically exhaust thc air from
the cuff
7)Minimum and maximum blood pressures and pulse rate ale displayed.
132m‖
In 日□
76/L
8)To turn Offthe power,press POヽ VER/START button
9)If yOu fOrget to tun■ off the unit after completion of a rneasurement,it nill be automatically
turned off after 180 seconds.
4‑5 Measured data storage
When either Tν 1l or A/12 is selected before starting a lncasurement,the rneasured data、 、
■
11
automatcalサ be stOred in tlle memo7 as the measurementis completed.
4… 6 Memory infornlation
l)The rneasured data、 v■ 1l be stored automatically in the set memo「 r acCOunt
When the lnemow is setto OFF,measurement rcsult、v■ 1l not be stored
2)The lnemOn/number l is the oldest stored data.
When the number of measurements exceeds the lnax■ rnurn storable number,the oldest data、 v■ 11
be deleted to record ncM′ data.
3)Each of bvo memo=y aCCOunts can hold 30 111easurellnent results and their average.
4)The unit has threc lnemo7 indiCadon I■ odes:Singlc data display lnode,data list displり mode
and data trend graph display llnode.
5)Single data display lnode
a)`Vhen the unitis tumed off(V√hen either nothing or clock is displayed),preSS MEMORY(+)or
(― )buttOn and the latest data nith lnemott number X、 ゃ
■1l appear on the display.The lnemoヮ
data number l is the oldest data in the lnemory.
″Change memolγ number、 ith MEMORY(+)or()buttOn
t The unit ulll be automatically tumed off after 30 secunless it is
operated.
た
Press POヽVER/START button to tum offthe unit.
丼
1/1ove to data list displav rllode by pressing Tッ IENU button.
b)TO See the average value,press IVIEト ノIORY(+)or(―)buttOn、vhile the latest data is on the
displav.
To see the old data,press MEMORY(+)buttOn;as the button is pressed,the memo弓 ア
number
changes increnlentally,、 vhile it changes decrementally as the()buttOn is pressed
No n→ AVERAGE→ No l→ No 2‑・ …
↑│
9
■ ﹈
n
45 M M 加
Ⅲ □ B 4
ノ
︲︲ 38 7
1. 0 ︶ 嘔ロニ
N l
slrs
DIn
PUL
‑14‑

WS‑720‑12jtd
No.1← No 2← ・
・・
・
↓AVERAGE
↑
C)TO fast fOnvard the data(4 data/Sec),h01d dovcn MEMORY(十 )or(― )buttOn fOr rnore than two
seconds.
d)Even、 ア
hen batteries are replaced,any stored rnemor/data vill not be deleted
e)If yOu need not to store lneasurement results alld not to recall them,set the rnemon「 OFF
6)Data list displεりmode
a)TO See the data list,press MENU during single data displε りmode.
b)The data shoヽ、m at the bottonl ofthe list Ⅵ
ith a cursor mark is the last data shoum in the
single display lnode.
C)Only flVe data can be shown on the displ〔 ぅ
Z at one time,scroll the screen、 ith rvIEA/10RY(十 )Or
(― )buttOn,hoM′ever,too see other data.
丼
Move the cursor uith MEMORY(+)or(―)buttOn.
・The unit、〜
■
1l be automaically turned off after 30 sec unless
it is operated
'Press POヽVER/START button to turn offthe unit
'1/1ove to trend graph displε りmode by pressing lENU
button
7)Trend graph display lnode
a)TO See thc trend graph,press A/1ENU button during data list displtt mode
b)The data rrlarked Ⅵith the cursor in the list displtt nashes and its IIneasurement date and
tilne are displayed at the top and its lneasurement results at the right.
C)TO See tlle other stored data inforlll■ atlon,press MEMORY(+)or(― )buttOn amd move the
flashing data.
☆
The 2nd data frorn the
ght of the graph is the latest
measured data.
オ
To shift flashing point,usc MEMORY(十)or(― )buttOn
☆
The unit uill be automatically tumed off after 30 sec
unless it is operated
キ
Press POヽVERノ START button to turn offthe unit.
d)The flrst data from the right of the graph is the average valuc.
e)H01d dOum either MEMORY(+)or(― )buttOn and memoっ 7 data、 ll be fast fon、・
arded
o Go back to single data display rnode by pressing lENU button during graph displa、'
mOde(The data nashing in tlle trend graph、 ill be sho、 711.)
↓
One memov indiCatlon
t
lemory list indication
↓
Trend Graph indication
↓
15
L 2 56 16 4
U 77 7 7 7 7
5 P
4⁚ n 20 8 9 2 6
0 1 8 8 88 8 8
l D
l S5 7 2 6 2 0
l Y 3 3 3 3 33
/ S l l l l l l
O
・
1
● E 7 8 901
N り 1 1
訥 別∩ ■
N口 .11 1□ /11 10:45
15口 1.… …
………
…
…
…
IDin

WS‑720‐ 12.jtd
4‑7 MENU
l)PreSS MENU button.
a)TO SCe mcnu,press NENU
is displayed). button、 ア
hen unitis turned off(M′hen urhether notl■ ing or the clock
'Select with MEMORY(+)or(― )buttOn.
オ
lvlake deterlnination、 ith MENU button
丼
The unit、v■ 1l be automatically turned off after 30 sec.unless
it is operated
☆
Press POヽVER/START button to turn offthe unit
2)Function
a)MEMORY SELECT;either setthe memow OFF or chose be● veenヽ7o memoり accOunts.
b)PRESET PRESSURE;set the inflation vduc.
c)MEMORY CLEAR;delete speciic stored data.
d)LANGUAGE;chose one offlve lanttages,EngLsh,Gerrl■ 狙,French,Italian and Spanish.
e)CLOCK SET;attuSt the clock(montl■ ,day,hour and minute).
o CONTRAST;attust LCD contrast(brightness)
3)Menu items alld setthg up
a)MEMORY SELECT;s、 itch mernolw accounts.
=Aftcr batte=ァ replaCement,accountis set to M l.
・Select among OFF,Ml and M2 nith MEMORY(+)or()
button.
☆
Press h/1ENU to determine and the unit w■ u be turned oI
十
The unit、v■1l be automatically tumed off aFter 30 sec.unlcss
it is operated
☆
Press POWER/START to turn offthe unit.
‖E‖ ORT SELECT
OFF ‖
1 ‖2
出
【
‑1(キ 【
+]
b)PRESET PRESSURE;set the
T PRESSURE
CHRNGE=1‑][+]
SET =1‖ ENU]
1 8口 mmHg
lnfladon valuc
キ
The initial preset pressure valuc is 180 1nmHg
丼
The pressure range is from 150 to 300 1nmHg.
キ
The valuc changes at 10 mmHgintewals as MEMORY(+)or(― )
button is pressed.
キ
Press A/1ENU to deterlnine and the unit、 ■1l be turned off
'The unit、ll be automatically tumed off after 30 seconds ifit
is not operated
'Press POヽVER/START button to turn or the unit.
16
SELECT
T PRESSURE
‖E140RV CLEnR
L∩ NGUnGE
CLOCK SET
CO1lTRnST
D∩ T∩ TR∩ NSFER

WS‐720‐ 12jtd
c)MEMORY CLEAR;delete speciflc stored data
Delete any unnecesstt data in the rnemo=y.
く
Procedures>
C‑1)Press MENU button and go to MENU
c‑2)Move the cursorto MEMORY CLEAR with MEMORY(+)or(― )buttOn
c‑3)PresS`ノ
IENU button and go to A71EA/10RY CLEAR,where stored blood pressure value and
pulse rate、 、
■th date and tirne are listed
c‑4)N71oVe the cursor to data to be deleted wih rvIEAIIORY(十 )Or()buttOn.Scroll the screcn
al■ d flnd al■y unnecessay data.
キ
Select the data、 th MEMORY(+)or(― )buttOn
丼
Delete the data by pressing IENU button
'The unit、、■1l be automatically turned off aFter 30 sec.unless
it is operated.
=Press POヽVER/START button to tunn offthe unit
c‑5)PresS IENU button and the data selected will be deleted
c‑6)PresS POWER/START button to cancel deleting the data;the power uill be turned off
d)LANGUAGE;chose one of flve lallguages,English,German,French,Italian ι
md Spall■ ish
Language can be changed anytime in the MENU.
Titles and messages du ng procedures、 v■ 1l be in the selected language.
■ENGLISH
DEUTSCE
FPttNCnI S
ITRLIロ ト10
ESPЛ ‖OL
丼
Initially set langュ age is English
'Move the cursor、 、ith MEMORY(+)or()buttOn
'Press A/1ENU button to set the langdage and turn offthe unit.
=The unit、v■ 1l be automatically tumed off after 30 sec unless
it is operated.
・Press POヽrER/START button to tunn ofthe unit
キ
The clock indicadon is 24 hours lnode
・After batteDr replacement,tl■ e date and time are al、 raヴs
」anuattr l st,200000:00.
オAd」 ust date and tlme with MEMORY(+)を nd(― )buttOn
=Set、、
ith MENU button and tum offthe power.
=The unit uill be automatically tumed off after 30 sec unless
it is operated
キPress POヽVER/START button to turl■ o∬ the unit
c)CLOCK SET;attuSt tl■e clock(month,d等 ,hour,minute and display ON/OFF).
At sarne m釘 lner of battew replacement,clock can be ad」 usted alytime.
FEB 15 2001
2口:21
DISPLΠ Υ
OFF
―
The vear flashes at flrstin CLOCK SET mode
―Press A/1ENU to rnovc the nashing article from ycar to month,dav,hour,nlinute al■ d
displa)・ ON or OFF(After display ON or OFF,the nashing goes back to)・ e ar.)
―Chose cither Display(DN or OFF and set、 、hether clock be displayed or not、 、
'hile the
po、ver is turncd off.As the display is set to ON,the clock is displaved、 vhen the pou:er is
turned off、=hile as the displav is set to OFF,notl■ ing is displそぅ
red、vhen the po、 ver is
turned off ‑17‑
L 8 8 8 8 8
¨H = r フ ちr 7う f
∩ 2 P
E l
L
・ ・n 6 0 0 38
C 61 8 9
︐3 8
l D
V ●Rうι●●う●●ハ0フイEJ
0 2V 5 3 3 3 3
=
/ c ソ ー ー 7 ︐1 1¨
E 0
M り 1一■ 9 Xソ O F よ う
H l l2 22
︲
1
■

WS‐720‐ 12jtd
―
Ad」 ust the nashing article、 、
ith MEMORY(+)or()buttOn.
―
To quit clock attuStment or turn offthe power,press POヽ VER/START button at any point
of clock ad」ustlnent process
o CONTRAST;ad」 ust LCD contrast(brightness).
NOTE:The battelw life、、
ill be short when Display is set to ON(apprOXimately 2 months
lvlth onc lneasurement a dav),u‐ hile the batteries、、
■
11 last longer as the display is
setto OFF(apprOXimateけ 10 mOnths with one measurement a d等 )
5
:― ]← →
[+]
・Initially set value is lO.
・The attustinent range is l to 10(10 indicates the strongest
contrast).
丼
Attust■Vith MEMORY(+)or(― )buttOn.
十
Press MENU to set and turn offttle power.
■
The unit、マ
■1l be automatically tumed off after 30 sec.unlcss
it is operated
'Press POヽVER/START button to turn offthe unit.
4)Clock mOde
ヽVhen the pOM/eris tumed off,clock is sho、 、
咀on the LCD
4‐ 8 Battery replacement indication
l)M′ hen the batte理/power is insufflcient,battery errOr appears on the LCD.
2)The battew error is released and the power、 v■1l be tumed offas the POWER/START button is
pressed.
3)As the battev error appears,non ofthe buttons except POWER/START button is
func」 onable.
‑lS―

WS‐720‑12jtd
4‑9 Special performance in ineasuring mode
l)A/1easuring error indication
a)Error appears on the displav and the〔
r is rapidly exhausted from the cuff、 「
hen innation
is not completed in 25 sec
b)When any body lnovementleads to a rneasurement crror,error appears on the displav and
the alr is rapidly exhausted frorn the curi
C)`Vhen iniaion is insufflcient even after repressurization、 vas repeated and pressure
reached 300 mrnHg,error、 vill appear on the displav
d)Elror appears on the display ifrneasured systolic and diastolic blood pressures ale
extraordina理′
.
C)`Vhenever any outside factor leads pressure to exceed 330 1nlnHg,error appcars on thc
displtt and the air will be rapidサ exhausted from the cuff.
2)PrcsS POWER/START button agn during inflation to stop a measurement and turn offthe
powerにum the pump and ECV oη .
3)Repressurレ ation
When the inflation isjudged insufflcient du ng a measurement,pump isturned on ag n and
the repressuttalton occurs to a leve1 30 mmHg higher than initialし preSSurized valuc
5。 ERROR DISPLAY
This blood pressure lnonitor displays erlor rnessages for incorrect lneasurement rnethod and、 7eak
batte=y.
ヽVhen any error rnessage appeals on■e displav during a llneasurement,exhaust the r frorn the cuff
and lneasure agam after conflming the correct rnethod.
5‑1.Improper pressure Error
キInfladon exceeds 330 mmHg
☆Noise is detected by lnovement of body during a
mcasurement.
キThe defla■ on speed is irregular
The dena■ on speed is faster th狙 9 mmHg/sec・ Or slower
than 3.5 mmHg/Sec.
5‑2.Weak battery
ヽVeak batte電provides inadequate voltage for operation ofthe unit Batteries need to be
replaced.
ヽ
Veak batte弓 7
‑19‑
Table of contents
Other ALP K2 Blood Pressure Monitor manuals