Alpha WDP-120 User manual

Model No.: WDP-120
Version 3
Alpha®Wet/Dry Polisher
Instruction Manual
MANUAL
103 Bauer Drive, Oakland, NJ 07436 • 800-648-7229 • Fax: 800-286-0114
www.alpha-tools.com
WARNING: To reduce the risk of injury, user must read and understand instruction manual!

2
TABLE OF CONTENTS
WDP-120 Overview....................................................................................................3
Specications ............................................................................................................3
Accessories .....................................................................................................4
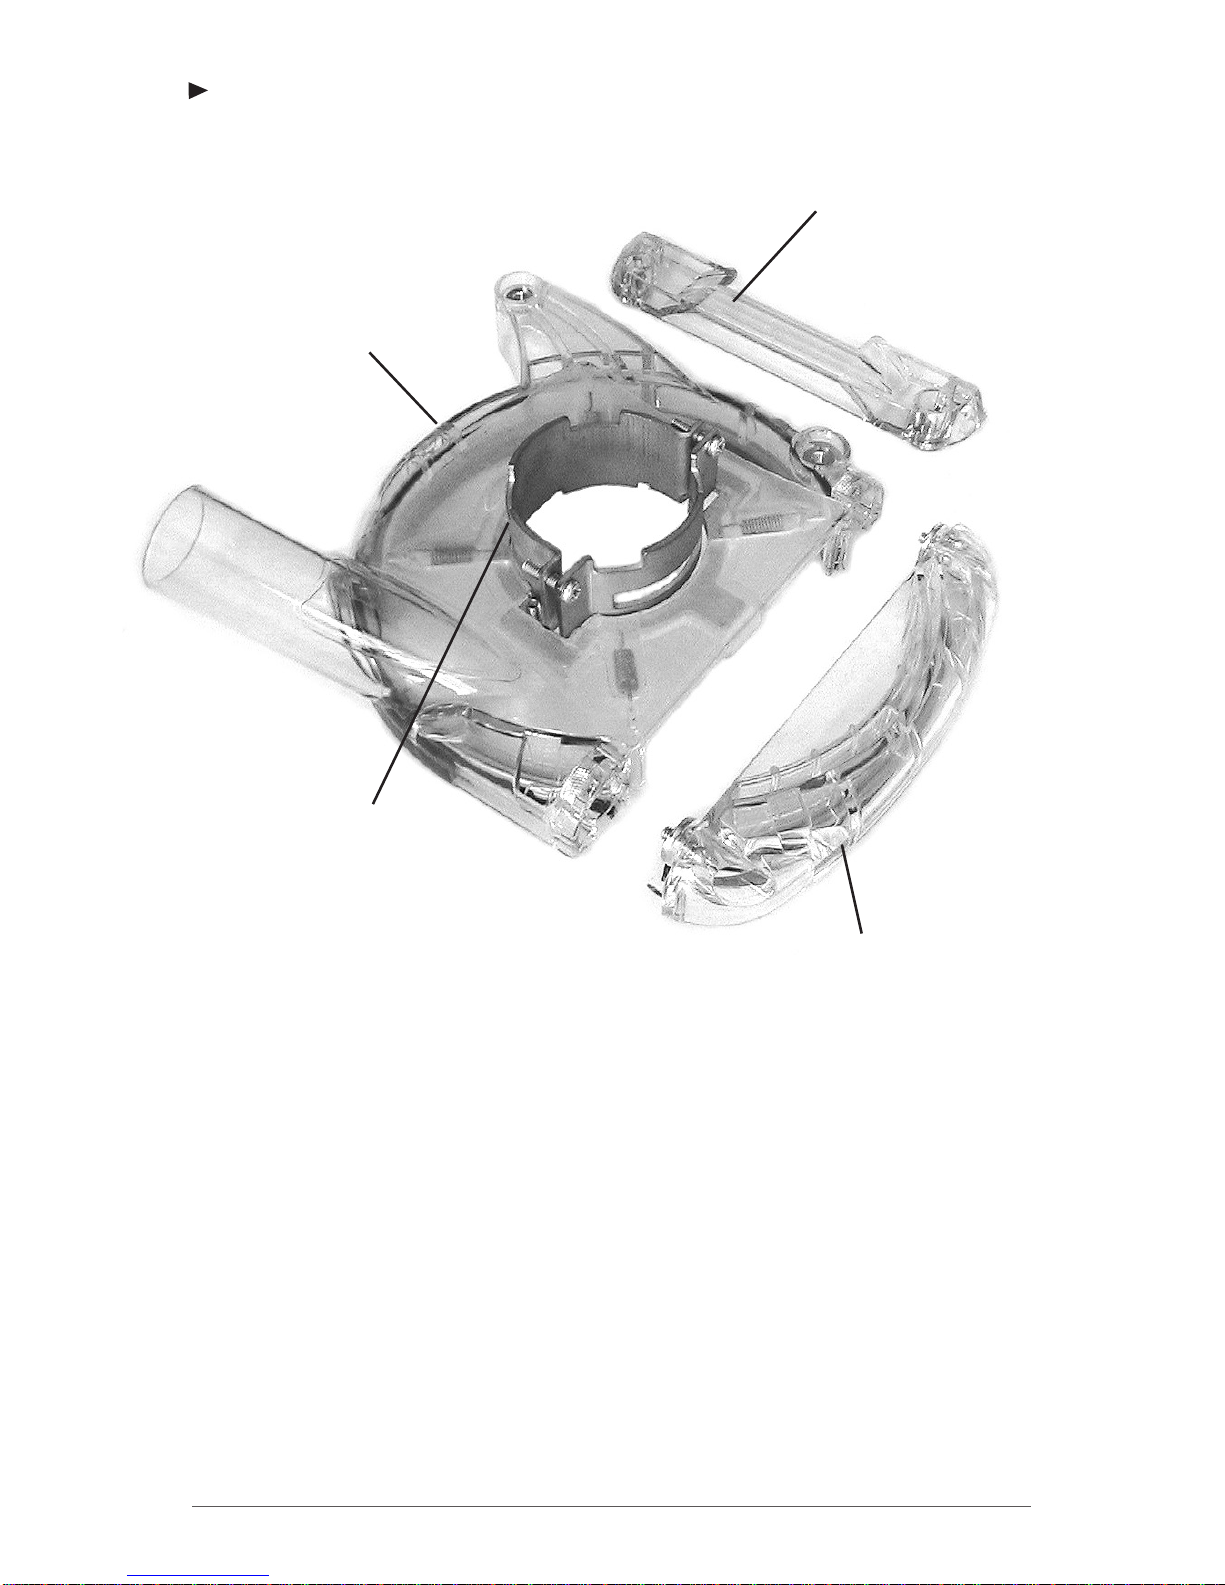
Attachment-Guard.........................................................................................5
Introduction................................................................................................................6
AboutTheSymbols.........................................................................................6
ElectricalSymbols ..........................................................................................6
GeneralSafetyRules.................................................................................................7
WorkArea.........................................................................................................7
ElectricalSafety...............................................................................................7
PersonalSafety ...............................................................................................7
ToolUseandCare ...........................................................................................8
Service..............................................................................................................8
SpecicSafetyRules ......................................................................................9
UseProperExtensionCords........................................................................10
GroundingInstructions ................................................................................10
AdditionalPrecautionsForUsingTheWDP-120........................................10
LawsAndRegulationsOfNoiseLevels......................................................11
GuardInstallation....................................................................................................12
AttachingABackerPadToWDP-120 ....................................................................13
AttachingRubberCapToWDP-120.......................................................................13
WDP-120WetOperation .........................................................................................14
WDP-120DryOperation..........................................................................................14
WDP-120PolishRightUptotheWall ....................................................................15
WDP-120Wet/DryConcretePolisherOperation...................................................16
MainConnection ...........................................................................................16
SwitchingOnAndOff ...................................................................................16
GroundFaultCircuitInterrupter(GFCI) ......................................................17
TestingIn-lineGFCIUnit(BeforeEachUseOfThePolisher) ...................18
VariableSpeedAdjustment ..........................................................................18
SpeedPotFeedbackSensor ........................................................................19
WaterControlValve.......................................................................................19
Water-FeedAttachment ................................................................................20
MAINTENANCE.......................................................................................................20
Bearingsandgears .......................................................................................21
CarbonBrushReplacement ........................................................................21
RearCoverRemoval .....................................................................................22
Alpha®WDP-120Schematic ..................................................................................27
Alpha®WDP-120GuardSchematic........................................................................28
Alpha®WDP-120Partslist ......................................................................................29
LoanerProgram.......................................................................................................32
Warranty ...................................................................................................................32
AppendixA..................................................................................................................i
FrequentlyAskedQuestions...........................................................................i
ProductRegistrationCard......................................................................................33

3
WDP-120 OVERVIEW
SPECIFICATIONS
Rating ............................................................................120 V
Amperage......................................................................7A
Wattage..........................................................................800W
Speed(Variable) ...........................................................500~2800RPM
Weight ......................................................................... 7.3Lbs/3.3kg
Spindle ........................................................................ 5/8”-11
Figure-1
WET
DRY

4
ACCESSORIES

5
ATTACHMENT-GUARD
Connector
MainUnit
SubCover
HalfCover
COMPONENTS:
1. MainUnit
2. Connector
3. HalfCover
4. SubCover
Figure-3

6
INTRODUCTION
ThankyouforpurchasingtheAlpha®Wet/DryConcretePolisher.Pleasereadthis
instructionmanualthoroughlytoensuresafetyandcorrectuseofthepolisher.Keep
thismanualinaplacewhereoperatorscanaccessiteasilywhenevernecessary.
ABOUTTHESYMBOLS
According to the hazard level, all safety notes in this manual are classied into
“DANGER”,“WARNING”,and“CAUTION”.
DANGER! Death or serious personal injury is imminent when handling
thispolisherincorrectly.
WARNING! Thereisapossibilityofdeathorseriouspersonalinjurywhen
handlingthispolisherincorrectly.
CAUTION! Thereis a possibility of personal injuryorpropertydamage
whenhandlingthispolisherincorrectly.
NOTE:Insomesituations,failingtoobserveWARNINGnotescouldresultin
deathorseriouspersonalinjury.Besuretoreadandobservethesafetynotes
toensuresafetyandcorrectuseofthepolisher.
ELECTRICALSYMBOLS
Thefollowingshowthesymbolsusedfortool.
V Volts
A Amperes
Hz Hertz
~ora.c. AlternatingCurrent
n0 Noloadspeed
…/min Revolutionorreciprocationperminute
kg Kilograms
ProtectiveEarth

7
CAUTION!
Thefollowingareimportantnotesforproducts,operation,andmaintenanceappli-
cabletothispolisher.
GENERALSAFETYRULES
WORKAREA
• Keepyourworkareacleanandwelllit.Clutteredbenchesanddarkareasinvite
accidents.
• Donotoperatepowertoolsinexplosiveatmospheres,suchasinthepresence
ofammableliquids,gases,ordust.Powertoolsmaycreatesparkswhichmay
ignitethedustorfumes.
• Keepbystanders,children,andvisitorsawaywhileoperating a powertool.
Distractionscancauseyoutolosecontrol.
ELECTRICALSAFETY
• Groundedtoolsmustbepluggedintoanoutletproperlyinstalledandgrounded
inaccordancewithallcodesandordinances.Neverremovethegroundingprong
ormodifythepluginanyway.Donotuseanyadaptorplugs.Checkwithaquali-
edelectricianifyouareindoubtastowhethertheoutletisproperlygrounded.
Ifthetools shouldelectricallymalfunctionorbreakdowngroundingprovidesa
lowresistancepathtocarryelectricityawayfromtheuser.
• Avoidbodycontactwithgroundedsurfaces,suchaspipes,radiators,ranges,
andrefrigerators.Thereisanincreasedriskofelectricshockifyourbodyis
grounded.
• Don’texposepowertoolstorainorwetconditions.Waterenteringapowertool
willincreasetheriskofelectricshock.
• Donotabusethecord.Neverusethecordtocarrythetoolsorpulltheplugfrom
anoutlet.Keepcordawayfromheat,oil,sharpedges,ormovingparts.Replace
damagedcordsimmediately.Damagedcordsincreasetheriskofelectricshock.
• Whenoperatingapowertooloutside,useanoutdoorextensioncordmarked
“W-A”or“W”.Thesecordsareratedforoutdooruseandreducetheriskof
electricshock.
PERSONALSAFETY
• Stayalert,watchwhatyouaredoingandusecommonsensewhenoperatinga
powertool.Donotusetoolwhiletiredorundertheinuenceofdrugs,alcohol,
ormedication.Amomentofinattentionwhileoperatingpowertoolsmayresult
inseriouspersonalinjury.
• Dressproperly.Donotwearlooseclothingorjewelry.Containlonghair.Keep
yourhair,clothing,andglovesawayfrommovingparts.Looseclothes,jewelry,
orlonghaircanbecaughtinmovingpartsordrawnintoairvents.
• Avoidaccidentalstarting.Besureswitchisoffbeforepluggingin.Carrying

8
toolswithyourngerontheswitchorpluggingintoolsthathavetheswitchon,
invitesaccidents.
• Removeadjustingkeysorwrenchesbeforeturningthetoolon.Awrenchora
keythatisleftattachedtoarotatingpartofthetoolmayresultinpersonalinjury.
• Donotoverreach.Keepproperfootingandbalanceatalltimes.Properfooting
andbalanceenablesbettercontrolofthetoolinunexpectedsituations.Donot
useonaladderorunstablesupport.
• Usesafetyequipment.Alwaysweareyeprotection.Dustmask,nonskidsafety
shoes,hardhat,orhearingprotectionmustbeusedforappropriateconditions.
TOOLUSEANDCARE
• Useclampsorotherpracticalwaytosecureandsupporttheworkpiecetoa
stableplatform.Holdingtheworkbyhandoragainstyourbodyisunstableand
mayleadtolossofcontrol.
• Donotforcetool,usethecorrecttoolforyourapplication.Thecorrecttoolwill
dothejobbetterandsaferattherateforwhichitisdesigned.
• Donotusetoolifswitchdoesnotturnitonoroff.Anytoolthatcannotbe
controlledwiththeswitchisdangerousandmustberepaired.
• Disconnecttheplugfrompowersourcebeforemakinganyadjustments,chang-
ingaccessories,orstoringthetool.Suchpreventivesafetymeasuresreduce
theriskofstartingthetoolaccidentally.
• Storeidletoolsoutofthereachofchildrenandotheruntrainedpersons.Tools
aredangerousinthehandsofuntrainedusers.
• Maintaintoolswithcare.Keeptoolssharpandcleanforbetterandsaferperfor-
mance.Followinstructionsforlubricatingandchangingaccessories.Inspect
theelectricalcordperiodicallyandifdamaged,haveitrepairedbyauthorized
servicefacility.Inspectextensioncordsperiodicallyandreplaceifdamaged.
Keephandlesdry,cleanandfreefromoilandgrease.
• Checkfordamagedparts.Beforeusingthetooleachday,aguardorotherpart
thatisdamagedshouldbecarefullycheckedtodeterminethatitwilloperate
properlyandperform itsintendedfunction.Checkforalignmentofmoving
parts,breakageofparts,mounting,andanyotherconditionsthatmayaffectits
operation.Aguardorotherpartthatisdamagedshouldbeproperlyrepairedor
replacedbyanauthorizedservicecenterunlessotherwiseindicatedelsewhere
inthisinstructionmanual.Havedefectiveswitchesreplacedbyauthorizedser-
vicecenter.Donotusethetoolifitcannotbeturnedonandoffbytheswitch.
• Useonlyaccessoriesthatarerecommendedbythemanufacturerforyourmodel.
Accessoriesthatmaybesuitableforonetool,maybecomehazardouswhen
usedonanothertool.
SERVICE
• Toolservicemustbeperformedonlybyqualiedrepairpersonnel.Serviceor
maintenanceperformedbyunqualiedpersonnelcouldresultinariskofinjury.
• Whenservicingatool,useonlyidenticalreplacementparts.Followinstructions
intheMaintenancesectionofthismanual.Useofunauthorizedpartorfailure
tofollowMaintenanceInstructionsmaycreateariskofelectricshockorinjury.

9
SPECIFICSAFETYRULES
• Accessoriesmustberatedforatleastthespeedrecommendedonthetool
warninglabel.Wheelsandotheraccessoriesrunningoverratedspeedcany
apartandcauseinjury.
• Holdtoolbyinsulatedgrippingsurfaceswhenperforminganoperationwhere
thecuttingtoolmaycontacthiddenwiringoritsowncord.Contactwitha“live”
wirewillmakeexposedmetalpartsofthetool“live”andshocktheoperator.
• Knowyourpowertool.Readoperator`smanualcarefully.Learnitsapplication
andlimitations,as wellasthespecic potentialhazardsrelatedtothistool.
Followingthisrulewillreducetheriskofelectricshock,re,orseriousinjury.
• Alwayswearsafetyglasseswithsideshields.Everydayeye-glasseshaveonly
impactresistantlenses;theyareNOTsafetyglasses.
• Protectyourlungs.Wearafaceordustmaskiftheoperationisdusty.
• Protectyourhearing.Wearhearingprotectionduringextendedperiodsof
operation.
• Inspecttoolcordsperiodicallyandifdamaged,haverepairedatyournearest
FactoryServiceCenterorotherAuthorizedServiceOrganization.Constantly
stayawareofcordlocation.
• Checkdamagedparts.Beforefurtheruseofthetool,aguardorotherpartthat
isdamagedshouldbecarefullycheckedtodeterminethatitwilloperateproperly
andperformitsintendedfunction.Checkforalignmentofmovingparts,binding
ofmovingparts,breakageofparts,mounting,andanyotherconditionsthatmay
affectitsoperation,Aguardorotherpartthatisdamagedshouldbeproperly
repairedorreplacedbyanauthorizedservicecenter.
• Donotabusecord.Nevercarrythetoolbythecordoryankittodisconnectit
fromthereceptacle.Keepcordawayfromheat,oil,andsharpedges.Following
thisrulewillreducetheriskofelectricshockorre.
• Makesureyourextensioncordisingoodcondition.Whenusinganextension
cord,besuretouseoneheavyenoughtocarrythecurrentyourproductwill
draw.Anundersizedcordwillcauseadropinlinevoltageresultinginlossof
powerandoverheating.
• Inspectforandremoveallforeignobjectsfromworkpiecebeforepolishing.
Followthisrulewillreducetheriskofseriouspersonalinjury.
• Drugs,alcohol,medication,Donotoperatetoolwhileundertheinuenceof
drugs,alcohol,oranymedication.Followthisrulewillreducetheriskofelectric
shock,re,orseriouspersonalinjury.
• Keephandsawayfrompolishingarea.Followthisrulewillreducetheriskof
cuts,scrapes,orseriouspersonalinjury.
• GroundFaultCircuitInterrupter(GFCI)protectionshouldbeprovidedonthe
circuitoroutlettobeusedforthetool.Receptaclesareavailablehavingbuilt-in
GFCIprotectionandmaybeusedforthismeasureofsafety.
• Savetheseinstruction.Refertothemfrequentlyandusethemtoinstruct
otherswhomayusethistool.Ifyouloansomeonethistool,loanthemthese
instructions.

10
USEPROPEREXTENSIONCORDS
Useonlythree-wireextensioncordsthathavethree-pronggrounding-typeplugsand
three-polereceptaclesthatacceptthetool’splug.Makesureyourextensioncord
isingoodcondition.Replaceorrepairdamagedorworncordimmediately.When
usinganextensioncord,besuretouseoneheavyenoughtocarrythecurrentyour
productwilldraw.Anundersizedcordwillcauseadropinlinevoltageresultingin
lossofpowerandoverheating.Belowtableshowsthecorrectsizetousedepend-
ingoncordlengthandnameplateampererating.Ifindoubt,usethenextheavier
gauge.Thesmallerthegaugenumber,theheavierthecord.
Ampere Rating Total length of cord in feet (120V )
25ft 50ft 100ft
More
Than Not More
Than AWG
0 6 18 16 16
6 10 18 16 14
10 12 16 16 14
12 16 14 12 Not Recom-
mended
GROUNDINGINSTRUCTIONS
Thistoolshouldbegroundedwhileinusetoprotecttheoperatorfromelectricshock.
Thetoolisequippedwithathree-conductorcordandthree-pronggroundingtype
plugtotthepropergroundingtypereceptacle.Thegreen(orgreenandyellow)
conductorinthecordisthegroundingwire.Neverconnectthegreen(orgreenand
yellow)wiretoaliveterminal.
ADDITIONALPRECAUTIONSFORUSINGTHEWDP-120
Inadditiontothegeneralsafetynotesdescribedontheprecedingpages,pleaseread
andobservethefollowingprecautionarynotesbeforeusingthepolisher.
DANGER!
1. Checktheworkingvoltage.
Besurethevoltageavailableatpoweroutletmatchesspeciedvoltageonthe
nameplate.Ifthepolisherisusedwithhighervoltagethanspecied,themo-
torwillburnout.Anyattemptstodosomaydamagethepolisherorcausean
accidentorinjury.
2. Inspectallpolishingdiscs.
Neverusecracked,chippedordamagedpolishingdiscs.
3. Holdthepolishertightlyatstart-up.

11
Failuretodosomaycauseaninjuryduetohighimpactatinitialstartup.
4. Stopusingthepolisherimmediatelywhennoticinganymalfunctionsorany
suspiciousabnormalnoises.
TurnthepowerswitchOFFandcontactyourdealerorAlphaProfessionalTools®
forrepair.
5. Handlethepolisherwithcare.
Ifyouaccidentallydropthepolisher,donotuseituntilcheckingthatitisnot
cracked,deformed,ordamagedinanyway.
6. Donotpourwateroranyliquidsontoorinsidethepolisher.
Itmaycauseelectricshocks.
7. Donotholdthepolisherinavice.
8. Donottouchanyrotatingparts.
Nevertouchthepolishingdiscofthepolisherduringoperationwithyourhands.
9. Donotleavethediscwhilespinningonthebench,oororsurfaceofyour
workpiece.
Itmaycauseanaccidentorinjury.
WARNING!
10. Attachthebackerpadandpolishingdisccorrectlybyfollowingtheprocedure
inthisinstructionmanual.
Attachingthepolishingdiscsincorrectlymaycauseanaccident.
11. Observeanysuspiciousabnormalnoiseswhenapolishingdiscisattachedfor
thersttimeandpolisheristurnedON.
Itmaycausebodilyinjuryifthepolishingdisciesoff.
12. Donottouchthepolishingdiscwhilespinning.
Thepolishingdiscspinsveryfastandyoumayhurtyourself.
13. Becarefulofyoursurroundingswhenworkinginhighplaces.
Whenworkinginhighplaces, make sure therearenopeoplebelow. Donot
trapthepowersupplycordonanythingordropthepolisheroranymaterials,
otherwise,Itmaycauseanaccident.
LAWSANDREGULATIONSOFNOISELEVELS
Pleaseobservelocallawsandregulationsregardingnoiselevelinordertoavoid
disturbingsurroundingareas.Installasoundproofwallifrequiredtocomplywith
thelocallawsandregulations.

12
GUARD INSTALLATION
Figure-4
Figure-5

13
ATTACHING RUBBER CAP TO WDP-120
ATTACHING A BACKER PAD TO WDP-120
RubberCap RubberCap
WET DRY
Figure-6
Figure-7

14
WDP-120 WET OPERATION
WDP-120 DRY OPERATION
RubberCap
Inserttherubbercaptothedustgageofthemaincover.
RubberCap
RubberHoseAdapter
StainlessSteel
HoseBand
FlexibleConnectorHose
(optional/soldseparately)
Figure-8
Figure-9

15
POLISH RIGHT UP TO THE WALL
Changethefrontcover
tothesubcover
Loosenthescrewsonbothsidesofthe
C-handleandmoveitupwardasshown
inFigure11.
STEP 1
STEP 2
STEP 3
Figure-10
Figure-11
Figure-12

16
WDP-120WET/DRYCONCRETEPOLISHEROPERATION
CAUTION!
Alwaysbesurethatthetoolisswitchedoffandunpluggedbeforeadjustingor
checkingfunctionontool.
MAINCONNECTION
Connectonlytosingle-phaseACcurrentsupplyandonlytothemainvoltagespeci-
edontheratingplate.
SWITCHINGONANDOFF
CAUTION!
Beforeplugginginthetool,alwayschecktheworkingvoltagebesurethatthevoltage
speciedisonthenameplate.Beforeplugginginthetool,alwayschecktoseethat
theslideswitchactuatesproperlyandreturnstothe“OFF”positionwhentherear
oftheslideswitchisdepressed.
Switchingon:
Switchcanbelockedin“ON”positionfor
easeofoperatorcomfortduringextended
use.Applycautionwhenlockingtoolin
“ON”positionandmaintainrmgraspon
tool.Pushpowerswitchtotheforward
positionuntilitlocksintopositionasshown
inFigure13.
Switchingoff:
Pushdownonpowerswitchtoreleaseto
therearpositionasshowninFigure14.
OFF POSITION
Figure-14
Figure-13
ON POSITION

17
GROUNDFAULTCIRCUITINTERRUPTER(GFCI)
AGroundFaultCircuitInterrupterisbuiltin-linewiththepowersupplycordto
protecttheoperatorfromelectricshock.
1. GFCIInformation.
– Alpha®WetPolisherisprovidedwithanin-lineGFCIasastandardacces-
soryforyoursafety,andtopreventpossibleelectricshocks.Itisstrongly
advisedtotesttheGFCIonaregularbasis.
DANGER!
Neverattachadamagedextensioncordtothepolisher.
NOTE:Usetheappropriateextensioncord,seetableonpage9.
CAUTION!
WhentheGFCItrips,thiscouldbetheresultofwaterenteringthepolisherhousing.
1.TurnOFFthepowerswitch,disconnectpolisherfrompowersupplyandblow
dryairinsidethemotorcoverthroughtheairvents.
2.Re-connectpowersupplyandpresstheGFCIresetbutton.Thepolisheris
readytostartworkingoncetheresetbuttonispresseddown.
DANGER!
AlwayscheckthattheGFCIunitisworkingcorrectly(reset,test,andreset)before
usingthistool.DonotusethetooliftheGFCIisnotworkingcorrectly.Donotbypass
theGFCIifthisconditionoccurs,arealshockhazardmayexist.
WARNING!
IftheGFCIfailstotripwhenthetestbuttonispressed,orfailstoreset,thedevice
isdefectiveandshouldreplaced.
CAUTION!
1.TheGFCIisasafetydevice,donotuseasanon/offswitch.
2.TheGFCIonthetoolwillnotprotectyouifyoucutintoanothercurrent
carryingconductor.
3.DonotusewherewatermayenterGFCIcase.

18
TESTINGIN-LINEGFCIUNIT(BeforeEachUseOfThePolisher)
1.ConnectpolishertoasinglephaseACpowersupply.
2.Verifythattheindicatorlensshowsred(indicatingoutputvoltage).
3.Pressthetestbuttontoverifythattheredintheindicatorlensdisappears.
4.Presstheresetbuttontoverifytheredindicatorisvisible.
5.TheGFCIisnowreadyforuse.
WARNING!
DONOTUSEIFABOVETESTFAILS!
VARIABLESPEEDADJUSTMENT
ThispolisherisequippedwithaVariableSpeedcontrol
thatwillallowthespindlespeedtobeadjustedfrom
500RPMto2800RPM.Speedadjustmentiscontrolled
byrotationofthewheelasshownintheFigure14.
NOTE-Wheelnumbersareforreferencepointofmo-
torspeed(#1is500RPMand#6is2800RPM).
AdjusttheRPMofthetooltomatchtherecom-
mendedRPMoftheproductbeingused.
Indicatorviewinglens.
REDlensshowspowerto
polisher.
CLEARlensshowsnopow-
ertopolisher.
RESETBUTTON
TESTBUTTON
Figure-15 Figure-16
INCREASE SPEED
DECREASESPEED
Figure-17

19
SPEEDPOTFEEDBACKSENSOR
ThispolisherisequippedwithaClosedLoopFeedbacksensorthatisattachedto
thespeedpot.Whenaloadisappliedtothetool,thesensorwillre-adjusttheRPM
tomaintainaconstantspeed.
WATERCONTROLVALVE
CAUTION!
Adjustthewaterowtowetthestoneandremovewaste,excessivesprayandmistwill
getinsidethetoolandcauseprematurefailureofthetooland/orcausetheGFCItotrip.
Thispolisherisequippedwithacenterwater-feedsystem.Waterowtothespindle
showerboltcanbecontrolled by throttling the valve stem as seen in Figure 18,
Figure19andFigure20.
WaterValvein
closedposition WaterValvein
halfopenposition
WaterValveinfullopenposition
Figure-18 Figure-19
Figure-20

20
WATER-FEEDATTACHMENT
Attachthepolisherwater-linettingtoanygardenhoseconnection.
OPERATION
WARNING!
Toreducetheriskofelectricshock,checkthetool’swatersupplysystemtoensure
thereisnodamagetothesealsorhoses.Adamagedwatersupplysystemmayresult
inabnormalwaterowtothetoolwhichcouldbedangerous.
CAUTION!
Alwayswearsafetygogglesorafaceshieldduringoperation.Neverswitchonthe
toolwhenitisincontactwiththeworkpiece,itmaycauseaninjurytooperator.Never
runthetoolwithoutproperlyinstalledaccessories.
Makesurethatthewatervalveisclosed.Connectthegardenhoseadaptertothewater
source.Makesurethatwatercomesoutwhenthewatervalveisopened.Holdthe
toolrmly.Turnthetoolonandbeginyourapplication.Applyslightpressureonly.
Excessivepressurewillresultinpoorperformanceandprematurewear.
MAINTENANCE
CAUTION!
Alwaysbesurethatthetoolisswitchedoffandunpluggedbeforeattemptingto
performinspectionormaintenance.
DAILY
1. Beforedailystart-upinspecttool,powercord,GFCI,andbackerpadorother
spindleattachments.
2. Ifdamagehasoccurred,repairaffectedareasbeforeuse.
3. ConnectthetooltothecorrectpowersourceandtesttheGroundFaultCircuit
Interrupter(GFCI)beforeusingthetool.PushtheRESETbuttonandconrm
thattheredlightison,pushtheTESTbuttonandconrmthattheredrunlight
isoffandpushtheRESETbuttontousethetool.
4. Turntheunitonandruninano-loadconditiontoensurethatbackerpadorother
spindleattachmentisbalanced.
5. Afterdailyuseofthetool,cleanandblowofftheexterioroftoolandaroundthe
rearairintakeventstoremoveanystandingwaterordust.Failuretodothis
willshortenthelifeofyourtool,andcouldvoidyourwarranty.
Table of contents
Other Alpha Sander manuals
Popular Sander manuals by other brands

HP Autozubehor
HP Autozubehor 20361 Operating lnstructions

Makita
Makita BO5031 instruction manual

Central Machinery
Central Machinery Central Machinery 6" Belt & 9" Sander 6852 Assembly and operating instructions

Makita
Makita M9204 instruction manual

BorMann
BorMann Pro BSS1350 user manual

iBells
iBells DS 80-70 Operator's manual

Alpha Professional Tools
Alpha Professional Tools AIR-680 instruction manual

Flex
Flex X 1107 VE Original operating instructions

Black & Decker
Black & Decker KA900E Powerfile Original instructions

Grizzly
Grizzly H6070 Parts Breakdown

BN Products
BN Products BNR1841 operating instructions

Festool
Festool RS 2E Specification sheet