ALPHAX 2step Box User manual

2step Box: Instruction Manual
WARNING:
For off-road or closed course use ONLY. Use this product ith GREAT
CAUTION. Misuse of this product can cause serious engine damage and
exhaust damage. ALPHAX takes no responsibility for the damage caused by
the misuse of this product
Note: 90 day arranty on manufacturing defects. Restrictions may apply.

IMPORTANT
1) The box to make 2step is Universal. For this reason, you are responsible for adjusting
properly the parameters of the box to obtain the effect of 2step that you ant in your vehicle.
AlphaX does not have each and every one of the specific parameters for each brand and
vehicle model to obtain the 2step.
2) The box make 2step only controls the moment the coils of your vehicle ill receive
12v ("current") and hen it ill not to make the effect of 2step. For this reason, if your
vehicle contains an advanced computer system, it is possible that the activation of the
2step causes the momentary ignition of the malfunction light of the engine or
"check engine".
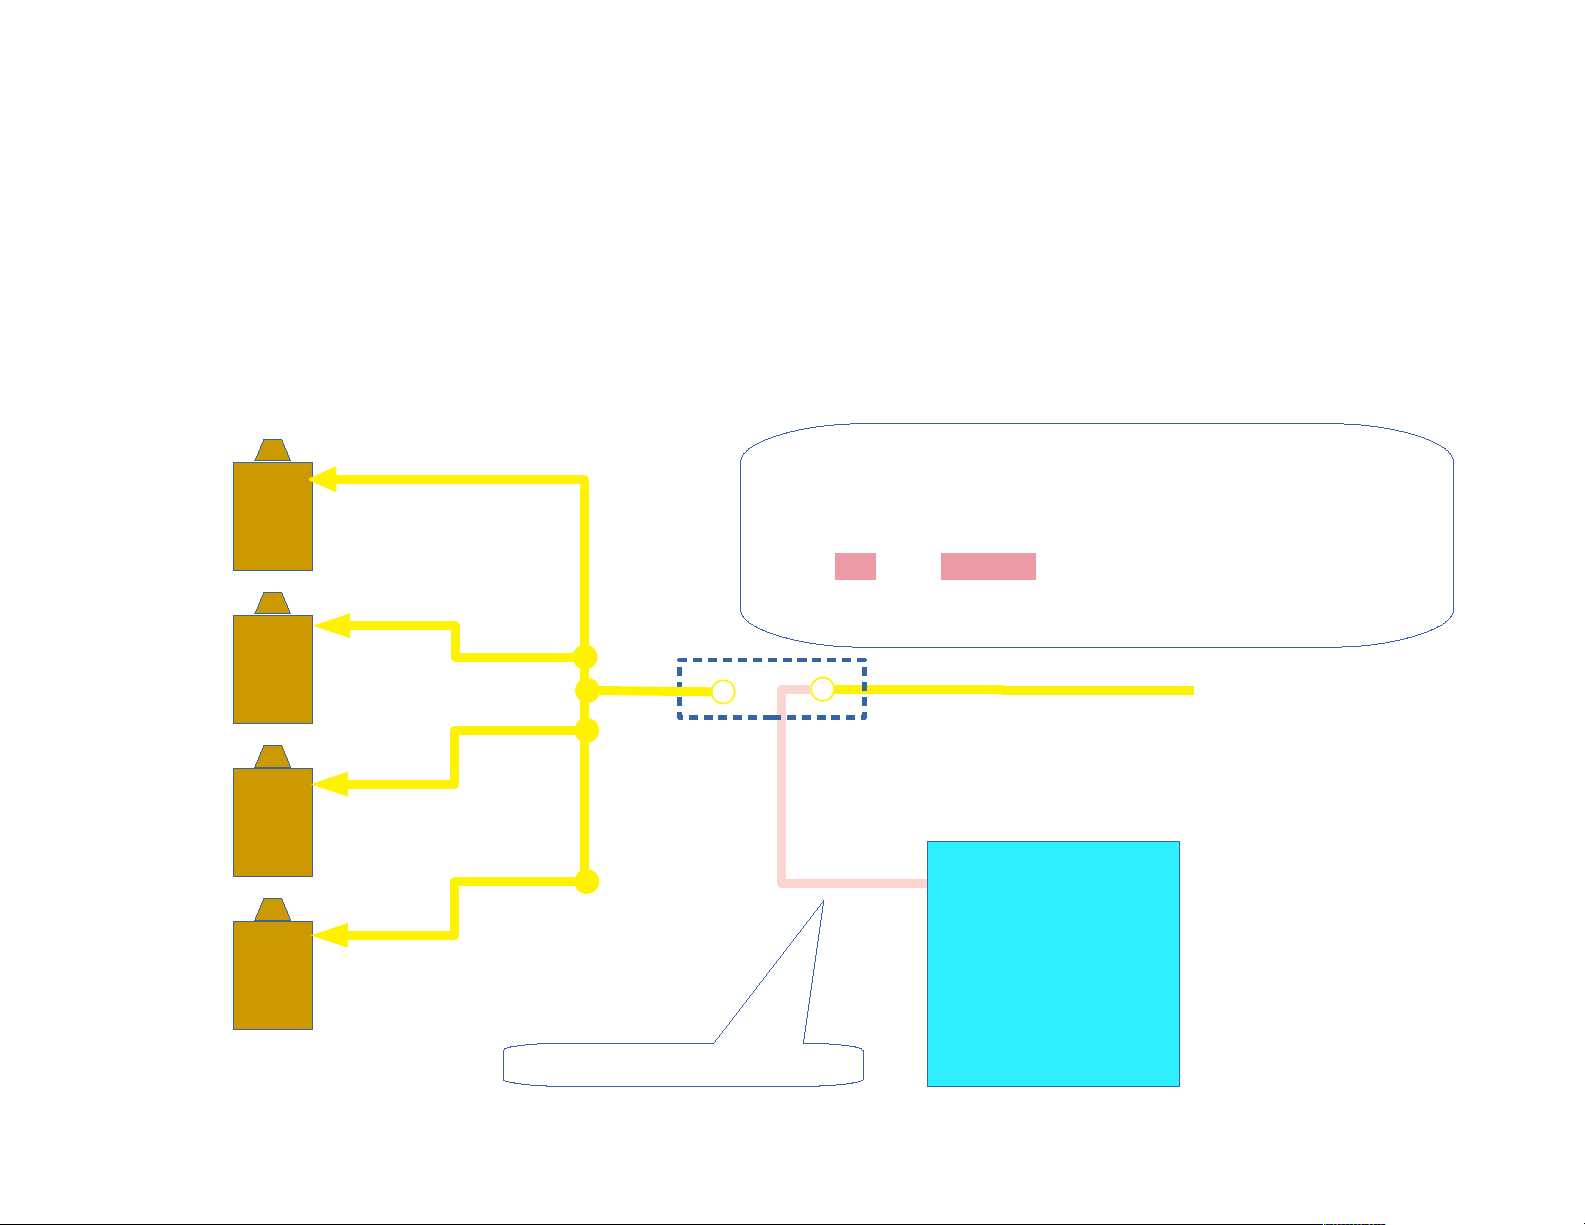
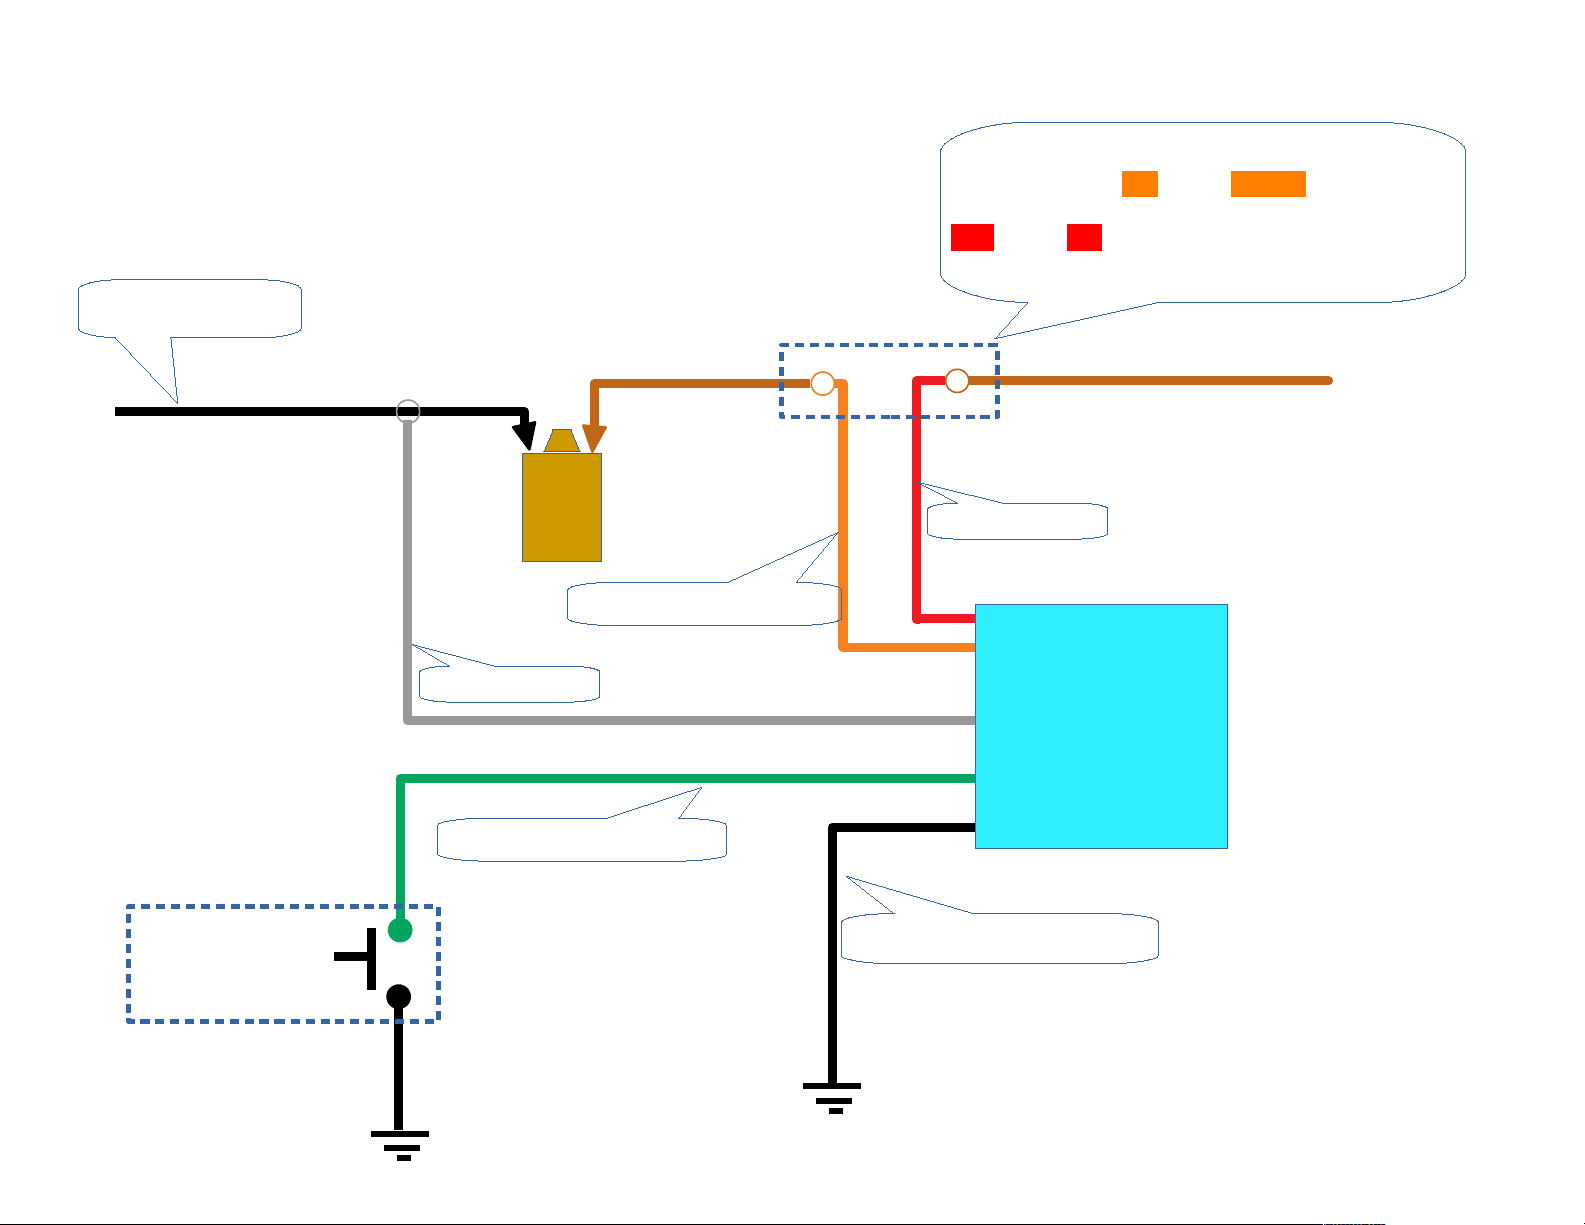
3) The diagrams belo for the installation of your 2step box are For Reference Only.
It is your duty to consult an electrical diagram of your brand and vehicle model to identify
the correct cables for the installation.
4) If the application for hich you purchased the 2step box falls out of the diagrams in this
manual, you should use the universal diagrams for single or multiple coil and consult an
automotive technician to complete a suitable installation.
5) The 2step box is an electronic accessory. All the boxes are tested before being sent and
No oney will be refunded if it as dispatched correctly. If you face problems ith your
2step box, you can contact AlphaX to evaluate the case and grant the arranty if applicable.

Symbols & Terms
S itch
Ground 2step signal
Symbol Ho it looks Ho it connects
Ground
Symbol Ho it connects
MPI: Cars ith multi point injectors near intake valve.
GDI: Cars ith gasoline direct injection or injectors inside the combustion chamber.

12V (Red)
Coil (Orange)
2step signal (Green)
RPM (Grey)
Ground (Black)
Wire name and color
Warning:
If this product is not installed according to the instructions or iring diagram for the
specific application, arranty ill be void automatically.
Toyota/Lexus IGF (Pink)
ALPHAX
2STEP BOX

Coil
+
-
ALPHAX
2STEP BOX
12V ire
Coil ire
RPM cable
S itch
2step signal ire
Ground ire
Signal ire Coil
+
-
Coil
+
-
Coil
+
-
Ground
Diagram for Hyundai Veloster 2013
Position sensor of
exhaust camshaft
White
Cut original coil ire. The coil side of the ire
connects to the “coil” ire (orange).
The harness side of the original ire connects
to the “12V” ire (red).

Coil
+
-
ALPHAX
2STEP BOX
12V ire
Coil ire
RPM ire
S itch
2step ire
Ground ire
Coil
+
-
Coil
+
-
Coil
+
-
Injector negative or
injector signal ire
Wiring diagram for Honda, Mitsubishi, Nissan, Toyota, Mazda and Kia 2003 present ith MPI.
For vehicles Toyota/Lexus add the steps on the next page.
Ground
WARNING:
If product is not installed according to the instructions or
iring diagram for the specific application, arranty ill be
void automatically.
Cut original coil po er ire or 12V ire just
before the junction here the ire splits into
multiple coils. The coil side of the ire
connects to the “coil” ire (orange). The
harness side of the original ire connects to
the “12V” ire (red).

ONLY FOR TOYOTA/LEXUS
Toyota and Lexus vehicles contain a confirmation signal that the computer of the engine
uses to monitor hether the coils of the engine are operating ithout faults.
This signal is disconnected from the engine coil(s) and is connected to
the imitation (pink ire) of the box.
Coil
+
-
ALPHAX
2STEP BOX
IGF ire for Toyota/Lexus
Cut the factory IGF ire that leads to all coils. The coil side
of the ire MUST BE LEFT UNCONNECTED and a ay from
any piece of metal to prevent short circuits.
The other side of the ire (the harness side) connects
to the IGF ire (pink ire) of the 2step box.
Coil
+
-
Coil
+
-
Coil
+
-

Wiring diagram for vehicles ith multiple coils and vehicles ith GDI technology.
Coil
+
-
ALPHAX
2STEP BOX
12V ire
Coil ire
RPM ire
S itch
2step signal ire
Ground ire
Coil signal ire
Coil
+
-
Coil
+
-
Coil
+
-
Ground/Tierra
WARNING:
If product is not installed according to the instructions or
iring diagram for the specific application, arranty ill be
void automatically.
Cut original coil po er ire or 12V ire just
before the junction here the ire splits into
multiple coils. The coil side of the ire
connects to the “coil” ire (orange). The
harness side of the original ire connects to
the “12V” ire (red)

Single coil iring diagram
Coil
+
-
ALPHAX
2STEP BOX
12V ire
Coil ire
RPM ire
S itch
Cable de señal de 2step
Coil ire
Coil negative or
coil signal ire
Ground/Tierra
WARNING:
If product is not installed according to the instructions or
iring diagram for the specific application, arranty ill be
void automatically.
Cut original coil ire. The coil side of the ire
connects to the “coil” ire (orange). The harness
side of the original ire connects to the
“12V” ire (red).

Vehicles with MSD syste s

Vehicles that use the hite cable of the MSD (see photo on this page) to pulse the MSD
see the diagram ith the instructions on the next page.

Wiring diagram for MSD that use hite ire to pulse
Coil
+
-
ALPHAX
2STEP BOX
12V ire
Coil ire
RPM cable
S itch
2step signal ire
Ground ire
MSD
Battery 12V
Ignition Key
Battery 12v
Ground
WARNING:
If product is not installed according to the instructions or
wiring diagra for the specific application, warranty will be
void auto atically
Leave as is
White ire of
MSD
Cut s itched 12V ire of the MSD, this is the thin red ire. The
MSD side of the ire connects to the “coil” ire (orange) of the
2step box. The other side of the ire, the harness side, connects
to the “12V” ire (red) of the 2step box.

Vehicles that use the green and violet cables of the MSD (see photo on this page) to
pulse the MSD, see the diagram ith the instructions on the next page.

Wiring diagram for MSD that use green ire and violet ire to pulse
Coil
+
-
ALPHAX
2STEP BOX
12V ire
Coil ire
RPM ire
S itch
2Step signal ire
Ground ire
Battery 12V
Ignition key
Battery 12V
Ground
Leave as is
Violet ire of
MSD
MSD
Cut s itched 12V ire of the MSD, this is the thin red ire. The
MSD side of the ire connects to the “coil” ire (orange) of the
2step box. The other side of the ire, the harness side, connects
to the “12V” ire (red) of the 2step box.

The 2step box contains the basic parameters to be able to make the effects in any car.
It contains a 10-position heel (photo) in hich you can choose bet een making cuts fast
at 7 different rpm and slo cuts at 3 different rpm. If you ant to change the parameters in any
of the positions, you can do it ith the instructions from the next page.
Basic Setting

Programming by USB

Install USB to serial driver: CH340 Driver
Do nload CH340
driver installer

Install Communication Soft are: Putty
Do nload Putty installer

Click if you ould like
a Desktop Shortcut

Connecting the 2Step Box to your laptop
Step 1: Open
Device Manager
Step 3: Identify
COM Port
Step 2: Connect 2Step Box
to laptop ith USB cable
Step 4: Open Communication
Soft are Putty
Step 5: Select “Serial” under
“Connection Type”. Set COM Port number
and set serial port Speed to 115200.
Click “Open”
Table of contents
Popular Automobile Accessories manuals by other brands

Menabo
Menabo ZB4980 manual

JL Audio
JL Audio Stealthbox SB-F-SUPRCNSL/8W7 installation guide

Subaru
Subaru F411SFL010 installation instructions

Cequent Towing Products
Cequent Towing Products 24756 installation instructions

Brink
Brink 3457 Fitting instructions

VBG
VBG Onspot Mounting instruction/Spare Parts List