manuals.online logo
Brands
  1. Home
  2. •
  3. Brands
  4. •
  5. ALTONOVUS
  6. •
  7. Measuring Instrument
  8. •
  9. ALTONOVUS NanoRanger User manual

ALTONOVUS NanoRanger User manual

MODEL: NR-01: AUTO-RANGING DC AMMETER-
QUICK START GUIDE (Rev 6.5 dated 14 Nov 20)
ALTONOVUS LTD. 37 OAST HOUSE CRESCENT,
FARNHAM, SURREY, GU9 0NP. UNITED KINGDOM
Do Not immerse in,
or expose to liquid or
dust.
No User-serviceable
components. Do Not
open unit, as it voids
warranty and
calibration.
Do Not drop, expose to
shock, or place heavy
objects on unit.
Do Not apply pressure
to display.
Avoid extremes of
temperature. Max
accuracy in 20-25
degree Celsius range.
DEVICE USE AND CARE
Only use a clean,
dry cloth to clean
unit.
Do Not exceed
maximum device
load of 1.0A. Higher
current can cause
device failure.
A - Positive Terminal
B - Negative Terminal
C - Display Screen
D - On / Off Button
E - Menu Navigation
F - Select Button
G - Isolated USB Interface
H - Battery Compartment
BEFORE USE
If desired, remove the protective film from the front of
the NanoRanger unit. Peel carefully from below the
Positive and Negative terminals. NanoRanger will
still function normally, if the film is left in place.
INSERT 2 x AA BATTERIES
1. Remove battery compartment cover (H) applying
gentle pressure to finger pad.
2. Ensure clean contacts on batteries.
3. Insert new batteries, observing polarity
instructions in battery compartment.
4. Replace battery compartment cover.
2 x AA alkaline batteries will give in excess of 150
hours of continuous operation. Treat all batteries in
accordance with the manufacturer’s instructions.
USE IN CONJUNCTION WITH THE FULL INSTRUCTION MANUAL. DOWNLOAD AT: WWW.ALTONOVUS.COM
SCREEN GUIDE
A- The current reading, displayed in mA, uA, nA, and pA. In this example,
0.309uA.
B- The small, lower Range Bar shows which ranges are in use. The
upper, longer Range Coverage Bar shows movement across the ranges
during the reading. The box surrounding both, shows which range
constraint has been input, via the menu. In this example, none.
C- The Signal to Noise Ratio (SNR). The SNR indicates how much
noise, variation, and AC components are in the signal, followed by
Maximum and Minimum samples during the reading.
D- Maximum (Mx) and E- Minimum (Mn). The Mx and Mn Readings
shown are those that have occurred since this measurement started.
Below that, the highest (Sh) and lowest (Sl) Samples are shown, from
which the Readings have been derived.
GETTING STARTED - TAKE A READING
WARNING. Use
NanoRanger with
cables less than 3
metres in length.
STEP 1: POWER ON
After inserting batteries
as shown, press the
POWER button to start
NanoRanger.
Connect Positive
terminal (RED) to
the higher voltage
side of the current
to be measured.
STEP 2: CONNECT LEADS
Connect Negative terminal (BLACK)
to the lower voltage side of the cur-
rent to be measured. Current
must
flow from Positive to Negative.
Leads (not supplied) should be
industry standard, uninsulated,
4mm banana plug. Leads of 0.3M
will help minimise any noise.
STEP 3: TAKE MEASUREMENTS
Sampling at a high rate to
eliminate mains noise, Nano-
Ranger takes about 3 readings
per second. It displays the current
in mA, uA, nA, and pA. In this
example, 0.309uA.
A Range Bar underneath the digits
shows which ranges are in use.
The Range Bar oscillates after
each reading to show how quickly
readings are occurring and to
provide a visual confirmation that
the device is functioning correctly.
STEP 4: POWER OFF
After measurements
are taken, press the
POWER button
again to return
NanoRanger to
Standby mode.
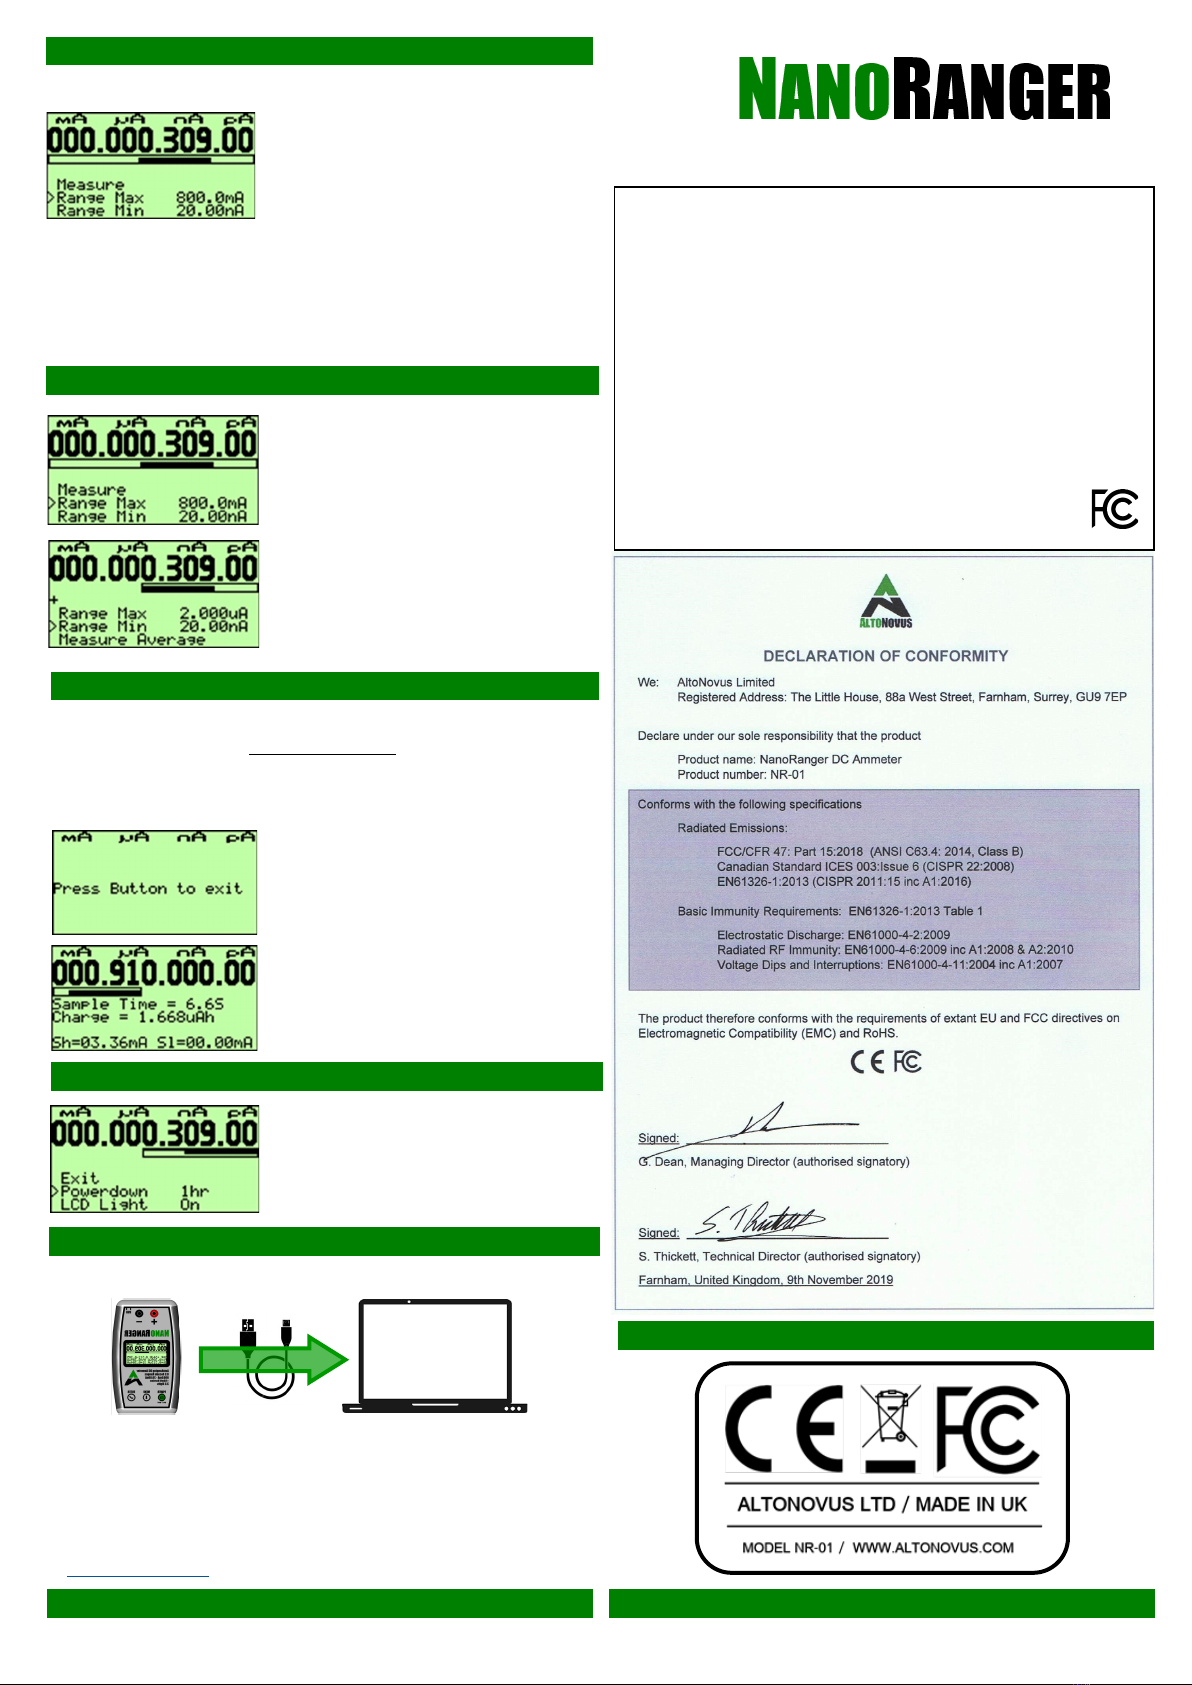
USING THE FULLY ISOLATED USB INTERFACE
NanoRanger’s micro-USB interface can be used to export readings
and to control the device via a PC (SCPI-format). The USB interface
cannot be used to power NanoRanger, as it is isolated from the main
circuitry to prevent interference. For help connecting NanoRanger,
see the guidance in our website’s NanoRanger section. For SCPI
instructions, please download the full NR-01 Instruction Manual at:
www.altonovus.com
USE IN CONJUNCTION WITH THE FULL INSTRUCTION MANUAL. DOWNLOAD AT: WWW.ALTONOVUS.COM
MODEL: NR-01: AUTO-RANGING DC AMMETER-
QUICK START GUIDE
NANORANGER - BASIC MENU FUNCTIONS
This device complies with part 15 of the FCC Rules. Operation is subject to the following two
conditions: (1) This device may not cause harmful interference, and (2) this device must accept any
interference received, including interference that may cause undesired operation.
NOTE: This equipment has been tested and found to comply with the limits for a Class B digital
device, pursuant to part 15 of the FCC Rules. These limits are designed to provide reasonable
protection against harmful interference in a residential installation. This equipment generates, uses
and can radiate radio frequency energy and, if not installed and used in accordance with the
instructions, may cause harmful interference to radio communications. However, there is no
guarantee that interference will not occur in a particular installation. If this equipment does cause
harmful interference to radio or television reception, which can be determined by turning the
equipment off and on, the User is encouraged to try to correct the interference by one or more of
the following measures:
- Reorient or relocate the receiving antenna.
- Increase the separation between the equipment and receiver.
- Connect the equipment into an outlet on a circuit different that to
which the receiver is connected.
- Consult the dealer, or an experienced radio/TV technician for help.
• Measure (as described on the previous page).
• Range Maximum.
• Range Minimum.
• Measure Average.
• Advanced.
Press the Menu button to exit
measuring and enter the Menu mode.
This screen will appear. Use the
Navigate and Select buttons to move
through the Menu. The options are:
RANGE MAXIMUM / MINIMUM - Use
these options to set the
upper
and
lower
limits over which NanoRanger will
Auto-Range during operation.
If not constrained by the User,
NanoRanger will exploit it’s full
measurement range.
The screen may show “UNDER LOAD” if
a minimum range has been set, or if
nothing is connected to NanoRanger.
MEASURE AVERAGE - Use this function to calculate an average
current over a time period, within a single range. Having prevented
auto-ranging (Set Range Max and Min), press Select to begin, and the
first screen below will be shown. Press Select again to end the meas-
uring period. At the end of the period, the second screen shows:
• The average current over the period
(here 910.0uA).
• The sample time, shown in multiples
of 200mS.
• The total charge for the period (here
1.668uAh).
• The highest (Sh) and lowest (Sl)
samples taken in the period.
ADVANCED MENU FUNCTIONS -
In this element of the Menu, the User
can configure the Auto-Powerdown
timer and LCD back-Light.

Other manuals for NanoRanger

1

This manual suits for next models

1

Other ALTONOVUS Measuring Instrument manuals

ALTONOVUS NanoRanger User manual

ALTONOVUS

ALTONOVUS NanoRanger User manual

ALTONOVUS OR-01 User manual

ALTONOVUS

ALTONOVUS OR-01 User manual

ALTONOVUS OR-01 User manual

ALTONOVUS

ALTONOVUS OR-01 User manual

Popular Measuring Instrument manuals by other brands

Associated Research OMNIA II 8204 Operation and service manual

Associated Research

Associated Research OMNIA II 8204 Operation and service manual

Konica Minolta CM3600D brochure

Konica Minolta

Konica Minolta CM3600D brochure

GENUV MG-08 manual

GENUV

GENUV MG-08 manual

W&T 55504 instructions

W&T

W&T 55504 instructions

Omnitronic SLM-500 user manual

Omnitronic

Omnitronic SLM-500 user manual

ATP Instrumentation MT-913 user manual

ATP Instrumentation

ATP Instrumentation MT-913 user manual

EasySplicer PRO user manual

EasySplicer

EasySplicer PRO user manual

Keithley 4200A-SCS quick start guide

Keithley

Keithley 4200A-SCS quick start guide

Vega VEGACAL 65 operating instructions

Vega

Vega VEGACAL 65 operating instructions

CubiScan 75-C Quick reference guide

CubiScan

CubiScan 75-C Quick reference guide

Van Walt CT12 operating instructions

Van Walt

Van Walt CT12 operating instructions

Efergy ELITE instruction manual

Efergy

Efergy ELITE instruction manual

Kobold DOG-4 instructions

Kobold

Kobold DOG-4 instructions

Omron K35-2 manual

Omron

Omron K35-2 manual

Radiodetection RD8000 user guide

Radiodetection

Radiodetection RD8000 user guide

PCE Instruments PCE-PA 8000 Operation manual

PCE Instruments

PCE Instruments PCE-PA 8000 Operation manual

Tektronix RSA6100B Series instructions

Tektronix

Tektronix RSA6100B Series instructions

Chauvin Arnoux C.A 742 IP2X user manual

Chauvin Arnoux

Chauvin Arnoux C.A 742 IP2X user manual

manuals.online logo
manuals.online logoBrands
  • About & Mission
  • Contact us
  • Privacy Policy
  • Terms and Conditions

Copyright 2025 Manuals.Online. All Rights Reserved.