manuals.online logo
Brands
  1. Home
  2. •
  3. Brands
  4. •
  5. ALTONOVUS
  6. •
  7. Measuring Instrument
  8. •
  9. ALTONOVUS OR-01 User manual

ALTONOVUS OR-01 User manual

MODEL: OR-01: LOW COMPLIANCE VOLTAGE OHMMETER.
QUICK START GUIDE (Rev 1.0 dated 10 MAR 22)
ALTONOVUS LTD. 37 OAST HOUSE CRESCENT, FARNHAM, SURREY,
Do Not immerse in,
or expose to liquid.
IP54 rated.
No User-serviceable
components. Do Not
open unit, as it voids
warranty and
calibration.
Do Not drop, expose to
shock, or place heavy
objects on unit.
Do Not apply pressure
to display.
Avoid extremes of
temperature. Max
accuracy in 20-25
degree Celsius range.
DEVICE USE AND CARE
Only use a clean,
dry cloth to clean
unit.
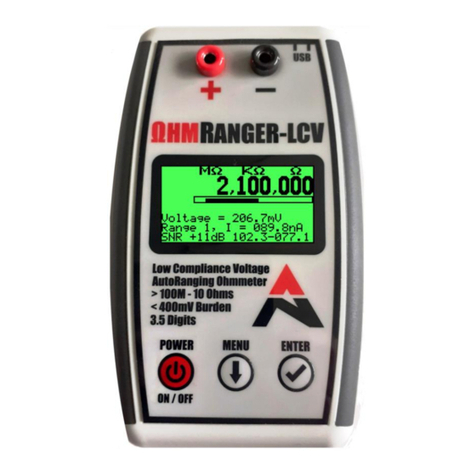
A - Positive Terminal
B - Negative Terminal
C - Display Screen
D - On / Off Button
E - Menu Navigation
F - Select Button
G - Isolated USB Interface
H - Battery Compartment
BEFORE USE
If desired, remove the protective film from the front of
the ΩhmRanger-LCV. Peel carefully from below the
Positive and Negative terminals.
ΩhmRanger-LCV will still function normally if the film
is left in place.
INSERT 2 x AA BATTERIES
2 x AA alkaline batteries will give in excess of 150
hours of continuous operation. Treat all batteries in
accordance with the manufacturer’s instructions.
1. Remove battery compartment cover (H) applying
gentle pressure to finger pad.
2. Ensure clean contacts on batteries.
3. Insert new batteries, observing polarity
instructions in battery compartment.
4. Replace battery compartment cover.
USE THIS QUICK START GUIDE IN CONJUNCTION WITH THE FULL INSTRUCTION MANUAL. DOWNLOAD AT: WWW.ALTONOVUS.COM
SCREEN GUIDE
A- The Resistance reading, displayed in MΩ, KΩ and Ω. In the example
above, 2.1MΩ.
B- A small, oscillating Range Bar shows which range is currently in use.
An upper, longer Range Coverage Bar shows any movement across the
ranges during the reading (in this case, none). The box surrounding
shows the operating range.
C- The Voltage being applied by ΩhmRanger-LCV at the Positive
terminal, in this case 206.7mV, to measure the resistance.
D- The active Range and the measured Current.
E- The Signal to Noise Ratio (SNR). The SNR indicates how much noise,
variation, and AC components are in the signal, followed by Maximum and
Minimum Current samples during the reading. Higher resistances (lower
currents) are more susceptible to noise.
GETTING STARTED - TAKE A READING
WARNING. Use
ΩhmRanger-LCV
with cables less
than 3 metres.
STEP 1: POWER ON
After inserting batteries
as shown, press the
POWER button to start
ΩhmRanger-LCV.
STEP 2: CONNECT LEADS
Connect the Resistance to be
measured between the Positive
(RED) and Negative (BLACK)
terminals of the ΩhmRanger-LCV.
Leads (not supplied) should be
industry standard, uninsulated, 4mm
banana plug. Leads of shorter
length will help minimise any noise.
STEP 3: TAKE MEASUREMENTS
Sampling at a high rate to
eliminate mains noise, Ωhm-
Ranger-LCV takes about 2.5
readings per second. It displays
the current in MΩ, KΩ and Ω. In
this example, 2.1MΩ.
A Range Bar below the digits
shows which ranges are, and have
been in use. The Range Bar
oscillates after each reading to
show how quickly readings are
occurring and to show that the
device is functioning correctly.
STEP 4: POWER OFF
After measurements
are taken, press the
POWER button
again to return
ΩhmRanger-LCV
to Standby mode.
Minimum stimulus
applied is 206mV. Do
not expose unit to
currents over 800mA.
USING THE FULLY ISOLATED USB INTERFACE
ΩhmRanger-LCV’s micro-USB interface can be used to export
readings and to control the device via a PC (SCPI-format). The
USB interface cannot be used to power ΩhmRanger-LCV, as it is
isolated from the main circuitry to prevent interference. For help
connecting ΩhmRanger-LCV, see the guidance in our website’s
ΩhmRanger-LCV section. For SCPI instructions, please download
the full OR-01 Instruction Manual at: www.altonovus.com
USE THIS QUICK START GUIDE IN CONJUNCTION WITH THE FULL INSTRUCTION MANUAL. DOWNLOAD AT: WWW.ALTONOVUS.COM
ΩHMRANGER-LCV - BASIC MENU FUNCTIONS
This device complies with part 15 of the FCC Rules. Operation is subject to the following two
conditions: (1) This device may not cause harmful interference, and (2) this device must accept any
interference received, including interference that may cause undesired operation.
NOTE: This equipment has been tested and found to comply with the limits for a Class B digital
device, pursuant to part 15 of the FCC Rules. These limits are designed to provide reasonable
protection against harmful interference in a residential installation. This equipment generates, uses
and can radiate radio frequency energy and, if not installed and used in accordance with the
instructions, may cause harmful interference to radio communications. However, there is no
guarantee that interference will not occur in a particular installation. If this equipment does cause
harmful interference to radio or television reception, which can be determined by turning the
equipment off and on, the User is encouraged to try to correct the interference by one or more of
the following measures:
- Reorient or relocate the receiving antenna.
- Increase the separation between the equipment and receiver.
- Connect the equipment into an outlet on a circuit different that to
which the receiver is connected.
- Consult the dealer, or an experienced radio/TV technician for help.
• Measure
• Voltage
• Powerdown
• LCD Light
• 4 Beep Read
• Details
Press the Menu button to exit measuring and
enter the Menu mode. This screen will
appear. Use the Navigate and Select buttons
to move through the Menu. The options are:
VOLTAGE - Use this Menu option to select the
maximum stimulus voltage that will be applied
by ΩhmRanger-LCV.
The options are available are:
• 380 mV (the default setting), or
• 206 mV
POWERDOWN - Use this function to set and configure the period of
inactivity after which ΩhmRanger-LCV will power down automatically.
The options are: • Off
• 30 Minutes
• 1 Hour (the default)
• 2 Hours
• 4 Hours
• 8 Hours
MODEL: OR-01: LOW COMPLIANCE VOLTAGE OHMMETER.
QUICK START GUIDE (Rev 1.0 dated 10 MAR 22)
LCD LIGHT - Use this function to toggle
the ΩhmRanger-LCV screen backlight
ON and OFF. Disabling the backlight will
extend battery life.
4 BEEP READ - Use this function to
take readings only when Resistance
values are stable within selected
tolerances. An audible prompt is given
when this is achieved.
DETAILS - Will display the ΩhmRanger-LCV’s unique serial number,
calibration date and status, and software version.

Other manuals for OR-01

1

Other ALTONOVUS Measuring Instrument manuals

ALTONOVUS OR-01 User manual

ALTONOVUS

ALTONOVUS OR-01 User manual

ALTONOVUS NanoRanger User manual

ALTONOVUS

ALTONOVUS NanoRanger User manual

ALTONOVUS NanoRanger User manual

ALTONOVUS

ALTONOVUS NanoRanger User manual

Popular Measuring Instrument manuals by other brands

Anderson IZMSG instruction manual

Anderson

Anderson IZMSG instruction manual

Phymetrix dewPatrol user manual

Phymetrix

Phymetrix dewPatrol user manual

Senter ST805C user manual

Senter

Senter ST805C user manual

Renishaw RMP600 installation guide

Renishaw

Renishaw RMP600 installation guide

Oval FLOWPET-EG LS5277-4 0B Series instructions

Oval

Oval FLOWPET-EG LS5277-4 0B Series instructions

Southwire 40110N operating instructions

Southwire

Southwire 40110N operating instructions

Paradyne FrameSaver SLV 9x24 Series installation instructions

Paradyne

Paradyne FrameSaver SLV 9x24 Series installation instructions

SUTO S606 Instruction and operation manual

SUTO

SUTO S606 Instruction and operation manual

Keysight Technologies i7090 installation instructions

Keysight Technologies

Keysight Technologies i7090 installation instructions

Extech Instruments CO260 user manual

Extech Instruments

Extech Instruments CO260 user manual

Trans instruments BP3001 Operation manual

Trans instruments

Trans instruments BP3001 Operation manual

SOMMY EW9L Series Operation manual

SOMMY

SOMMY EW9L Series Operation manual

Tufner T909 user manual

Tufner

Tufner T909 user manual

Chauvin Arnoux AEMC 407 user manual

Chauvin Arnoux

Chauvin Arnoux AEMC 407 user manual

Kirchner und Tochter RA 77 Installation and operating instructions

Kirchner und Tochter

Kirchner und Tochter RA 77 Installation and operating instructions

MRC LX-1102 Operation manual

MRC

MRC LX-1102 Operation manual

Omron K3NP manual

Omron

Omron K3NP manual

Twilight ATAGO PAL-CLEANER quick start guide

Twilight

Twilight ATAGO PAL-CLEANER quick start guide

manuals.online logo
manuals.online logoBrands
  • About & Mission
  • Contact us
  • Privacy Policy
  • Terms and Conditions

Copyright 2025 Manuals.Online. All Rights Reserved.