Altrason Humidry BRA-200V User manual

®
Ceiling Mounted Desiccant Rotor
Multifunctional Dehumidifier
For
Vendor &
Installation
PROFESSIONALS
USE ONLY
Installation
Guide
For Models:
BRA-200V, BRA-220V, BRA-230V, BRA-240V
(1700W)
,
BRB-200V, BRB-220V, BRB-230V, BRB-240V
(1700W)
,
BRF-200V, BRF-220V, BRF-230V, BRF-240V
(500W)
,
BIF-110V, BIF-120V, BIF-200V, BIF-220V, BIF-230V, BIF-240V
(500W)
,
BRC-100V, BRC-110V, BRC-120V
(1500W)
,
BRF-100V, BRF-110V, BRF-120V
(500W)
Please provide the customer with the User Manual.
For correct and safe installation, please read this Installation Guide carefully
prior to beginning installation.
Please find a qualified electrician from the vendor or installation professionals
for electrical work. (The customer should not carry out installation work.)

Safety Precautions
Please read this guide carefully prior to installation.
The following symbols are used to indicate the level of danger resulting from incorrect use.
・
・
・
・
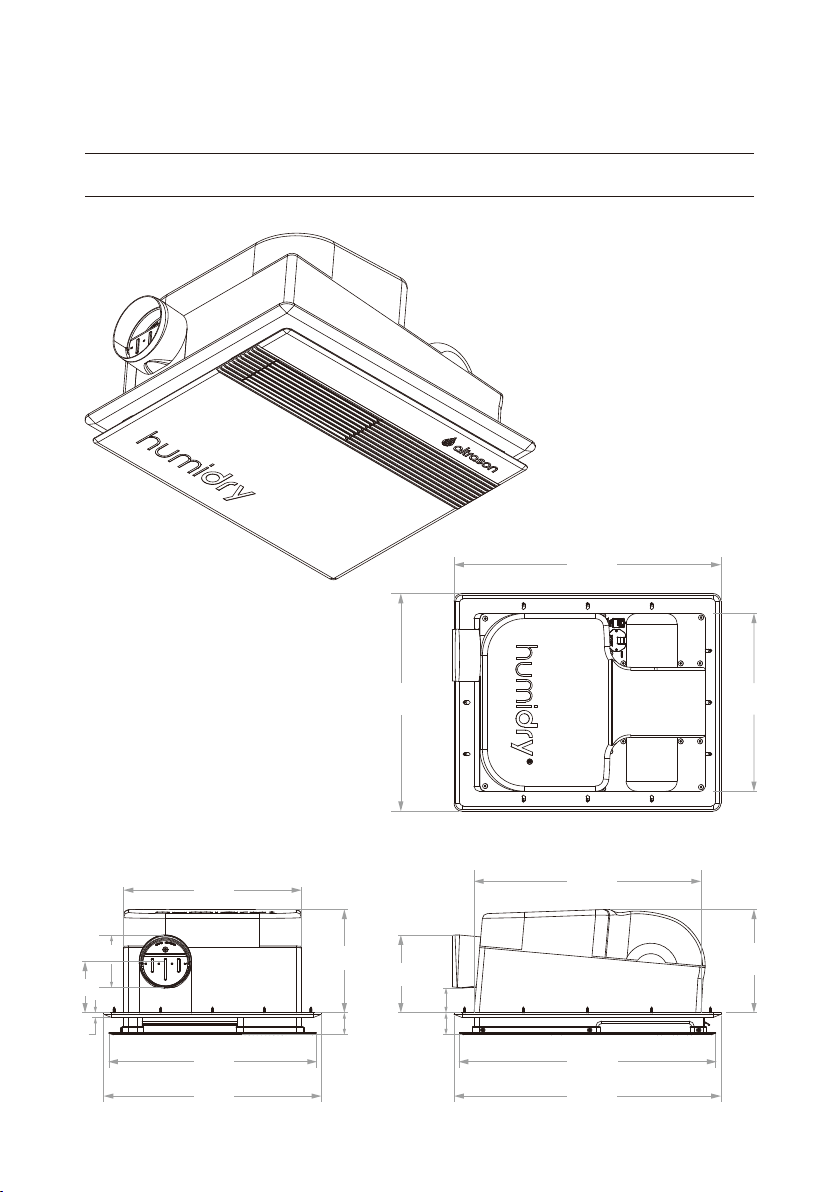
Install the unit in the center of the bathroom. Do not
install the unit directly above showers or bath tubs to
avoid excess steam from getting into the unit.
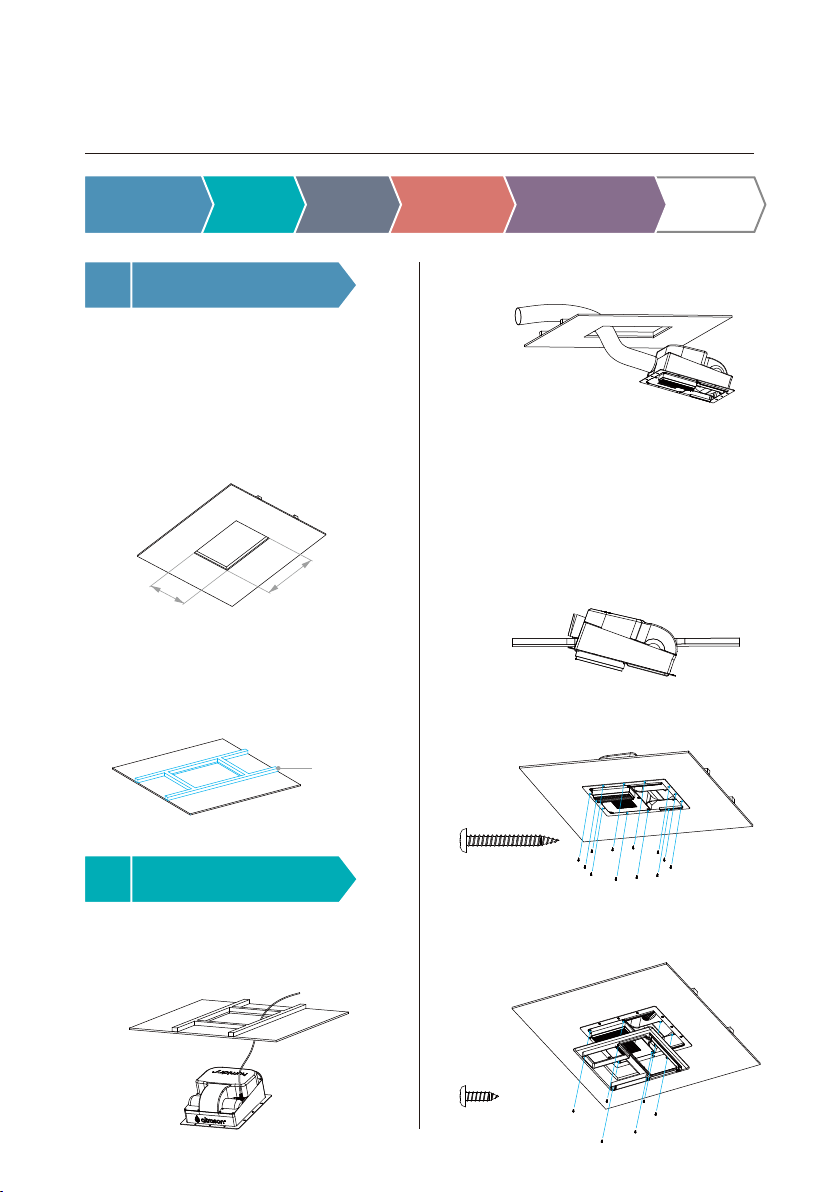
The unit requires a 450x350mm (17.75”x13.75”)
opening for installation. Please also reserve
maintenance panels.
Please take into consideration of the weight of the unit
(7.2 kg or 15.8 lbs) during installation so that it is
installed in a safe manner.
Please use 10cm (4”) air ducts and sealed with tape to
the unit.
・
・
Please do not use extension cords of any kind as this
may cause overheating, risk of fire and electrocution.
Do not use damaged or refurbished power cord. Do
not place anything heavy on the power cord or alter
the power cord in any way, as this may cause damage
to the cord.
・
・
・
・
Turn off power before inspecting the unit.
Should an anomaly occur, please stop operation of the
unit, and then turn off power. Continued operation
during an anomaly may result in malfunction, electric
shock, or fire.
When re-installing the unit after it has been moved,
please follow the installation steps. When re-installing
the unit, improper installation may result in electric
shock or fire.
To avoid danger, unit operation should be stopped
immediately if the power cord is found damaged.
Please contact your dealer.
Installation Cautions
Incorrect use may
result in death or serious injury.
WARNING Incorrect use may
result in injury or property damage.
CAUTION
Please find a reseller or specialized technician for
installation as installation and electrical work require
specific expertise.
Carrying out your own installation may result in water
leakage, electric shock, or fire.
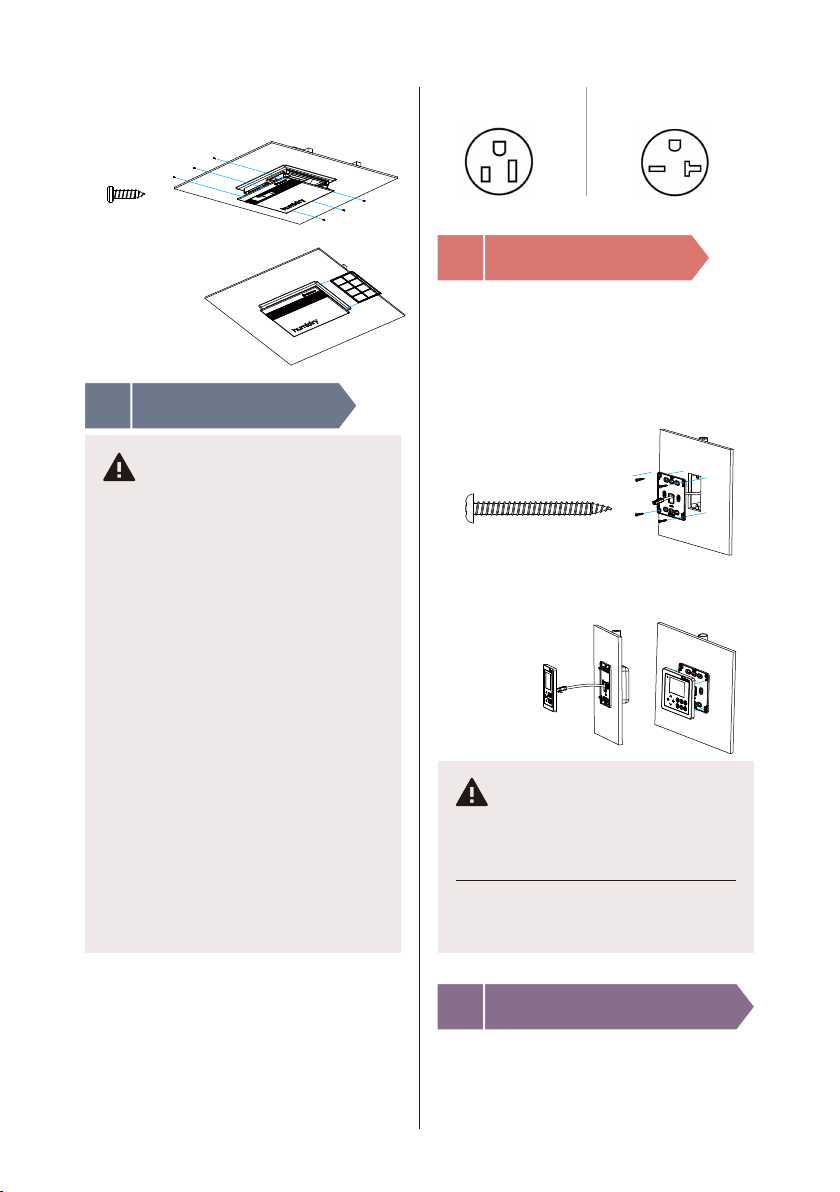
Power outlets must be properly grounded.
An Earth Leakage Circuit Breaker (or GFCI in the US) must be
installed for installation in bathrooms and other wet areas.
Please install dedicated Earth Leakage Circuit Breaker
where it is easily accessible. Make sure that the power
supply is appropriate and corresponds with your unit’s
need:BRA and BRB series with corresponding voltage at
200V, 220V, 230V, or 240V, no less than 15A of current load.
BRC series with corresponding voltage at 100V, 110V or
120V, no less than 20A of current load.
BRF series with corresponding voltage at 100V, 110V, 120V,
200V, 220V, 230V, or 240V, no less than 10A of current load.
BIF series with corresponding voltage at 100V, 110V, 120V,
200V, 220V, 230V, or 240V, no less than 10A of current load.
Use of incorrect power supply may result in fire or electric
shock.
During installation and maintenance, please ensure that
power is turned off and check power supply.
Operation of the unit is prohibited during interior decoration
work at the site. The unit should be protected from dust and
dirt.
To prevent poor operating efficiency, please ensure that the
site has been thoroughly cleaned, floating particles and
airborne odors have been removed, and the unit is clean
prior to operation of the Unit.
Please ensure that all components are properly installed.
Unsecured components may result in injury.
Please wear gloves during installation to prevent injuries.
Do not install in areas where organic solvents and sprays
are used.
Do not disassemble, repair, modify, or reinstall the unit.
Incomplete or inaccurate assembly and installation can
cause fires, electrocution or unit malfunction. Unsecured
components may fall and cause injuries.
・
・
・
・
・
・
・
・
・
・
・
・
・
・
Safety Instructions
Moving and Repair
Cautions and Warnings

340
510
434
490
510
198
149
198
340
396
100
98
9
416
48
4242
416
unit: (mm)
Parts & Dimensions
Unit, Bottom Cover & Bottom Panel

Wall Panel Mount
120
120
95
95
8.62
10
120
46.10
14
59.90
10
unit: (mm)
unit: (mm)
60
117
117
8499
99
Wall Panel
Parts & Dimensions

ApplicationName and Description Qty.Shape
Remote Control For controlling the unit.
Infrared Receiver For communication between
the unit and the remote.
1
1
RJ45 Cable For connecting the unit to the
Wall Panel/Infrared Receiver.
1
Unit Mounting Screw
M4.0 x 31.75mm
Self-tapping Screw
For securing the unit onto
the ceiling.
Bottom Cover Screw
M4.0 x 12mm
Self-tapping Screw
For attaching the Bottom
Cover to the unit.
Bottom Panel Screw
M3.5 x 12mm
Self-tapping Screw
For attaching the Bottom
Panel to the Bottom Cover.
Wall Panel Screw
M4.0 x 51mm
Self-tapping Screw
For securing the Wall Panel
Mount onto the wall.
Filter For keeping dust
out of the unit.
12
6
6
4
1
Wall Panel For controlling the unit.
※For Wall Panel version
※For Wall Touch Panel version
※For Wall Panel version
※For Remote Control version
Wall Panel Mount For installing the Wall Panel.
1
1
Accessories

Unit
M4.0 x 31.75mm
Self-tapping Screw
M4.0 x 12mm
Self-tapping Screw
M3.5 x 12mm
Self-tapping Screw
Washable
Filter
Bottom
Cover
Bottom Panel
Installation

Installation Steps
1
2
・
・
・
Ceiling must be capable of handling the weight of the
unit (7.2kg) and compensated where necessary.
Make sure the thickness of the ceiling is no more than
40mm, as the unit cannot be fitted if the ceiling is over
this thickness.
・
・
・
・
Secure the duct with duct tape or clamps.
Adjust the exhaust duct accordingly and make
sure the duct is not pinched, as this will constrict
air flow.
It is recommended that a bird guard be used
with your exterior exhaust vent to prevent birds
and rain from entering.
Tilt the unit into the ceiling opening.
450mm
350mm
Ceiling
strength
Compensation
M4.0 x 31.75mm
M4.0 x 12mm
(Continued on next page)
Preparing the
ceiling hole
Preparing the ceiling hole
Installing the unit
Installing
the unit
Electrical
Work
Wall Panel
Installation
Infrared Receiver
Installation
Operational
Testing
Provide at least 20cm of spacing between the wall
and the air intake for removing and installing the
filter.
When installing near any doors, make sure there is
enough clearance provided so that the door does
not hit the unit.
1.
2.
Prepare a ceiling hole in the bath room
measuring 450x350mm. Caution:
・Connect one end of the RJ45 cable into the RJ45 jack
of the unit (The other end will connect with the Wall
Panel or the Infrared Receiver).
・Install a 4-inch (10cm) duct to the unit’ s exhaust
duct connector.
・Use the supplied M4.0 x 31.75mm self-tapping
screws to secure the unit onto the ceiling.
・Use the supplied M4.0 x 12mm self-tapping
screws to attach the Bottom Cover to the unit.

Electrical Work
3
Wall Panel Installation
4
Infrared Receiver Installation
5
M3.5 x 12mm
M4.0 x 51mm
(Continued on previous page)
・Use the supplied M3.5 x 12mm self-tapping screws to
attach the Bottom Panel to the Bottom Cover.
・Insert the air filter.
HumiDry®
BRA-200V, BRB-200V, BRF-200V and BIF-200V:
Use only 200V AC power; use of other power
source may result in fire or electric shock.
BRA-220V, BRB-220V, BRF-220V and BIF-220V:
Use only 220V AC power; use of other power
source may result in fire or electric shock.
BRA-230V, BRB-230V, BRF-230V and BIF-230V:
Use only 230V AC power; use of other power
source may result in fire or electric shock.
BRA-240V, BRB-240V, BRF-240V and BIF-240V:
Use only 240V AC power; use of other power
source may result in fire or electric shock.
BRC-100V, BRF-100V, BIF-100V:
Use only 100V AC power; use of other power
source may result in fire or electric shock.
BRC-110V, BRF-110V, BIF-110V:
Use only 110V AC power; use of other power
sources may result in fire or electric shock.
BRC-120V, BRF-120V, BIF-120V:
Use only 120V AC power; use of other power
source may result in fire or electric shock.
Electrical and wiring work should follow national
standards and the governing rules for user premise
power line placement. Electrical and wiring work
should be conducted safely and reliably.
WARNING
Set up a power outlet within 1.5 meters from the unit in
preparation. Install dedicated Earth Leakage Circuit
Breaker and ensure that the outlet complies with
required standards.
Attention: The actual power outlet may differ depending
on the country you live in. Please use the proper power
outlet that corresponds with your HumiDry unit.
Power outlet
※For Wall Panel version
※For Remote Control Version
・
・
Secure the wall mounting box the position you
wish to install your wall panel and run the RJ45
cable through (Use the supplied Wall Panel Mount
to help determine the size of the box you need)
Use the supplied M4x51mm self-tapping screw to
secure the Wall Panel Mount to the wall mounting
box (Make sure to not over-tighten the screws).
・Connect the RJ45 cable to the Wall Panel and
gently snap it against the Wall Panel Mount to
complete installation.
Choose a location for secure installation.
Falling from insecure installation may
break the unit.
Do not place infrared receiver
near sharp objects.
May lead to electrocution or cause malfunction.
WARNING
・
・
Make sure that the RJ45 cable is securely connected
to the Infrared Receiver.
Find a desired location and use the appropriate
waterproof double-sided tape to secure the Infrared
Receiver onto the ceiling.
110V North American
NEMA 5-15R
220V North American
NEMA 6-20R

Before plugging in the power, make sure that the electrical and
installation work is done properly and accurately. Follow the
steps below to insure that the unit is functioning properly and
notice if there are any unusual noise or vibrations and such.
Make sure that the LCD displays Smart Room
Heating and that warm air is coming out of the unit.
3
S
3
S
1
2
3
4
5
6
BRF Series only has three
functional buttons, including:
1.Air Circulation
2.Cool Air Dehumidification
3.Standby/Settings
※
※BIF Series only provides Cool
Air Dehumidification function,
Wall Panel not included.
※Only BRA, BRB and BRC series
provide Smart Room Heating,
Smart Clothes Drying and
Enhanced Dehumidification.
Operational Testing
Wall Panel ※For users with wall panel version
Enhanced
Dehumidi-
fication
Cool Air
Dehumidi-
fication
Smart
Room
Heating
Air
Circulation
Smart
Clothes
Drying
Power Off
Settings
・Vent Air
・Indoor Air (Hold for 3 Sec)
Touch the “Smart Room Heating”button
Make sure that the LCD displays Smart Clothes
Drying and that hot air is coming out of the unit.
Touch the “Smart Clothes Drying”button
Make sure that the LCD displays Cool Air Dehumidifi-
cation and that a slight breeze is coming out of the
unit.
Touch the “Cool Air Dehumidification”button
Make sure that the LCD displays Enhanced
Dehumidification and that warm air is coming out of
the unit.
Touch the “Enhanced Dehumidification”button
Make sure that the LCD displays Powered Off and
slowly fades to black and that the unit stops. Touch
and hold for 3 seconds to enter Settings menu.
Touch the “Power Off/ Settings”button
Make sure that the LCD displays Air Circulation – Vent
Air/ Indoor Air. Use the up/down buttons or simply
press the Air Circulation button again to switch
between Vent Air and Indoor Air. There should be a
slight breeze if the unit is functioning properly.
Touch the “Air Circulation”button

1
2
3
4
5
6
BRA, BRB, BRC
Series
BRF Series
〈Press each function button again to switch function 〉
・
・
・
・
・
Install the battery and point the Remote Control in the direction of the
Infrared Receiver.
A “beeping” sound can be heard when the unit receives a signal.
Please press the buttons on the remote if there is no “beep” .
Follow the steps below to make sure the unit is functioning normally
and notice if there are any unusual vibrations or noises.
BRF Series only includes Cool Air Dehumidification, Air Re-Circulation
and Ventilation functions.
BIF Series only provides Cool Air Dehumidification and does not come
with a remote.
Remote Control ※For users with remote control version
Make sure that the LCD displays (Smart) Room Heating and
that warm air is coming out of the unit.
Press the “Smart Drying & Heating -
Room Heating”button
Make sure that the LCD displays Ventilation & Recirculation or
Air Ventilation/ Air Recirculation. Use the up/down buttons or
simply press the button again to switch between Ventilation
and Recirculation. There should be a slight breeze if the unit
is functioning properly.
Press the “Ventilation & Recirculation”button
Make sure that the LCD displays (Smart) Clothes Drying and
that hot air is coming out of the unit.
Press the “Smart Drying & Heating -
Clothes Drying”button
Make sure that the LCD displays Cool Air (Dehumidification)
and that a slight breeze is coming out of the unit.
Press the “Cool Air Dehumidification”buton
Make sure that the LCD displays Enhanced (Dehumidification)
and that warm air is coming out of the unit.
Press the “Enhanced Dehumidification”button
Make sure that the LCD displays Powered Off and that the unit
stops. Touch and hold for 3 seconds to enter Settings menu.
Press the “Power Off/Settings”button

Possible CauseProblem Correction
Unit failed
to start
Unit not powered
Please check to make sure the
breaker and power lines are
connected, power cord plugged.
Vibration or
abnormal
noise
Unit and wall panel not connected
Unable to control
with Wall Panel
Insufficient ceiling strength
Unable to control
with Remote Control
Insecure installation Secure the screws.
Controlling the Wall Panel
with wet hands
Bad Wall Panel connection
due to loose wire
Remote Control doesn’t
have enough power
Batteries installed incorrectly
Please dry your hands.
Unplug the Wall Panel and
plug it back in.
Change new batteries.
Make sure the battery direction
is correct.
PTC crackling sound
Please stop using the unit if the following troubleshoot does not resolve the
problem and contact an authorized service personnel.
Troubleshooting
Make sure the LED indicator is
displaying normally and check
the connection of the cable to
the Unit and the Wall Panel.
PTC heater will activate during
Smart Room Heating, Enhanced
Dehumidification, or Smart
Clothes Drying, which may create
a sound due to heating and
cooling of air around the PTC. Not
a malfunction.
Make sure the unit is securely
mounted on suitable material in
the ceiling.

ALTRASON INC.
6F., No.189, Lequn 2nd Rd.,
Zhongshan Dist., Taipei City 10462, Taiwan
Phone : +886-2-8502-3818
E-mail: sales@altrason.com
www.altrason.com
®
This manual suits for next models
23
Table of contents
Other Altrason Dehumidifier manuals
Popular Dehumidifier manuals by other brands

Ecoair
Ecoair ECOI 4LDG user manual

Air Naturel
Air Naturel Kompressor user manual

Concept2
Concept2 OV2010 manual

thermastor
thermastor HI-E Dry 195 Installation, operation and maintenance instructions

thermastor
thermastor FOCUS Ultra-Aire 135H owner's manual

thermastor
thermastor Phoenix R175 Installation, operation & service instructions