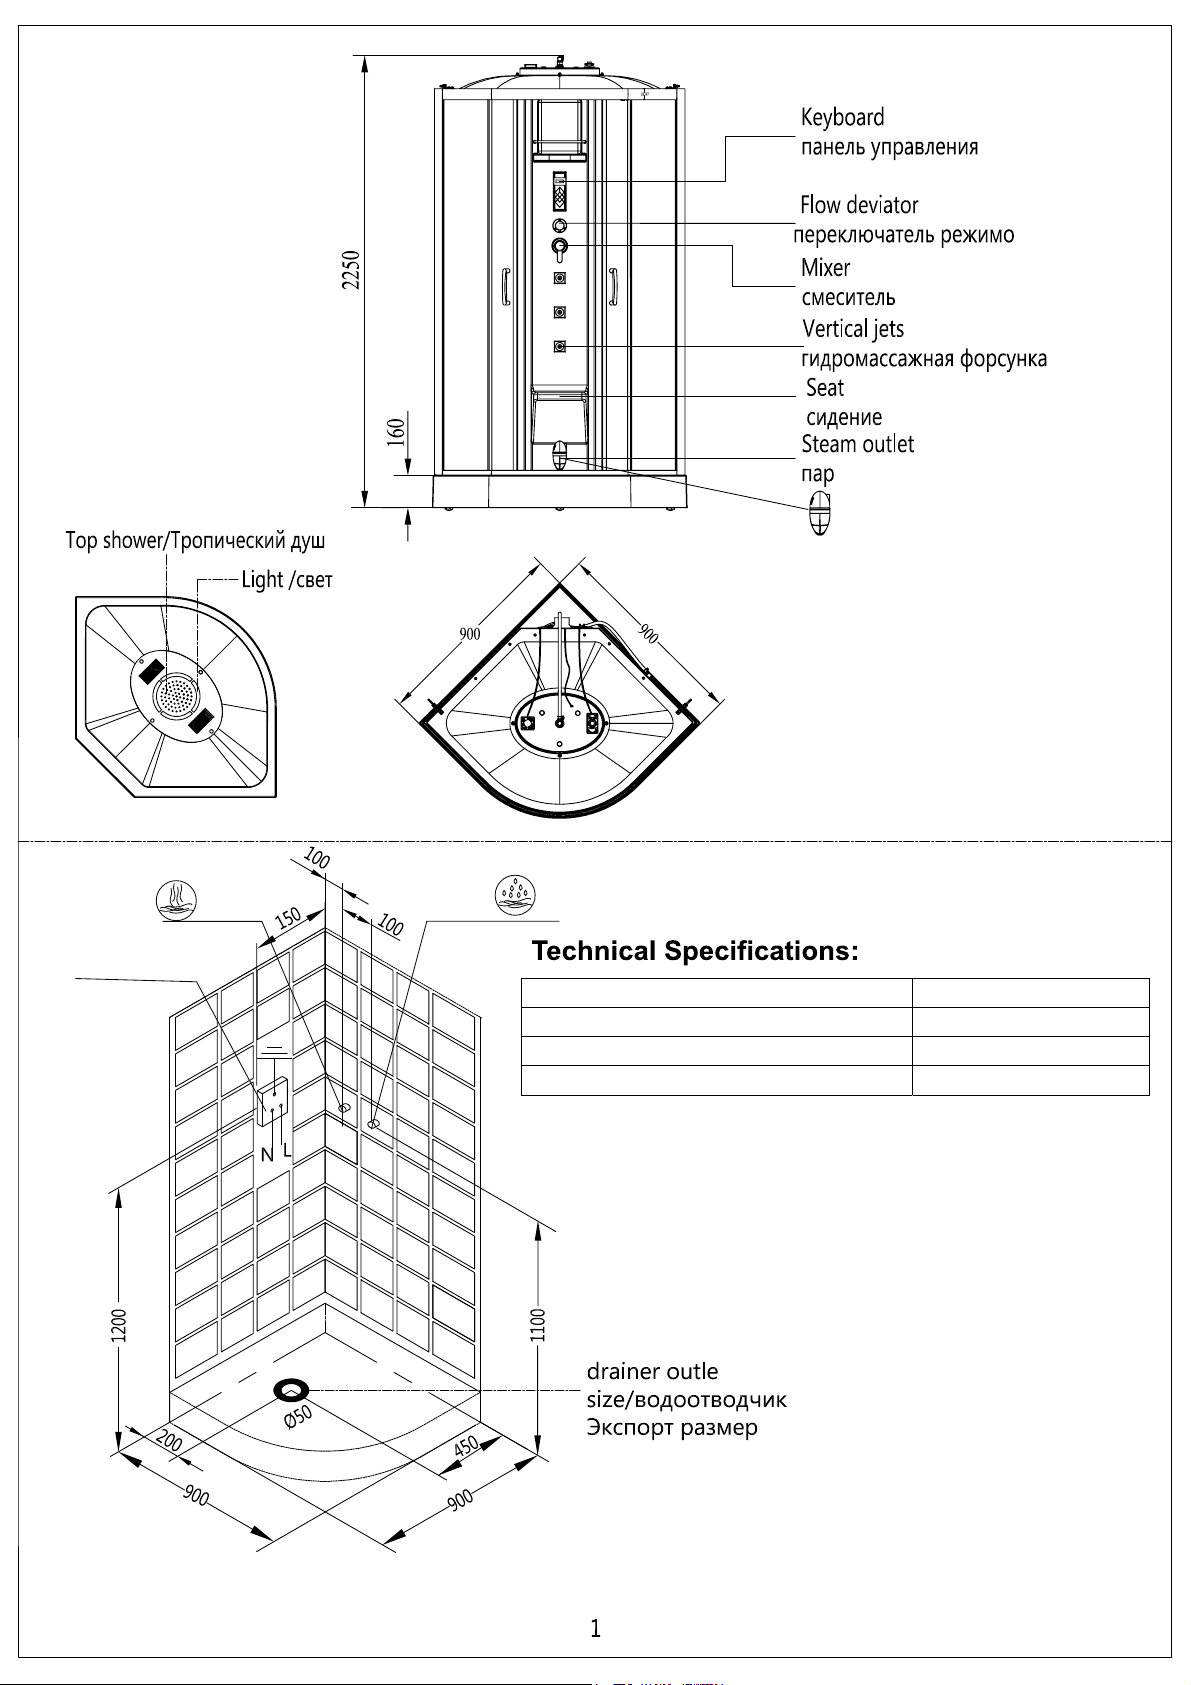
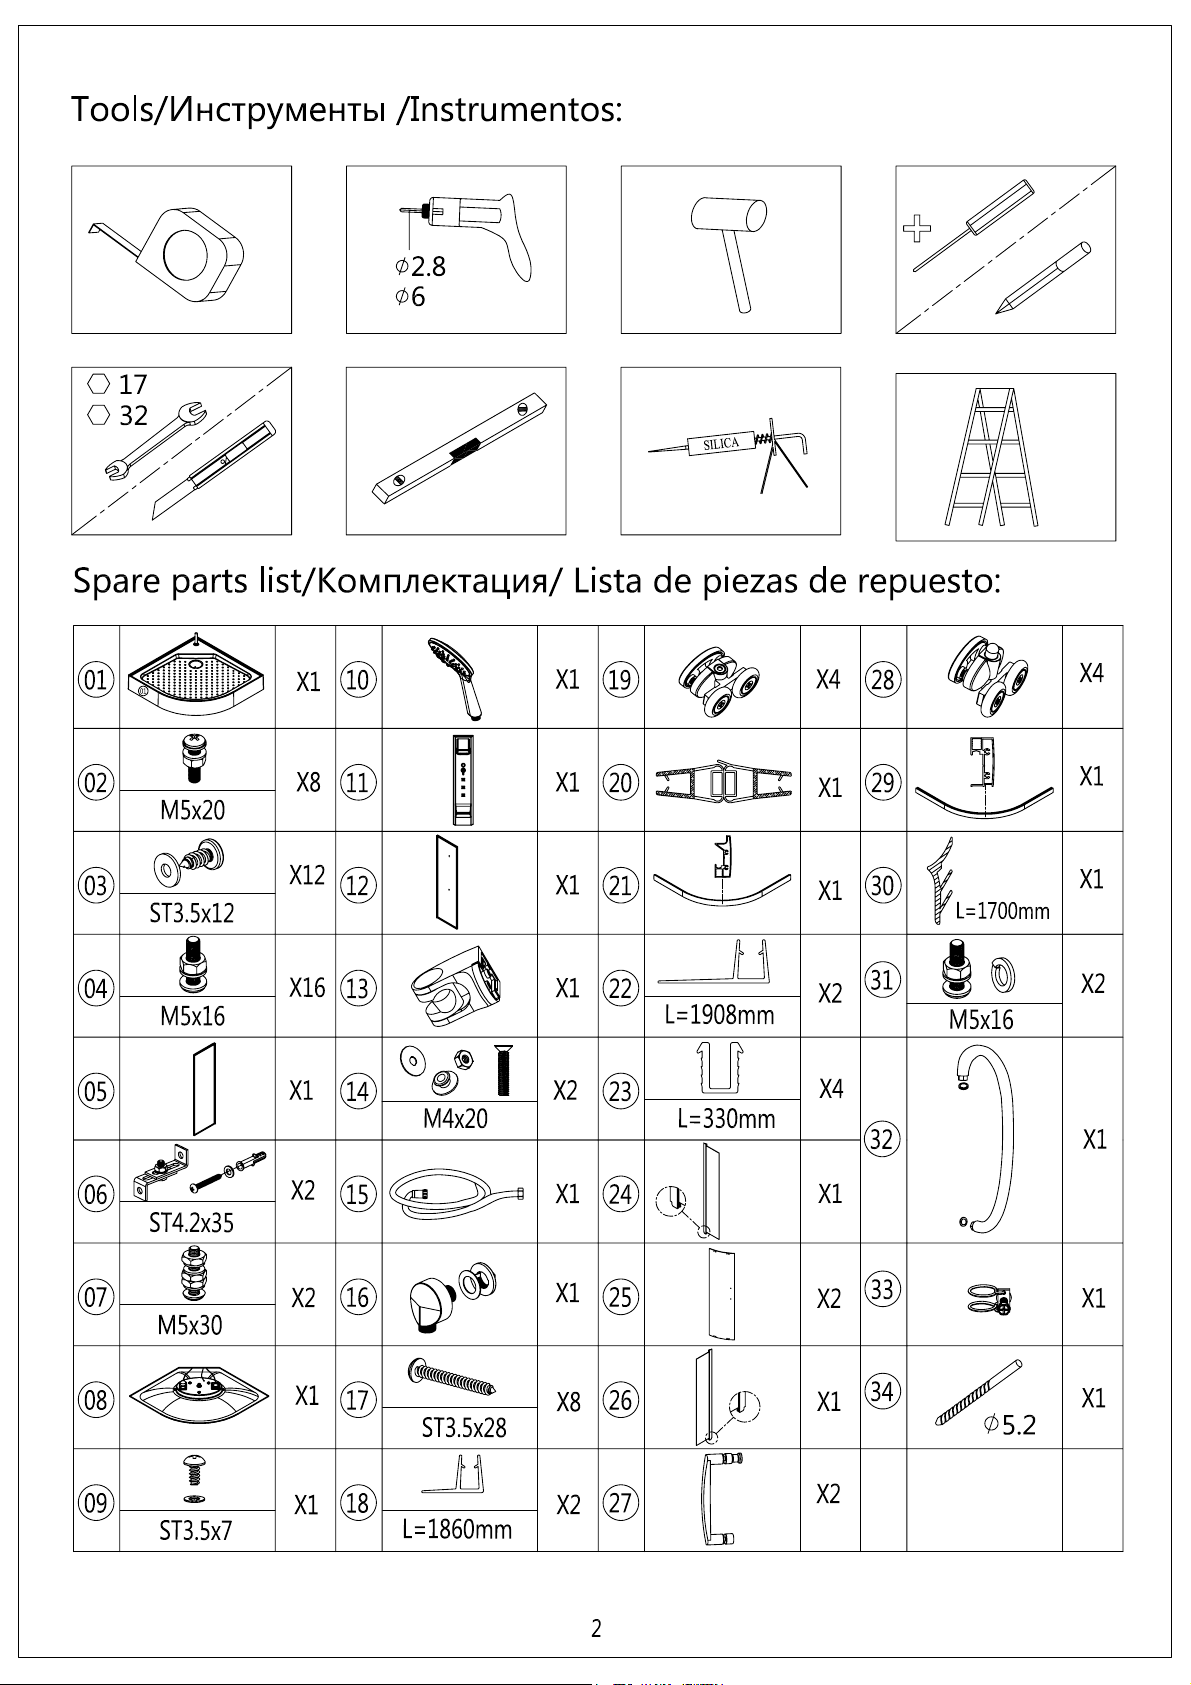
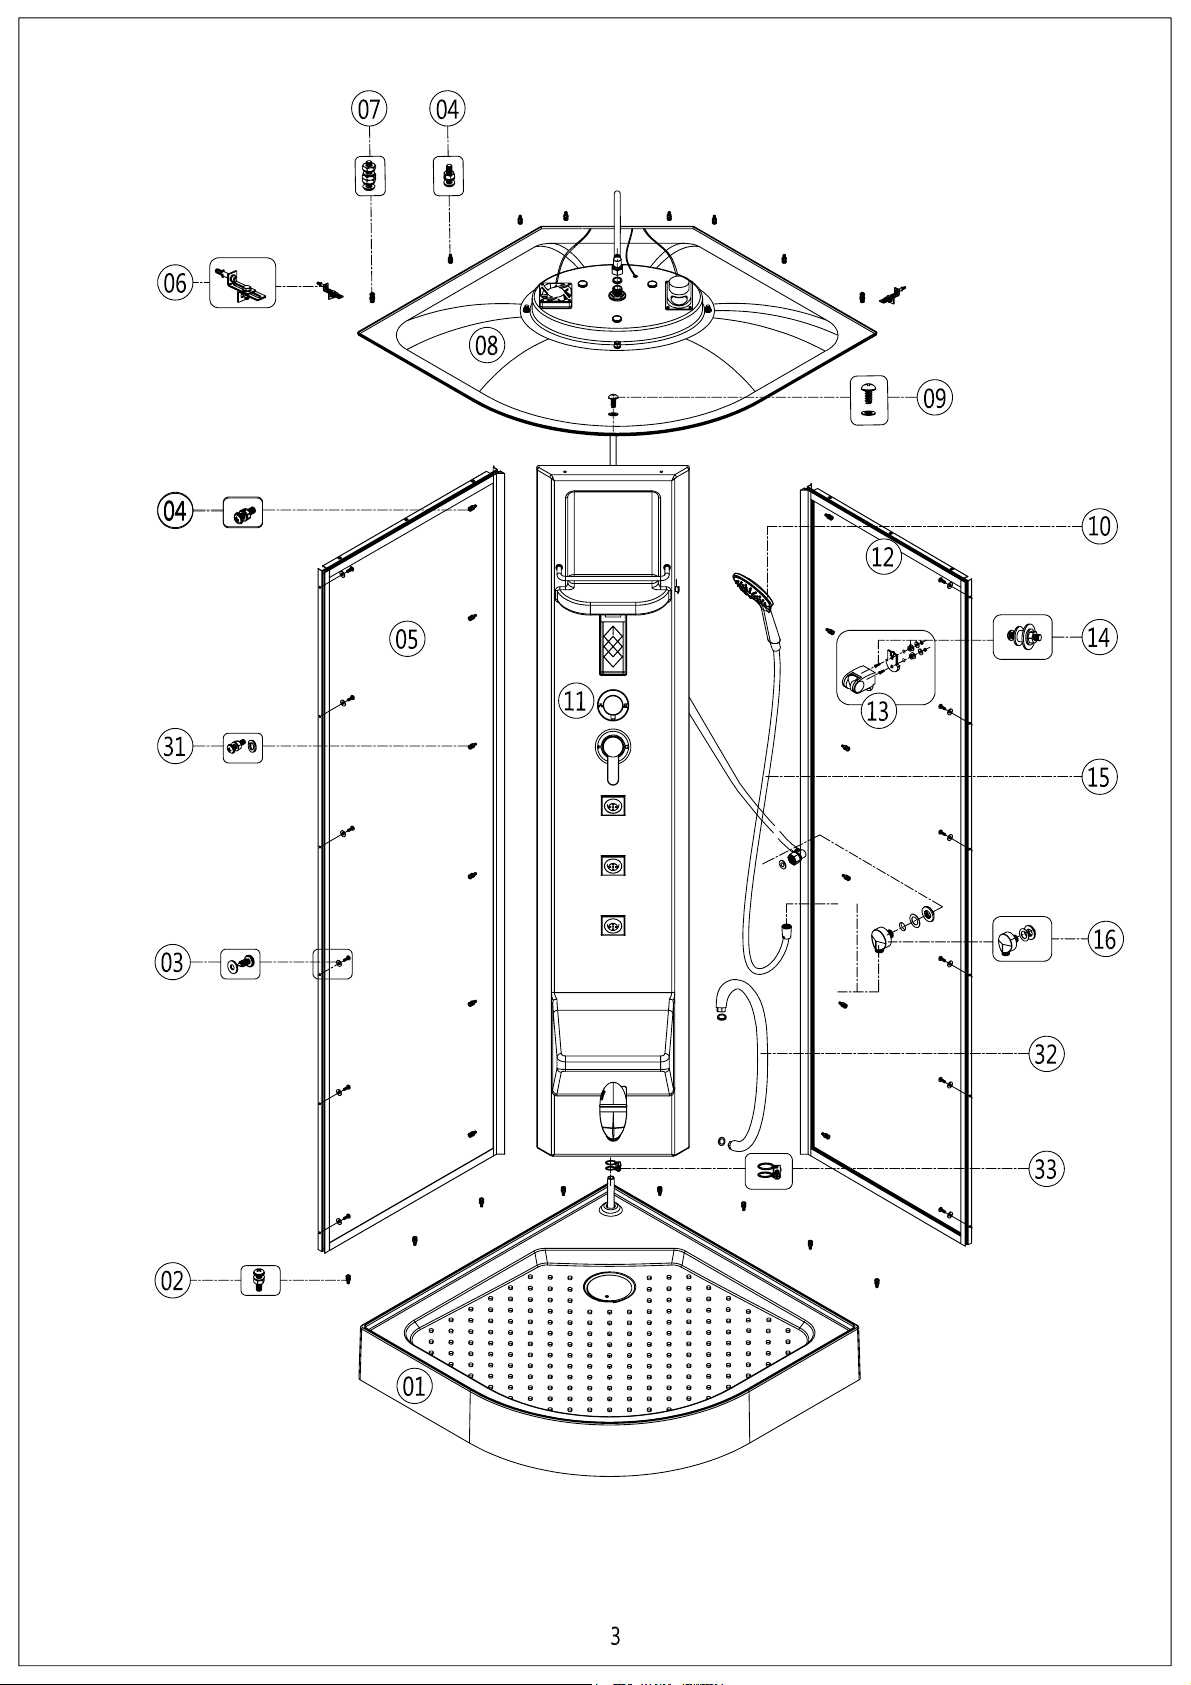
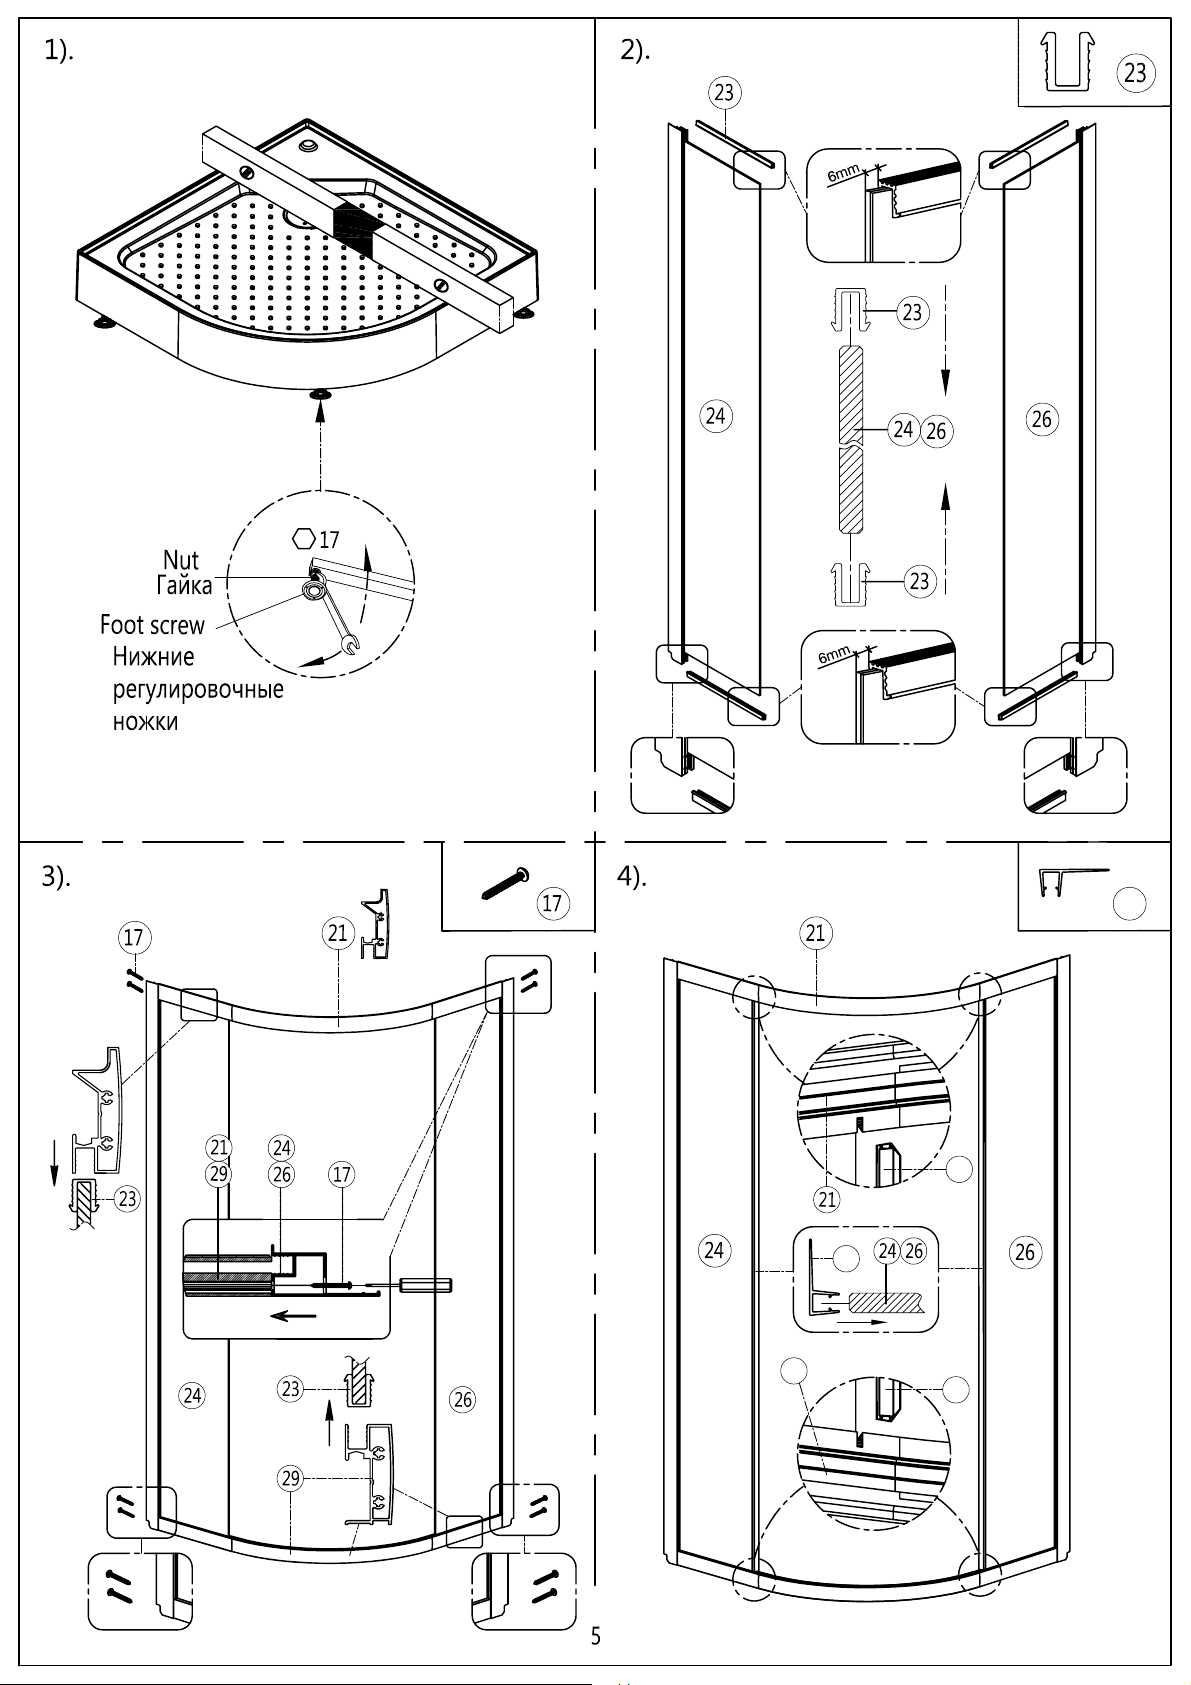
Alvaro Banos LeonS90.20-V3 Blanco User manual

CABINA PARA DUCHA
LeonS90.20-V3 Blanco


Model:
Rated power: 2840W
LeonS90.20-V3 Blanco
220V~50Hz
0.1-0.4MPa
Rated supply voltage/frequency:
Water pipe pressure:
Ekectrical supply


18
18
18
18
18


31
33
33
31


13
Instruction Manual
One-Functional Instruction:
1. Power On/Off:
Press button, the system starts, ceiling light is on, room temperature will be displayed, and system is in
standby other functions being open; Press button again, the system is off.
2. Light Function:
Store/Search Channel
Fan
Steam Sauna
Parameter Setting
Radio
Light
Power On/off
+/- key. This key can
adjust radio frequency,
volume, temperature and
time. Press this key for a
short time, the parameter
will increase or decrease
by 1. If holding on press
the key, the parameter
will increase or decrease
automatically. When the
radio is on and parameter
is not set, press these keys
can read the radio station.
(The station is from 0 to
15)

14
When system is on, ceiling light is on, press button to turn it off, and the corresponding light sign will flash
on the LCD.
3. Fan Function:
When system is on, press button, the fan works, the fan sign will flash; Press button again to turn off
the fan, at the same time, the fan sign is off.
4. Sauna function:
4.1 When the system is on, press button, LCD display the sauna sign, first water discharge for 20 seconds and
automatically water intake. After water reaches the standard level, automatically turn off the water intake valve,
and then heater starts to work. After reach the setting temperature, heater turns off automatically.
4.2. Time setting: default working time is 60 minutes, press button to adjust working time, and press ,
button to adjust sauna time. At the same time, the LCD will display the present time, and the time setting range is
1-120 minutes. If without any operation on , in 5 seconds, automatically quit the setting system.
4.3. Temperature Setting: default temperature is 45 ºC, press button to enter into temperature setting, and
press , to adjust the room temperature, at the same time, the LCD will display present temperature, the
setting range is 25ºC--60ºC. If without any operation on , in 5 seconds, automatically quit the setting system.
4.4 If sauna function used before closing the system, then after closing the system for 1 minute, drain for
3minutes and also ozone works.
4.5 button is multifunctional button, first press, MIN will flash on LED and enter into time setting mode; press
this button again to enter into temperature setting mode, and a temperature sign will flash on LED; if without any
pressing , in 5 seconds, automatically quit the setting mode.
4.6 Discharge: If sauna function is used before turn off the system, then after system is off in 1 minute, system will
water discharge for 3 minutes.
5. FM Digital Radio:
This radio system can receive FM frequency broadcasting channels, the frequency range is between 87MHz—
108MHz, this system contains 8W power amplifier.
5.1. When the system is on, press button to enter into radio mode, the frequency is the last used channel.
Press button again to turn off FM broadcasting.
5.2 Tune: when radio is on, press button to enter into tune setting mode, press , buttons, every press,
the frequency increase or decrease by 0.1MHz.Press button to 108MHz, and then to 87MHz. Similarly, press
button to 87MHz, then to 108MHz.Long press on , to search the channel automatically.

15
5.3 Volume adjustment: When radio is on, press button to enter volume adjustment mode, and press , to
increase or decrease the volume. The range is 0-10.
5.4 .Auto search and store channels: when radio is on:
5.4.1 Store channels: to choose the frequency and press button, which store the present frequency to the
present channel position (0-15), LCD displays the corresponding channel number and frequency.
5.4.2 Read Channel: Without any setting, press , button to read the channels (stored ones). LCD displays the
corresponding channel and frequency.
5.4.3 Auto Search Channel: Press for 3 seconds, system enter into auto search channel mode, the frequency
scans from 87MHz to 108MHz, and store the received channels on the position from 0-15.
5.5 Enter into tune mode or volume adjustment mode, if without pressing , in 5 seconds, automatically quit
the mode.
6. Ozone function:
After system turns off for 1 minute, Ozone works for 3 minutes, and then turns off automatically.
7. Lock/Unlock Function:
When system is on, if without any pressing on the keyboard for 15 seconds, the system will automatically be
locked, the sign will flash. Press any button for 1.5 second to unlock the keyboard.
Two-Self-Alarm of Malfunctions:
1. This system has already installed 4 different kinds of malfunction diagnostic.
2. Malfunctions as follows:
2.1. E0:Sensor Error: When the room temperature sensor is in open circuit or short circuit, alarm error “EO”.
2.2. E1:Error 1with water feeding: Infuse water at first surpass 2 minutes, the water level doesn’t reach the
setting water level ,alarm error “E1”, infuse water compulsorily.
2.3. E2:Error 2with water feeding: Infuse water surpass 5 seconds again, the water level doesn’t reach the
setting water level, alarm error “E2”, stop electric heat in and infuse water continuously.
2.4. E3: Surpass heat protect: After protect switch of electric heat breaks, alarm malfunction “E3” , other working
process as follows:
Stop electric heat and infusing water 3 seconds---stop infusing water 10 seconds ---drain water 30
seconds-stop draining.

16
After finishing the above process, and check the protect switch of electric heat weather it is closed or not, if it is
closed and clear away the malfunction, and it gets into the normal sauna working, or repeat the above
process
When the system has above troubles, the buzzer will sound the voice “do” long times.
Three- Technical Specification:
Working Condition and characteristic
Rated Voltage AC220V Rated Frequency 50/60Hz
Rated Current <=13A Rated Power 2840W
Insulance >20M Waterproof Level IPX4
Dimensions
Control Box Length*Width*High 195*65*42 Unit: mm
Remarks:
1. The waterless protection of steam generator is adopted by water level sensor.
2. The over-heater protection of steam generator is adopted by ceramic temperature sensor.
3. Difference steam generators have different rated current and rated power.
4. Without the permission of our technical department, please don’t enlarge the load power.
5. This product follows national standard《Safety of Household and similar electrical appliances》GB4706.1-2005
6. The installation of keyboard and electric box are attached in the appendix.
Three-Cautions:
In order prolong the lifetime of this product and ensure the safety of human being, please read these cautions
carefully before using this product.
1. User must strictly follow our provided circuit drawing and parameter to install the load.
2. The earth wire of control box must be well connected on the circuit.
3. User must use at least 3x2mm² power supply which meet the nation standards (GB), the socket of power supply
of the control box must be at least 20A, and fix it reliably.
4. User must add extra 20A or above national standard air switch or leakage switch, the leakage switch of control
box is only used as complement.
5. Please check and ensure the pipe of water intake, steam pipe, power control box, power supply of electric box
are in good condition, then turn on the power. (Attention: Ensure that water provided)
6. The inner hole of the steam pipe should be at least 15mm, strictly forbid to install valve on steam pipe.

17
7. Please don’t connect electric equipment from other supplier to our steam generator. Forbid to disassemble,
refit our inside fixed wire connection.
8. The quality of water used for steam generator should meet the water standard.
9. When install the pipe of steam generator, we suggest that add the filter onto the water intake to prolong the
lifetime.
10. In hard water area, please make descaling rinsing regularly for the steam generator, especially for the probe of
the water level sensor. Normally, check it every three months. Following descaling rinsing method is advised:
Use 5-10g citric acid to dilute by 1.4L warm water, disassemble the pipe of steam output, and infuse the
diluted citric acid into the input of steam generator, then connect the pipe and wait for 60minutes to start the
system, after heating for 30minutes to stop and make completely discharge.
11. Make sure that all the wires are well connected, output can’t be short circuit with each other.
12. After used this product, please cut off the power supply to avoid long time machine internal electrification
and accelerate ageing.
13. The installation of this controller system must follow the instruction and be installed by qualified technician.
Four-Malfunction Analysis:
During the operation of this product, if any abnormal malfunctions happen, please ask qualified technician to
refer following analysis to remove malfunctions.
Malfunctions Type Analysis (Solutions)
Can’t turn on the
system, no display on
the screen
1. No power connection (Connect power supply)
2. Leak-protection switch is off ( Please turn it on), wrong connection inside the
electric box ( Modify it)
3. 1A fuse loosens or burns ( Tighten or replace it)
4. Panel doesn’t connect properly. (Connect it well)
5. Panel or Electric Box is broken. (Replace it)
Light, Fan, and Ozone
don’t work,
meanwhile turn on
the panel, E3 displays
on the screen.
1. 5A fuse loosens or burns (Tighten or replace it). If after replace 5A fuse and still
burns, it is in short circuit. ( Open the Electric box and find where causes the
short circuit, and debug it)
2. The 12V Transformer inside the Electric Box is loose. ( Connect it )
3. Electric Box is broken. ( Replace it)
Light doesn’t work
1. The connection between Light and Electric Box is loose. ( Tighten it)
2. Output of the Light is in open circuit. ( Tighten it )
3. Output of the Light is in short circuit. (Debug short circuit)

18
4. Light is broken ( Replace it)
5. Electric Box is broken. ( Replace it)
Fan doesn’t work
1. The connection between Fan and Electric Box is loose. ( Tighten it)
2. Output of the Fan is in open circuit. ( Tighten it )
3. Output of the Fan is in short circuit (Debug short circuit)
4. Fan is broken ( Replace it)
5. Electric box is broken. ( Replace it)
Ozone doesn’t work
1. The connection between Ozonizer and Electric Box is loose. ( Tighten it)
2. Output of the Ozonizer is in open circuit. ( Tighten it )
3. Output of the Ozonizer is in short circuit. (Debug short circuit)
4. Ozonizer is broken ( Replace it )
5. Electric box is broken. ( Replace it)
Can’t receive phone
1. The signal wire of the telephone doesn’t connect the telephone wire. ( Connect
it )
2. Too many extension
3. Panel or Electric Box is broken. (Replace them)
Too much noise, less
Receipt Channels
1. The Antenna is not in a good position. ( Put it on the best position)
2. Electric box is broken. ( Replace it)
No sound
1. The connection between Speaker and Electric Box is loose. ( Tighten it)
2. Output of the Speaker is in open circuit. ( Tighten it )
3. Output of the Speaker is in short circuit. (Debug short circuit)
4. Speaker is broken (Replace it )
5. Electric box is broken. ( Replace it)
No steam comes out
from steam generator
1. The Electric Heater inside the Steam Generator is broken. (Replace it)
2. The signal wire of the water inlet valve inside the Steam Generator is off or in
open circuit.(Connect it)
3. The signal wire between the Electric Box and Steam Generator doesn’t connect
well. (Connect it)
4. The wire of the heater between Electric Box and Steam Generator doesn’t
connect well. (Connect it )
5. Anti-dry heating protection works. (Restore)
6. The water inlet valve is broken ( Replace it)
7. Steam Generator or Electric Box is broken. (Replace it)
Table of contents
Languages:
Popular Shower Cabin manuals by other brands

Kinedo
Kinedo KINESPACE R installation instructions

AM.PM
AM.PM SPIRIT TWIN SLIDE Assembly instructions

glass 1989
glass 1989 SOHO QG Installation & maintenance manual

Artweger
Artweger 360 WALK IN 9WTS3 Series Assembly instructions

SANPLAST
SANPLAST TX4b Series installation guide

RIHO
RIHO NOVIK Z309 installation manual