manuals.online logo
Brands
  1. Home
  2. •
  3. Brands
  4. •
  5. Am
  6. •
  7. Toy
  8. •
  9. Am AS133 User manual

Am AS133 User manual

B
A
D
F
E
C
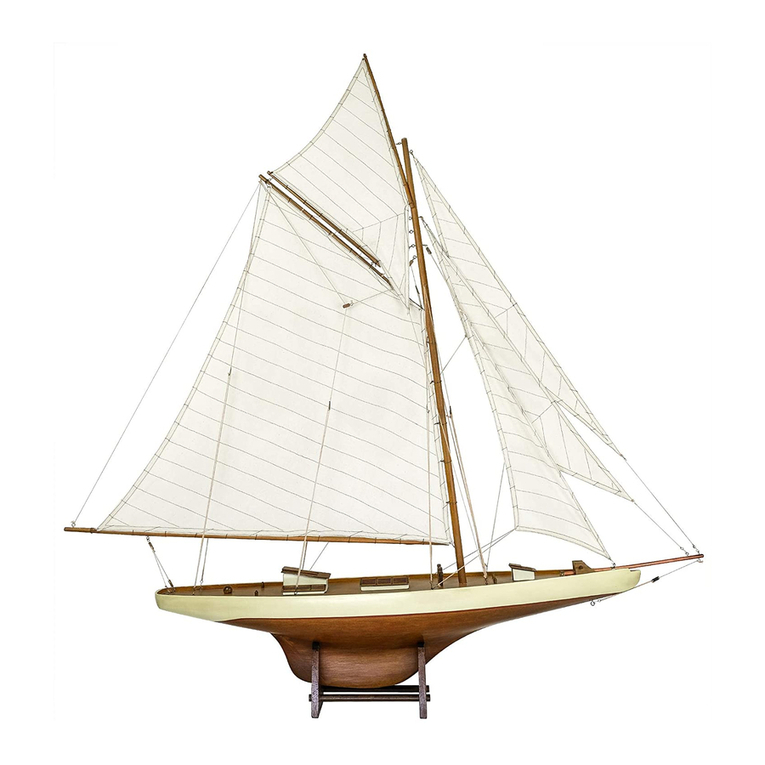
A - Bowsprit
B - Mast
C - Main Sail
D - Boom
E - First Jib
F - Second Jib
1. Remove boat and sails from the box.
2. Unwrap sails, and place mast into mast step just in front
of cabin.
3. Place bowsprit under 2 brass plates, on front of boat. Connect
line on bottom of bowsprit to eye hook on the bottom side
of the bow. Connect lines on left and right side of the
bowsprit to the eye hooks on the left and right side of
the boat.
4. Connect front corner of First Jib to the 1st eye hook on
bowsprit. Connect aft corner to 1st eye hook on deck
(next to mast).
5. Connect front corner of Second Jib to 2nd eye hook on
bowsprit. Connect aft corner to the 3rd eye hook on deck
(next to mast).
6. To rig mainsail, hook end of boom to eye hook on back
deck. Locate end of main halyard (line connected in a ‘Z’
at top of main sail) and begin working the line through the
blocks. Hook end of line to 2nd eye hook right next to mast.
Pull up on adjustors to tighten lines.
Be sure to follow the directions and
not unwind any lines until ready to
connect, otherwise they can become
tangled.
AS133/AS134/AS135/AS136 Instructions
The Netherlands
AM NL
Ambachtsweg 37
NL-3899 AM
Zeewolde
United States
AM USA
888 Garfield
P.O. Box 21710
Eugene, OR 97402
7/08 83000119
B
A
D
F
E
C
1. Retirez le bateau et ses voiles de la boîte.
2. Déroulez les voiles et placez le mât dans son pied de mât situé à l’avant
la cabine.
3. Placez le beaupré sous les deux plaques de cuivre, à l’avant du bateau.
Fixez l’étai qui part de l’extrémité du beaupré à l’œilleton placé sous
la proue. Fixez les haubans latéraux aux oeilletons placés à gauche et
droite de l’avant du bateau.
4. Fixez le coin avant du foc au premier oeilleton du beaupré. Fixez le
coin arrière au premier oeilleton sur le pont (près du mât).
5. Fixez le coin avant de la trinquette au deuxième oeilleton du beaupré.
Fixez le coin arrière au troisième œilleton sur le pont (près du mât).
1. Nehmen Sie das Boot und die Segel aus dem Karton.
2. Breiten Sie die Segel aus und stellen den Mast in den Mastfuß vor
der Kabine.
3. Stecken Sie den Bugspriet unter die zwei Messingplatten an der
Vorderseite des Schiffes. Verbinden Sie die Leine mit dem Ende des
Bugspriets und der unteren Öse vorn am Bug. Die weiteren Leinen
rechts und links des Bugspriets werden mit den Ösen auf der linken
und rechten Seite des Bootes verbunden.
4. Verbinden Sie die vordere Ecke des ersten Vorsegels mit der ersten Öse
am Bugspriet, die hintere Ecke mit der ersten Öse auf dem Deck (neben
dem Mast).
5. Die vordere Ecke des zweiten Vorsegels muß mit der zweiten Öse auf
dem Bugspriet verbunden werden, die hintere Ecke mit der dritten Öse
an Deck (neben dem Mast).
Suivez les instructions et ne déroulez les
différentes drisses et écoutes que lorsque vous
serez prêts à les fixer, pour éviter de les emmêler.
A - Beaupré
B - Mât
C - Grand-voile
D - Bôme
E - Foc
F - Trinquette
Beachten Sie bitte die Aufbauanleitung und
wickeln Sie die Leinen erst ab, wenn es die
nachstehende Anleitung vorsieht.
A - Bugspriet
B - Mast
C - Großsegel
D - Baum
E - erstes Vorsegel
F - zweites Vorsegel
6. Pour gréer la grand-voile, accrochez l’extrémité de la bôme à l’oeilleton
situé à l’arrière du pont. Repérez l’extrémité de la drisse principale
(celle qui est placée en “Z” en haut de la grand-voile) et faites-la glisser
à travers les poulies.
Fixez l’extrémité de la drisse au deuxième oeilleton près du mât et
ajustez la tension avec les régleurs en bois.
6. Um das Großsegel aufzutakeln, haken Sie das vordere Ende des Baumes
in die Öse auf der Rückseite des Mastes und nehmen das Ende des Falls
(zick-zack förmige Leine über dem Großsegel) und führen dies durch die
Blöcke. Haken Sie das Ende der Leine in die zweite Öse direkt neben
dem Mast.
Mit dem Plättchen spannen Sie die Leine.
AS133/AS134/AS135/AS136 Instructions - Aufbauanleitung
The Netherlands
AM NL
Ambachtsweg 37
NL-3899 AM
Zeewolde
United States
AM USA
888 Garfield
P.O. Box 21710
Eugene, OR 97402
7/08 83000119

This manual suits for next models

3

Other Am Toy manuals

Am AP502 User manual

Am

Am AP502 User manual

Am AS076F User manual

Am

Am AS076F User manual

Am AP502 User manual

Am

Am AP502 User manual

Popular Toy manuals by other brands

rollzone PetRide user manual

rollzone

rollzone PetRide user manual

UGEARS Mechanical Flower Assembly instruction

UGEARS

UGEARS Mechanical Flower Assembly instruction

Staufenbiel RED COUGAR instruction manual

Staufenbiel

Staufenbiel RED COUGAR instruction manual

Faller HALF-TIMBERED HOUSE quick start guide

Faller

Faller HALF-TIMBERED HOUSE quick start guide

INTERACTIVE TOY CONCEPTS BladeRunner Storm-Wolf instruction manual

INTERACTIVE TOY CONCEPTS

INTERACTIVE TOY CONCEPTS BladeRunner Storm-Wolf instruction manual

Eduard ZOOM FE 979 quick start guide

Eduard

Eduard ZOOM FE 979 quick start guide

Hasbro Star Wars Revenge of the Sith Count Dooku Lightsaber... instruction manual

Hasbro

Hasbro Star Wars Revenge of the Sith Count Dooku Lightsaber... instruction manual

Compass 3D Plus Nitro Powered Helicopter Assembly manual

Compass

Compass 3D Plus Nitro Powered Helicopter Assembly manual

Sol-Expert 1818584 Quick user guide

Sol-Expert

Sol-Expert 1818584 Quick user guide

Eduard B-17G waist section Assembly instructions

Eduard

Eduard B-17G waist section Assembly instructions

E-FLITE Gypsy Assembly manual

E-FLITE

E-FLITE Gypsy Assembly manual

J. Perkins Twister Hawk Assembly & flight training guide

J. Perkins

J. Perkins Twister Hawk Assembly & flight training guide

Spinmaster Hyper Actives Stunt instructions

Spinmaster

Spinmaster Hyper Actives Stunt instructions

Pro Boat Miss Budweiser owner's manual

Pro Boat

Pro Boat Miss Budweiser owner's manual

Hobby King Typhoon -EP manual

Hobby King

Hobby King Typhoon -EP manual

V-tech Play & Learn Activity Table user manual

V-tech

V-tech Play & Learn Activity Table user manual

WATT AGE Extra 330l EP Instructions for final assembly

WATT AGE

WATT AGE Extra 330l EP Instructions for final assembly

LaserPegs GI670B Model instructions

LaserPegs

LaserPegs GI670B Model instructions

manuals.online logo
manuals.online logoBrands
  • About & Mission
  • Contact us
  • Privacy Policy
  • Terms and Conditions

Copyright 2025 Manuals.Online. All Rights Reserved.