Amana AOGD2750 Series User manual

Gas Wall Oven
Owner's Manual
AOGD2750*
* Additionalalphanumericcharacters
representingother models in seriesmay
followeachmodelnumber.
Please Read Manual Before Operating Oven
Installer
Leavethismanualand other literature with consumer for
futureuse.
Customer
Keeptheseinstructionsfor future reference. If appliance
changesownership, be sure this manualaccompanies
oven.
English......................................................................... 1
Francais..................................................................... 35

Contents
CookingGuide
Baking Guide .......................................................... 26
BroilingGuide ......................................................... 26
Poultry RoastingGuide ........................................... 27
Beef andPork RoastingGuide ................................ 27
Slo-Cook™Recipes
Main Dish Recipes.................................................. 28
Slo-Cook™ MenuMeals ......................................... 31
QuickReferenceInstructions .....................................34
Model Identification
Completeenclosedregistration card and promptly return.
If registration card is missing, call Consumer Affairs
Departmentat1-800-843-0304insideU.S.A.
319-622-5511outsideU.S.A.WhencontactingAmana,
provideproductinformationlocated on rating plate. Rating
plateis located on the ovenframe. Record the following:
ModelNumber: ______________________________
ManufacturingNumber: ________________________
Serialor S/N Number: _________________________
Dateofpurchase:_____________________________
Dealer’snameandaddress: ____________________
__________________________________________
__________________________________________
Parts and Accessories
Purchasereplacementparts and additional accessories
(e.g.,refrigeratorshelves, dryer racks, orcooktop
modules)overthephone. To order accessories for your
Amanaproduct,call 1-800-843-0304 inside U.S.A.or
319-622-5511outside U.S.A.
Service
Keepa copy of sales receipt for futurereference or in
case warranty service is required. Any questions or to
locateanauthorizedservicer,call1-800-NAT-LSVC
(1-800-628-5782)insideU.S.A.319-622-5511 outside
U.S.A.Warranty service must be performed by an
authorizedservicer.Amana,also recommends contacting
anauthorizedservicerifserviceisrequiredafterwarranty
expires.
Asure™ Extended Service Plan
Amanaofferslong-termservice protection for this new
oven.Asure™ Extended Service Planis specially
designedtosupplement Amana’sstrongwarranty.
Thisplancoversparts, labor, andtravelcharges.
Call1-800-528-2682forinformation.
ModelIdentification ................................................. 2
Parts and Accessories............................................ 2
Service.................................................................... 2
Asure™ ExtendedServicePlan .............................. 2
ImportantSafetyInformation.......................................3
ALL APPLIANCES.................................................. 3
SELF-CLEANINGOVEN......................................... 3
OVEN ..................................................................... 3
DelayedIgnition ...................................................... 4
In Case ofFire ........................................................ 4
Precautions ............................................................ 4
Installation
Packing Material ..................................................... 4
OvenLocation ......................................................... 4
CabinetOpening ..................................................... 4
Gas and Electrical Supply Location ........................ 5
Electrical ConnectionRequirements ....................... 5
GasConnectionRequirements................................ 6
Gas SupplyPressure.............................................. 6
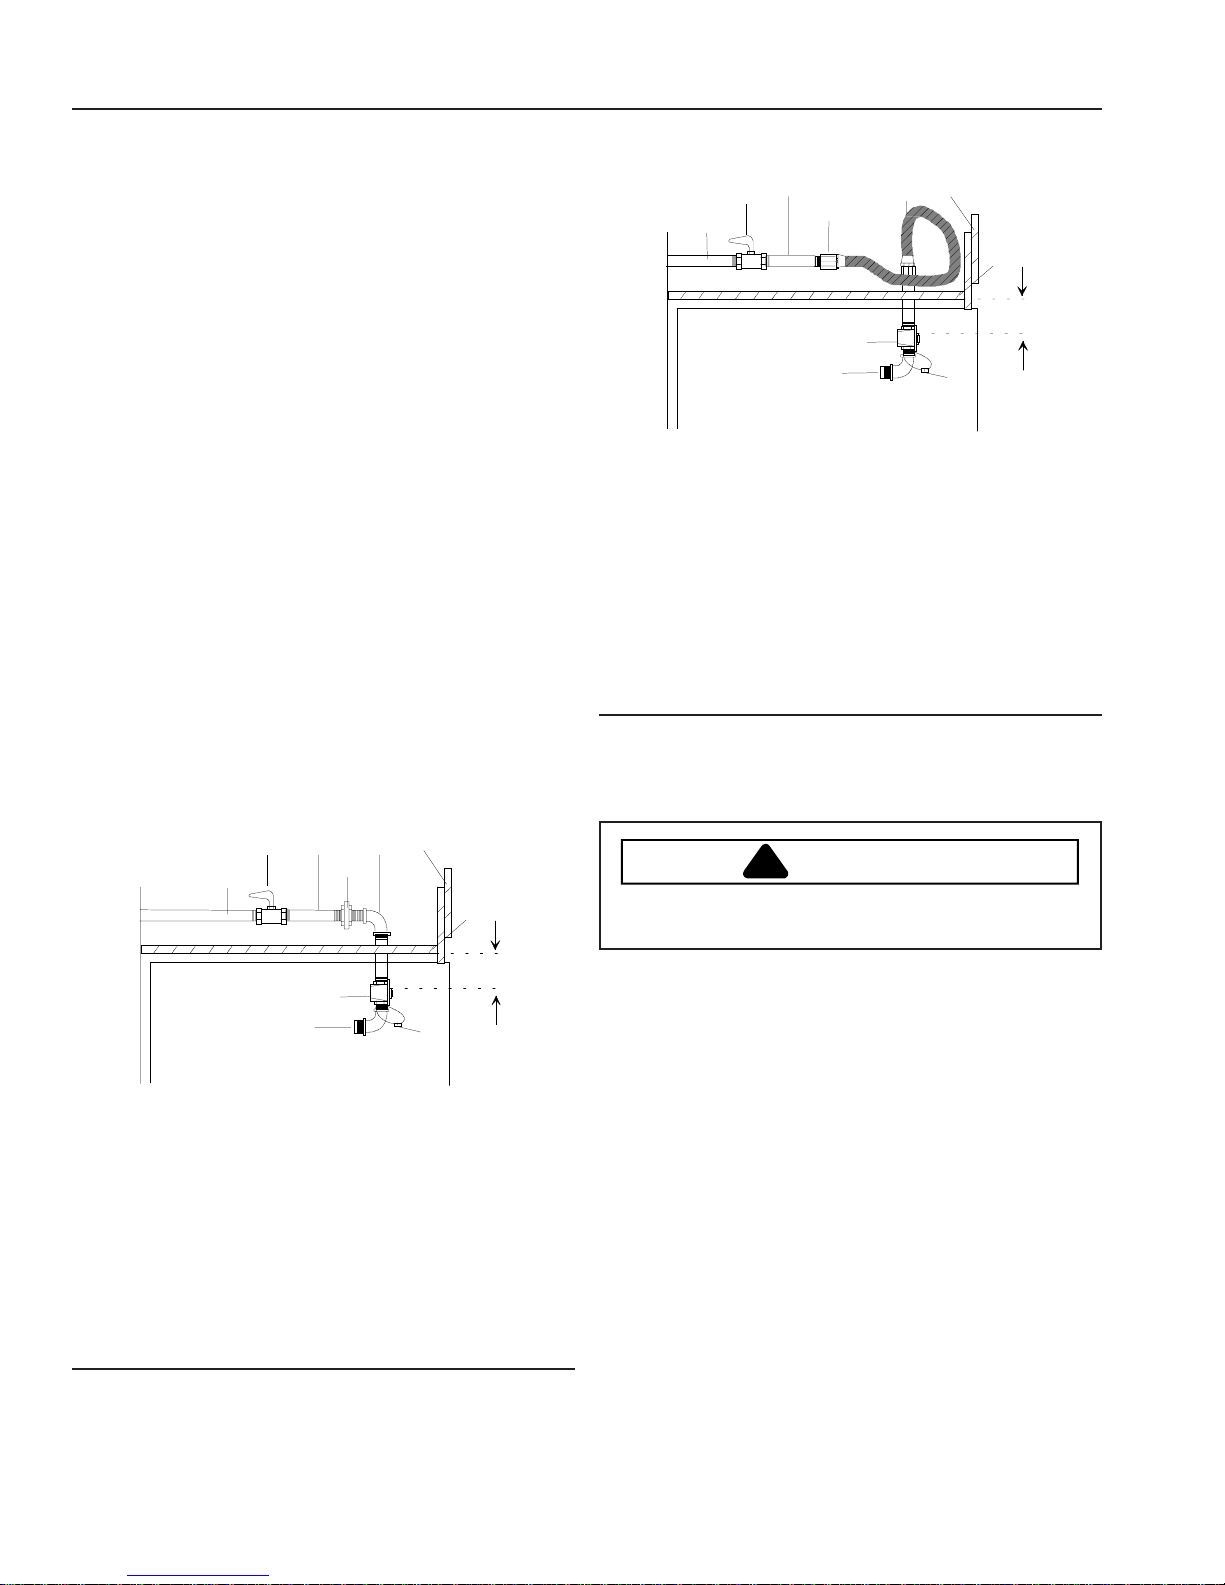
SealOpenings ........................................................ 7
Place Oven in Wall ................................................. 7
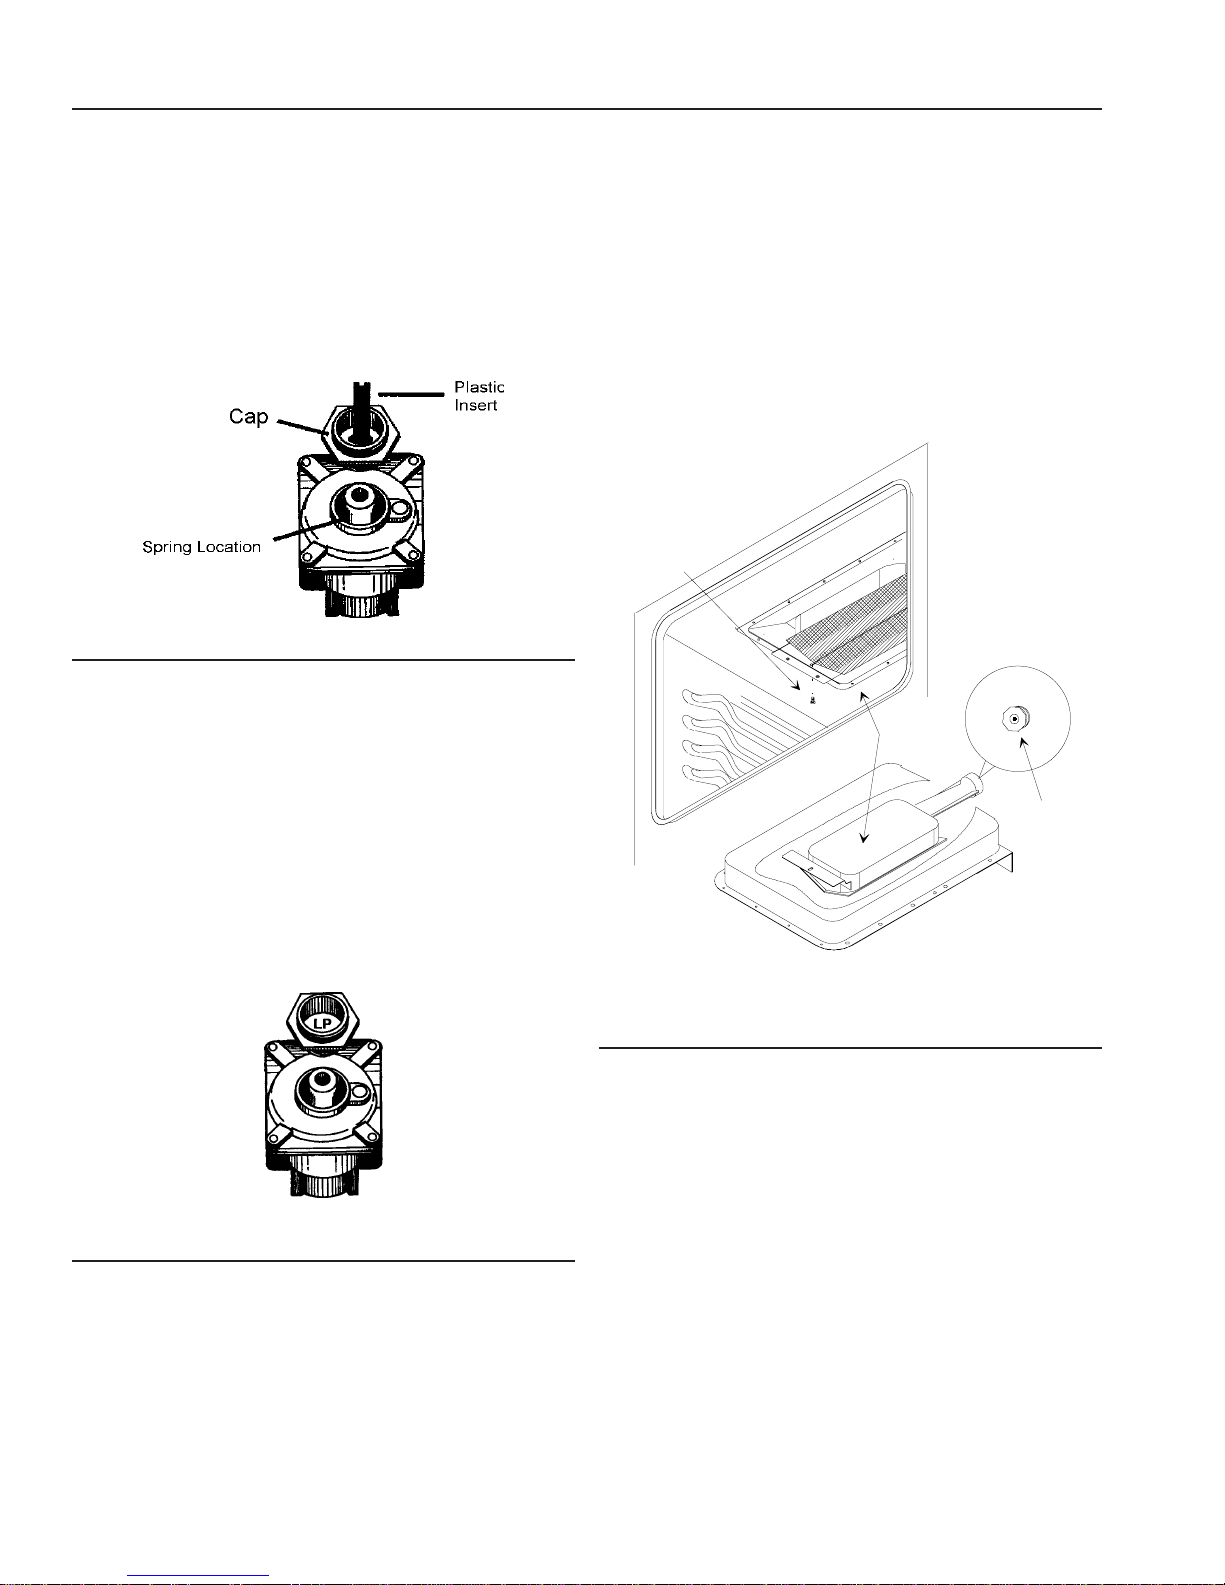
ConvertingPressureRegulatorforUsewithNaturalGas
orPropaneGas....................................................... 7
GasConnection ...................................................... 10
Testing for Gas Leaks ............................................. 11
TestOvenBurnerFlame.......................................... 11
Adjust OvenBurnerFlame ...................................... 11
Test Broiler Flame................................................... 12
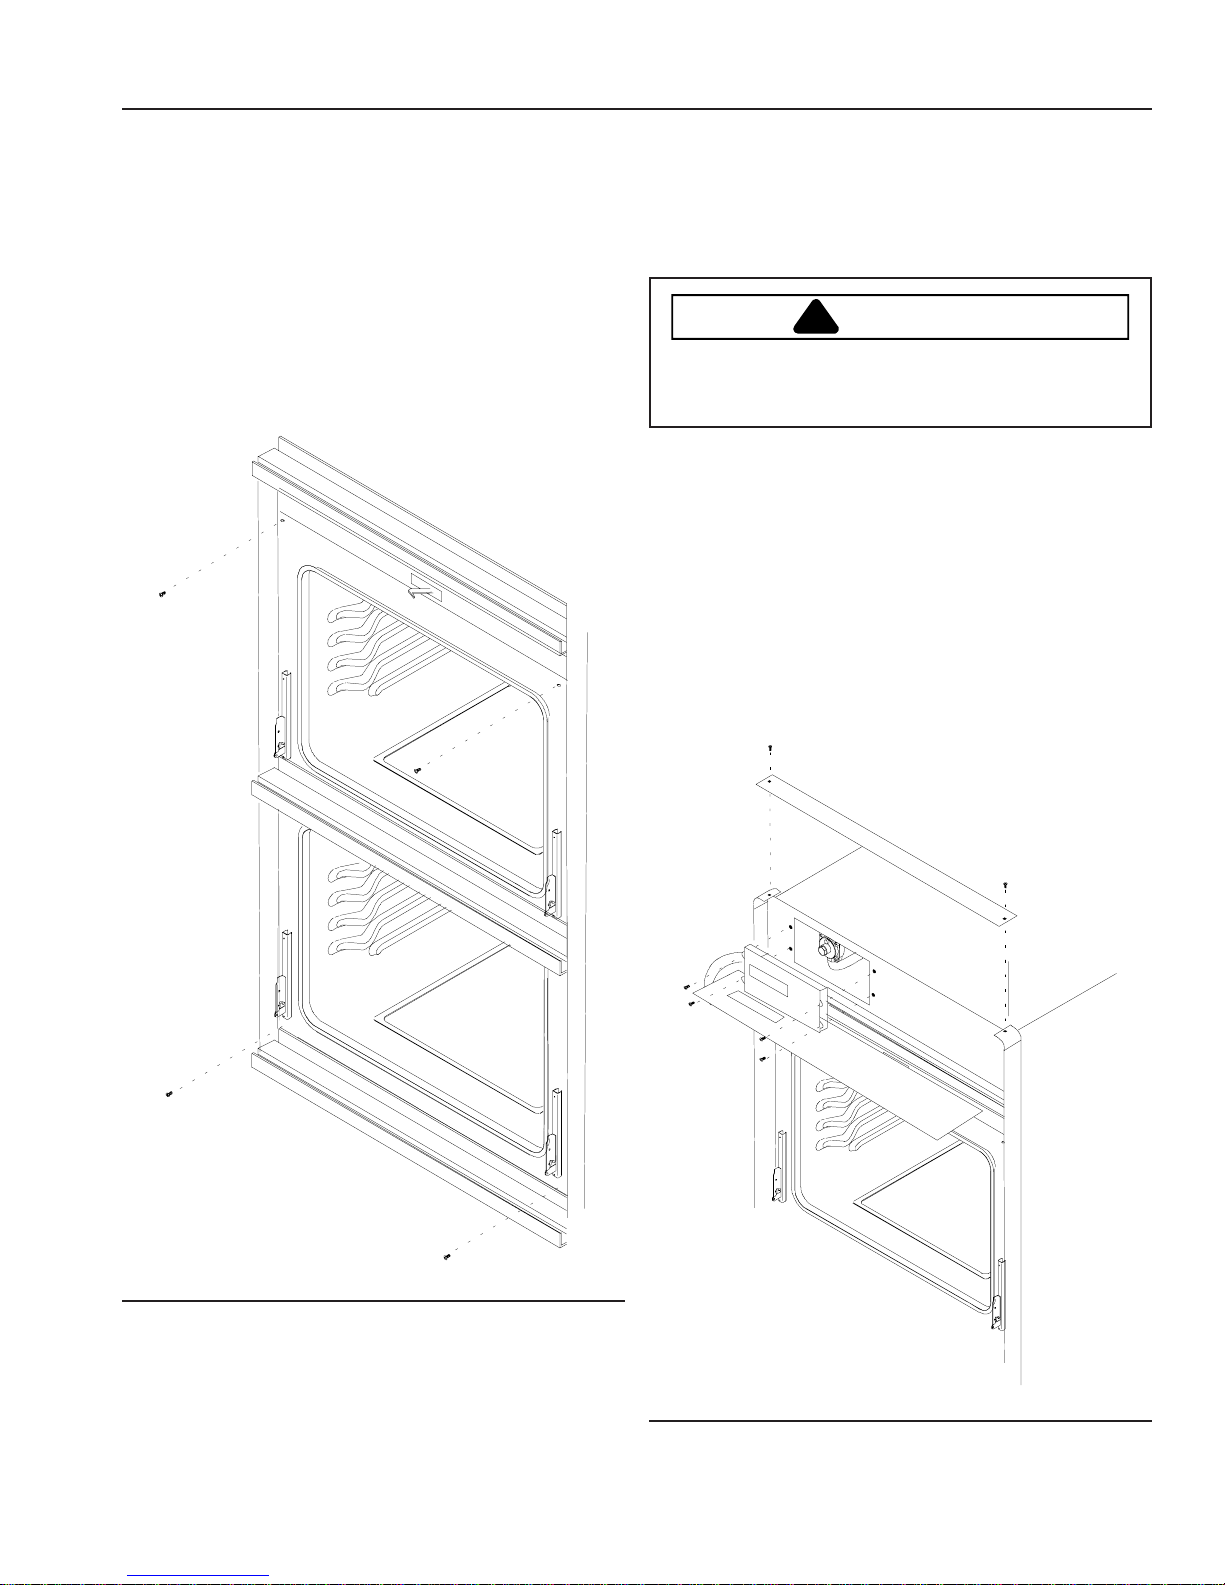
RemovalandReplacementof Oven ......................... 12
Operation
OvenControlPanel ................................................. 13
Flashing Display ..................................................... 16
Setting Electronic Clock ......................................... 16
Setting Electronic Timer.......................................... 16
Prepare to Bake, Timed Bake, and Delayed Bake... 16
Baking .................................................................... 17
TimedBaking.......................................................... 17
DelayedBaking....................................................... 18
PrepareforBroiling ................................................. 18
Insta-Broil™ BroilingSystem .................................. 18
Hold ........................................................................ 19
PrepareforSlo-Cook™,TimedSlo-Cook™,
DelayedSlo-Cook™................................................ 19
Slo-Cook™ ............................................................. 19
TimedSlo-Cook™................................................... 20
DelayedSlo-Cook™................................................ 20
PrepareforSelf-cleanand ....................................... 21
DelayedSelf-cleanCycle ........................................ 21
Self-cleaning ........................................................... 21
DelayedSelf-cleanCycle ........................................ 21
CareandCleaning
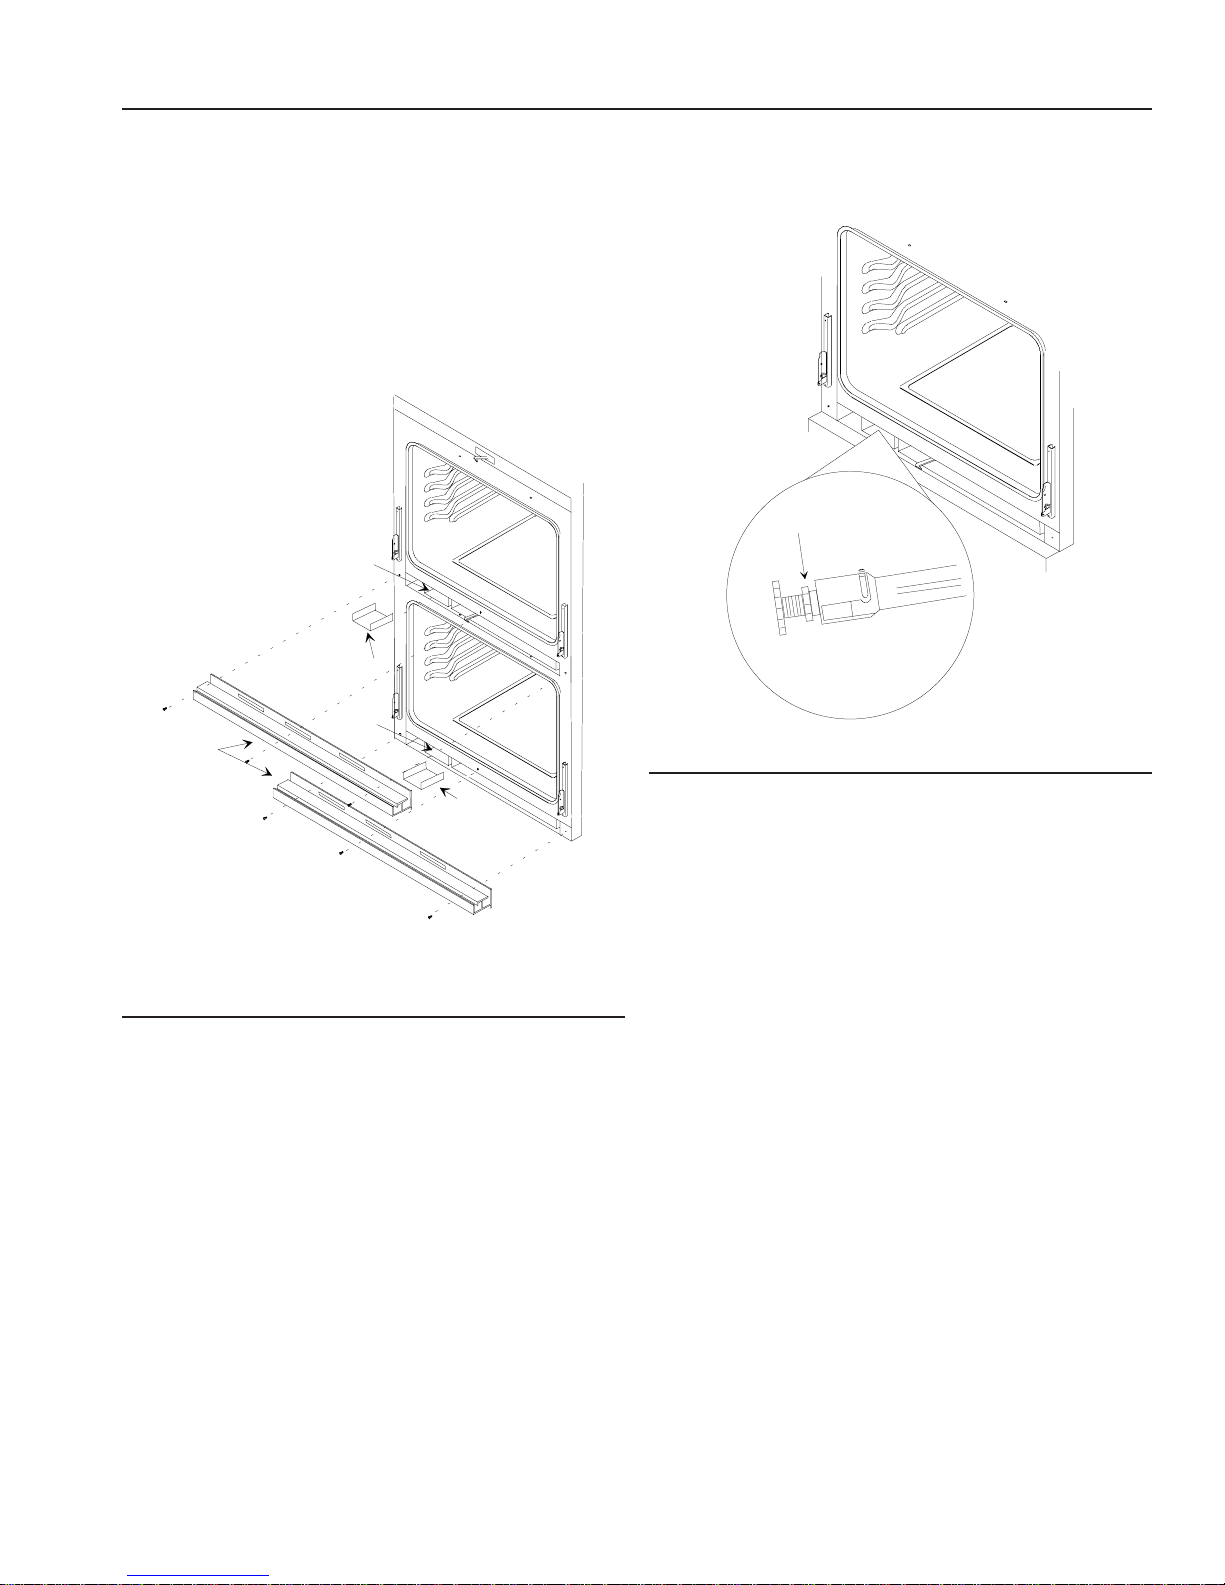
RemovingOvenDoor ............................................... 22
ReplacingOvenLight .............................................. 22
Cleaning.................................................................. 23
BeforeCallingforService............................................24
Warranty ....................................................................25

IMPORTANT SAFETY INFORMATION
ALL APPLIANCES
1. ProperInstallation—Besureyourapplianceisproperly
installedandgroundedbyaqualifiedtechnician.
2. NeverUseYourApplianceforWarming orHeating
the Room.
3. DoNotLeaveChildren Alone—Children should not be
aloneor unattended in the area where theappliance
is in use. They should never be allowed to sit or
stand on any part of the appliance.
4. WearProperApparel—Loosefittingorhanging
garmentsshouldneverbewornwhileusingappliance.
5. UserServicing—Donot repair orreplace any part of
theappliance unless specifically recommended in
the manual. All other servicing should be referred to a
qualifiedtechnician.
6. StorageinoronAppliance—Flammablematerials
(includingpaper and plastic) should not be stored in
anoven,itsstoragedrawerornearsurfaceunits.
7. Do Not Use Water On Grease Fires—Smother fire or
flame, or use dry chemical or foam-type extinguisher.
8. UseOnly Dry Potholders—Moist or damp potholders
on hot surfaces may result in burns from steam. Do
not let potholder touch elements. Do not use a towel
or other bulky cloth.
OVENS
1. UseCare When Opening Door—Let hotair or steam
escapebeforeremovingorreplacingfood.
2. DoNotHeatUnopenedFoodContainers—Build-upof
pressure may cause container to burst and result in
injury.
3. KeepOvenVent Ducts Unobstructed.
4. PlacementofOven Racks—Always place ovenracks
in desired location while oven is cool. If rack is
removedwhileoven is hot, do not letpotholder
contacthot heating element inoven.
5. ProtectiveLiners—Donotusealuminumfoiltolineoven
racksorovenbottoms.Improperinstallationofthese
liners may result in a risk of electrical shock, or fire.
SELF-CLEANING OVENS
1. DoNot Clean Door Gasket—The doorgasket is
essential for a good seal. Care should be taken not to
rub,damage, or move the gasket.
2. DoNotUseOvenCleaners—Nocommercialoven
cleaneroroven liner protective coating of anykind
should be used in or around any part of the liner.
3. Clean Only Parts Listed in Manual
4. BeforeSelf-CleaningtheOven—Removebroiler pan,
ovenracks, and other utensils.
5. RemoveAllItemsFromRangetopand Backguard.
SAVE THESE INSTRUCTIONS
WARNING
!
To avoid risk of electrical shock, personal injury, or
death,make sure your oven hasbeen properly grounded
andalways disconnect it from mainpower supply before
anyservicing.
CAUTION
!
TheGovernorofCaliforniaisrequiredtopublishalistof
substances known to the state of California to cause
cancerorreproductiveharmandrequiresbusinessesto
warncustomersofpotentialexposurestosuch
substances. Some appliances contain or produce a
chemical or chemicals which can cause death or
serious illness and which are known to the State of
Californiatocause cancer, birth defects, or other
reproductiveharm.Toreduce the risk from substances
during the self-clean cycle make sure this appliance is
installed,operated,andmaintainedaccordingtothe
manufacturer’sinstructions.
WARNING
!
To avoid personal injury, do not sit, stand or lean on
ovendoor.
CAUTION
!
Donot obstruct the flow ofcombustion or ventilation
air.
WARNING
!
Toavoid death, personal injury orproperty damage,
information in this manual must be followed exactly.
Do not store or use gasoline or other flammable
vapors and liquids in the vicinity of this or any other
appliance.
WHAT TO DO IF YOU SMELL GAS
• Do not try to light any appliance.
• Do not touch any electrical switch; do not use
any phone in your building.
• Immediately call your gas supplier from a
neighbor’sphone. Follow the gas supplier’s
instructions.
• If you cannot reach your gas supplier, call the fire
department.
Installationand service must be performed by a
qualifiedinstaller,service agency or the gas supplier.

4
Important Safety Information
Delayed Ignition
Bake Burner Flame
Allownomore than 40–60 seconds before burnerignites
and heat is felt. To check for heat, open oven door to first
stopand place hand over oven door. If heatis not felt,turn
temperatureknobto
OFF
position.If burner repeatedly
failsto ignite, contact an authorized servicer.
Broiler Flame
Allownomore than 40–60 seconds before burnerignites
and flame is seen. If burner does not ignite turn
temperatureknobto
OFF
position.If burner repeatedly
fails to ignite within 40–60 seconds contact an authorized
servicer.
Radiantscreen style broiler flameshould appear hazy or
fuzzy. Haze should be no more than 3/8inch thick. The
radiantscreen should begin toglow red within 1–2
minutes.
In Case of Fire
Fires can occur as a result of over cooking or excessive
grease. Though a fire is unlikely, if one occurs, proceed
as follows:
Oven Fires
1. Ifyousee smoke fromoven, do notopen oven door.
2. Turn ovencontrolto
OFF
.
3. As an added precaution, turn off gas supply and
power at main circuit breaker or fuse box.
4. Turnon vent to remove smoke.
5. Allow food or grease to burn itself out in oven.
6. If smoke and fire persist, call fire department.
7. If there is any damage to components, call repair
servicebeforeusingoven.
Precautions
• Do not mix household cleaning products. Chemical
mixturesmay interact with objectionable oreven
hazardousresults.
• Do not put plastic items on warm cooking areas. They
may stick and melt.
• Do not use damp sponge or dishcloth to clean oven
when oven is hot. Steam from sponge or dishcloth can
burn.
• Do not leave fat heating unless you remain nearby. Fat
can ignite if overheated by spilling onto hot surfaces.
Installation
Packing Material
Removeprotectivepackingmaterialfromoven. Tape
residue can be cleaned with a soft cloth and alcohol.
Oven Location
Choose a location based on following factors.
• Makesure there is adequate spacefor proper
installation.
• Carefully read all instructions before beginning
installation.
Cabinet Opening
Preparethe cabinet for wall oven.
A
BC
E
D
F
A—54 inches
B—25 inches
C—233/4inches
D—27 inches minimum
E—121/2inches
F—3 inches
Cabinet Opening
CAUTION
!
DONOTTOUCH HEATINGELEMENTSOR
INTERIORSURFACESOFOVEN—Ovenheating
elements may be hot though they are dark in color.
Interiorsurfaces of an ovenmay become hot enough
to cause burns. During and after use, do not touch, or
let clothing or other flammable materials touch
heatingelements or interior surfaces ofoven until they
havehad enough timeto cool. Otherrange surfaces
that may become hot enough to cause burns are the
ovendoor,ovencavity, and ovenvent.

5
Gas and Electrical Supply Location
Gas supply must be located in the area shown. Gas
connection must not interfere with the electrical
connection.
AB
C
D
E
Electrical
A—8 inches
B—5 inches
Gas
C—5½ inches
D—5 inches
E—4-inch round hole
Gas and Electrical Supply Location
Electrical Connection Requirements
WARNING
!
To avoid the risk of serious electrical shock or
propertydamage, do not cut orremove the third
(ground)prong from the powerplug. A 3-wire
grounded conductor system must be used. Relying
on the flexible connector, hard piping or any other
part of the gas supply line as a ground may cause
fire, electrical shock and/or erratic control operation.
Ovenmust be electrically grounded in accordance with
local codes or in the absence of local codes, with the
National Electrical Code, ANSI/NFPA No. 70-Latest
Edition.
In Canada, electrical connections are to made in
accordance with CSA C22.1 Canadian Electrical Code.
All electrical connections are to be made in accordance
with CSA standards Z240.6.1 electrical requirements for
mobile homes.
Use a 120 volt, 60 hertz, 3-prong receptacle protected by
a 15 amp circuit breaker or time delay fuse. A qualified
electricianshould confirm the outlet isproperly grounded
andpolarized.
Ifa 2-prong outlet is encountered, home owner must
replace outlet before using oven. Do not cut off cord, use
plugadapter or extension cord,or remove grounding plug.
Grounded Plug and Outlet

6
Gas Connection Requirements
Before connecting this appliance to the gas supply piping
system,confirm installationmeetstherequirementsoflocal
codes, or in the absence of local codes, with the National
FuelGasCode,ANSIZ223.1-LatestEdition.
When installed in mobile housing, installation is to be in
accordancewithCSAstandard Z241.1 gas equipped
mobilehousing.
Theinstallationofappliancesdesignedformanufactured
(mobile)home installation must conform with
ManufacturedHomeConstructionandSafetyStandard,
Title 24 CFR, Part 3280, or when such standard is not
applicable,theStandardforManufacturedHome
Installation,ANSI225.1/NFPA501A-LatestEdition,orwith
localcodesor the standard CAN/CSA-z240MH,“Mobile
Homes”,andwith local codes whereapplicable.
The installation of appliances is to be in accordance with
CAN1-B149.1orB149.2installation code for gas burning
appliances and equipment and/or local codes. Part 1 and/
or local codes.
Assemble gas supply line to oven. All gas supply piping,
tubing,fittings,andshutoffvalvesarenotsuppliedwiththis
oven.Seeexamples.
ABCDEF
G
H
J
KL
A—1/2-inch rigid pipe supply line
B—Manual shutoff valve
C—Nipple
D—Union
E—Elbow
F—Upper cabinet door or removable panel
G—Upper cabinet shelf
H—21/4 inches
J—L.P. orifice spuds
K—Inlet to oven
L—Pressure regulator
Hardpipe Gas Supply
ABCDEF
G
H
J
KL
A—1/2-inch rigid pipe supply line
B—Manual shutoff valve
C—Nipple
D—Adapter
E—Flexiblegas connector
F—Upper cabinet door or removable panel
G—Upper cabinet shelf
H—21/4 inches
J—L.P. orifice spuds
K—Inlet to oven
L—Pressure regulator
Flexible Connecter Gas Supply
Gas Supply Pressure
CAUTION
!
Toavoid property damage,maximum gas supply
pressure must not exceed 14" WCP.
• Applianceandindividualshutoffvalvemustbe
disconnected from the gas supply piping system during
any pressure testing of that system at test pressures in
excess of ½ psig (3.5kPa) (14" WCP).
• Appliance must be isolated from gas supply piping
systembyclosing manual shutoff valveduringany
pressure testing of the gas supply piping system at
test pressures equal to or less than ½ psig (3.5kPa)
(14"WCP).
• Gassupply pressure for checkingregulator setting
must be at least 1" WCP above manifold pressure
shownonrating label.

7
Seal Openings
Openingsinwallbehindtheovenoronfloorunderovenmust
be sealed before sliding oven into position.
Place Oven in Wall
Thisprocedureshouldbeperformedby 2 people.
1. Leanovento each sideand remove shipping base.
2. Movewall oven close towall opening and plugin oven
cord.
3. Secure wall oven to cabinet with 4 screws.
Place Oven inWall
Converting Pressure Regulator for Use with
Natural Gas or Propane Gas
Thisovenarrivesfromfactoryadjusted for use with natural
gas.If using LP/propane gas isdesired, oven must be
converted.See“Type1”or“Type2”regulator.
WARNING
!
To avoid electric shock that can cause personal
injury or death, disconnect main electrical supply to
ovenbeforeservicing.
Remove Control Panel
Toconvertpressureregulator remove oven control panel.
1. Remove 2 screws and lift off top trim.
2. Tilt control panel out to expose electronic range
control.
3. Remove 4 screws and pull out range control to
exposepressureregulator.
• Broilerburnerorificespuds are wired to manifold
behindpressureregulator.
4. Afterconvertingbroilerburners and wiring orifice
spuds to manifold. After “Testing for Gas Leaks”
section,reverse procedure toreinstall control panel.
Remove Control Panel

8
Converting Type 1 Pressure Regulator for Use with
LP/ Propane
1. Removepressureregulatorcapwithawrench.
2. Remove plastic insert from pressure regulator cap.
• Plastic insert fits tightly in cap.
3. Reverse plastic insert and carefully push plastic
insert firmly into hole in pressure regulator cap.
• Cap must show “LPG10” or “LP10”.
Type 1 Pressure Regulator
4. Placepressureregulatorcap on pressure regulator
andtighten.
• Insertshould not disturb springin body of regulator.
Converting Type 2 Pressure Regulator for Use with
LP/Propane (Figure 9)
1. Remove pressure regulatorcapwitha wrench.
2. Reversepressureregulatorcap.
• Cap must show “LP”.
Type 2 Pressure Regulator
3. Placepressureregulatorcap on pressure regulator
andtighten.
Converting Broiler Burner for Use with LP\Propane
1. Locate orifice spud attached adjacent to pressure
regulatorandremoveforlateruse.
• Orificespud used for LP/propanegas is stamped
2. Openovendoorandlocatebroilerburneronoven
ceiling.
• Removeovendoortomakeconversioneasier.See
“RemovingOvenDoor”section.
3. Removescrewsecuringfrontofburnertoovenceiling
andremovebroiler.
• Becarefulnotto damage ignitor while removing
broiler.
A
B
C
A—Remove Screw
B—Broiler
C—Orifice
Broiler and Orifice Spud
4. Unscrewnaturalgas burner spud stamped “52” with
5/16-inch socket wrench and replacewithLP/propane
burnerspudstamped“58”.
• Attachunusedburnerspudnearregulatorforfuture
use.
5. Reinstallbroiler.

9
Converting Oven Burners for Use with LP\Propane
Lowerburner orifices andair shutters arelocated behind
fronttrim.Removeoven trim to convert oven burners.
1. Removeovendoors.
• See“RemovingOvenDoor”section.
2. Removescrews(3) from eachtrim piece.
3. Pulltrim away from oven.
• Each orifice box has an air channel. Air channel
must be in place before reinstalling trim.
• Reverseproceduretoreinstalltrim.
A
B
A
B
C
A—Air Channel
B—Oriface Box
C—Trim
Remove Oven Trim
4. Turn(tighten)orifice hood clockwise untilsnug.
• Do not overtighten orifice hoods. Orifice hoods can
strip.
A
A—Orifice Hood
Converting Oven Burners
5. Replace trim after burner is tested and air shutter is
properlyadjusted.
• See“Test and AdjustOven Burner” section.
Converting Type 1 Pressure Regulator for Use with
Natural Gas
1. Remove pressure regulator capwitha wrench.
2. Removeplasticinsertfrom pressure regulator cap.
• Plastic insert fits tightly in cap.
3. Reverse plastic insert and carefully push plastic insert
firmlyinto hole in pressure regulator cap.
• Insertmust show “NAT” or be blank.
4. Place pressure regulator cap on pressure regulator
and tighten.
• Insert should not disturb spring in body of
regulator.

10
Converting Type 2 Pressure Regulator for Use with
Natural Gas
1. Removepressureregulatorcapwithawrench.
2. Reversepressureregulatorcap.
• Insert shows “NAT” or is blank.
3. Placepressureregulatorcap on pressure regulator
andtighten.
Converting Oven Burner for Use with
Natural Gas
Lowerburner orifices andair shutters arelocated behind
fronttrim.Removeoven trim to convert oven burners.
1. Removeovendoors.
• See“RemovingOvenDoor”section.
2. Removescrews(3) from eachtrim piece.
3. Pulltrim away from oven.
• Each orifice box has an air channel. Air channel
must be in place before reinstalling trim.
• Reverseproceduretoreinstalltrim.
4. Turn(loosen)orificehoodcounterclockwise2 full
turns.
5. Replacecoverplateandstoragedrawer.
Converting Broiler Burner for Use with
Natural Gas
1. Locate orifice spud attached adjacent to pressure
regulator and remove for later use.
• Orifice spud used for natural gas is silver and is
stamped “52”.
2. Open oven door and locate broiler burner on oven
ceiling.
• Remove oven door to make conversion easier.
See
Removing Oven Door
section.
3. Removescrewsecuringfrontofburnertoovenceiling
andremovebroiler.
• Be careful not to damage ignitor as you remove
broiler.
4. Unscrew LP/propane burner spud stamped “58” with
5/16 inch socket wrench and replace with natural gas
burner spud stamped “52”.
5. Reinstall broiler and, if necessary, oven door.
Gas Connection
Connect gas supply to regulator using hard pipe or
flexible connector (Check local codes). Pressure
regulator supplied with this appliance has a ½ inch NPT
femaleconnection.
• Amanual shutoff, not supplied with oven, must be
installed in an accessible location outside of oven.
• Use joint compound that is resistant to action of
propane gas on all male pipe threads.
• Use supplied pressure regulator only.
• Do not overtighten gas fitting when attaching to
pressure regulator. Overtightening may crack regulator.
• Support pressure regulator with wrench when installing
gas fitting.
WARNING
!
Toavoid property damage orpersonal injury,only use
a new flexible connector that is AGA/CGA design
certified.
• Do not use an old connector.
• Donot reuse a connector after moving appliance.

11
Testing for Gas Leaks
After final gas connection is made, turn on manual gas
valve and test all connections in gas supply piping and
ovenforgasleaks.
WARNING
!
Toavoid property damage orserious personal injury,
never use a lighted match to test for gas leaks.
1. Place soap suds on connection.
• Bubbles appear if leak is present.
2. Ifbubblesappear,shutoffgas supplyvalve.
3. Tighten joint if leak is at factory fitting.
• If leak is not at factory fitting, unscrew, apply more
joint compound, and tighten to correct leak.
4. Retestconnection for leak after tightening.
• Retest any connections that were disturbed.
Testing for Gas Leaks
Test Oven Burner Flame
Properlyadjustedovenburner flames are blue with a
distinct deep blue inner cone approximately ½ inch long.
Whenusing natural gas, flameshould not have anyyellow
flamewhenburning.Someyellowflamewhenburning
LP\propanegasis normal.
Flame should not be visible in the oven cavity when
burning and should not extend into the oven cavity
beyond the removable oven bottom.
• If burner flame is blowing or noisy, reduce airflow to
burner.
• If burner flame is yellow and does not hold its shape,
increaseairflowtoburner.
Adjust Oven Burner Flame
WARNING
!
To avoid electric shock that can cause personal
injury or death, disconnect main electrical supply to
ovenbeforeservicing.
Lowerburner orifices andair shutters arelocated behind
fronttrim. Remove oven trimto adjust oven burners.
1. Removeovendoors.
• See“RemovingOvenDoor”section.
2. Removescrews(3) from eachtrim piece.
3. Pulltrim away from oven.
• Each orifice box has an air channel. Air channel
must be in place before reinstalling trim.
• Reverseproceduretoreinstalltrim.
A
B
A
B
C
A—Air Channel
B—Orifice Box
C—Trim
Remove Oven Trim

12
4. Loosen air shutter screw and open or close air
shutter.
A
B
A—Air Shutter Screw
B—Air Shutter
Loosen air shutter screw
5. Replace trim after burner is tested and air shutter is
properlyadjusted.
Test Broiler Flame
Broilerflame should appear hazy or fuzzy.Haze should
be no more than 3/8-inch thick. The radiant screen should
beginto glow red or ovenwithin 1–2 minutes.
Because broiler has a fixed orifice it can not be adjusted.
Broilerdoes not have an airshutter.
Removal and Replacement of Oven
1. Disconnectpower to oven atcircuit breaker or fuse
panel.
2. Turnoffmanualshutoffgasvalve,anddisconnectgas
supply.
3. Removeoven,unplugpowercord,andplace oven
aside.
4. Toreinstall oven, follow instructionsin
Installation
section of this manual.
• Donotreuse a flexible connector after moving
appliance.

13
Oven Control Panel
Operation
Oven Control Description
Controls clock, timer, and interior oven lights for
both ovens. STOP TIME pad is used to program
delayed bake and delayed clean features for both
upper and lower ovens.
Controls upper oven settings. Any, time or
temperature settings entered only effect upper
oven.
Controls lower oven settings. Any, time or
temperature settings entered only effect lower oven.
Pad Description
OVEN LIGHTS Turns light on and off in both upper and lower ovens.
TIMER ON/OFF Use to time any kitchen function or cancel timer. Does not control bake, broil, or
clean function.
CLOCK Use to set time of day.
STOP TIME Use to set delayed bake and delayed self-clean.
OVEN CANCEL Cancels any cooking or cleaning function except timer.
COOK TIME Use to set timed baking.
CLEAN Use to select self-clean cycle.
BROIL Use to select broil.
BAKE Use to select bake.
Use to set temperature or time.
-
+

14
Display
Some items in display can be seen but will not glow. Displays temperature and cooking method or function
for upper oven.
Displays time-of-day, timer and timed or delayed
settings.
Displays temperature and cooking method or function
for lower oven.
Display Glossary
TIME AM, PM or HR TIME AM or PM Flashes in display while time-of-day is entered. TIME HR flashes
when time is entered for timed or delayed baking or delayed self-cleaning.
TIMER Flashes in display while timer is set. TIMER stops flashing and displays while time
counts down.
PRE-BAKE, BAKE BAKE flashes while bake oven temperature is entered. While oven preheats PRE-
BAKE displays. After oven has reached temperature, BAKE displays.
ON Displays when oven is heating.
OVEN 1 or 2 Flashes while time is entered for timed or delayed cooking. 1 displays when upper
oven is set. 2 displays when lower oven is set.
TIMED BAKE Flashes, then displays when a timed baking cycle is set.
DELAYED TIMED
BAKE or CLEAN Displays when delayed bake or clean self-cycle is set.
STOP Displays when setting the stop time for a delayed baking or self-clean cycle.
BROIL Flashes, then displays when a broil is set.
CLEAN Displays when self-clean cycle is entered and set.
LOCK LOCK flashes while oven door is locking and remains in display while door is locked.
After cycle is complete and oven has cooled to a safe temperature, LOCK no longer
displays and door can be opened.
HLD Displays when oven is holding oven temperature at 170ºF for 1 hour.
SLO Displays when oven is set to Slo-Cook™ temperature. Oven cooks like crocpot for
up to 12 hours.
8888
8888
P
R
B
CONV BROIL PRE
DELAY TIMED BAKE
CLEAN LOCKED ON 8888
P
R
B
CONV BROIL PRE
DELAY TIMED BAKE
CLEAN LOCKED ON
CLEAN OVEN 1 2 STOP ON TIMER
AM
PM
HR
8888
8888
P
R
B
CONV BROIL PRE
DELAY TIMED BAKE
CLEAN LOCKED ON 8888
P
R
B
CONV BROIL PRE
DELAY TIMED BAKE
CLEAN LOCKED ON
CLEAN OVEN 1 2 STOP ON TIMER
AM
PM
HR
8888
8888
P
R
B
CONV BROIL PRE
DELAY TIMED BAKE
CLEAN LOCKED ON 8888
P
R
B
CONV BROIL PRE
DELAY TIMED BAKE
CLEAN LOCKED ON
CLEAN OVEN 1 2 STOP ON TIMER
AM
PM
HR

15
Oven Signals
Preheat signal After setting oven to bake and selecting a temperature, oven preheats. When
oven reaches set temperature, 1-second signal sounds.
Timer and
End-of-Cycle signal When a timed cooking cycle is complete or time elapses on timer, three long signals
sound, then once approximately every 6-8 seconds. End of cycle signal continues to
sound until OVEN CANCEL pad is pushed.
If minute timer end of cycle signal is sounding, push TIMER ON/OFF pad.
Other Features
12-hour automatic cancel This safety feature prevents oven from continuing to operate if it has been left on
for over 12 hours. If a cooking function continues longer than 12 hours without any
options on oven control being touched, this feature turns oven off. Any time an
option is touched, 12-hour automatic cancel is reset.
Child lockout This safety feature is used to prevent children from accidentally programming oven
by disabling electronic oven control. On the upper oven control Press and hold BAKE
and COOK TIME for 5 seconds. “OFF” displays where the temperature normally
appears. To reactivate control, press and hold BAKE and COOK TIME pads for 5
seconds on the upper oven control. Child lockout must be reset after a power failure.
Service codes and tones Electronic range control is equipped with a self diagnostic system. Self diagnostic
system alerts you if there is a error or problem in the control. If electronic range
control sounds a series of short, rapid beeps for over 16 seconds and display shows
a F-code, record the F-code shown. Some F-codes can be cleared by touching
OVEN CANCEL or disconnecting power to the range. If the code continues to
reoccur call an authorized servicer. Disconnect electrical supply to range and contact
an authorized servicer.
F1—Control malfunction
F2—High oven temperature
F3—Temperature sensor malfunction
F4—Temperature sensor malfunction
F7—Touch pad malfunction
F9—Door lock malfunction (Door unlocked)
FF—Door lock malfunction (Door locked)
Sounds
Oven Fan Oven cooling fan can turn on while oven is heating to cool range control.

16
Flashing Display
When power is connected to oven display flashes. Press
OVEN CANCEL to clear display.
Setting Electronic Clock
Whenpower is connectedor restored, displayflashes
until pad is pressed.
1. PressCLOCK pad.
2. Press
+or -pad until correct time-of-day displays.
• Time increases in largerincrements the longer +or
-pad is held.
• Clocksavestime-of-dayapproximately5-10
seconds after time is entered.
Setting Electronic Timer
The timer is a timer only. Electronic timer does not control
bake, broil, or self-clean function. Timer can be set up to
11 hours and 50 minutes. Up to 1 hour, timer displays
minutes and seconds. After 1 hour, timer displays hours
andminutes.
1. PressTIMERON\OFF pad.
2. Press +or -pad until correct time displays.
• Time increases in largerincrements the longer +or
-pad is held.
• Timerbeginscountingdown automatically after
time is entered.
3. Press TIMER ON\OFF pad to cancel timer signal.
• After time elapses, timer beeps approximately once
a second until TIMER ON\OFF pad is pressed.
Resetting and Canceling Timer
To reset the time when remaining time is displayed, press
TIMER ON\OFF pad, then +or -pad until new time
displays.
Tocancel timer, pressand hold TIMER ON\OFFpad for
approximately5 seconds.
Also, to cancel timer, press TIMER ON\OFF pad, then
press
+or -pad until timer displays “00”.
Prepare to Bake, Timed Bake, and Delayed
Bake
CAUTION
!
To reduce risk of food poisoning due to bacterial
growthand production of toxins, neverhold meat, milk,
fish or eggs for more than 2 hours before cooking.
Remove Items Stored in Oven
Remove any pans and other cooking utensils stored in
oven. Items left in oven can cause damage to the oven or
itemin oven.
Never store the broiler pan or place utensils directly on
the oven bottom. If the broiler pan or utensils are left on
the oven bottom while heating, the oven bottom can chip
orbedamaged.
Remove Items Stored in Oven

17
Oven Rack Placement
Positionoven rack before turning ovenon.
WARNING
!
Toavoid damaging oven liner orcreating fire, do not
line oven bottom or oven racks with foil.
1. Pull rack forward to stop position.
2. Raise front edge of rack and pull until rack is out of
oven.
3. Place rack in new rack position.
• Curvededge of rack must betoward rear of oven.
Oven Rack Placement
Pan Placement
• Keep pans and baking sheets 2 inches from oven
walls.
• Stagger pans placed on different racks so one is not
directlyover the other.
PanPlacement
Check for Bake Burner Flame
Allownomore than 40–60 seconds before burnerignites
and heat is felt. To check for heat, open oven door to first
stopand place hand overoven door. If heat isnot felt,
pressOVEN CANCEL. If burner repeatedly fails toignite,
contactanauthorized servicer.
Baking
Openoven door toconfirm nothing isstored in oven
cavity and set racks to proper height before baking.
Preheatapproximately 10–15 minutes before placing food
insideoven.
1. Press BAKE pad.
2. Press
+or -pad until desired temperature is
displayed.
• Temperaturecan be set from170°F to 550°Fin 5
degreeincrements.
• Temperaturestarts at 170°F andincreases in 5°
incrementsuntil reaching set temperature. Some
minorsmoking is normal when usingoven for first
time.
• Whencooktemperature is reached oven signal
soundsforapproximately 1 second.
3. PressOVENCANCEL pad whenfinished.
• Removefoodfromovenwhencookingtimehas
elapsed.Foodleftin oven can overcook.
Timed Baking
Set oven to cook for desired amount of time. Oven
automatically stops heating after time elapses.
1. Placefoodin oven.
2. PressCOOK TIME pad.
3. Press
+or -pad until cooking time is displayed.
• Cook time can be set up to 11 hours and 50
minutes.
• 10 minutes minimum cooking time.
4. Press BAKE pad.
5. Press
+or -pad until desired temperature is
displayed.
• Temperaturecan be set from170°F to 550°Fin 5°
increments.
• Temperaturedisplayincreases in 5°F increments
startingat 100°F until reaching set temperature.
Someminorsmoking is normal whenusingoven for
firsttime. When cook temperatureis reached oven
signals.
• Toview cook time, pressand hold COOKTIME
pad.
• When cooking time has elapsed, an end of cycle
signalsounds,oven automatically turns offand
display returns to time of day. Oven signal sounds 3
times, then once every 3 seconds for 5 minutes or
until OVEN CANCEL pad is pressed.
6. PressOVENCANCEL pad whenfinished.
• Removefoodfromovenwhencookingtimehas
elapsed.Foodleftin oven can overcook.
To Cancel Remaining Cooking Time
PressOVEN CANCEL pad.

18
Delayed Baking
Set oven to begin and end baking at later time. Range
control automatically calculates starting time.
1. Placefoodin oven.
2. PressSTOP TIME pad.
• Current time of day appears in display.
3. Press
+or -pad until desired stop time displays.
• Stop time can be set 11 hours 50 minutes ahead of
current time of day.
4. PressCOOK TIME pad.
5. Press
+or -pad until desired cooking time
displays.
• 10 minutes minimum cooking time.
6. Press BAKE pad.
7. Press
+or -pad until desired temperature is
displayed.
• Temperaturecan be set from170°F to 550°Fin 5°
increments.
• Electronic range control calculates start time.
• When start time is reached “DELAY” no longer
displays and “ON” displays.
• Toview cook time, pressand hold COOKTIME
pad.
• Toview stop time, press andhold STOPTIME pad.
• When cooking time has elapsed, end of cycle
signalsounds,oven automatically turns offand
display returns to time of day. Oven signal sounds 3
times, then once every 3 seconds for 5 minutes or
until OVEN CANCEL pad is pressed.
To Cancel Remaining Cooking Time
PressOVEN CANCEL pad.
Prepare for Broiling
WARNING
!
To avoid risk of fire, do not line the broiler grid with foil.
• Foil may trap grease on top of grid close to burner
causing a fire.
• Neverleaveovenunattendedwhilebroiling.
Overcookingmay result in a fire.
Broiling Tips
• Removeexcess fat from meat before broiling. Cut
edgesof meat toprevent curling.
• Place food on a cold ungreased broiling pan. If pan is
hot, food sticks.
• All food except fish should be turned at least one time.
Begin broiling with skin side down.
• Season meat after it has browned.
• Broilingdoesnot require preheating.
• Begin cooking using suggested rack levels in
Broiling
Guide
section to test broiler results. If food is not brown
enough, cook on a higher rack position. If food is too
brown, cook on a lower rack position.
Insta-Broil™ Broiling System
Insta-Broil™Broiling system generates immediate,
intense heat using a special screen. This screen focuses
heat directly on the food; searing in natural juices and
providingrestaurantquality, charbroiled flavor.
1. Centerfood on broiling grid and pan, and place on
rackin oven.
• Ovendoor should beclosed.
A
B
A—Broiler Grid
B—Broiler Pan
Broiler Pan and Grid
2. PushBROILpad.
3. Press
+pad to set HI broil or -pad to set lower
broiltemperature.
• Temperaturesets to HI orfrom 170°F to 545°F.
Broiler Setting Use
HI Cooking red meats
545 Cooking pork
525 Cooking poultry
475 Cooking seafood
425 Cooking fruits and vegetables
400 and below Toasting and warming breads
4. PressOVENCANCEL pad whenfinished.

19
Check Broiler Flame
Allownomore than 40–60 seconds before burnerignites
and flame is seen. If burner does not ignite, press OVEN
CANCELpad.If burner repeatedly failstoignite within 40–
60secondscontact an authorized servicer.
Radiantscreen style broiler flameshould appear hazy or
fuzzy. Haze should be no more than 3/8inch thick. The
radiantscreen should begin toglow red within 1–2
minutes.
Hold
Thehold feature holds theoven temperature at alow
temperaturefor 1 hourto keep foodwarm.
1. Press BAKE pad.
2. Press -pad until 170°, then HLD is displayed.
• If -pad is held after HLD displays, SLO for Slo-
Cook™displays.
3. PressOVENCANCEL pad whenfinished.
• Removefoodfromovenwhencookingtimehas
elapsed.Foodleftin oven can overcook.
Prepare for Slo-Cook™, Timed Slo-Cook™,
Delayed Slo-Cook™
Facts and Hints to Remember
•Amana’s Slo-Cook™ feature simulates a traditional
crockpot by cooking food slowly at a low temperature.
• Slo-Cook™ provides enhanced flavorandtenderness,
since food is cooked slowing at low temperature.
•Meats cooked at low temperature shrink less and are
more tender, thus allowing less expensive cuts of meat
to be used.
• Slo-Cook™time for meat will varydepending on
distributionand amount of fat, bone,weight, and
shape.
•Meats may be placed on Slo-Cook™Trivet to avoid
saturation of juices and to brown.
•Dairy products such as milk, cheese, sour cream,
and condensed cream soups have a tendency to
separate, break down, and mix with other ingredients
duringSlo-Cook.
•Fresh vegetables tend to discolor or turn dark during
Slo-Cook™. Discolorationcan be avoided by using
frozenorblanchedvegetables.
•Spices areenhanced and liquids do not boil away
whencooked slowly at low temperature.
• Foodflavors are not mixed when cooked in the oven in
separate,covered dishes. Covered dishes generally
cookmore evenly andretain moisture.
• Mixing, cooking, and serving an entire meal in the
sameoven-proof glass or stoneware canbe
accomplishedwith the Slo-Cook™feature.
• Astandard oven cavity allowsfour rack positions for
placingdishes in oven forSlo-Cook™.
•No preheating of oven is necessary before using the
Slo-Cook™feature.
• Valuable heat loss is prevented since stirring is not
necessary during Slo-Cook™. It is important not to
open oven door during Slo-Cook™,as heat loss will
occur resulting in extended cooking time.
Suggested Dish Arrangements
• Determine rack level by dish size and amount of
food.
• Covereddishesretainmoisture better than uncovered
dishes.
• Casseroleitems with bread or crackertopping should
be left uncovered so toppings stay crisp.
• Roast should not be covered so a rich browness can
beobtained.
• Wrap food items like baking potatoes and corn on
the cob in foil.
• While using Slo-cook™ feature, one-dish items such
as casseroles require adding a separate dish with
water. This is important as it prevents overcooking of
food.
Slo-Cook™ Trivet
Ovenincludes Slo-Cook™ trivet. This trivet should be
placedin pan or roaster. Slo-Cook™ trivetelevates food
keeping it out of food liquids.
Slo-Cook™ Trivet
Slo-Cook™
Slo-Cook™feature sets oven temperature tocook like a
crockpotfor up to 12 hours.Open oven door to confirm
nothing is stored in oven cavity and set racks to proper
heightbeforeusing Slo-Cook™ feature. See“Slo-Cook
Recipes”and “Slo-Cook Main Meals” sectionsfor
recipes.
1. Press BAKE pad.
2. Press -pad until 170°, then HLD, and then SLO is
displayed.
3. PressOVENCANCEL pad whenfinished.
• Removefoodfromovenwhencookingtimehas
elapsed.Foodleftin oven can overcook.

20
Timed Slo-Cook™
Set oven to cook for desired amount of time at crockpot
temperature.Oven automatically stops heating after time
elapses.See “Slo-Cook Recipes”and “Slo-Cook Main
Meals” sections for recipes.
1. Placefoodin oven.
2. PressCOOK TIME pad.
3. Press
+or -pad until cooking time is displayed.
• Cook time can be set up to 11 hours and 55
minutes.
• 10 minutes minimum cooking time.
4. Press BAKE pad.
5. Press -pad until 170°, then HLD, and then SLO is
displayed.
• Toview cook time, pressand hold COOKTIME
pad.
• When cooking time has elapsed, an end of cycle
signalsounds,oven automatically turns offand
display returns to time of day. Oven signal sounds 3
times, then once every 3 seconds for 5 minutes or
until OVEN CANCEL pad is pressed.
6. PressOVENCANCEL pad whenfinished.
• Removefoodfromovenwhencookingtimehas
elapsed.Foodleftin oven can overcook.
To Cancel Remaining Cooking Time
PressOVEN CANCEL pad.
Delayed Slo-Cook™
Set oven to begin and end cooking at later time using
crockpot temperature. Range control calculates back
from end time to determine starting time. See “Slo-Cook
Recipes”and “Slo-Cook Main Meals” sectionsfor
recipes.
1. Placefoodin oven.
2. PressSTOP TIME pad.
• Current time of day appears in display.
3. Press
+or -pad until desired stop time displays.
• Stop time can be set 11 hours 55 minutes ahead of
current time of day.
4. PressCOOK TIME pad.
5. Press
+or -pad until desired cooking time
displays.
• 10 minutes minimum cooking time.
6. Press BAKE pad.
7. Press -pad until 170°, then HLD, and then SLO is
displayed.
• Electronic range control calculates start time.
• When start time is reached “DELAY” no longer
displays and “ON” displays.
• Toview cook time, pressand hold COOKTIME
pad.
• Toview stop time, press andhold STOP TIME pad.
• When cooking time has elapsed, end of cycle
signalsounds,oven automatically turns offand
display returns to time of day. Oven signal sounds 3
times, then once every 3 seconds for 5 minutes or
until OVEN CANCEL pad is pressed.
To Cancel Remaining Cooking Time
PressOVEN CANCEL pad.
Table of contents
Languages:
Other Amana Oven manuals

Amana
Amana ACF3315A User manual

Amana
Amana AO27DG User manual

Amana
Amana AMV6177AA User manual

Amana
Amana AOES3030 Series User manual

Amana
Amana AOCS2740 User manual

Amana
Amana XPRESS AXP22 User manual

Amana
Amana AMC7159TA User manual

Amana
Amana AEW3530D User manual

Amana
Amana AOCS3040 Series User manual

Amana
Amana AXP520 User manual

Amana
Amana AO27SE1 User manual

Amana
Amana AO24-DC User manual

Amana
Amana HIGH SPEED COMBINATION OVEN User manual

Amana
Amana AEW3530DDW User manual

Amana
Amana AOES2730 SERIES User manual

Amana
Amana AEP222VAW User manual

Amana
Amana EvenAir Plus User manual

Amana
Amana AO27SEW User manual

Amana
Amana EvenAir AOCS3040 User manual

Amana
Amana AO24-SC User manual