Ambery LCDT7 User manual

Ambery Model Number: LCDT7
Corporate Website: http://www.ambery.com
Contact Support: support@ambery.com
AnalogVideotoDVIHDMIConverterScaler
ExternalCableTVTuner
Full HDMI/DVI 1080p / 1920x1200 Output
OPERATION MANUAL

2
INDEX
Package Content……………………………..…………... 3
Introduction………………………………………………... 4
Product Features & Applications..………………………. 5
Front And Back Panel View of LCDT7 Unit …………... 6
Hardware Installation………………………………….…. 7-10
Remote Controller And Functions.………….………….. 11-13
OSD Menu And Operation Functions………………….. 14-16
Favorite Channel Operation…….…………………….... 17
Frequently Asked Questions……………………………. 18
Specification................................................................. 19
Safety Requirement……………………………………… 19

3
PACKAGE CONTENT
Before your installation, please check the package content:
1. HDMI Video Scaler X 1
2. Vertical Stand X 1
3. Remote Controller X 1
4. HDMI cable X 1
4. 3.5 mm audio wire X 1
5. AC/DC Switching Power Adaptor X 1
6. AAA Batteries X 2
HDMI Video Scaler Unit Vertical Stand Remote controller
HDMI cable Audio Cable Power Adaptor AAA Battery

4
INTRODUCTION
Congratulations on your purchase of our latest HDTV multimedia AV center / HD video upconverter
product. Your satisfaction is very important to us. This new LCDT7 model offers the best solution for
integrating all of your home AV equipments together and up scaling them to the true 1080p HDTV
format or 1920x1200 pixels DVI format through single digital DVI/HDMI link with any flat panel display
or HDTV set.
This multi-format DVI/HDMI digital video converter/scaler unit offers the ultimate digital video/high
definition video conversion, providing far more flexibility between video formats and resolutions than
other existing products on the market. This all-In-1 product merges a multi-format video processor,
video scaler, video switch plus a NTSC cable TV tuner into one single unit to raise your multimedia
entertainment experience to a new horizon.
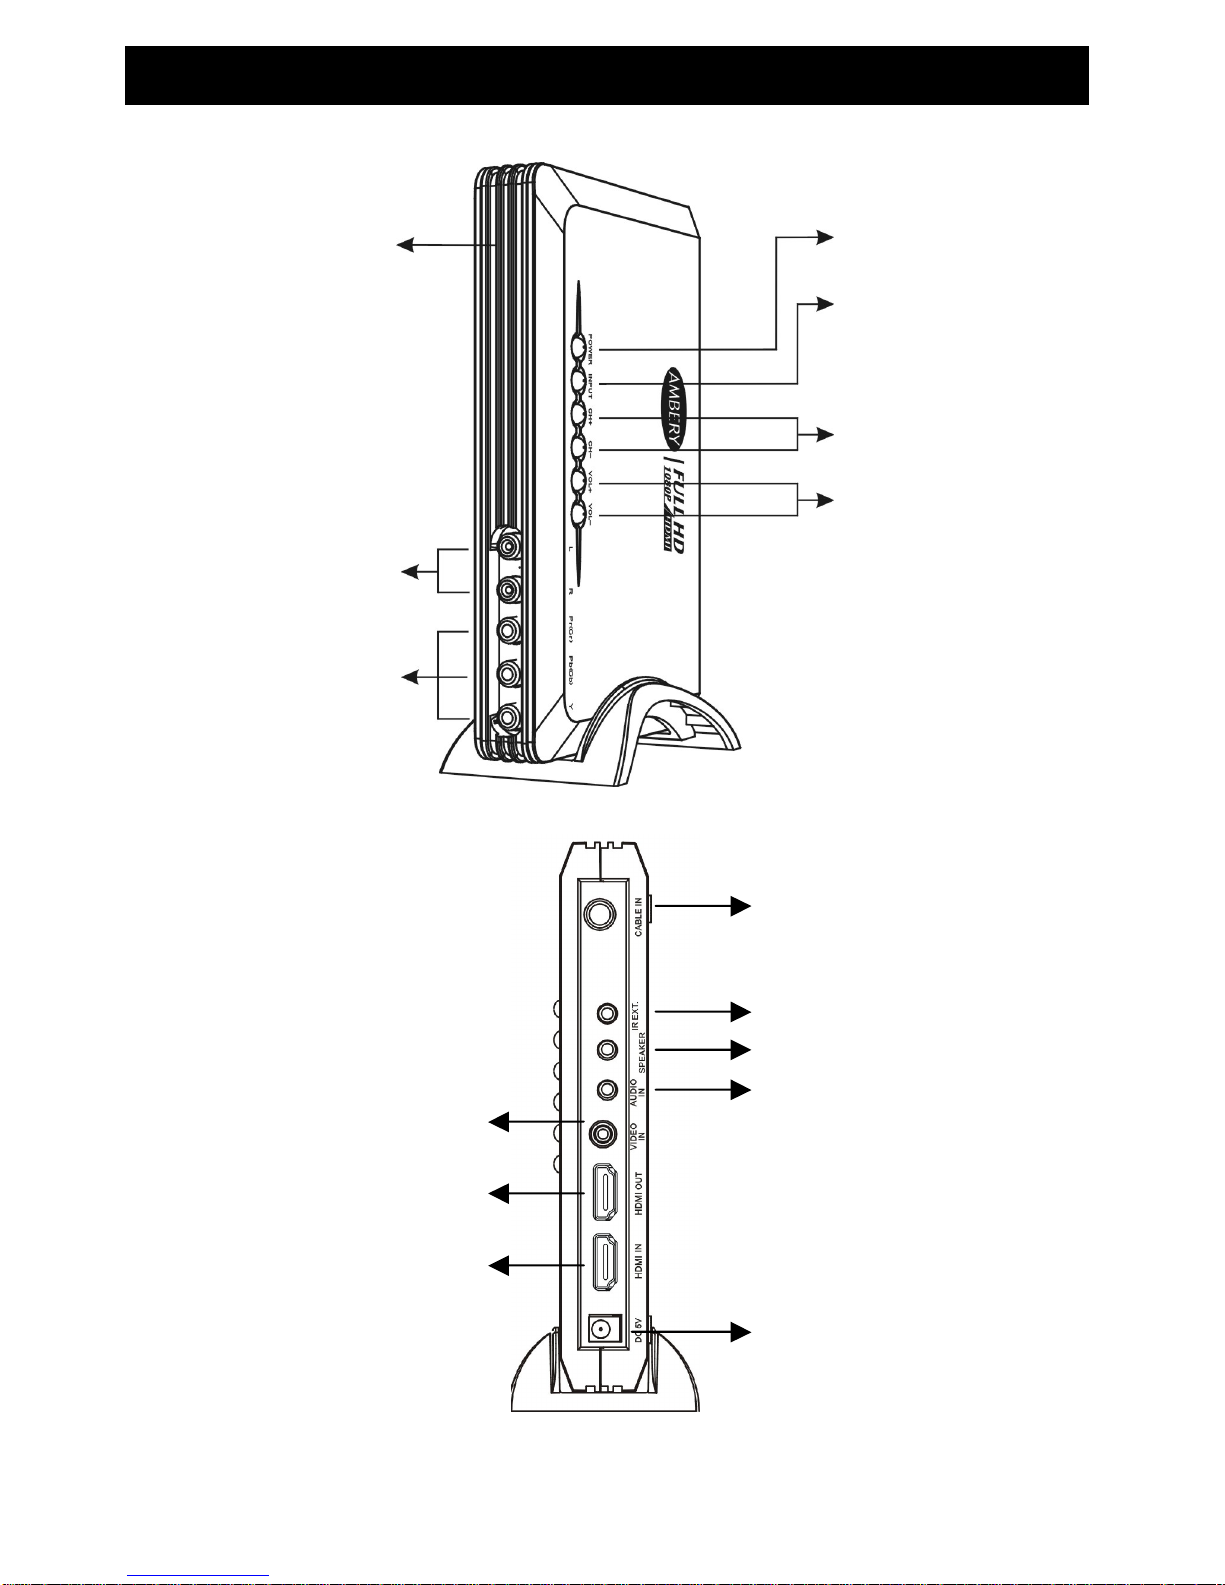
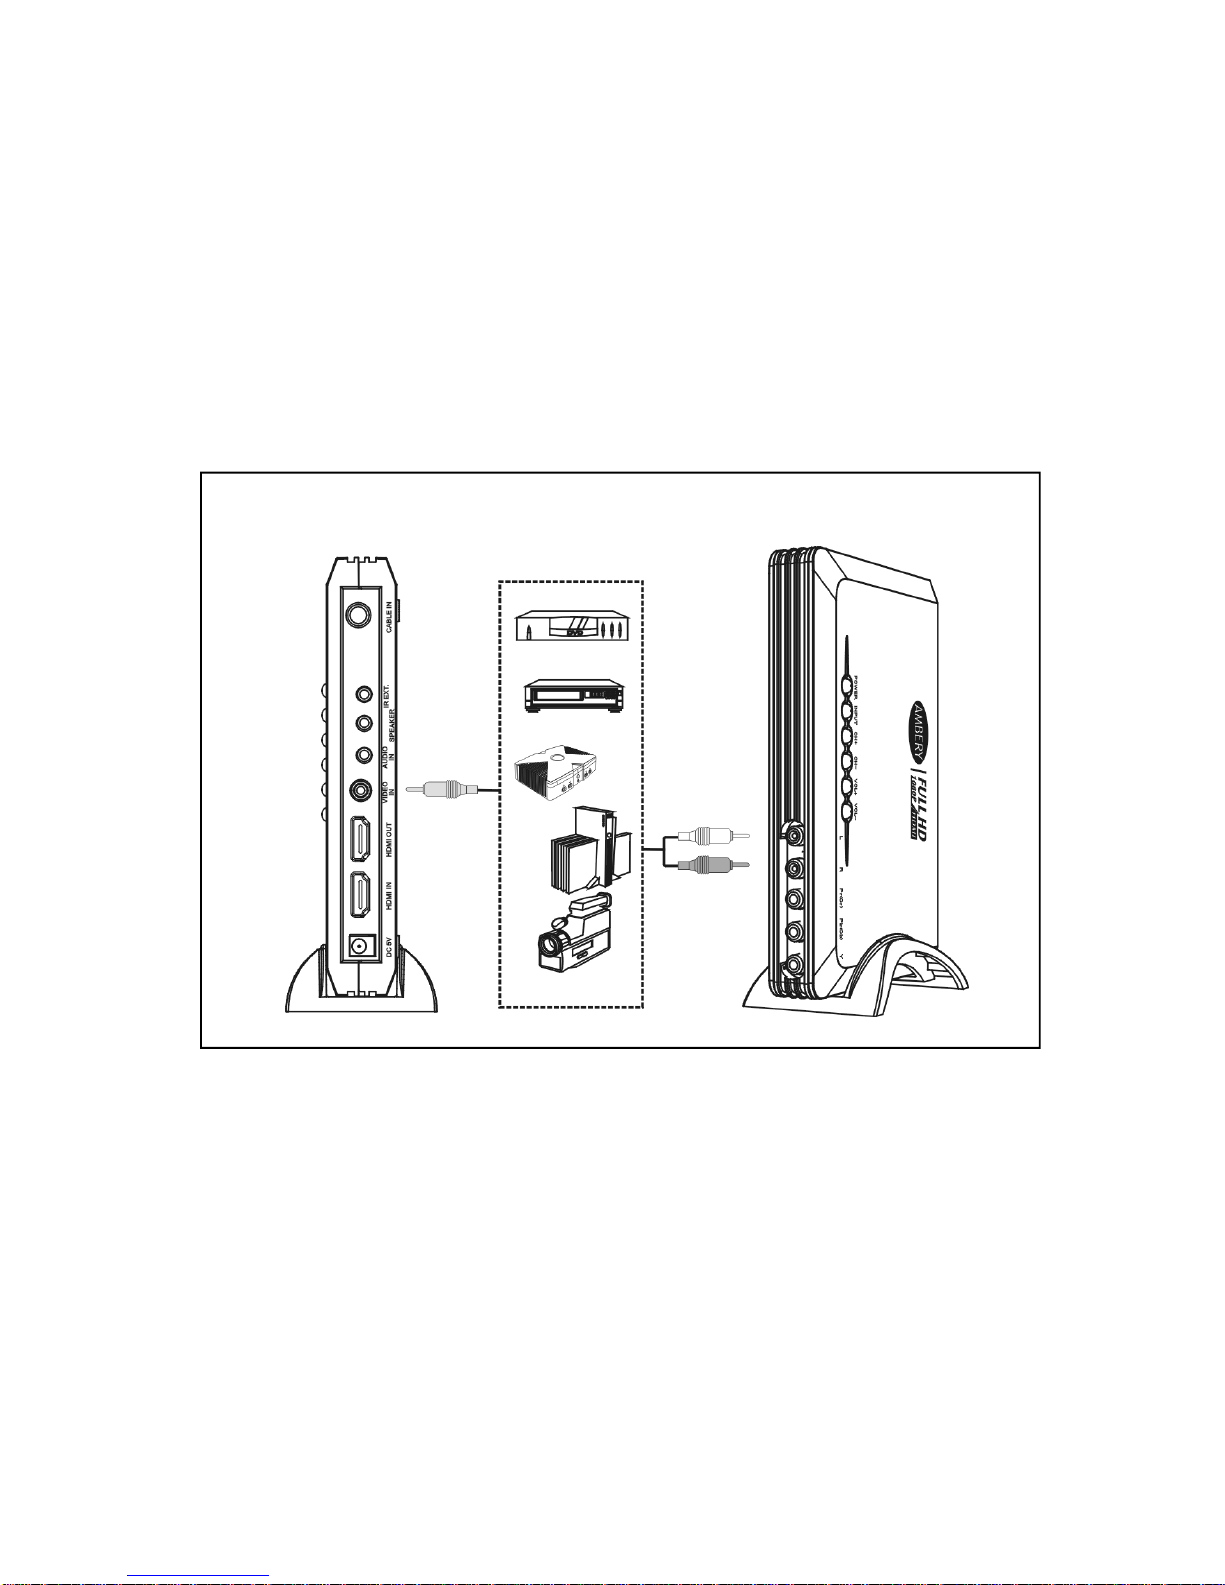
This multimedia hub supports analog and digital video inputs including Coax cable, composite video,
component video and HDMI for comprehensive sources selection and eventually upconverts each
input to crystal clear and sharp digital pictures.
This design is meant to solve the typical problem of watching standard non-HD video on a digital HD
display and reduce the inconvenience of constantly swapping audio video cable connection for those
TVs’ with limited inputs or visible cable mess . More importantly, this product is aimed at enhancing
standard analog video quality to the ultimate digital format at true 1080 resolution through HDMI
connection with the HD display.
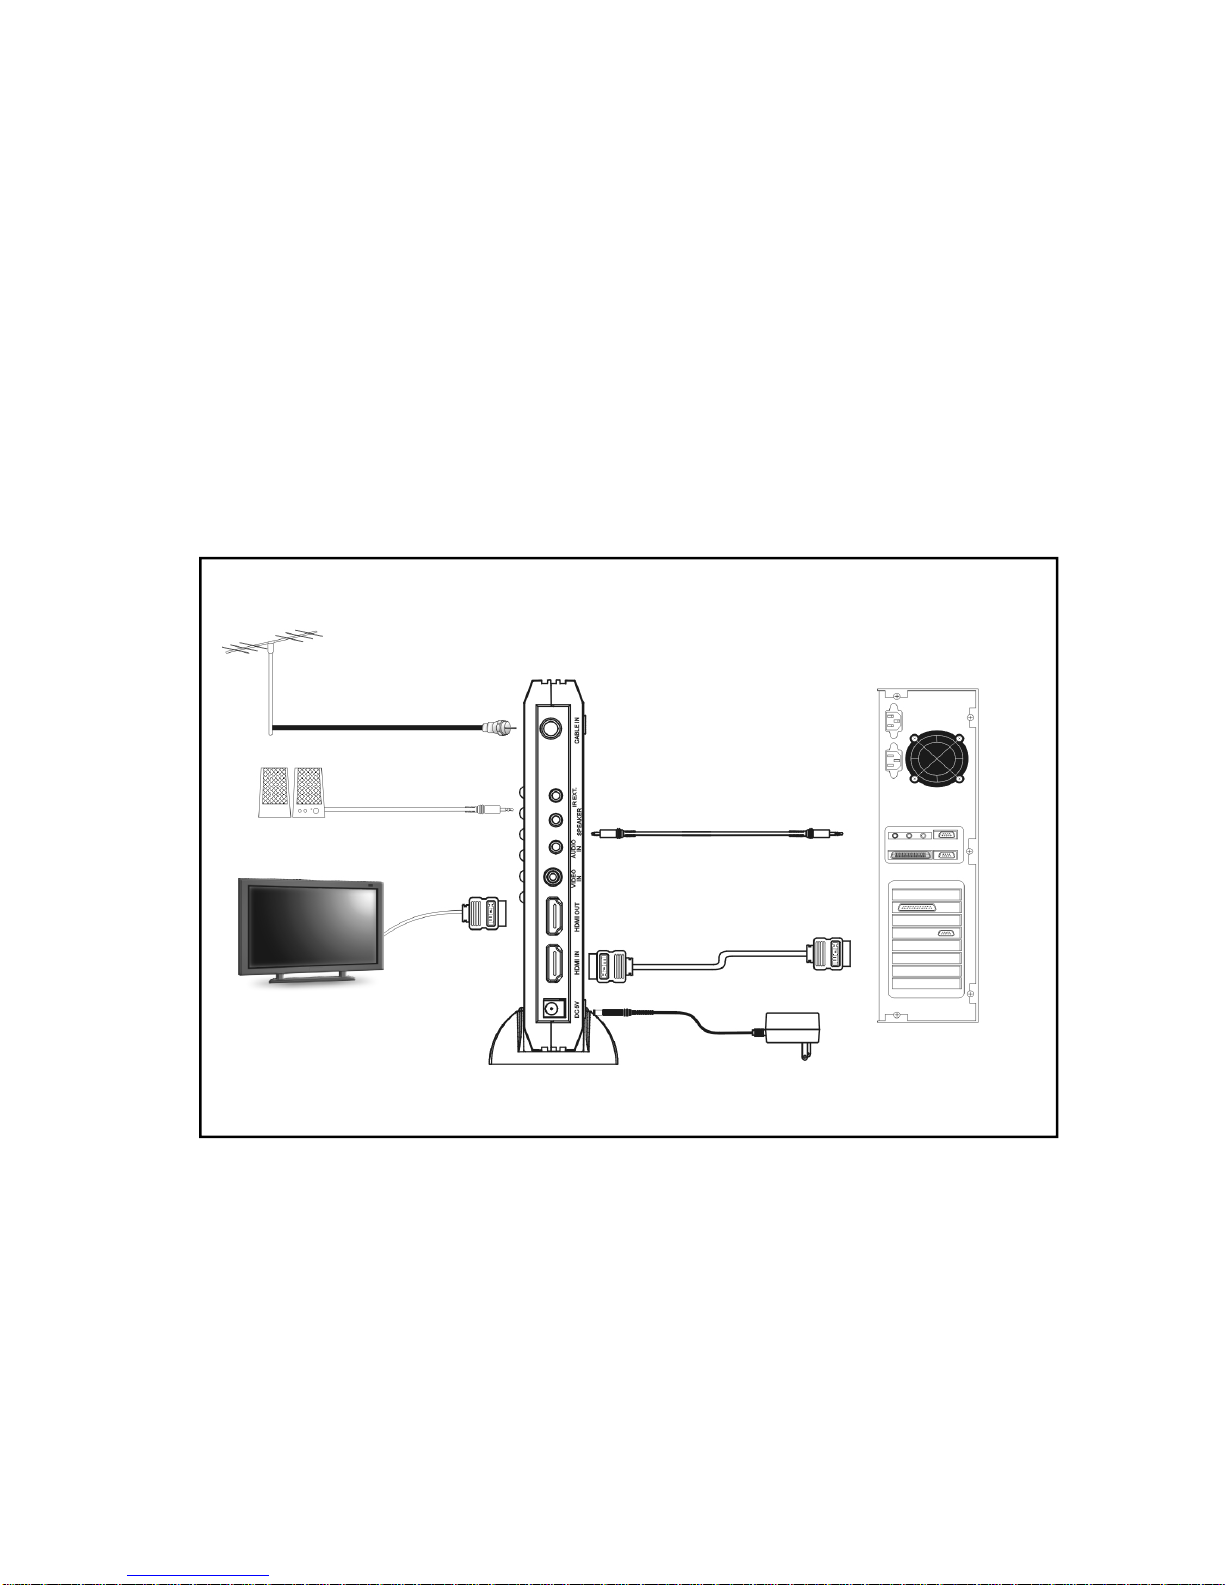
Combining all the features of audio video switch, SD to HD video scaler, PC to TV converter and
digital audio video format converter into one single unit, this next generation multimedia center
enables users to keep their non-HDMI analog source devices to perform well with the new digital flat
panel display through one single HDMI link and enjoy the sensational visual and audio sonic
entertainment from this neat and slick HD multimedia box.
This unit adopts the most advanced forms of de-interlacing technology available for 3D
Motion-adaptive interfiled de-interlacing, which greatly helps minimize jagged edges on angled lines,
resulting in high quality vibrant, clean and natural images for home theater experiences beyond your
imagination.
For multimedia entertainment, a well-thought-out Picture-In-Picture function is provided to help users
take full advantage of this TV video entertainment center. When the main screen in HDMI or
Component video input channel, a PIP sub video window will be inserted on top of the main screen.
The PIP sub window allows for display of either Cable TV or composite video input channel.

5
PRODUCT FEATURES & APPICATIONS
Stand alone NTSC cable TV tuner module for all flat panel DVI or HDMI displays.
Great demodulator for converting coaxial cable TV signals into digital HDMI video/audio outputs
for LCD TVs, HD monitors, Plasma panel, computer monitors or projectors.
Up-converts all composite video, component video, computer DVI/HDMI and digital HD HDMI
signals into crystal clear digital signals at supreme high 1080p or 1920x1200 pixels.
Advanced digital video processing.
Supports PIP mode (Picture-In-Picture) for users to watch cable TV or DVD movie from a sub
video window while satellite video or DVI computer screen being displayed in the main screen.
When in PIP mode, TV video sub-window can be resized and re-positioned to different location on
the monitor screen.
Selectable digital video output modes with multiple video resolution levels.
-> DVI : 1920x1200, 1680X1050, 1600X1200, 1440 X 900 , 1366X768, 1280X1024,
1024X768, 800X600 pixels at 60hz.
-> HDMI: 480P ,720P ,1080P at 60Hz
Adjustable controls of video color elements for brightness, contrast, hue, saturation, color
temperature and picture modes.
4 video inputs (RF/Coaxial + composite video + component YPbPr/YCbCr + HDMI/DVI )
Supports all component video inputs including 480i,480p,576i,576p,720p and 1080i.
Supports video inputs from all NTSC and PAL systems with automatic video mode detection.
4 preset color screen modes: Warm/Cool/User Define/Preset to match different
Selectable screen ratios when in TV and AV Composite mode.
Supports MTS for Stereo/SAP/Mono audio modes.
Supports sleep timer function for powering off the module after a pre-set time interval.
Full-function remote controller.
Applications:
This multi-format digital video scaler can be used for the following applications:
Upconverting coaxial cable TV signal to DVI or HDMI type signal.
Upconverting composite video or s-video to DVI or HDMI type signal.
Upconverting component video to DVI or HDMI type signal.
Upconverting DVI or HDMI RGB or HD type video signal to DVI / HDMI RGB or HD digital
signal.

6
FRONT AND BACK VIEW
FRONT VIEW
BACK VIEW
Volume +/
-
IR Remote Control
Sensor Window
Stereo Audio Input
Component Video
YPbPr Input
Composite
Video Input
HDMI Output
HDMI Input
RF / Coaxial Cable Input
IR Remote Control Extender
Plug-In
Audio Output
Audio Input
DC Power Plug:5V, 2A
Power LED
Input Source Selection
TV Channel Up/Down

7
HARDWARE INSTALLATION
(1) CATV Connection Setup For Our LCDT7 Model:
1. Connect the coaxial cable for CATV to “CABLE in” of this HDMI video converter unit.
2. Connect HDMI cable between the HD monitor and the HDMI output of this video converter.
3. Connect the multimedia speaker to the audio output “Speaker” of this unit.
4. Power on our LCDT7 HDMI video converter.
5. Press the “Input” button from the remote control to the TV mode, A text message of “TV” will
be indicated on the corner of your HD TV screen.
6. Press the “MENU” button from the remote controller to display the operation menu on the
screen and select TV function from the menu while in TV mode. Under TV function sub-menu,
select either “Channel Scan” or “Full Scan” for searching all the available cable TV channels.
7. If the picture is on, the installation is OK now. If not, please check your cable connection again.
Note: You can hide this HDMI TV video converter box behind your monitor or TV stand through
using the optional IR remote control extending probe(sold separately). You can mount this IR
remote control extension sensor near the front of your monitor or TV display.
CATV
Speaker Speaker out
HDMI OUT
IR output probe (option)
AC Outlet
AC/DC Adaptor
REAR
DC
TV

8
(2) Connect A DVI/HDMI Computer Output With Our LCDT7 Unit:
1. Connect the coax cable for CATV to the “CABLE IN” of this video converter.
2. Use a DVI To HDMI adapter cable or a HDMI cable to connect from the DVI output or
HDMI output of your computer to the HDMI Input of this converter. Then use a HDMI
cable to connect from the “HDMI out” of this converter box to the HDMI input of your TV
or HD monitor.
3. Use the supplied 3.5mm stereo audio cable to connect from the line out of your
computer’s sound card to the audio input (“Speaker” port) of this HDMI video converter.
4. Power on our LCDT7 HDMI video converter and the computer.
5. Press the “Input” button from the remote control to the HDMI mode, A text message of
“HDMI” will be indicated on the corner of your HD TV screen.
6. If the picture is on, the installation is OK now. If no picture showing, please make sure
that the computer video card resolution is set as one of the supported resolution and
also make sure that your DVI/HDMI display can handle the output resolution you have
selected from our LCDT7 unit.
Note: If your computer video card supports DVI output only, you can use a DVI
HDMI adaptor
cable to connect between the DVI end of your computer and the HDMI input of our LCDT7 model.
Note: This LCDT7 model supports output in either DVI RGB or HDMI resolution. Please make sure
that your DVI or HDMI display can support such resolutions properly before setting up the output
mode from our LCDT7 unit. Failure to do so may result in no video displayed on the screen.
CATV
Speaker output
TV
HDMI Output
HDMI Input
Audio Input
REAR REAR View of PC
Audio Output
Sound Card
HDMI Output Video
Card
DC
AC/DC Adaptor
Speaker

9
(3) Connect A Component Video Device With Our LCDT7 Unit:
1. Use a component video cable (not included) to connect between the YPbPr component
output from your video game console or satellite receiver and the component video input
on the front panel of our LCDT7 unit.
2. Use a stereo cable with RCA left/right channels to connect from your component video
device to the stereo audio input on the front panel of our LCDT7 unit.
3. Power on our LCDT7 HDMI video converter and the component video device.
4. Press the “INPUT” button from the remote controller to switch to “YPbPr” mode for
selecting component video input channel. If the picture is on, the installation is OK now. If
no picture showing, please use a different component video device or a different display
for troubleshooting purpose.
FRONT Panel Of LCDT7 Model
Component Video
Game
Camcorder
Game
DVD
VCR

10
(4) Connect A Composite RCAVideo Device With Our LCDT7 Unit:
1. Use a composite A/V cable (not included) to connect between the composite video output
from your video device such as VCR, camcorder, video camera etc and the “VIDEO IN” rca
composite input on the front panel of our LCDT7 unit.
2. Use a stereo cable with RCA left/right channels to connect from your component video
device to the stereo audio input on the front panel of our LCDT7 unit.
3. Power on our LCDT7 HDMI video converter and the component video device.
4. Press the “INPUT” button from the remote controller to switch to “AV” mode for selecting
composite video input channel. If the picture is on, the installation is OK now. If no picture
showing, please use a different video device or a different display for troubleshooting
purpose.
DVD
Note: There is only RCA stereo input so both composite video input and component video input must
share the same stereo audio input. When you change the input source from component video to
composite video, you need to unplug the audio connection with component video device and connect
stereo audio out from the compositeA/V device to our LCDT7’s stereo input.
Or you may use a simpleA/V switch with multi stereo inputs for expanding more video inputs and audio
inputs by connecting all the video/audio outputs from your video devices to your A/V switch first. Then
connect the A/V output from the switch to our LCDT7 unit.
FRONT
REAR
Video
DVD
VCR
Game
Camcorder
Audio

11
REMOTE CONTROLLER
(2) Power On/Off
CH: Change the channel(PIP/Favorite
channel mode for channel selection)
VOL
: Change the volume
(PIP/Favorite channel mode)
(1) MTS
(4) Input Source Selection
(3) Mute Audio
(6) Fast HDMI Input Selection
(Instant switch to HDMI input)
(5) Fast TV Input Selection
(Instant switch to CATV input mode)
(8) Volume Up/Down
(11) Exit Of OSD Operation Menu
(12) Numeric Key
(15) Last Channel Recall
(17) Activate PIP Mode
(18) HDMI/DVI Output Mode
(19) HDMI/DVI
Resolution Select
(21)Picture Mode Select
(7) Selection key
(9) Channel Key
(10) OSD Operation
Menu
(13) Favorite Channel
Scan, see page 17 for
details
(14) Favorite Channel
List. See page 17 for
more info
(16) Setting Info Display
(20) Zoom In/Out

12
( 1 ) MTS Audio: Select the second-language program(SAP) or stereo audio if available for
the current cable TV channel. This audio feature is optional and works only if that
particular CATV channel can support SAP or MTS.
( 2 ) Power: Press this button to be in video mode so users can watch TV or video on the
HDMI display. Press this button for another time, the unit will be in “STANDBY” mode
which will pass the HDMI or DVI input from the computer signal to the display for
loop-through and no video conversion made.
( 3 ) Mute: Turn off audio from video. Push this button for another time or simply press VOL+/-
key to turn the audio back on again.
( 4 ) Input: Press this button to switch between different A/V input sources connected to this
unit. The input selection will be in sequential order:TV > AV > YpbPr > HDMI > TV…
( 5 ) TV: Fast switch to TV Input instantly. When pressing this key, this unit will switch to coax
cable TV input mode right away for watching cable TV.
( 6 ) HDMI: Fast switch to HDMI Input instantly. When pressing this key, this unit will switch to
HDMI input mode right away.
( 7 ) SELECT: Only valid under MENU operation and PIP function.
( 8 ) Volume UP/Down: Press “◄”or”►” to adjust the volume.
( 9 ) Channel UP/Down: Press “▲” or ”▼” to select the cable channel
This function is only valid under the TV mode.
( 10 )MENU: Configures all the setting-related controls and functions.
( 11 )EXIT: Press to exit the OSD operation menu after all settings done.
( 12 )Numeric key 0~9: You can direct press the number key to select the channel.
NOTE: For TV channel number above 100, please input the 3 digits of the
desired cable tv channel number accordingly.
( 13 )FC SCAN: Favorite channel scan. Further information will be at P.17
( 14 )FC MEMO: Favorite channel memory. Further information will be at P.17
( 15 )RCL: Return to the previous viewed TV channel.
( 16 )OSD: Press this button to show the system information like channel number, current input
mode and output resolution information. There will a pop-up window in the upper-left side
on your monitor screen to show all these system info.
( 17 )PIP: Press this button to activate the Picture-In-Picture function. If you want to have PIP
window inserted to the main video screen, the main video screen needs to be HDMI
input or component YPbPr input while the PIP window will be either TV or
composite video AV input. When in PIP window, users can press the “INPUT” button on
the remote controller to choose input source to be displayed in the PIP window. There are
2 modes for PIP window sizes, 1/4 and 1/16 of the screen size. To adjust the location
of PIP window on the screen, press 【▲】【▼】【◄】【►】from the remote controller to
adjust the position of PIP screen.
NOTE:
PIP function will be available at either one of DVI output resolution of 1920X1200
, 1600X1200,1680X1050, 1440X900, 1366x768, 1280X1024, 1024X768,800X600.
Channel selection is done via by the “CH+” or ”CH-“ key when in PIP mode.
Press “SELECT” key to choose the audio source for main or PIP window when in PIP
mode.

13
( 18 )VIDEO OUT : Press this button to change the video output mode between DVI and
HDMI. In each mode, this unit can output different type of resolution:
-> HDMI mode:480P, 720P, 1080P
-> DVI mode:800x600 60Hz,1024x768 60Hz, 1366x768 60Hz, 1280x1024 60Hz,
1440x900 60Hz, 1680x1050 60Hz, 1600x1200 60Hz, 1920x1200 60Hz
( 19 )RES: Press this button to select different video output resolution when unit is set at HDMI
output mode or DVI output mode.
-> HDMI mode:480P, 720P, 1080P
-> DVI mode:800x600 60Hz,1024x768 60Hz, 1366x768 60Hz, 1280x1024 60Hz,
1440x900 60Hz, 1680x1050 60Hz, 1600x1200 60Hz, 1920x1200 60Hz
NOTE: The maximum video output resolution is 1920X1200 pixels for DVI out or
1080p for HDMI out. So please make sure that your DVI monitor or HDMI display can
support these resolutions.
( 20 )Zoom: User may zoom in or zoom out any screen area using this button. This function is
only available for TV input and AV input modes.
( 21 )Picture: User may select different video color mode for display: There are 4 pre-set video
color modes: warm, cool, user and preset. Users can choose the preferred color mode for
optical performance with their display.
Note: If you have selected a video output resolution beyond the support range of your display, the
screen will go away without any video or showing “Out Of Range/Sync” message.At any time when this
happens to you, you can solve this problem by pressing the power on/off button using the remote
control then enter “000”by pressing “0” button three times continuously from the remote control.
Immediately this LCDT7 unit will revert back to the default output resolution, HDMI mode output at 720P
and the source input will be reverted back to TV mode.

14
ADVANCED OPERATION MENU
This section is for advanced settings of the operation. If you are not so familiar with all these
settings, we recommend you not to use MENU operation and stay with factory’s default
setup. Wrong setting will cause annoying picture quality for display so please proceed with
care.
When pressing the “MENU” button on the remote controller, an on-screen operation menu will be
displayed as illustrated, use ▲or ▼ arrow key to choose the item for manual adjustment. Then press
“►”key to enter next MENU screen , then use ▲or ▼ key to highlight the item that you want to change.
Press “Select” button on the remote controller and then use ◄ or ► key to adjust the parameter.
<< all the selection are done via the arrow buttons and the “select” button from the remote controller,
【▲】【▼】【◄】【►】【Select】>>
PICTURE PICTURE QUALITY CONTROL OPERATION
CONTRAST
BRIGHTNESS
COLOR
TINT
SHARPNESS
Video Mode
Press ▲or ▼key for selecting the desired item
,
press ”
Select”
key to confirm the selection, press”
◄” or “►” to adjust the
value.
Contrast:press”◄” or “►” to adjust the color contrast needed.
Brightness:press”◄” or “►” to adjust the brightness
value needed.
Color:press”◄” or “►” to adjust the color of the picture.
Tint:press”◄” or “►” to adjust the tint for the picture.
Sharpness:press”◄” or “►” to adjust the sharpness of the picture.
Video Mode: There are 4 preset picture modes, warm ,cool, user
and preset. You can choose the mode best suited for your video
display.
NOTE: The parameters of each vide input source for TV, AV, YPbPr and HDMI need to be
adjusted separately to meet the best viewing experience.

15
TV FUNCTION CABLE TV OPERATION
MTS
CHANNEL SCAN
FULL SCAN
PROGRAM SKIP
Press ▲or ▼key for selecting the desired item ,
press ”Select” key to confirm the selection, press”
◄” or “►”
to adjust the value.
MTS: Select different audio mode, MONO/STEREO/SAP, for TV
channel if available.
Channel Scan: Standard scan for all available cable TV channels
via channel mapping method.
Full Scan:Scan all the TV channels via frequency basis. This scan
method is detailed scan and recommended for use when you use
the above standard channel scan method and find some channels
missing from the standard scan result.
PROGRAM SKIP:Skip the channel you select.
SYSTEM SETTING
SYSTEM CONFIGURATION OPERATION
LANGUAGE
SLEEP TIMER
OSD TRANSPARENCY
ASPECT
RESET
VERSION
Press ▲or ▼key for selecting the desired item,
press ”Select” key to confirm the selection, press”◄” or
“►” to adjust the value.
LANGUAGE: English Only
SLEEP TIMER:
Set the timer to shut down the unit automatically.
Timer can be set from period of 10~120 minutes.
OSD TRANSPARENCY: Choose the transparency level for
the OSD operation menu.
ASPECT: Change the screen aspect ratio. This is only
available in the TV and AV input mode to over-scan or
under-scan picture to work with some HD TV or projector type
displays if needed. There are 3 selections available.
RESET: Reset all settings back to the original default value.
VERSION: show the firmware version of this unit.
NOTE: If at any point you feel uncomfortable about the setting you changed, you can restore
all the system settings back to the original manufacturer’s default values.

16
VIDEO OUTPUT
RESOLUTION VIDEO OUTPUT OPERATION
Resolution Adjust
800 x 600
1024 x 768
1366 x 768
1280 x 1024
1440 x 900
1680 x 1050
1600 x 1200
1920 x 1200
Resolution Adjust
HDMI 480P
HDMI 720P
HDMI 1080P
Press ▲or ▼key for selecting the desired item,
press ”Select” key to confirm the selection
1). There are DVI and HDMI video output modes. You can change
to either output mode via the “VIDEO OUT” button on your remote
controller.
2). Make sure that your DVI monitor or HDMI display can support
the resolutions:
-> HDMI mode:480P, 720P, 1080P
-> DVI mode:
800x600 60Hz,1024x768 60Hz, 1366x768 60Hz,
1280x1024 60Hz, 440x900 60Hz, 1680x1050 60Hz, 1600x1200
60Hz, 1920x1200 60Hz.
INPUT SOURCE VIDEO INPUT SOURCE SELECT OPERATION
TV
AV
YPBPR
HDMI
▲▼key for desired item,press ”Select” key for confirmation
TV : CATV mode from coax input to watch cable TV
AV : AV mode from composite RCA input
YPBPR:Component video mode from ccomponent input
HDMI :HDMI or DVI mode from HDMI or DVI input

17
FAVORITE CHANNEL OPERATION
Setting of favorite channel:
STEP1:Select the TV channel to be memorized and saved in the list.
STEP2:Press “FC MEMO” button on your remote controller
(A window will pop up on your screen like the following)
FAVORITE
< 1 > CH- xxx
< 2 > CH- xxx
< 3 > CH- xxx
< 4 > CH- xxx
< 5 > CH- xxx
< 6 > CH- xxx
STEP3:Press the arrow key【▲】【▼】to choose the location that you want the channel to be
memorized then press “select” key to save the selected channel in the favorite list.
NOTE: FC MEMO function only available when the input mode is TV .
OPERATION OF FAVORITE CHANNEL:
STEP1:Press “FC scan” key , a window like below (previous memorized channel list) will pop up, then
this pop-up window will disappear and the upper-left corner of screen will show ” FC mode”
FAVORITE
< 1 > CH- xxx
< 2 > CH- xxx
< 3 > CH- xxx
< 4 > CH- xxx
< 5 > CH- xxx
< 6 > CH- xxx
Then, you can press numeric key (1~9) to choose previous memorized channel( channel list).
NOTE:
(1.) If you want to leave the FC MEMO mode, just press “EXIT” button on the remote.
(2.) When in FC mode, you can change channel by “CH+” or “CH-“ to select the channel.
(3.) When you want to erase all the channel, please use “reset” function from main menu.
(4.) Under PIP mode, you can also use FC MEMO mode, and also can change channel by “CH+”
or “CH-“ to select the channel.

18
FREQUENTLY ASKED QUESTIONS
Problem EASY WAY TO SOLVE
No Picture 1). Check all the cable and the power
connections first. Use known-good quality cables
for input/output.
2). Make sure that you have selected the right
video output mode for the display. If you are
using a non-HD type monitor for displaying the
HDMI output from this unit, there will be no
picture due to the incompatible signal.
3). Make sure that your display can properly
support the output resolutions from our unit.
Picture with noise under some TV
channels
Check you coax cable connection from the cable
outlet first. If you are using a coax cable splitter,
please bypass the splitter first and use direct
connection first.
Blurring image when under PC
mode
Please check the connection of DVIHDMI
cable and use known-good quality cables for
input/output.
PIP function failed 1). When using the PIP mode, please make sure
that the main video screen is set for HDMI input
or component YPbPr input first. If the current
source input is AV(composite) or TV mode, the
PIP function can not be activated.
2). PIP window can only display AV(composite) or
TV channels when the main screen selects HDMI
or component video for input mode.
2). When HDMI input is a computer, the
computer video card resolution should be one of
the following pixels:
1920X1200, 1600X1200,1680X1050, 1440X900,
1280x1024, 1366X768, 1024X768, 800X600
Seeing the “Out Of Range” error
message showing on the screen
display
If you have selected a video output resolution
beyond the support range of your display, you
can solve this problem by pressing the power
on/off button on the remote control then enter
000 by pressing “0” button three times
continuously from the remote control next. Then
the output resolution of this HDMI video up
converter will be reverted to HDMI mode output
at 720P and the source input will be “TV”.

19
PRODUCT SPECIFICATION
CATV Tuner Frequency 55.25 - 801.25 MHz
CHANNEL 2-125 CATV FOR NTSC SYSTEM USE
Video Inputs Coaxial Input 75 ohm ( F Female )
Component Input Y Pb/Cb Pr/Cr via 3 RCA
Composite Input RCA x 1
HDMI Input HDMI Type A 19 pin female x 1
Video Output HDMI Output HDMI Type A 19 pin female x 1
Audio Inputs Stereo Input Stereo audio via RCA x 2 + 3.5mm x 1
Audio Output Digital Audio Out HDMI Type A 19 pin female x 1
Power Supply AC/DC Switching In: AC 100V ~ 240V Out: DC 5V / 2A
※Specification subject to change without further notice
SAFETY NOTICE
1.Indoor use only. Not suitable for outdoor or environment with severe humidity.
2.Do not open the housing to prevent electric shock.
3.Use the supplied AC/DC power adapter only. Failure to do so using different rating and voltage will
damage the device and equipments and human injury.
4.Do not use this unit when room temperature is high and avoid direct sunlight exposure.
5.Do not use this unit in the high humidity, dust and magnetic environment.
6.Do not drop liquid into this unit. If there is smoke or bad smell from the unit, please call for service.
7.Gentle clean with soft and clean cloth on the enclosure only.
Table of contents
Other Ambery Media Converter manuals