Amcor AMH8 Owner's User manual

It is important that you read
these instructions before using
your new purchase and we strongly
recommend that you keep them in
a safe place for future reference.
Owner’s
Manual
Wall Mountable/Portable Heater
Model AMH8

Table of Contents
Safety Instructions ……………………………………………… 1
ThankYou! ……………………………………………………… 2
Unpacking and Set-up …………………………………………… 2
Parts …………………………………………………………… 3
Specifications …………………………………………………… 3
Wall Mounting Installation ……………………………………… 4
Potable Installation ……………………………………………… 5
Operation ……………………………………………………… 6
Maintenance …………………………………………………… 7
Storage ………………………………………………………… 7
Troubleshooting ………………………………………………… 8
Limited Warranty ………………………………………………10

1
Safety Instructions
When using electrical appliances, basic precautions should always be followed to reduce the risk of fire, electric shock,
and injury to persons, including the following:
• Do not cover or obstruct top and bottom air vents of the heater.
• Read all instructions before using this heater.
• This heater is hot when in use. To avoid burns, do not let bare skin touch hot surfaces.
• Keep combustible materials, such as furniture, pillows, bedding, papers, clothes and curtains
at least 3 feet (0.9m) from the front of the heater and keep them away from the sides and rear.
• Extreme caution is necessary when any heater is used by or near children or handicapped persons.
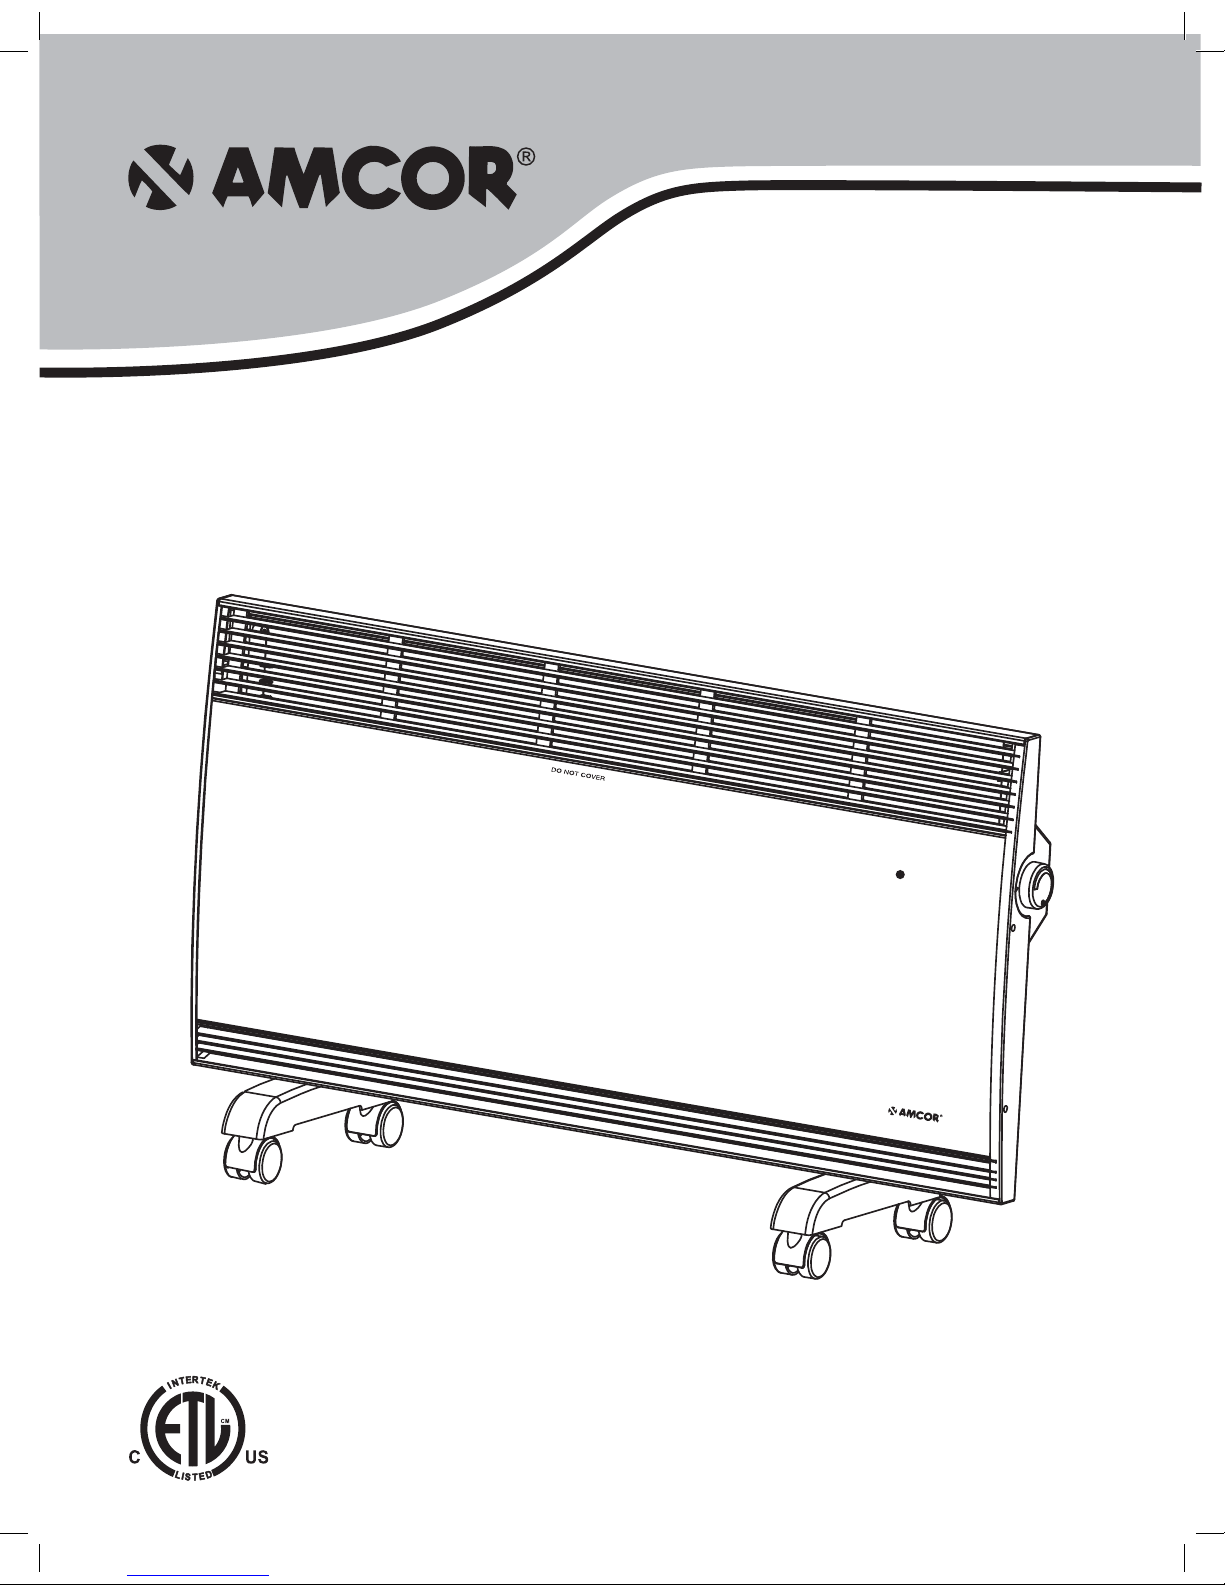
• This heater is equipped with a grounded type plug (see illustration)
and must be pluged into a grounded type outlet as shown.
This is a safety feature: DO NOT REPLACE THIS PLUG!
• Always inspect power cord, and do not operate heater with a damaged cord or plug.
• DO NOT OPEN HEATER. There are no user serviceable parts inside.
• Do not use the heater if the cord or plug is damaged, or if the heater has malfunctioned,
or if it has been damaged or dropped in any way. In such a case, return the heater to an
authorized service facility for examination and/or repair.
• Do not use outdoors – for indoor use only.
• This heater is not intended for use in bathrooms, laundry areas, wet areas or similar indoors areas.
• Never locate heater where it may fall into a bathtub or other water containers.
• Do not run the heater cord under carpeting, or otherwise cover the cord.
Make sure the cord is out of the way so that it does not pose a risk of tripping.
• Turn off heater before unplugging from the electrical outlet.
• Do not insert objects through the air vents of the heater as this may cause an electric shock or fire.
To prevent fire do not block air intakes or exhaust in any manner.
• A heater has hot and arcing parts inside. Never use the heater in the vicinity where paint thinners, gasoline, paint or
other flammable liquids are used or stored.
• Use this heater only as described in this manual.
Any other use may cause injury to persons, or property damage, or electric shock.
• Avoid using an extension cord to power the heater because the extension cord may overheat and cause a risk of fire.
However, if you have to use an extension cord, the cord shall be of a No. 14 AWG minimum size, and should be rated no
less than 1875 watts.
• This heater draws 12.5 amps during operation. To prevent overloading a circuit, do not plug the heater into a circuit that
is already being used to power other appliances.
• While it is normal for the heater’s plug to feel warm to the touch, a loose fit between the plug and the electrical outlet
may cause overheating and warping of the plug. If the outlet is loose, contact a qualified electrician to replace loose or
worn outlets.
• Do not allow water to splash on the heater. If the heater appears to be damp, discontinue its use immediately.
• The output of this heater may vary and its temperature may become intense enough to burn exposed skin.
Use of this heater is not recommended for persons with reduced sensitivity to heat or inability to react to avoid burns.
• Service of the heater other than cleaning should be performed by an authorized service center.
No user serviceable parts inside. Only authorized service personnel shall handle repair work.
• The appliance has an internal over-temperature safety device, which automatically switches the heater off, if an
over-heat situation is detected. Manually reset the unit once the heater cools off.
• When the unit cools off, if you notice the safety device still switches off the heater, unplug the unit, wait 30 seconds to
a minute, and plug in again. This will trigger the unit and it will switch on.

2
Thank you for purchasing an AMCOR Flat Panel Heater.
AMCOR is a leading brand in indoor air treatment. We would like you to enjoy the many benefits this
unit offers, so please read this manual carefully and take full advantage of the many advanced features
that your AMCOR portable Heater offers you.
AMCOR has specialized in complete indoor environment control, manufacturing world-class heaters,
air conditioners, dehumidifiers and air purifiers with innovative technology.
In designing these advanced products, we have listened carefully to our customers and have passed
their views on to our research and development laboratories.
We wish you many years of enjoyable use.
After reading this manual, please keep it in a safe place for future reference.
Read this entire instruction manual before use.
Please keep your receipt. Your receipt is your Proof of Purchase and is
necessary for warranty service.
Thank You!
1. Carefully remove your heater from the box (please save the carton for off-season storage).
2. Make sure the unit is in the OFF position before plugging the heater into the outlet.
3. Proceed with the instructions for “Wall mounting” or “Portable Use”.
Unpacking and Set-up

Specifications
Model AMH8
Power Supply Voltage 120V~ 60Hz
Power Consumption 1500W
Maximum Current 12.5 Amps
3
Parts
Rear Housing
ON/OFF/
Thermostat
Knob
ON/OFF Pilot
Light Indicator
Top
Grille
Heater
Front
Bottom
Grille

4
Wall Mounting Installation
Fig. 1
• The heater must be mounted at four
points. Two mounting holes (keyhole
slots) are located on the upper rear of
the heater and two wall mount angle
brackets are provided for securing the
heater’s bottom to the wall.
• Fit the short edges of the angle brackets
to the heater and secure brackets with
the screws provided, ensuring the long
tabs protrude downward (see Fig. 1).
• The heater must be positioned on a wall
away from cold draughts or breezeways
which may interfere with the tempera-
ture control system (rotary thermostat).
• A clearance of at least 6" (152mm) to
BOTH sides of the heater, at least 20
inches (508mm) to the front and top of
the heater should be maintained.
• A clearance of at least 8" (205mm) must
be maintained above the floor or floor
coverings (see Fig. 2).
• The unit must NOT be positioned
directly under a power outlet.
• The unit should not be located
below air extraction vents.
Installation Instructions:
1. Mark the two screw points for the top
mounting screws on the wall at dimen-
sions shown at right (Fig. 1) 17.75"
(451 mm) apart.
2. Do not Screw Directly into
sheetrock or paneling only.
3. Screws must be securely screwed
into wall studs or by using suitable
anchors (not supplied), not
completely, leaving 4-5 mm’s
(0.16" - 0.2"). Consult a qualified
electrican if in doubt.
4. Slide keyhole slots in heater over these
two screws.
5. Connect the two wall mount angle
brackets at the bottom of the unit as
shown at right (Fig 1).
6. Mark the two screw points (holes in the
brackets).
7. Repeat steps 2 & 3 above, only this time
screws must be screwed completely.
Fig. 2
Approximately 173/4" between
the midpoints of the holes
At least 20" (508mm)
At least
6"
(152mm)
Install bottom of Heater not less than 8" (205mm)
above the finished floor.
Two Mounting Holes
Two Wall Mount Angle Brackets

5
Portable Installation
Portable Use
CAUTION:
Risk of fire – Do NOT operate heater without
the wheel assemblies securely attached.
Operate heater only in upright position (wheel
on bottoms). Any other position of the heater
can create a hazardous condition.
1. Attach the two (included) wheel assemblies
by positioning them as shown in Fig. 3
(one on each side).
2. Secure the wheel assemblies with the
included screws.
Fig. 3
Screw
Castor
Foot
Screw
Attach Hole

Operation
6
1. The thermostat maintains the desired room temperature
automatically by switching on and off.
2. Make sure the thermostat is on the “OFF” position
before plugging the heater.
3. Plug the heater.
4 ON/OFF Thermostat control knob controls the
temperature setting of the heater, and it also turns
the heater ON/OFF. When the arrow (a) indicated
below lines up with the “0” in the knob, the heater is turned OFF.
Rotating the control clockwise turns the heater ON and increases
the temperature setting of the heater.
5. Adjust the temperature as desired.
Once the heater is turned ON, the power light will illuminate.
6. The further the knob is turned clockwise the higher the
setting temperature – see “Thermostat Setting”
7. Pilot light indicator (b) shown below indicates when the
heater is operating. This indicator will light up when the
heater is ON and heating up and will be OFF when the heater
is unplugged, turned OFF, or has reached the desired temperature.
CAUTION:
FRONT GRILL IS HOT WHEN
UNIT IS IN OPERATION
Thermostat Setting
To properly set the heater to the desired temperature we recommend:
• Turn the knob clockwise, starting with a low temperature setting.
• Allow the heater to reach its set temperature.
• If a higher temperature is desired, turn the thermostat knob further clockwise.
If a lower temperature is desired, turn the thermostat knob counter-clockwise.
• Turn again the knob clockwise (just a little): in this position the thermostat will
maintain the comfortable temperature you have selected.
(a)
(b)
Pilot
Light

7
Storage
• Before storage, turn the heater OFF, unplug and wait for the heater to cool down.
Wrap the cord, pack the heater in the original carton and store it in a a cool, dark place.
Maintenance
• ALWAYS TURN THE HEATER OFF AND UNPLUG IT BEFORE CLEANING
• It is recommended that the heater be cleaned at least twice during the operating season.
• Air inlet and outlet grilles can be cleaned with a vacuum cleaner to remove dust.
• Use a dry, soft cloth to clean the exterior surfaces.
• In case you need to repair it, please contact an authorized repairing center.

8
Troubleshooting
If your heater fails to operate, follow these instructions:
• Check to make sure that your circuit breaker or fuse is working properly.
• Ensure that the heater is properly plugged in, and that the electrical outlet is working properly.
• DO NOT ATTEMPT TO OPEN OR REPAIR THE HEATER YOURSELF.
DOING SO MAY VOID THE WARRANTY AND COULD CAUSE DAMAGE OR
PROPERTY AND PERSONAL INJURY.

Don’t forget to register your Amcor purchase online,
and view our broad selection of innovative products.
www.amcorgroupusa.com
9

One Year Limited Warranty
Amcor, Inc. (“Amcor”) warrants the original retail purchaser (“Purchaser”) purchasing in the United
States that the Amcor product with which this warranty is enclosed is free from defects in materials
and workmanship.
Amcor’s sole obligation under this warranty is to replace, or at Amcor’s discretion, to repair, free of
charge, all defective parts, for a period of one (1) year from date of original purchase. ANY IMPLIED
WARRANTY OF MERCHANTABILITY IS SIMILARLY LIMITED TO ONE (1) YEAR FROM DATE
OF ORIGINAL PURCHASE AND NO ACTION BASED UPON ANY IMPLIED WARRANTY OF
MERCHANTABILITY OR OTHER-WISE MAY BE COMMENCED AFTER EXPIRATION OF ONE
(1) YEAR FROM DATE OF ORIGINAL RETAIL PURCHASE. Some states do not allow limitations on
how long an implied warranty lasts, so the above limitation may not apply to you.
The provisions of this warranty shall not apply to any product which in Amcor’s judgment has been
(1) subject to misuse or neglect. (2) damaged in an accident. (3) used for a purpose for which it was
not designed, or (4) repaired or altered in any way that adversely affected its performance or reliability.
Do not attempt to “open unit”. Opening unit will void manufacturers warranty.
To obtain warranty service, the defective product or part must be shipped or delivered to: Amcor
the Manufacturer. Shipping charges and insurance are only covered by Amcor during
first 30 day period after purchase, solely for defective product.
AMCOR NEITHER ASSUMES NOR AUTHORIZES ANY PERSON TO ASSUME FOR IT ANY
OTHER ( LIABILITY IN CONNECTION WITH ITS PRODUCTS, THERE ARE NO WARRANTIES
WHICH EXTEND BEYOND THE DESCRIPTION ON THE FACE HEREOF. NO RESPONSIBILITY
IS ASSUMED FOR INCIDENTAL OR CONSEQUENTIAL DAMAGES THAT MAY RESULT FROM
THE USE OF AN AMCOR PRODUCT, NOR FOR THE DAMAGES DUE TO ACCIDENT, ABUSE,
LACK OF RESPONSIBLE CARE, THE AFFIXING OF ANY UNAUTHORIZED ATTACHMENT,
LOSS OF PARTS, OR USE AT A VOLTAGE OTHER THAN SPECIFIED. Some states do not allow
the exclusion of limitation of incidental or consequential damages, so these limitations may not ap-
ply to you. Amcor disclaims all liabilities for defects or damages caused by use of replacement parts
obtained from or by service at any service center other than Amcor the Manufacturer.
This warranty gives you specific legal rights, and you may also have other rights which vary from state
to state.
Product: AMCOR Wall Mountable/Portable Heater Model: AHM8
Date Purchased:__________________________________ Production Code:_____________
QUESTIONS? Call 1-866-361-2233
www.amcorgroupusa.com
Dear Customer: Please keep this warranty for your record.
DO NOT return it.
913129090
10/2008
10

Es importante que lea estas instrucciones
antes de utilizar su nueva compra y le
recomendamos ampliamente que las guarde
en un lugar seguro para futuras referencias.
Manual del
Usuario
Calentador Portátil /
Instalable en la Pared
Model AMH8

Índice
Instrucciones de Seguridad ……………………………………… 1
Gracias ………………………………………………………… 2
Desempaque y Configuración…………………………………… 2
Partes …………………………………………………………… 3
Especificaciones ………………………………………………… 3
Instalación en la Pared ………………………………………… 4
Instalación Portátil ……………………………………………… 5
Funcionamiento ………………………………………………… 6
Mantenimiento ………………………………………………… 7
Almacenaje ……………………………………………………… 7
Solución de Problemas ………………………………………… 8
Garantía Limitada ………………………………………………10

1
Instrucciones de Seguridad
Para reducir el riesgo de incendios, descargas eléctricas, o lesiones al utilizar cualquier aparato eléctrico, siempre se deben
tomar medidas de seguridad básicas, incluyendo las siguientes:
• No cubra, tape ni obstruya los conductos de aire superior e inferior del calentador.
• Lea todas las instrucciones cuidadosamente antes de usar el calentador.
• Este calentador se calienta durante su uso. Para evitar quemaduras no toque las superficies calientes de este calentador
con las manos descubiertas o con cualquier parte del cuerpo sin protección.
• Mantenga los materiales combustibles, tales como, muebles, almohadas, ropa de cama, papeles, ropa y cortinas por lo
menos a 3 pies (0.9mts) de distancia de la parte frontal del calentador y manténgalos fuera del área lateral y
posterior del calentador.
• Se debe tener mucho cuidado cuando el calentador este siendo utilizado alrededor o
cerca de niños pequeños o personas discapacitadas.
• Este calentador está equipado con un enchufe a tierra (ver ilustración) y
debe ser enchufado en una toma de corriente conectada a tierra como
se muestra más abajo. Esta es una característica de seguridad.
¡NO REEMPLACE O CAMBIE ESTE ENCHUFE!
• Revise siempre el cable de alimentación de energía, y no opere el calentador si el
ordón o enchufe está dañado.
• NO ABRA EL CALENTADOR. El interior de la unidad contiene partes que no son de
utilidad para el usuario.
• NO use el calentador si el cordón o enchufe están dañados, o después que la unidad haya funcionado
mal, o si ha sido dañada o tirada al piso en cualquier forma. En este caso, devuelva el calentador a un
establecimiento de servicio autorizado para su inspección y/o reparación.
• No utilice la unidad en el exterior, es sólo para uso interior.
• Este calentador no es para ser usado en baños, áreas de lavandería o cualquier otra área húmeda o vaporosa.
• Nunca coloque el calentador donde pueda caerse en una tina de baño u otros contenedores de agua.
• No extienda el cordón del calentador por debajo de alfombras o tapetes ni tampoco cubra el cordón.
Asegúrese que el cordón esté fuera del camino y no presente riesgo de tropiezos.
• Apague el calentador antes de desenchufarlo de la toma de corriente.
• No meta objetos en los conductos/rejillas de aire del calentador ya que esto puede causar una descarga
eléctrica o un incendio. Para prevenir un incendio no bloquee las entradas o salidas de aire en ninguna forma.
• El calentador contiene adentro piezas y partes calientes y con arco eléctrico. Nunca use el calentador cerca
del área donde se use o guarde pintura, solvente de pintura, gasolina u otros líquidos inflamables.
• Sólo utilice este calentador como se especifica en este manual. Cualquier otro uso podría ocasionar lesiones
a personas o daños a su propiedad o hasta descargas eléctricas.
• Evite el uso de cables de extensión para conectar la unidad ya que la extensión puede sobre calentarse y causar un riesgo
de incendio. Sin embargo, si debe utilizar una extensión, el cable debe ser como mínimo de tamaño Núm. 14 AWG y
debe ser clasificado con no menos de 1875 vatios.
• Este calentador toma 12.5 amperios durante su funcionamiento. Para prevenir que el circuito se sobrecargue,
no enchufe la unidad en un circuito que ya se está usando para conectar otros electrodomésticos.
• Mientras que es normal que el enchufe del calentador se sienta caliente al tocarlo, algún cable suelto entre
el enchufe y la toma de corriente puede causar sobrecalentamiento y deformación del enchufe. Si el enchufe esta suelto,
contacte a un electricista calificado para cambiar enchufes o tomas de corrientes sueltas o desgastadas.
• No permita que agua salpique en el calentador. Si el calentador parece estar húmedo, interrumpa o suspenda
su uso inmediatamente.
• La salida de este calentador puede variar y su temperatura puede llegar a ser lo suficientemente alta o intensa para
quemar la piel expuesta. El uso de este calentador no es recomendable para personas con sensibilidad reducida al comer
o inhabilidad de reaccionar para evitar o prevenir quemaduras.
• Cualquier tipo de servicio que no sea de limpieza debe llevarse a cabo por un centro de servicio autorizado.
El interior de la unidad contiene partes que no son de utilidad para el usuario. Solamente personal de servicio autorizado
deberá realizar el trabajo de reparación.
• El aparato tiene un dispositivo interno de la seguridad de la sobre-temperatura, que cambia automáticamente la calenta-
dora lejos, si un recalienta la situación es discernida. Reponga manualmente la unidad una vez la calentadora se calma.
• Cuándo la unidad se calma, si usted advierte que el dispositivo de la seguridad todavía apaga la calentadora, desenchufa
la unidad, la espera 30 segundos a un minuto, y al tapón en otra vez. Esto provocará la unidad y encenderá.

2
Gracias por comprar un Calentador de Panel Plano AMCOR. AMCOR es una marca líder en el
tratamiento del aire interior. Deseamos que usted disfrute los numerosos beneficios que esta unidad le
ofrece, así que por favor lea detenidamente este manual y aproveche las muchas ventajas que su
Calentador Portátil AMCOR le brinda. Amcor se ha especializado en el control ambiental interior
fabricando calentadores, aires acondicionados, deshumidificadores y purificadores de aire de clase y
calidad mundial con tecnología innovadora. En el diseño de estos productos tan avanzados, hemos
prestado mucha atención a nuestros clientes y hemos indicado sus puntos de vista y opiniones a
nuestros laboratorios de investigación y desarrollo.
Le deseamos que disfrute de este producto por muchos años.
Después de leer este manual, consérvelo en un lugar seguro para futuras referencias.
Lea este manual de instrucciones en su totalidad antes de usar la unidad.
Por favor guarde su recibo de compra. Su recibo es su Comprobante de Compra y es
necesario para el servicio de garantía. Desempaque
¡Gracias!
1. Con cuidado saque su calentador de la caja (por favor guarde la caja para su almacenaje de fuera
de temporada).
2. Asegúrese que la unidad esté en la posición de APAGADO antes de enchufar el calentador a la
toma de corriente.
3. Proceda con las instrucciones para “Instalación en la Pared” o “Uso Portátil”.
Desempaque y Configuración

Especificaciones
Modelo AMH8
Voltaje de la Fuente de Energía 120V~ 60Hz
Consumo de Energía 1500W
Corriente de Trabajo 12.5 Amperes
3
Partes
Cubierta
Posterior
Perilla del
Termostato
APAGADO/
ENCENDIDO
Luz indicadora
de APAGADO/
ENCENDIDO
del piloto
Rejilla
Superior
Parte
Frontal del
Calentador
Rejilla
Inferior

Fig. 2
Por lo menos 20" (508mm)
Por lo
menos
6"
(152mm)
Instale la parte inferior del Calentador A No Menos
de 8" (205mm) de distancia sobre el piso.
4
Instalación en la Pared
• El calentador debe ser montado en cuatro
puntos diferentes. En la parte trasera supe-
rior del calentador están ubicados dos hoyos
de montaje y se proporcionan dos soportes
angulares para montaje de pared para sujetar la
parte inferior del calentador a la pared.
• Ajuste los bordes o lados cortos de los
soportes angulares al calentador y sujete los
soportes con los tornillos que se le proporcio-
nan, asegurándose que las lengüetas o pestañas
largas sobresalgan hacia abajo.
• El calentador debe estar posicionado en una
pared lejos de corrientes frías o de corredores
o pasillos que puedan interferir con el sistema
de control de temperatura (termostato
giratorio).
• Se debe mantener un espacio libre de por lo
menos 6" (152mm) en AMBOS lados del calen-
tador, y por lo menos 20 pulgadas (508mm) en
la parte frontal y superior del calentador.
• Se debe mantener una altura o espacio libre de
por lo menos 8" (205mm) sobre el piso o el
recubrimiento del piso. (Ver Fig. 2).
• La unidad NO debe ser colocada directamente
debajo de un enchufe de energía eléctrica.
• La unidad no debe ser colocada debajo de
rejillas de extracción de aire.
Fig. 1
Aproximadamente 17¾” entre
ambos centros de los hoyos
Dos Hoyos de Montaje
Dos Soportes Angulares para Montaje de Pared
Instrucciones de Instalación:
1. Marque en la pared los dos puntos para
los tornillos superiores de montaje con
las dimensiones que se muestran en la
derecha (Fig. 1) con 17.75" (451mm)
de distancia.
2. No atornille directamente en tableros
de yeso o paneles de madera.
3. Los tornillos deben ser atornillados
firmemente en soportede pared o utilizando
anclajes adecuados (no proporcionados), pero
no atornille completamente, deje 4-5mm de
espacio (0.16"-0.2"). Si tiene dudas, consulte
a un electricista calificado.
4. Deslice las ranuras que se encuentran en la
parte trasera de calentador sobre estos
dos tronillos.
5. Sujete o fije los dos soportes angulares para montaje en la parte inferior
de la unidad como se muestra a la derecha (Fig. 1).
6. Marque los dos puntos a atornillar (hoyos/agujeros en los soportes).
7. Repita los pasos 2 y 3 anteriores, sólo que esta vez los tornillos deben
de ser atornillados completamente.

5
Instalación Portátil
Uso Portátil
PRECAUCION:
Riesgo de incendio – NO opere el calentador
sin haber fijado o puesto firmemente el
ensamblaje de las ruedas.
Solamente opere el calentador en posición
vertical (con las ruedas en la parte de abajo).
Cualquier otra posición en que coloque el
calentador puede crear una condición peligrosa.
1. Fije los dos ensamblajes de las ruedas
(incluidos) colocándolos como se muestra en
la Fig. 3 (una en cada lado).
2. Sujete los ensamblajes de las ruedas con los
tornillos que se incluyen.
Fig. 3
Tornillo
Rueda
Giratoria
Pie
Hoyo para
el Tornillo

Funcionamiento
6
1. El termostato mantiene automáticamente la temperatura
ambiental deseada encendiendo y apagando la unidad.
2. Asegúrese que el termostato esté en “APAGADO” antes de
enchufar el calentador.
3. Enchufe el calentador.
4. La perilla de control de ENCENDIDO/APAGADO
del termostato controla la configuración de la
temperatura del calentador, y además ENCIENDE/APAGA
el calentador. Cuando la flecha que se muestra en el inciso (a)
se alinea con el “0” en la perilla de control, el calentador se APAGA.
Girar la perilla de control hacia la derecha ENCIENDE el calentador
y aumenta la configuración de temperatura del calentador.
5. Ajuste la temperatura según sea deseada.
6. Entre más gire hacia la derecha la perilla del termostato, más alta será
la configuración de temperatura – ver “Configuración del Termostato”.
7. El indicador de luz piloto que se muestra en el inciso (b) indica cuando
el calentador está funcionando. Este indicador se prenderá cuando el
calentador esté ENCENDIDO y operando y se APAGARÁ cuándo el
calentador está desenchufado, APAGADO o ha alcanzado al
temperatura deseada.
PRECAUCION: LA REJILLA FRONTAL
ESTARÁ CALIENTE CUANDO LA UNIDAD
|ESTÈ EN FUNCIONAMIENTO.
Configuración del Termostato
Para configurar correctamente el calentador en la temperatura deseada, le recomendamos:
• Girar la perilla hacia la derecha, empezando con una configuración de temperatura baja.
• Permita que el calentador alcance la temperatura configurada.
• Si desea una temperatura más alta, gire la perilla del termostato más hacia la derecha.
Si desea una temperatura más baja, gire la perilla del termostato hacia la izquierda.
• Gire de nuevo la perilla hacia la derecha (sólo un poco): en esta posición el termostato
mantendrá la temperatura confortable que usted ha seleccionado.
(a)
(b)
Piloto
Table of contents
Languages:
Other Amcor Electric Heater manuals
Popular Electric Heater manuals by other brands

Dimplex
Dimplex DLG1058 owner's manual

Midea
Midea NT20-16A owner's manual

Somogyi Elektronic
Somogyi Elektronic home FK 3 instruction manual

Heatscope
Heatscope SPOT MHS-SM Series Original installation and instruction manual

Harvia
Harvia PC110EE Instructions for installation and use

Teesa
Teesa TSA8049 owner's manual

Sawotec
Sawotec Tower Series manual

Chromalox
Chromalox NWHO(F)-27 Installation and RENEWAL PARTS IDENTIFICATION

DeLonghi
DeLonghi TRV0715 Instructions for use

Harvia
Harvia HL135SA Instructions for installation and use

Dimplex
Dimplex DES 1821 installation instructions

Heylo
Heylo IRE 3 Translation of the original instruction manual