Amcor Wine Vault WV 150 User manual

It is important that you read these instructions before
using your new purchase and we strongly recommend
that you keep them in a safe place for future reference.
Owner’s
Manual
WV 50 WV 100 WV 150
Featuring Digital Dual Zone
Cooling Technology

You can also register your Amcor purchase online,
and view our broad selection of innovative products.
www.amcorgroupusa.com

Table of Contents
1
ThankYou ……………………………………………………… 2
Safety Instructions ……………………………………………… 3
Your Wine Vault ………………………………………………… 4
Installation …………………………………………………… 5-6
Installing in Cabinet or with Decorative Door ………………… 6
Temperature Settings ………………………………………… 7-8
Layout & Storage……………………………………………… 9-12
Care & Maintenance ……………………………………………13
Troubleshooting …………………………………………………14
Limited Warranty ………………………………………………16

Thank You!
2
Thank you for choosing the Amcor Wine Vault™
This Owners Manual is applicable for Amcor models WV-50, WV-100, WV-150
Wine Vault Models.
Before using your Wine Vault, please carefully read this instruction manual to fully
understand how to maximize this product's performance. The manual describes
in detail options for storing your wine, and how to adjust the units dual zone
temperauture, shelf positioning, and odor filter devices.
For over 50 years, Amcor has specialized in indoor environmental control devices, and
a broad array of innovative products such as portable air conditioners, air purifiers,
shower products, and aroma therapy scent diffusers. These world class products have
incorporated patented technologies, and beautiful industrial design styling for the home
or office interiors.
SPECIAL CAUTION:
1. The Wine Vault should not be plugged in for 48 hours, to insure refrigerant
has settled properly
2. Do not store flammable or explosive chemicals in this unit
3. Storage of food and other consumable items should comply with
local laws relating to food safety
4. Door should be kept locked, and keys kept safely away from children
5. These Wine Vaults are not designed for the storage of medicine or
any medical products
6. Improper use of the grounded plug can result in the risk of electrical shock.
If the power cord is defective, return the unit to Amcor. If your electrical outlet
does not accept a grounded plug, consult with a licensed electrician
7. It is strongly recommended that you do not use an extension cord with
any Amcor Wine Vault product

3
Safety Instructions
1. The parameter is subject to change without prior notice, the final data and circuit
diagram is on rating label. Please pay attention to latest data.
2. Its common that there are drips on the glass door when humidity in the air is high or
the temperature different largely between inside of the cabinet and the environment
temperature. Rub it clear with dry soft cloth will be OK.
3. The protective film attached to the unit has been applied to prevent scuff damage
and may be removed.
4. It is normal to frost on the inside back panel of your Wine Vault.
5. If the appliance is broken and not be used for ever, don’t throw it freely,
send it to the recycle bin.
IMPORTANT SAFETY INSTRUCTIONS
• You must always observe some basic precautions when using your wine cabinet, including:
Only use your wine cabinet for the use intended, as described in this guide.
• Never unplug the wine cabinet by pulling on the power cord.
Grip the plug firmly and pull straight out to remove from wall socket.
• Immediately repair or replace any worn or damaged cord.
Never use a cord that is split or which shows signs of wear along its length or on its ends.
• Do not allow children to climb on, sit on or stand on the Wine Vault, nor hang from its
shelves. They could damage the wine cabinet and injure themselves seriously.
• Do not use an extension cord.
DANGER - Risk of child entrapment
If you throw away your Wine Vault:
1. Take off the doors
2. Leave the shelves in place so that children may not easily climb inside.
If the supply cord is damaged, it must be replaced by the manufacturer, its service agent or
similarly qualified persons in order to avoid a hazard.
Connecting To Power Supply
The Wine Vault’s power cord is equipped with a plug which fits into any standard socket with
grounded connection, to prevent any risk of shock.
Have the power outlet checked by a qualified electrician to make sure it is actually grounded.
If this is not the case, you must have it replaced with a socket which is suitably grounded.
If the power cord is damaged, have it replaced by a qualified electrician to prevent any risk.
If the wall socket is not equipped with an grounded connection, it is your responsibility and
your duty to have it replaced with a suitably grounded wall socket, if the plug does not match
your socket, you may have another fitted.
Note
1. For your safety, Wine Vault must be correctly grounded
2. New electrical cables and plugs should be fitted by a qualified electrician.

4
Your Wine Vault
1. Removable Top Plate for installations under cabinets
2. Digital Control Panel for Dual Zone Temperature Settings
3. Durable Wine Vault Cabinet Construction
4. Sliding Shelf
5. Storage Shelf
6. Front Ventilation Base
7. Four Adjustable Feet
8. Hinge
9. Activated Charcoal Filter
10. Door
11. Free Ventilation Hole

5
Installation
When you unpack your Wine Vault, make sure the unit is in perfect conditon by inspecting the unit from all angles.
If the unit is damaged in any way, contact Amcor within 24 hours of receiving the unit.
Check your unit to make sure you have all the parts:
If you wish to install your cabinet under a worktop, you will need to remove the top plate which is fixed from
underneath by two front screws in the hinges and two screws behind in the angle brackets.
Keep the two front screws if you wish to encase the unit under a worktop so as to fix it to the existing
worktop (see diagrams page 4).
Move the cabinet to where you want to install it. Make sure the place selected is:
• Away from any source of heat
• Not too damp (laundry room, utility room, bathroom, etc.)
• On a stable level surface
• Equipped with a power point (standard socket, rated voltage, 16A, connected to earth)
Make sure the On/Off switch located on the right of the control panel is in the off position.
Take out the power cord and connect it as shown in section 3.
Check the power point supply (fuses in, fuse amperage, circuit breaker working.
You can if you wish use another appliance to check the power supply.)
Adjust the four feet underneath the cabinet (screwing them up or unscrewing them) so that your cabinet is level
(it is advisable to use a spirit level).
Slide the cabinet into its final position, leaving a space of between .75" and 2.25" between the wall and the rear
wall of the cabinet, for installation under a worktop, fix the cabinet to the worktop using two screws in the top
hinges (see page 6).
Do not obstruct the front ventilation grille.
If Wine Vault is installed under countertop or in cabinet, it is recommended that a ventilation hole be cut to allow
for proper ventillation of the unit. A flush mount grill may be used in this case to prevent large objects from falling
down vent opening. See diagram on page 6.
The Wine Vault should be installed in a place where the ambient temperature is between 72-78°F. If the ambient
temperature is above or below recommended temperatures, the performance of the unit may be affected.
For example, placing your unit in extreme cold or hot conditions may cause interior temperatures to fluctuate.
The range of 40-65°F may not be reached.
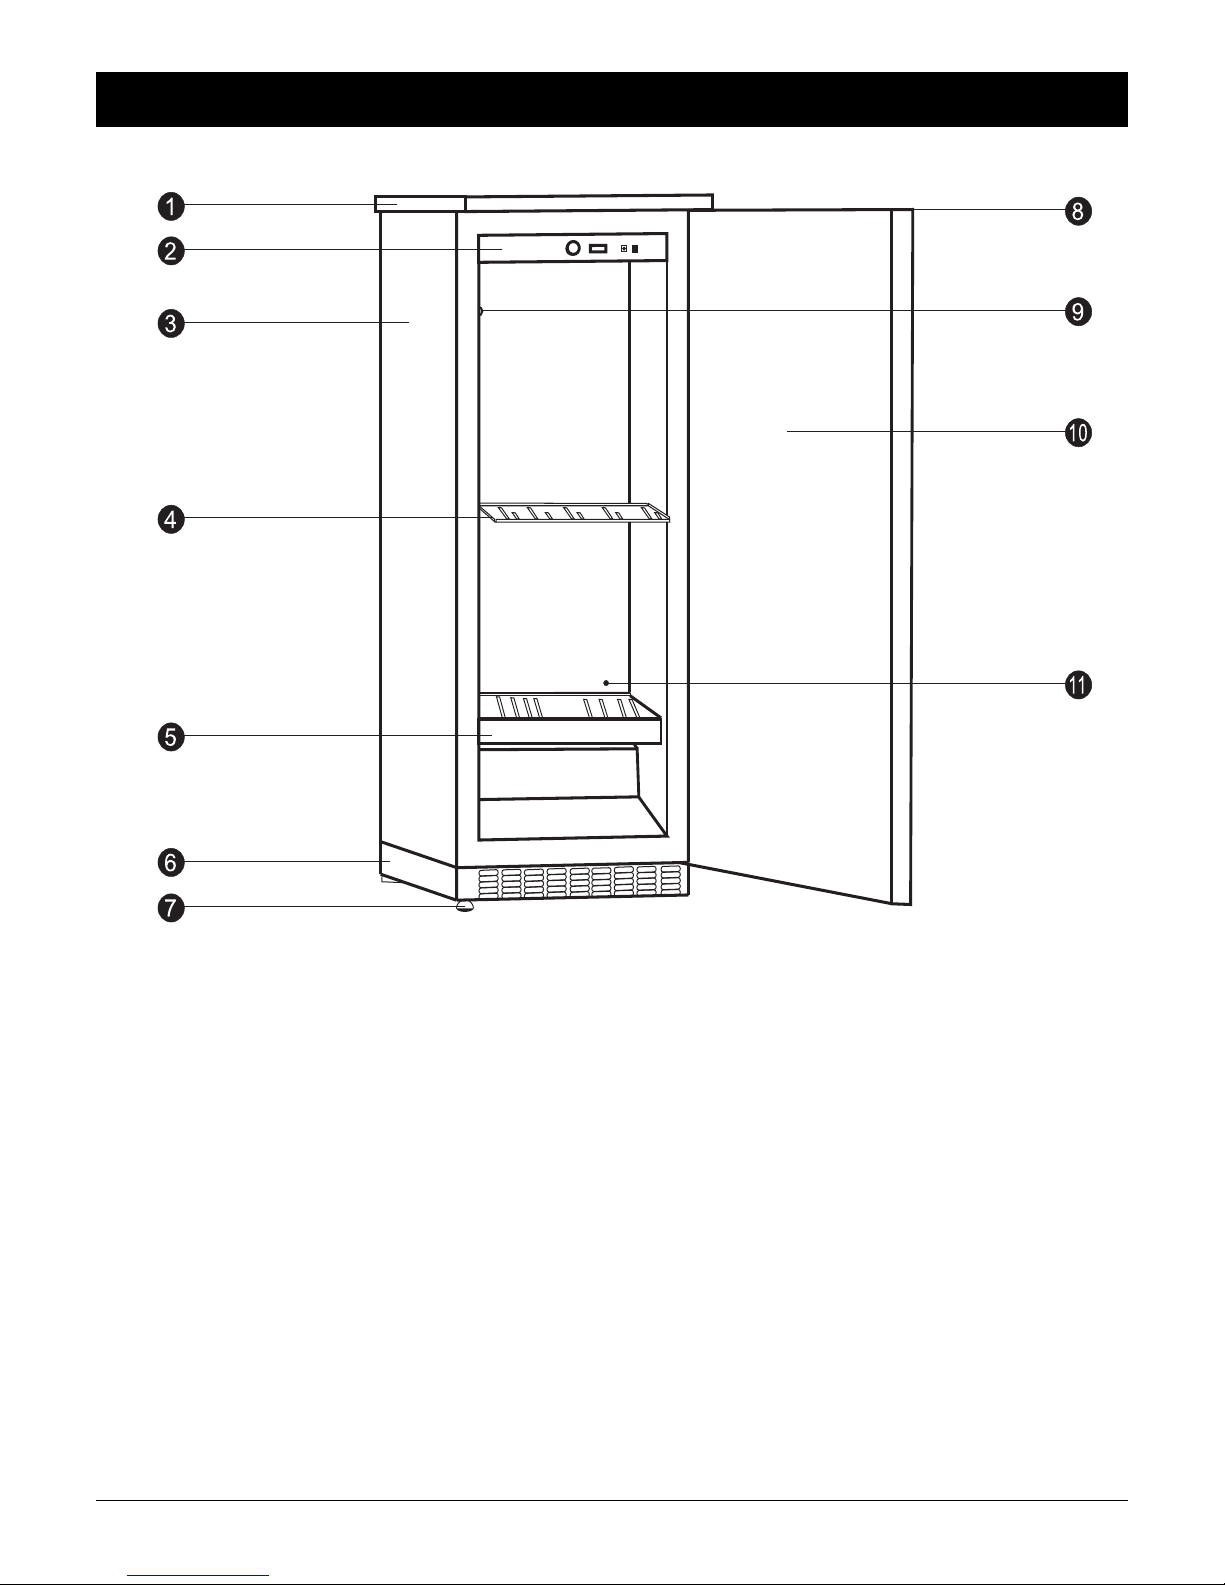
Remove protective shipping materials from inside the Wine Vault.
Remove the protective paper from the charcoal filter that you will find in the accessories pack.
From inside the cabinet, position the filter in the round box located in the top back of the cabinet.
Arrange the shelves to suit your convenience (see section 6.)
Wait 48 hours before switching the cabinet on so as to allow the fluids to settle.
If you need to move the Wine Vault, do not tip over 45 degrees, and only tip towards the back of the unit.
Make sure you can access the plug of the unit for servicing or moving when needed.
Wine Vault Parts List By Model
WV-50 WV-100 WV-150
1- Wine Vault Cabinet 1- Wine Vault Cabinet 1- Wine Vault Cabinet
3- Wooden Shelves 5- Wooden Shelves 8- Wooden Shelves
1- Metal Handle Assembly Bag
with 2 Keys
1- Metal Handle Assembly Bag
with 2 Keys
1- Metal Handle Assembly Bag
with 2 Keys
1- Carbon Filter Assembly Bag 1- Carbon Filter Assembly Bag 1- Carbon Filter Assembly Bag
1- Owners Manual 1- Owners Manual 1- Owners Manual

6
Installation
22.5"
23.4"
23.5"
4.25"
32"- 32.5"
minimum 22.6"
22.5"
Installing in Cabinet or with Decorative Door
1. Level the Unit inside the cabinet
2. Open the door or the unit at a 90° angle
3. Fix the facing of the kitchen cabinet on
the door of unit (8 screws included)
4. Be sure the gasket is sealed properly
33 lbs.
23.4" with
23.6" 27.5"
31.3"
33 lbs.
23.6"
31.3"
23.4" with
27.5"
Air entry
grid 79"
2
minimum

7
Temperature Settings
Right Digital Display:
Indicate the current temperature or preset temperature of upper layer. When +/- Key is pressed, display
on the digital tube flashes, indicating the preset temperature. If no temperature setting operation occurs
within five seconds, the system will automatically return to the display of ambient temperature in the
storage cabinet, with the accuracy of 1°F.
Malfunction Code Explanation:
E2 Faults of upper layer’s cabinet temperature sensor. The sensor is short circuit or open circuit
(10 seconds later the system will close and this code will display. The buzzer will tweet every 2 seconds).
E9 is Superheating protection. After compressor operating 4 hours under any condition, When the upper
layer sensor detects the cabinet temperature no less than 77°F, The buzzer will alarm and tweet every
2 seconds. When the detected cabinet temperature is >86°F, “E9” malfunction code will display. The
Electrical Heating will close and compressor will go on working. (The buzzer will tweet every 2 seconds).
When Upper layer sensor detects the cabinet Temperature reaches 70°F, the system will restart auto-
matically and the temperature will display normally.
Preset Temperature Adjusting Key for Upper Layer:
Press this key to adjust the preset temperature of upper layer. Every time it is pressed, the preset
temperature of upper layer is increased or decreased by 1°F. Temperature setting range is 54°F - 72°F.
Left Digital Display:
Indicate the current temperature or preset temperature of lower layer. When +/- Key is pressed, display
on the digital tube flashes, indicating the preset temperature. If no temperature setting operation occurs
within five seconds, the system will automatically return to the display of ambient temperature in the
storage cabinet, with the accuracy of 1°F.
Malfunction Code Explanation:
E3 Faults of lower layer’s cabinet temperature sensor. The sensor is short circuit or open circuit
(10 seconds later the system will close and this code will display. The buzzer will tweet every 2 seconds).
E8 is Supercooling protection. When the lower layer sensor detects the cabinet temperature reaches
37°F , the compressor will stop, but electrical heating keeps going on. “E8” malfunction code will display
(the buzzer will tweet every 1 second). When the detected cabinet temperature is no less than 43°F,
the system will restart automatically and the temperature will display normally.
Preset Temperature Adjusting Key for Lower Layer:
Press this key to adjust the preset temperature of lower layer. Every time it is pressed, the preset
temperature of lower layer is increased or decreased by 1°F. Temperature setting range is 41°F-54°F.
Compressor Indicator LED:
This LED comes on while the compressor is operating, and goes out when the compressor stops operation.
Electric Heating Indicator LED:
This LED comes on during operation of electric heating device and goes out when electric heating device
stops operation.
Set temperature for
Lower Layer by
adjusting +/- buttons
Left
Digital
Display
Set temperature for
Upper Layer by
adjusting +/- buttons
Right
Digital
Display
Compressor
Indication LED ON/OFF
Key

8
Temperature Settings
TEST Key:
If this Key is pressed in Standby state, the compressor and electric heating device will operate at the
same time, and Compressor Indicator LED and Electric Heating Indicator LED will come on at the same
time. When this key is released, the system returns to previous standby state.
This key is invalid in operational state.
Notes:
1. There should be at least 5-minute interval between compressor stopping and starting again.
The compressor should operate for at least five minutes after it is started up and then its operation
can be stopped depending on actual conditions.
2. The temperature indicating range of Digital Display 1 and Digital Display 2 is 32°F - 99°F.
When the temperature is below 32ºF in the storage cabinet, indicated temperature is 000, and when
the ambient temperature is above 99°F in the storage cabinet, the indicated temperature is 99°F.
3. The difference of temperature displayed on Digital Display 1 and Digital Display 2 should
be above 41°F.
4. The temperature setting range of upper layer (54°F - 72°F) and lower layer (41°F - 54°F) are
effective when the ambient temperature is 90°F, otherwise it would be difficult to reach the lowest
setting temperature of upper layer and lower layer.
5. The difference between display temperature and setting temperature is ±3°F,
when the cabinet temperature is balanced.

9
Layout and Storage
Your Wine Vault was designed to be flexible, to be able to adapt to your requirements. Many bottle may
differ in size and dimensions. As such, the actual number of bottles you may be able to store may vary.
WARNING: Shelves have protective notch feature which prevents shelf from rolling out
of track when loaded or unloaded with wine bottles. Shelves should be gently rolled out to
their maximum extension. However, do not pull shelves out with excessive force, as this
may allow the shelf to jump out of the track, resulting in the shelf to drop to the floor,
creating a hazardous situation.
Different Types of Layout:
How To Use Your Storage Shelf (AXL):
Fitting shelf brackets (read carefully if you intend to modify your cabinet's shelf positions)
Storage Shelf
To move a storage shelf, first remove all bottles, then move the shelf brackets and make sure to fit them
back into slots as shown below:
Storage Shelf
Ref: AXL
Capacity: 61 Bottles
Max. Weight: 187 ibs.
Storage Shelf
Ref: AXM
Capacity: 8 Bottles
Max. Weight: 33 lbs.

10
Layout and Storage
Sliding Shelf
To move a sliding shelf, first remove
all bottles, then remove the sliding
shelf by sliding it towards you while
lifting the front part.
Remove the sliding guides from the
walls, while making sure not to mix
up the right and left guides.
Then refit them as shown here:
Then refit the sliding shelf as shown below:
WARNING: Shelves have protective notch feature which prevents shelf from rolling out of track when
loaded or unloaded with wine bottles. Shelves should be gently rolled out to their maximum extension.
However, do not pull shelves out with excessive force, as this may allow the shelf to jump out of the
track, resulting in the shelf to drop to the floor, creating a hazardous situation.

Layout and Storage
All slide wooden shelves
VW-50 VW-100 VW-150
(35 bottle maximum capacity) (72 bottle maximum capacity) (100 bottle maaximum capacity)
11

12
Layout and Storage
Ball Bearing Shelf:
To move a ball bearing shelf, first
remove all bottles, loosen the
screws on the shelf, slide out the
shelf, remove the sliding guides
from the walls, then refit them as
shown below, and fix the screws.
Recommendations
Your cabinet was designed to store a maximum number of bottles in total security.
We recommend that you observe the tips below to optimize loading.
• Spread your bottles out as evenly as possible over the shelves, so that weight is not concentrated
in one point. Also make sure your bottles do not touch the back of the cabinet, or the step at
bottom. Also make sure that bottles are not all grouped together at the top or bottom of
the cabinet.
• Observe the loading instructions provided in section 6, according to the type of storage fixtures
with which your cabinet is equipped, and never stack bottles on a sliding shelf.
• Never try to pull out more than one sliding shelf at a time.
PLEASE NOTE
Before modifying your Wine Vault's original configuration in any way, be sure to ask your dealer
for advice.
Guide Wall
Guide
Wall

13
Care & Maintenance
Cleaning Your Wine Vault
• Turn off the power, unplug the appliance, and remove all items including shelves
• Wash the inside surfaces with warm water and baking soda solution.
Solution should be 2 tablespoons of baking soda to a quart of water.
• Wash the shelves with a mild detergent solution
• Wash the outside cabinet with warm water and mild liquid detergent.
Rinse well and wipe dry with a clean soft cloth
Power Failure
• Most power failures are corrected within a few hours, and should not affect the temperature of
your appliance if you minimize the numberof times you open the door.
• If unit is unplugged, power lost, or turned off, you must wait 3-5 minutes before restarting the unit.
If you attempt to restart your Wine Vault before this time delay, the Wine Vault may not start.
• If the power is going to be off for a longer period of time, you need to take the proper steps
to protect your contents.
Moving Your Wine Vault
• Remove all items
• Securely tape down all loose items, shelves etc. inside your appliance
• Turn the adjustable leg up to the base to avoid damage
• Tape the door shut
• Be sure the appliance stays secure in an upright position during transportation.
Also protect the appliance with a blanket, or similar item.
Energy Saving Tip
The Wine Vault should be located in the coolest area of the room, away from heat producing appliances,
and out of direct sunlight.

14
Troubleshooting
START-UP
Compressor does not start, even though the desired temperature is lower
than the temperature in the room.
1. Check the wall socket by plugging in any type of electrical device, and make sure that the
on/off button is pressed.
2. Press the TEST button and check that the two red and green indicator lights light up.
(In the standby status).
3. If the compressor still does not start after steps 2 and 3, contact your dealer.
Compressor Does Not Stop.
1. Place your hand on the condenser (metal screen at the back of your cabinet) to check its temperature
Contact your dealer if cold.
2. If the condenser is hot, set the cold temperature as high as possible (as far as it will go clockwise) and
make sure that the cold circuit operation indicator goes off. lf the compressor does not stop, unplug
the cabinet and contact your dealer.
DURING OPERATION
Digital Tube display indicates a temperature below the temperature you set.
1. Check the temperature set-points.
2. Check that the red hot circuit operation indicator light is on.
3. Press the TEST button, and check that the two red and green indicator lights on the right side of the
panel are on. lf either step 2 or 3 is incorrect contact your dealer.
Digital Tube display indicates a temperature above the temperature you set.
1. Check the temperature set-points.
2. Check that the green cold circuit operation indicator light is on.
3. Press the TEST button, and check that the two red and green indicator lights on the right side of the
panel are on. lf either step 2 or 3 is incorrect contact your dealer.
Contact your dealer, if after adjusting set-points and testing hot and cold circuit indicator lights either of
the two problems above are not corrected.
NOTE: The refrigeration unit must only be serviced by a refrigeration technician, who
must check the circuit for leaks before putting back into service.
Any servicing of the electrical circuit must only be performed by an electrician.
Whatever the case, if your cabinet does not seem to be operating normally, unplug it and
call your dealer.

14
Wine Vault Warranty
WHAT IS COVERED
One Year Limited Warranty Amcor, Inc. (“Amcor”) warrants the original retail purchaser (“Purchaser”) purchasing in the United States
that the Amcor product with which this warranty is enclosed is free from defects in materials and workmanship.
Amcor’s sole obligation under this warranty is to replace, or at Amcor’s discretion, to repair, free of charge, all defective parts, for a period
of one (1) year from date of original purchase. ANY IMPLIED WARRANTY OF MERCHANTABILITY IS SIMILARLY LIMITED TO ONE
(1) YEAR FROM DATE OF ORIGINAL PURCHASE AND NO ACTION BASED UPON ANY IMPLIED WARRANTY OF MERCHANT-
ABILITY OR OTHERWISE MAY BE COMMENCED AFTER EXPIRATION OF ONE (1) YEAR FROM DATE OF ORIGINAL RETAIL
PURCHASE. Some states do not allow limitations on how long an implied warranty lasts, so the above limitation may not apply to you.
For one year from the date of purchase by the original owner, AMCOR, will at its option, repair or replace any part of the unit, which
proves to be defective in material or workmanship under normal use. During this period AMCOR will provide all parts necessary to
correct such defects free of charge, so long as the unit has been installed and operated in accordance with the written instructions in
the owner’s manual. In rental or commercial use, the warranty period is 90 days.
The provisions of this warranty shall not apply to any product which in Amcor’s judgment has been: (1) subject to misuse or neglect.
(2) damaged in an accident. (3) used for a purpose for which it was not designed, or (4) repaired or altered in any way that adversely
affected its performance or reliability.
WHAT IS NOT COVERED
• Content losses of food or other, due to spoilage
• Incidental or consequential damages.
• Parts and Labor costs for the following will not be considered as warranty:
Door Springs, and/or frames.
Inner door panels, door rails and/or door supports.
Light bulbs and/or plastic housing.
Plastic cabinet liners.
Punctured evaporator that voids the warranty on the complete sealed system.
Repairs peformed by third party, other than Amcor.
Service calls that do not involve defects in material or workmanship such as customer education, door reversal, or
proper installation.
Service calls that are related to external problems, such as abuse, misuse, inadequate electrical power, accidents, fire, floods, or
acts of God.
Replacement of house fuses or resetting circuit breakers.
Failure of product if used for other than its intended purpose.
Failure of product due to improper installation
• This warranty does not apply outside the Continental USA.
To obtain warranty service, the defective product or part must be shipped or delivered to Amcor.
All postage, insurance and shipping charges are the responsibility of the Purchaser and are not included in this warranty.
LIMITED SECOND THROUGH FIFTH YEAR WARRANTY
For the Second through fifth year from the date of original purchase, AMCOR will provide a replacement compressor free of charge due
to a failure. You are responsible for the service labor and freight charges. In rental or commercial use, the limited compressor warranty
is one year and nine months. Cost to move the appliance to the servicers’ shop and back to the user’s home, as may be required, are
the users responsibility.
AMCOR NEITHER ASSUMES NOR AUTHORIZES ANY PERSON TO ASSUME FOR IT ANY OTHER (LIABILITY IN CONNECTION
WITH ITS PRODUCTS, THERE ARE NO WARRANTIES WHICH EXTEND BEYOND THE DESCRIPTION ON THE FACE HEREOF.
NO RESPONSIBILITY IS ASSUMED FOR INCIDENTAL OR CONSEQUENTIAL DAMAGES THAT MAY RESULT FROM THE USE OF
AN AMCOR PRODUCT, NOR FOR THE DAMAGES DUE TO ACCIDENT, ABUSE, LACK OF RESPONSIBLE CARE, THE AFFIXING
OF ANY UNAUTHORIZED ATTACHMENT, LOSS OF PARTS, OR USE AT A VOLTAGE OTHER THAN SPECIFIED. Some states do
not allow the exclusion of limitation of incidental or consequential damages, so these limitations may not apply to you.
Amcor disclaims all liabilities for defects or damages caused by use of replacement parts obtained from or by service at any service
center other than Amcor’s authorized service center. This warranty gives you specific legal rights, and you may also have other rights
which vary from state to state.
Product: Amcor Wine Vault™Models: WV 50, WV 100, WV 150
Date Purchased:_______________________________ Production Code:________
QUESTIONS? Call 866-361-2233 • www.amcorgroupusa.com
913126830
7/2008

Es importante que usted lee estas instrucciones
antes utilizar su nueva compra y nosotros
recomendamos totalmente que usted los mantenga
en un lugar seguro para la referencia futura.
Manuel
De Dueños
Representar la Zona Doble Digital
La refrigeración de Tecnología
WV 50 WV 100 WV 150

Usted puede registrar también su compra de Amcor en línea,
y ver nuestra amplia selección de productos innovadores.
www.amcorgroupusa.com

Tabla de contenido
1
Gracias ………………………………………………………… 2
Instrucciones de Seguridad ……………………………………… 3
Su Gabinete deVino …………………………………………… 4
Instalación …………………………………………………… 5-6
Instalar en el Gabinete o con Puerta Decorativa ……………… 6
Escenarios de Temperatura…………………………………… 7-8
Disposición & Almacenamiento ……………………………… 9-12
Cuidado y Mantenimient…………………………………………13
Solución de Problemas …………………………………………14
Garantía Limitada ………………………………………………16
This manual suits for next models
2
Table of contents
Languages:
Other Amcor Wine Cooler manuals
Popular Wine Cooler manuals by other brands

Summit Commercial
Summit Commercial SCR321LWC2 instruction manual

Electrolux
Electrolux E24WC75HSS0 Factory parts catalog

Wine Racks
Wine Racks Magnum/Champagne Kit Assembly guide

Vestfrost
Vestfrost WFG 22 Instructions for use

AEG
AEG AWUS052B5B user manual

Franklin Chef
Franklin Chef FWC36 Use and care guide