manuals.online logo
Brands
  1. Home
  2. •
  3. Brands
  4. •
  5. AMERICAN IMAGE DISPLAYS
  6. •
  7. Tent
  8. •
  9. AMERICAN IMAGE DISPLAYS ShowStopper Deluxe 10 x 20 User manual

AMERICAN IMAGE DISPLAYS ShowStopper Deluxe 10 x 20 User manual

4/12Instructions Continued On Back Side
Product Specifications
Thermal Peak Maximum Imprint : 46" w x 17" h
Thermal Overhang Maximum Imprint : 60” w x 8” h
Canopy Color: White
Dimensions: 236" w x 125" h up to 138" h x 118" d
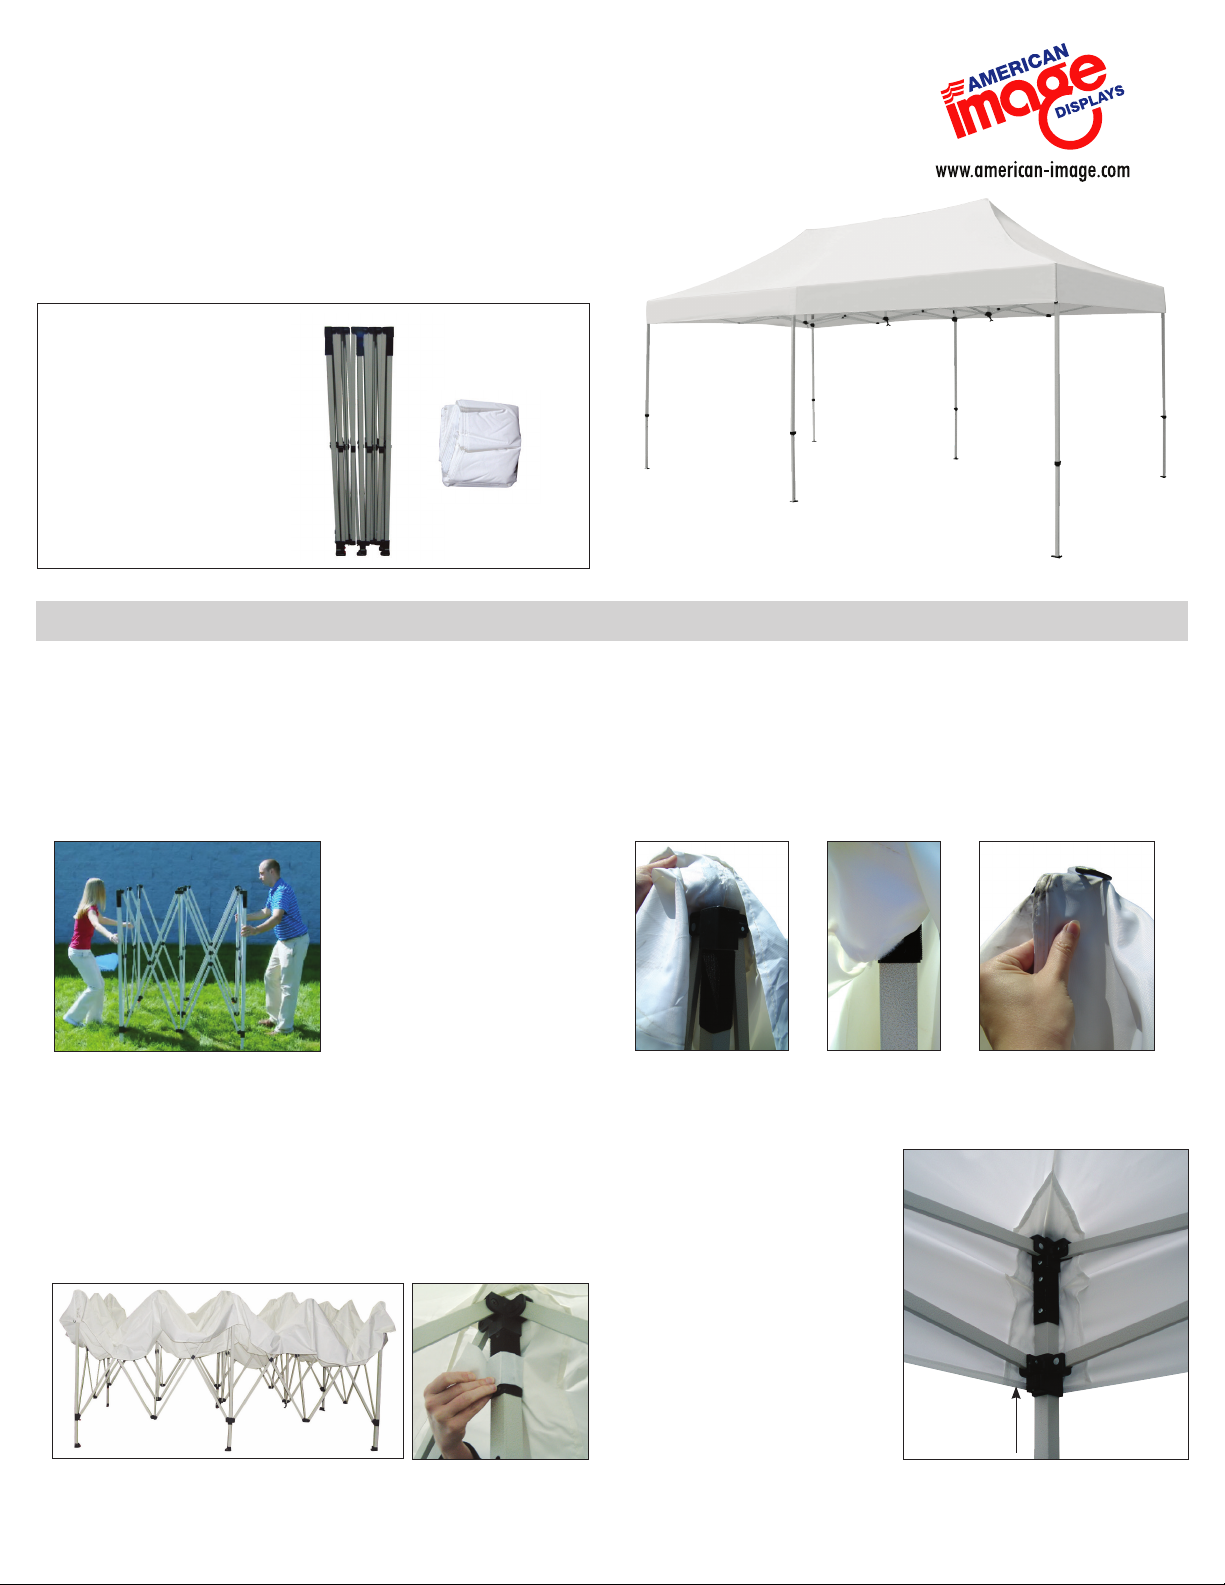
Product Parts
1 - Frame
2 - Canopy
ShowStopper Deluxe 10' x 20' Tent
Set-Up
Step 1
Remove the tent from the bag and placing it at your
desired location.
In tandem with another person, separate the legs of the
tent until they are extended a full arms length.
Step 2
Unfold your Canopy (2) and drape over the tent’s Frame (1).
Attach the Canopy (2) by connecting the loop strips on the
canopy corners with the hook strips on the frame’s four legs.
Position the canopy’s apex with the center poles of the Frame (1).
Step 3
Separate the frames legs. About halfway open, attach
the loop in the middle of the Canopy (2) to hook on the
middle legs on each side. Continue to open the frame
until fully extended. The frame will open a little at a time so
alternate ends until the Frame (1) no longer expands.
Step 4
Lift the expanding section
of the frame upwards until
the sliding connectors lock
into place on the frame’s
legs.
1
2
4/12
Warranty Information: All products are designed to provide the user with a cost-effective and durable product. Standard warranty is a ‘one year parts and labor’ warranty which
warrants product against defects in material and workmanship. It does not cover damage due to accidents, abuse, or normal wear and tear. Products found to be defective will
be replaced or repaired at factory’s discretion.
Set-Up Continued...
Care
Storage
Place all product parts into either your provided dust cover, and store in a
cool dry location.
To clean, wipe with damp cloth.
Step 5
Once set, release and extend
the telescoping legs. Raise the
tent to your desired height and
lock the legs into place
Step 6
Lift the three apexes of
the canopy up into place
by turning the cranks
located on the center of
the expanding frame. Turn
counterclockwise until the
canopy is taut.
Secure with Stakes - Sold Separately
Simply drive the stakes through the holes in the feet and
into the ground to secure.
Secure with Ballast - Sold Separately
Simply strap the Ballast to the legs and fill with water or
sand.
Dust cover is for storage
only & is not a carry case

Popular Tent manuals by other brands

Jack Wolfskin grand illusion ii/ grand illusion iv manual 

Jack Wolfskin

Jack Wolfskin grand illusion ii/ grand illusion iv manual 

Nemo BUGOUT 9x9 quick start guide

Nemo

Nemo BUGOUT 9x9 quick start guide

Kiwi Camping KC077-057 manual

Kiwi Camping

Kiwi Camping KC077-057 manual

SunnyTent Oval M manual

SunnyTent

SunnyTent Oval M manual

Outdoor Connection Easy Up 2 instructions

Outdoor Connection

Outdoor Connection Easy Up 2 instructions

Alaska Tent & Tarp Prospector & Miner Framed Wall Tent Setup instructions

Alaska Tent & Tarp

Alaska Tent & Tarp Prospector & Miner Framed Wall Tent Setup instructions

Caribbean Blinds Outdoor Living Pod Operation and maintenance instructions

Caribbean Blinds

Caribbean Blinds Outdoor Living Pod Operation and maintenance instructions

Alice's Garden DIVIO manual

Alice's Garden

Alice's Garden DIVIO manual

TMG TMG-GH2525 product manual

TMG

TMG TMG-GH2525 product manual

PahaQue R-Pod Side Tent Setup instructions

PahaQue

PahaQue R-Pod Side Tent Setup instructions

SUNRAY 851028 Care Instructions

SUNRAY

SUNRAY 851028 Care Instructions

Expondo MSW-MBT-05 user manual

Expondo

Expondo MSW-MBT-05 user manual

GigaTent Dream Catcher owner's manual

GigaTent

GigaTent Dream Catcher owner's manual

Clas Ohlson COMET 4 manual

Clas Ohlson

Clas Ohlson COMET 4 manual

Coleman Air Awning Instructions for use

Coleman

Coleman Air Awning Instructions for use

Coleman ELITE SUNDOME 2000004659 manual

Coleman

Coleman ELITE SUNDOME 2000004659 manual

canvascamp PATROL Assembly instructions

canvascamp

canvascamp PATROL Assembly instructions

Vango DELTA ALLOY TENT PITCHING INSTRUCTIONS

Vango

Vango DELTA ALLOY TENT PITCHING INSTRUCTIONS

manuals.online logo
manuals.online logoBrands
  • About & Mission
  • Contact us
  • Privacy Policy
  • Terms and Conditions

Copyright 2025 Manuals.Online. All Rights Reserved.