American Standard Gold 824 User manual

American Standard Gold 824
Smart Control User Guide
The Gold 824 is an easy-to-
use, programmable control
with a color touch-screen.
When connected with
American Standard®Home
you can control your home’s
heating and cooling system
and up to 230 separate
Z-Wave™devices from a
smartphone, PC or tablet
from virtually anywhere.
This guide will help you
congure and connect your
Gold 824 Smart Control
quickly and easily.
012-5060-06C-EN
Start using your
new Gold 824
now! See “Start
Here!” on page
3.

page 2 824 User Guide
Thank you for choosing the American Standard
Gold 824 Smart Control. The intuitive interface
and powerful features incorporated into the
compact design of the color touch-screen control
represent the latest in climate control technology
from the industry’s leader in residential HVAC
systems.
This guide will introduce you to the unit’s many
features and get you started using your Gold 824
Smart Control right away.
The Gold 824 Smart Control can be accessed
remotely with your smart device and it can serve
as the central hub of an entire network of smart
home devices. To fully enjoy these benets your
Gold 824 must be connected to an American
Standard Home account. American Standard
Home provides an all-in-one cloud based app
that allows you to access your Gold 824 anytime/
anywhere connecting your smart devices
through Z-Wave technology. See the full line of
available features and functions at:
http://www.asairhome.com
For tutorials search: Gold 824.
American Standard Home allows you to:
• Monitor and control your HVAC system using
an internet-enabled smartphone, tablet or
computer from anywhere in the world.
• Build a network of up to 230 Z-Wave enabled
products on one account.
• View weather information including outdoor
temperature, ve-day forecasts, radar and
weather alerts.
• Receive text and e-mail notications that
inform you of happenings in your home.
• Receive software updates automatically.
• Automatically adjust your temperature set
points, helping to reduce your overall energy
consumption by learning your comfort
preferences.
Congratulations!
User Setup Wizard................................................... 3
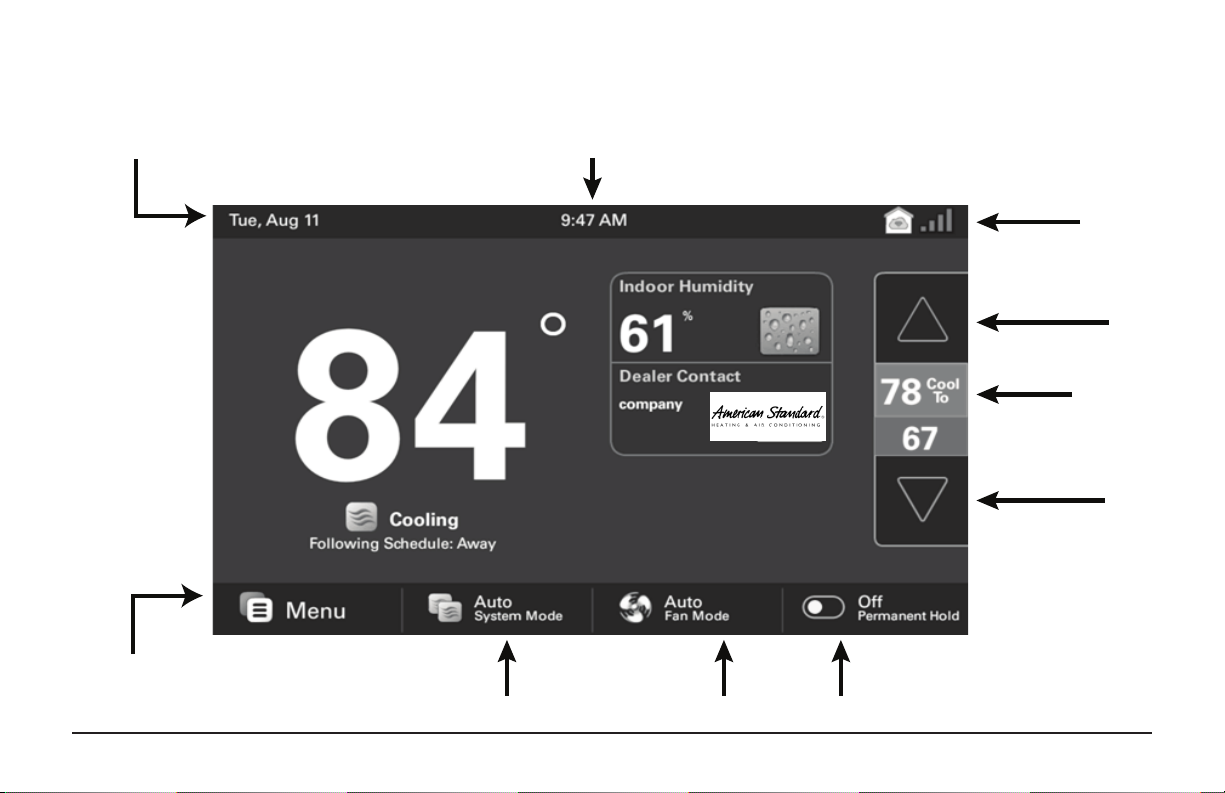
Navigating the Control .........................................4
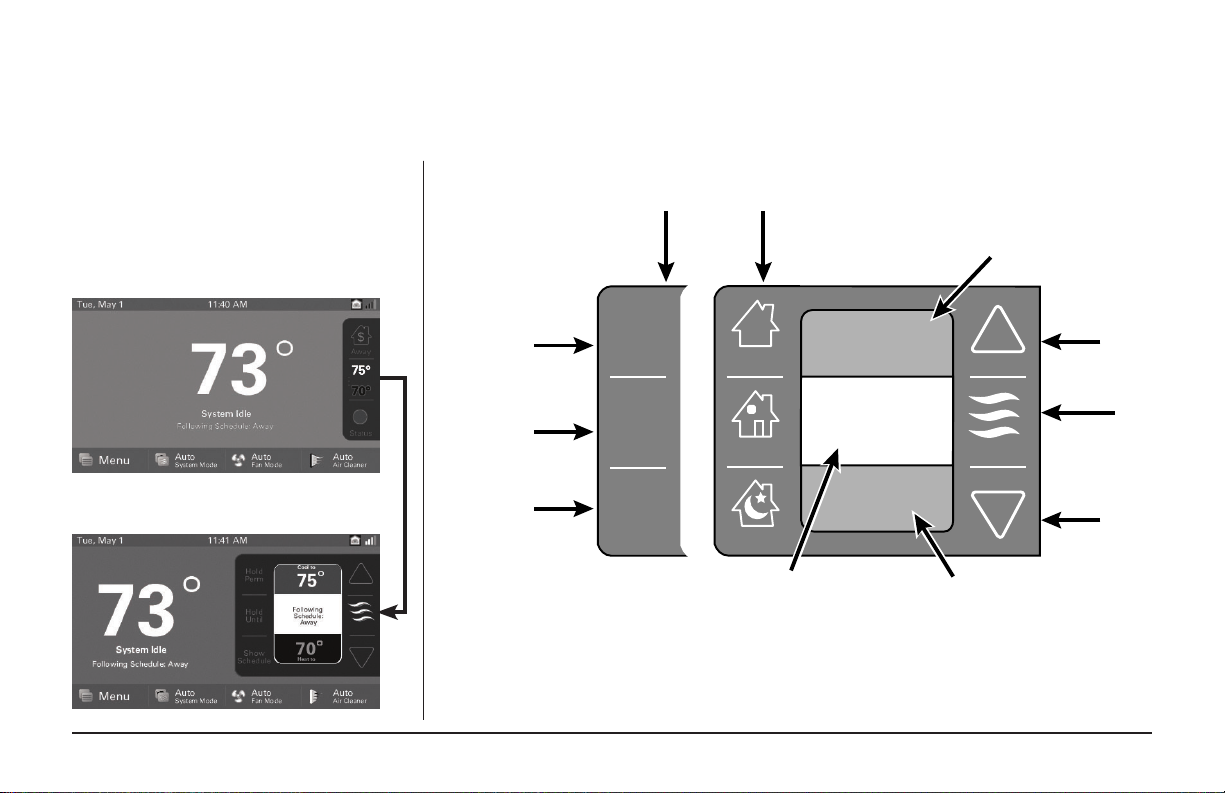
Temperature Control Panel .................................7
Home Screen - Simple View ................................ 8
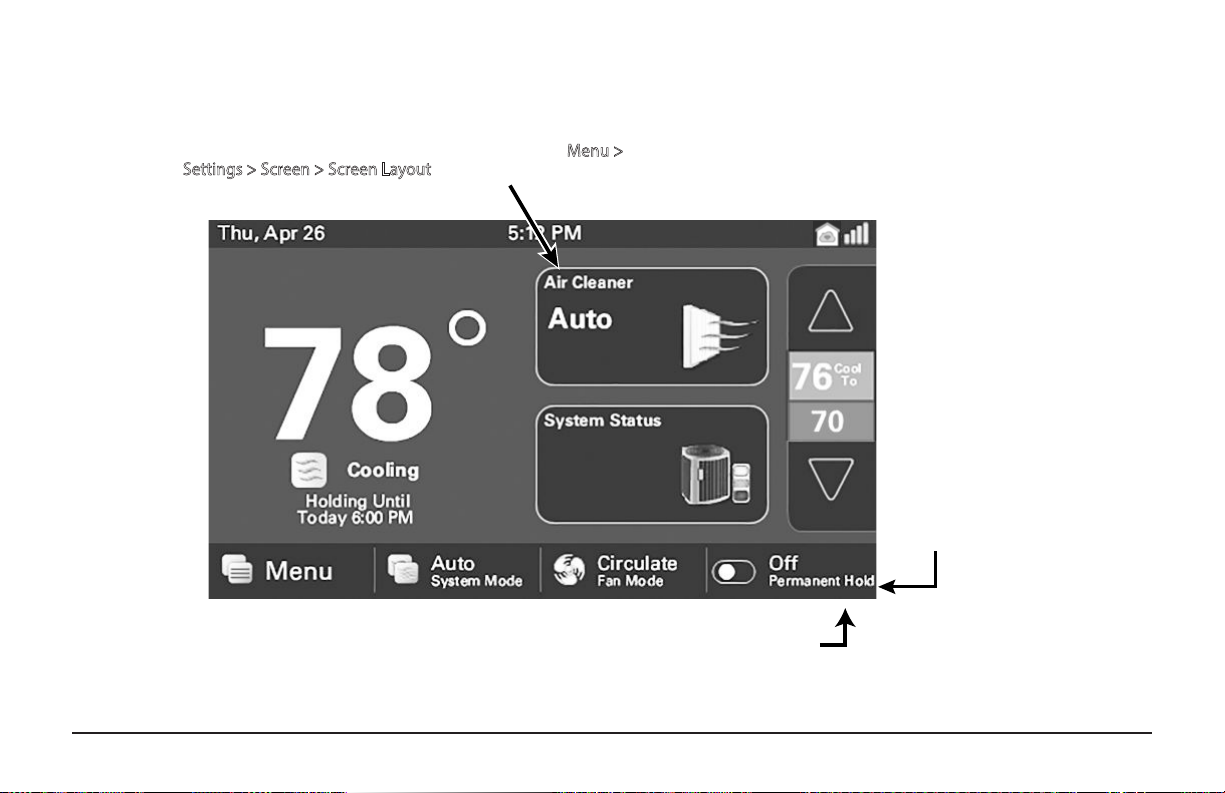
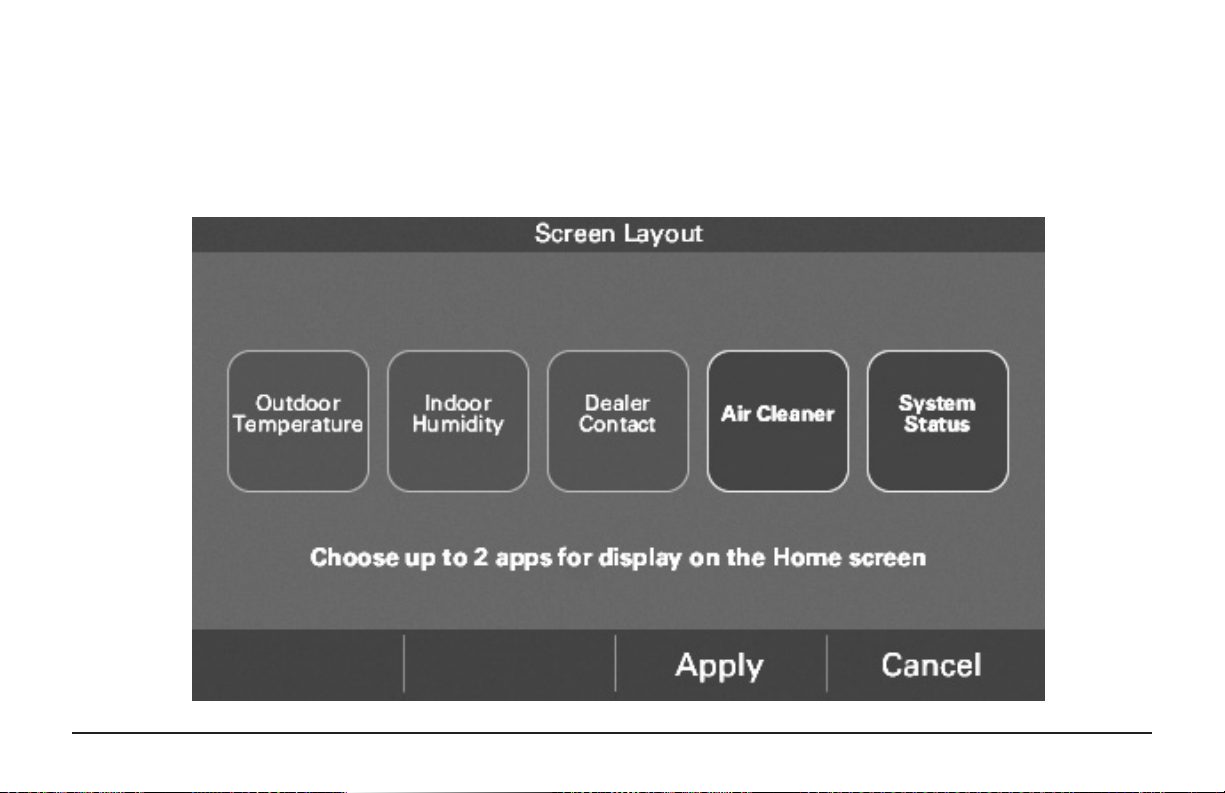
Home Screen Customization.............................. 9
Menu Screen...........................................................10
Settings Screen......................................................11
Scheduling ..............................................................12
Changing Periods..................................................14
Adding Periods ......................................................15
Deleting Periods....................................................16
Overriding Schedules..........................................17
Conguring 1-Touch Presets.............................18
Setting Access Restrictions................................20
American Standard Home ................................21
Network Setup.......................................................22
American Standard Home Registration........24
Adding/Removing Z-Wave Devices................26
Adding Z-Wave Devices (via mobile app) ....27
Advanced Z-Wave Settings................................28
Other Features .......................................................30
Notices ......................................................................31
FCC Notice ...............................................................31
IC NOTICE.................................................................31
Contents
Up to eight smart controls of any combination of the
1050, 850, 824 and 624 are allowed on your American
Standard Home account for no additional cost. A monthly
subscription charge may apply beyond this number of
devices.

012-5060-06C-EN page 3
The User Setup
Wizard guides
you through the
Gold 824’s user
configurable
settings.
To complete the Setup Wizard and connect the
Gold 824 to American Standard Home, you need:
• A high-speed connection to the Internet
(wired or wireless)
• Your wireless (WiFi) network name and
password
• An internet browser
• A valid e-mail address
To access the User Setup Wizard, select
MENU>SETTINGS>USER SETUP WIZARD.
When the Setup Wizard is activated, the process
cannot be cancelled. The Wizard will guide you
through the following steps:
Screen Settings
• Adjust the Screen brightness, backlight, screen
saver and color themes.
Screen Layout
• Choose up to two widgets to display on the
Home screen.
Schedule Settings
• Set the Gold 824 scheduling feature to
enabled or disabled. When Scheduling is
disabled, 1-Touch Presets are available.
Guided Scheduling (Scheduling Enabled)
• Automatically create schedules based on
answers to a series of questions.
1-Touch Presets (Scheduling Disabled)
• Congure heating and cooling target
temperatures for Home, Away and Sleep
conditions. The Presets are selectable from the
Home Screen.
Network Setup
• Select your wireless network and enter your
password. If your wireless network is available
but not shown in the list, select Hidden
Network, and manually enter your network’s
name (SSID).
NOTE: If you are having diculty enrolling
the Gold 824 to your account, visit the
troubleshooting section at www.asairhome.com
for help.
American Standard Home registration
(requires Internet connection)
• Your Gold 824 control comes equipped
with remote access and other features from
American Standard Home.
Weather (requires American Standard Home
registration)
• Input the Zip Code of the location for
appropriate weather information including
ve-day forecasts, radar display and weather
alerts.
That’s it! You can now begin enjoying the
benets of your new American Standard Gold
824 Smart Control!
NOTE: Wireless Setup is not required when the
Gold 824 is hard-wired to your home network.
Start Here!
Menu
Settings
Accessing the User Setup Wizard
User Setup Wizard

page 4 824 User Guide
Navigating the Control Home Screen - Simple View
Notifications and System Alerts
Date and
Time
Heating and
C
ooling
Set Points
Thermostat
Menu
System Mode
(Auto/ Heating/Cooling/
Off/Emergency Heat)
Fan Mode
(Auto/On/Circulate)1-Touch Presets
(Off/Home/Away/Sleep)
Increase
the
set point
Decrease
the
set point
Default Home Screen can be customized with several
widgets. To learn more about this feature see the
section in this user guide about customization.
American Standard Home
and Network
Status

012-5060-06C-EN page 5
Home Screen View
Homeowners may toggle between Home Screen Options
by selecting: Home Screen > Menu > Settings > Screen >
Home View Options. Select Simple View or Classic View.
Simple View
Classic View
OR
NOTE: Simple View is the default view.

page 6 824 User Guide
Notifications and System Alerts
Date and Time
Heating and
Cooling Set Points
T
emperature
Control Panel
T
hermostat
Menu
System Mode
(Auto/ Heating/Cooling/
Off/Emergency Heat)
Fan Mode
(Auto/On/Circulate)
Air Cleaner Mode
(On/Off)
1-Touch presets
(Off/Home/Away/
Sleep)
American Standard Home
and Network
Status
Home Screen - Classic View
Home Screen can be customized with several widgets. To learn more
about this feature see the section in this user guide about customization.

012-5060-06C-EN page 7
The Temperature Control Panel is where target
temperatures are manually set and adjusted.
The panel is shown on the Classic View Home
Screen only.
Temperature Control Panel
Hold
Until
Show
Schedule
Hold
Perm 82º
62º
Away
$
Home
Sleep
Increase
the
set point
Decrease
the
set point
Cooling Set Point
(select to change)
Available when
Scheduling is Enabled
Available when
Scheduling is Disabled
Activate 1-Touch Presets
Heating Set
Point (select to change)
Schedule Status Area
Mode
Indicator
OR
Disable Schedule
and maintain
current
temperature
settings.
Temporarily
overrides
Schedule
View and edit
Schedule
Select Heating and Cooling Set-points to
show panel.

page 8 824 User Guide
Home Screen - Simple View
To maintain a temperature indefinitely, adjust the setpoint to the desired temperature
and select the Permanent Hold button. It will then display ON, and the control will
maintain that temperature setpoint until you manually change it. Select the Permanent
Hold button again to turn Permanent Hold OFF. The Control resumes following the
schedule.
Optionally, up to 2 widgets may be chosen to appear on your
home screen. They can be selected by navigating to Menu>
Settings>Screen > Screen Layout
When scheduling is
enabled, the Preset
button is disabled
and a Permanent
Hold button is
displayed. The
system will follow the
custom schedule
you’ve created. You
may override the
schedule by adjusting
the temperature
settings with the
up/down arrows at
the right of the
screen. At the next
period change, the
schedule will resume.

012-5060-06C-EN page 9
Home Screen Customization
Homeowners may customize the Home Screen by
selecting: Menu > Settings > Screen > Screen Layout
Choose up to two widgets (or apps) to show up on the Home Screen.
Make selection and select Apply.

page 10 824 User Guide
Menu Screen
Dealer contact
information
Smart
Optimization
Indoor Humidity &
Humidity Target
Ventilation Options (Requires
accessory Ventilation System)
User settings
(see Settings
Screen)
Z-Wave bridge
functions
Edit your schedule (when scheduling
is enabled) or edit 1-Touch Presets
(when scheduling is disabled)
Enable/Disable Scheduling at
Menu>Schedules & Presets
Weather, 5-Day Forecast,
Radar and Weather
Alerts.
System Information: Alerts,
Demand Response,
Notifications, and About
Navigate to Menu Screen by selecting: Home Screen > Menu

012-5060-06C-EN page 11
Settings Screen
System maintenance and
service reminders
Temperature scale,
Deadband,
Calibration* and
Displayed Outdoor
Temperature
Sensor source
Modify screen brightness,
backlight timer, screensaver,
and color theme
Manually upgrade
software
User Setup Wizard
* Allow at least 1 hour for the Control to acclimate to the ambient room conditions. Temperature display may be inaccurate during the acclimation period.
Restart the
thermostat
Connect to a Wi-Fi
network. Enable/Disable
wireless connection,
access Advanced Setup,
Network Properties and
Diagnostics
Navigate to Settings Screen by pressing: Home Screen > Menu > Settings
Manually set the Date, Time and Time
Zone. No need to update when
connected to American Standard Home.

page 12 824 User Guide
Schedule Screen
Add a
period
Change
start or stop
times
Delete a
period
Use the
Up and
Down
arrows to
change
values
Press in the
gray area to
rename the
Period
Group days under the
same schedule
Guided Schedule Tool Return to
the Menu
The current day or group
of days is highlighted
Press in the red or blue area, then adjust the Set Point
using the up and down arrows
Navigate to Scheduling Screen by selecting: Home Screen > Menu > Schedules & Presets > Custom Schedule

012-5060-06C-EN page 13
Grouping Screen
Then select the days to be grouped or removed from
the group. Select Apply. The previous Scheduling
screen will appear. Whenever a set point or period
start or stop time is changed the entire group of days
will change to the new set point and period time.
Select
Grouping to use the same set points and times
for multiple days.
HINT: To copy a schedule between days, group them, select Apply, then open the grouping menu and de-select the days. Select Apply again.
Navigate to Grouping Screen by selecting: Home Screen > Menu >
Schedules & Presets > Custom Schedule > Grouping

page 14 824 User Guide
To change Periods select: Home Screen > Menu > Schedules & Presets >
Custom Schedule > Select Schedule Time
Changing Period Start or End Times
1. Select anywhere in the Period to make it
active. Other Periods will dim and the Start
and End times for this Period will be in a
black box.
2. Select the TIME START or TIME END and
adjust the time using the UP and DOWN
arrows. NOTE: The Gold 824 uses intelligent
technology and will not allow setting an
illogical start or end time. Periods must be
at least 30 minutes in duration.
Changing Period Set Points
1. Select the active Period’s Cooling or Heating
Set Point.
2. Adjust the Set Point using the UP or DOWN
arrows.
Changing the Period Name
1. Select the PERIOD NAME (Wake, Away,
etc.).
2. Select a predened name or select NEW
and select NEXT.
3. If selecting a new name, enter the name
using the on-screen keyboard.
4. Select NEXT.
When all changes have been made, select APPLY
to save and exit, or select CANCEL to discard all
changes that were made to this Schedule.
Changing Periods
Schedule Mon Tue Wed Thu Fri Sat Sun
6:00 am 8:00 am 6:00 pm 10:00 pm
78º
70º
85º 78º
70º
82º
62º62º
Wake
Time
Start
Time
End
Away Home Sleep
Apply Cancel
Select Apply to save
changes and exit
Adjust Start and
End Times
Press in the red or blue area, then adjust
the Set Point using the up
and down arrows
Press in the gray area
to rename the period
Use the Up and
Down Arrows to
change values

012-5060-06C-EN page 15
The Gold 824 Smart Control is capable of
adjusting the temperature settings throughout
the day according to a user-programmable
schedule.
Each day of the week can have its own unique
schedule, and each day can have a maximum of
four Periods.
Important: Scheduling must be enabled before a
schedule can be dened.To verify that Scheduling
is enabled, navigate to MENU>SCHEDULES &
PRESETS and verify that the USE SCHEDULES
button is set to ON.
To set or modify schedules, navigate to HOME >
MENU > SCHEDULES & PRESETS > CUSTOM
SCHEDULE or select SHOW SCHEDULES from
the Temperature Control Panel.
Periods dene the time of day when the target
temperature is adjusted. Each day can have from
1-4 Periods, and each day can have dierent
number of periods. The Scheduling Screen
shows the start time for each Period highlighted
across the top row.
Adding Periods
1. Select ADD PERIOD, the Add Period Screen
is displayed.
2. Select the green circle where you would like
to insert a Period.
3. Choose a name for the new Period or select
New to dene a custom name and select
NEXT.
4. If selecting a new name, enter the name
using the on-screen keyboard.
5. Select NEXT.
6. Add additional periods, the maximum per
day is 4.
7. Select APPLY to save your changes and
return to the Schedule Screen. The new
period should be displayed.
Adding Periods
Add Period
Apply Cancel
6:00 am 8:00 am 6:00 pm 10:00 pm
78º 85º 78º 82º
70º 62º 70º 62º
Wake Away Home Sleep
Select the green target to insert a new period
Navigate to Add Period by selecting: Home Screen > Menu > Schedules & Presets >
Custom Schedule > Add Period

page 16 824 User Guide
Deleting Periods
1. From the Schedule Screen select DELETE
PERIOD, the Delete Periods Screen is
displayed.
2. Select the TRASH CAN icon in the Period(s)
you wish to delete. Note that each day must
have at least one Period.
3. Select APPLY to save your changes and
return to the Schedule Screen. The changes
should be reected in the display.
Deleting Periods
Delete Periods
6:00 am 8:00 am 6:00 pm 10:00 pm
78º
70º
85º 78º
70º
82º
62º62º
Wake Away Home Sleep
Apply Cancel
Save changes and exit
Select the trash can to mark a period for deletion
Navigate to Delete Periods by selecting: Home Screen > Menu > Schedules & Presets >
Custom Schedule > Delete Period

012-5060-06C-EN page 17012-5060-06 page 17
NOTE: These functions require Scheduling to
be enabled. To enable Scheduling, go to HOME
> MENU > SCHEDULES & PRESETS > USE
SCHEDULES ON.
Hold Until
Follow these steps to override a schedule until a
specied time.
1. Press in the INDOOR TEMPERATURE area
to reveal the Temperature Control Panel.
2. To change the Cooling Set Point, select
the blue COOLING SET POINT. The Mode
Indicator will display blue wavy lines.
Use the UP and DOWN Arrows to adjust the
Set Point to the desired temperature.
3. To change the Heating Set Point, select
the red HEATING SET POINT. The Mode
indicator will display red wavy lines.
Use the UP and DOWN Arrows to adjust the
Set Point to the desired temperature.
4. To change the duration of the Hold, press
in the STATUS AREA. The day will appear
in bold type.
5. Use the UP and DOWN arrows to select the
day when the hold will cancel.
6. Press in the STATUS AREA again to toggle
to the Time setting. The Time will appear in
bold type.
7. Use the UP and DOWN arrows to select the
time when the hold will cancel.
8. Press in the INDOOR TEMPERATURE area
to return to the Home Screen.
9. The words“Holding Until” will appear under
the Indoor Temperature.
Hold Permanently
Follow these steps to permanently override a
schedule. The changes you make will be held
until you cancel the hold.
1. Press in the INDOOR TEMPERATURE area
to reveal the Temperature Control Panel.
2. To change the Cooling Set Point, select
the blue COOLING SET POINT. The Mode
Indicator will display blue wavy lines.
Use the UP and DOWN Arrows to adjust the
Set Point to the desired temperature.
3. To change the Heating Set Point, select
the red HEATING SET POINT. The Mode
Indicator will display red wavy lines.
Use the UP and DOWN Arrows to adjust the
Set Point to the desired temperature.
4. Select HOLD PERM. The words “Hold Perm”
will appear in bold type.
5. Press in the INDOOR TEMPERATURE area
to return to the Home Screen.
The display will indicate Hold Permanently
below the Indoor Temperature.
Cancelling an Override
To cancel Permanent Hold or Hold Until, follow
these steps.
1. Press in the INDOOR TEMPERATURE area
to reveal the Temperature Control Panel.
2. To cancel Hold Until, select HOLD UNTIL
and the words“Hold Until”will dim.
To cancel Permanent Hold, select HOLD
PERM. The words “Hold Perm” will dim.
3. Press in the INDOOR TEMPERATURE area
to return to the Home Screen.
The words“Following Schedule” will appear
below the Indoor Temperature.
Overriding Schedules

page 18 824 User Guide
1-Touch Presets provide predetermined Heating
and Cooling Set Points for Home, Away and Sleep
time periods.
NOTE: 1-Touch Presets require Scheduling to be
disabled. To disable Scheduling, go to HOME
> MENU > SCHEDULES & PRESETS > USE
SCHEDULES OFF.
When scheduling is disabled, heating and
cooling set points are maintained indenitely.
When a temperature change is desired, the user
must manually adjust the Gold 824 Control to the
new setting.
Conguring 1-Touch Presets
1. To change the Cooling Set Point, select the
blue COOLING SET POINT to activate the
setting. The current System Mode indicator
will display blue wavy lines.
Use the UP and DOWN Arrows to adjust the
Set Point to the desired temperature.
2. To change the Heating Set Point, select the
red HEATING SET POINT area to activate
the setting. The current System Mode
indicator will display red wavy lines.
Use the UP and DOWN Arrows to adjust the
Set Point to the desired temperature.
Conguring 1-Touch Presets
82º
62º
Away
Away
Away Preset
Temperatures
$
Home
Sleep
Increase active
set point
Decrease active
set point
Cooling Set Point
(select to change)
Adjust
presets
Heating Set Point
(select to change)
Current
mode
Navigate to Conguring 1-Touch Presets by selecting:
Home Screen > Menu > Schedules & Presets > 1-Touch Presets
3. Repeat the process for Home and Sleep
settings.
4. Select APPLY, then HOME to return to the
Home Screen.
NOTE: When Scheduling is enabled, only the
Away preset is available and can be used for
energy savings.

012-5060-06C-EN page 19
Conguring 1-Touch Presets
1-Touch Presets provide predetermined Heating
and Cooling Set Points for Home, Away and Sleep
time periods.
NOTE: 1-Touch Presets require Scheduling to be
disabled. To disable Scheduling, go to HOME >
MENU > SCHEDULES & PRESETS > Toggle USE
SCHEDULES to OFF, or if scheduling is disabled
touch icon on home screen.
When scheduling is disabled, heating and cooling
set points are maintained indenitely. When a
temperature change is desired, the user must
manually
adjust the Gold 824 Control to the new
setting.
Conguring 1-Touch Presets
1. To change the Cooling Set Point, select the
blue COOLING SET POINT to activate the
setting. The current System Mode indicator
will display blue wavy lines.
Use the UP and DOWN Arrows to adjust the
Set Point to the desired temperature.
2. To change the Heating Set Point, select the
red HEATING SET POINT area to activate the
setting. The current System Mode indicator
will display red wavy lines.
Use the UP and DOWN Arrows to adjust the
Set Point to the desired temperature.
3. Repeat the process for Home and Sleep
settings.
4. Select APPLY, then HOME to return to the
Home Screen.
NOTE: When Scheduling is enabled, only the Away
preset is available and can be used for energy
savings.

page 20 824 User Guide
Setting Access Restrictions
To select access restrictions select: Home Screen > Menu > Settings >
Screen > Access Restrictions
Other manuals for Gold 824
3
Table of contents
Other American Standard Control System manuals