Ametek CAN-Communicator User manual

072-101929
SPARTAN CHASSIS
LIGHTBAR MESSAGE CENTER
USER GUIDE

Page 2of 45 072-101929
Table of Contents
DESCRIPTION ................................................................................................................4
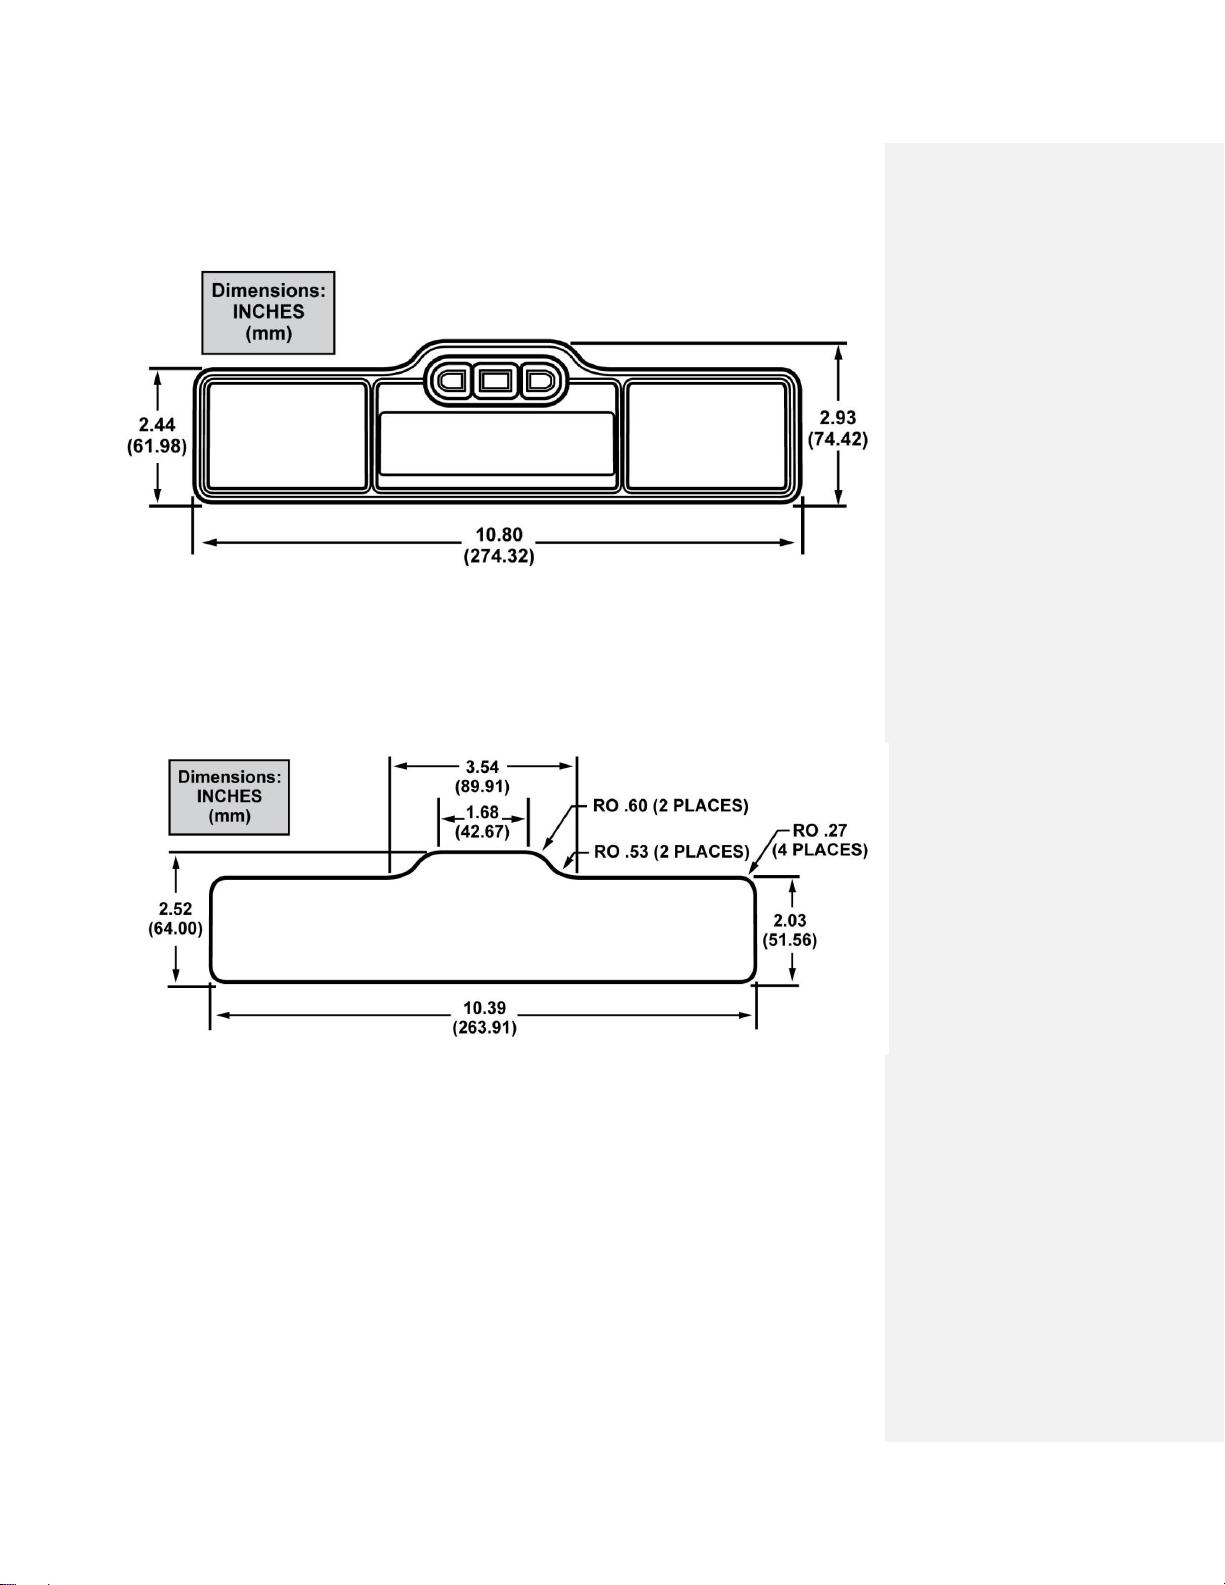
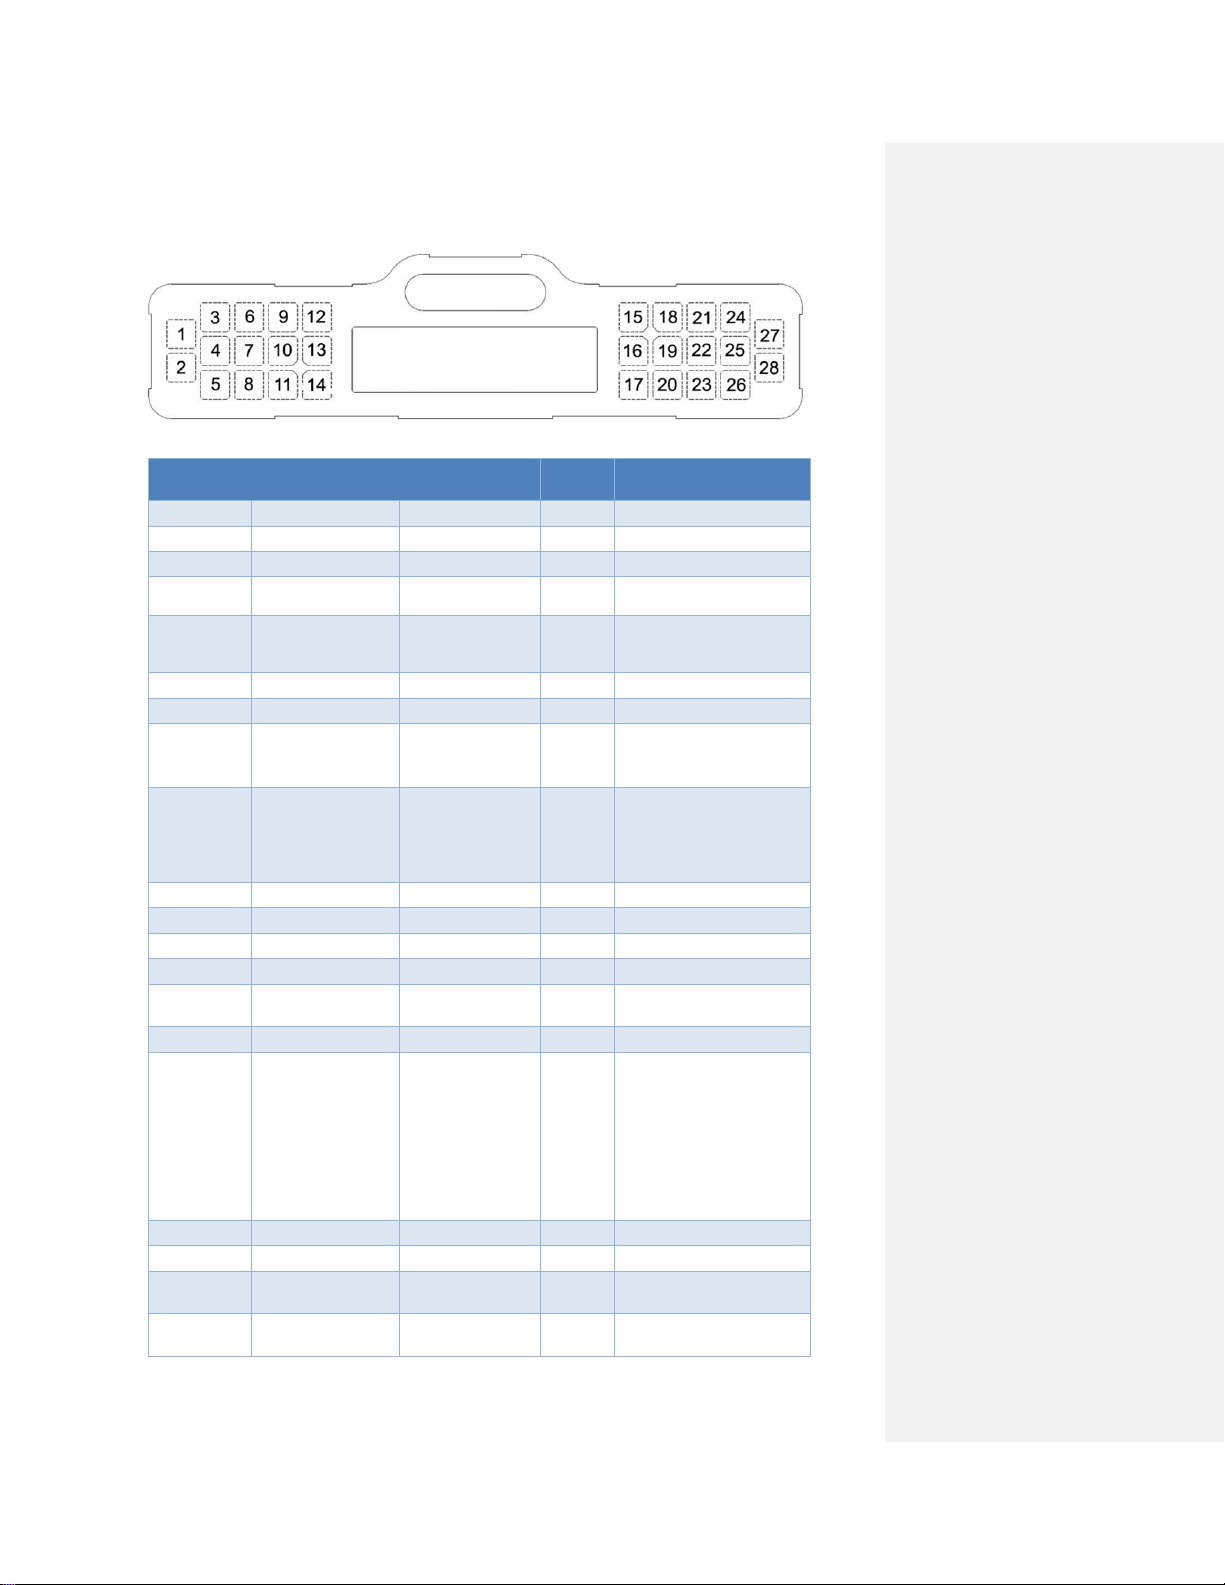
SPECIFICATIONS...........................................................................................................5
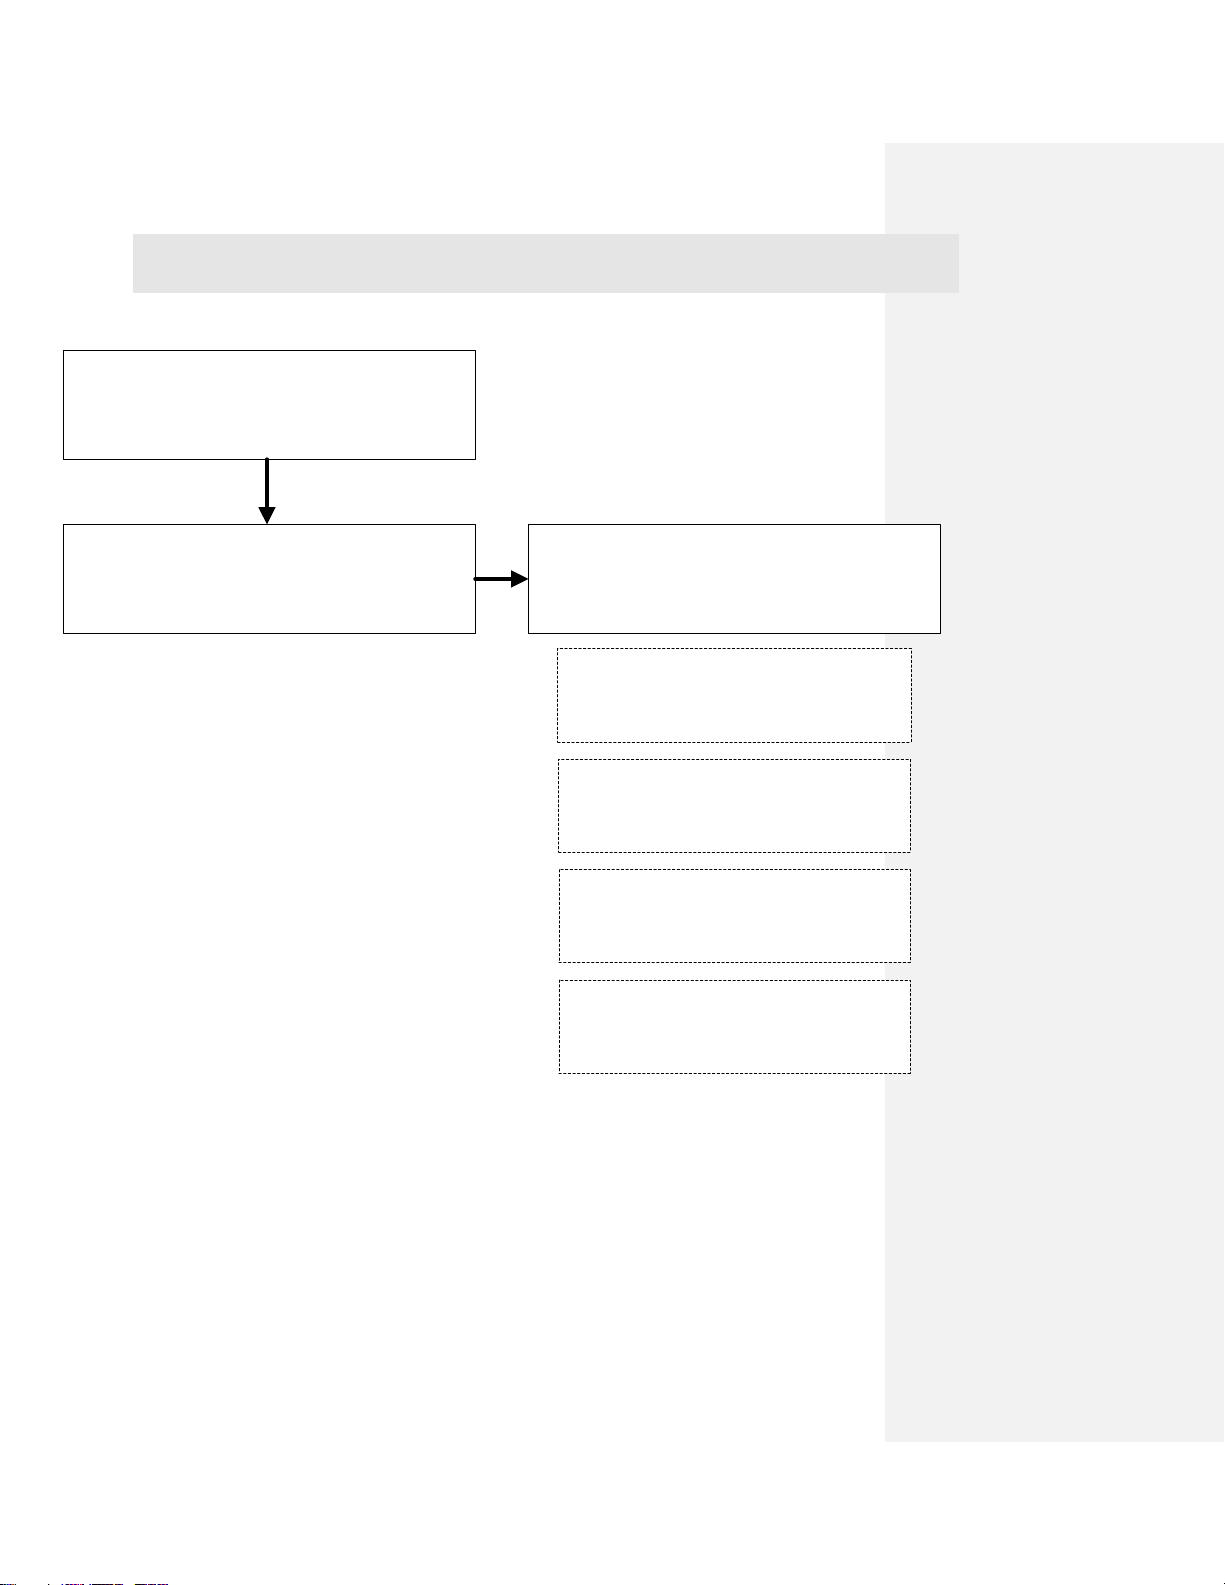
SCREEN MENU OVERVIEW ......................................................................................10
SCREEN MENU DETAIL..............................................................................................11
POWER UP .................................................................................................................11
DATA..........................................................................................................................12
MAIN MENU - OVERVIEW.......................................................................................14
MAIN MENU - WARNINGS ......................................................................................15
MAIN MENU –WARNINGS......................................................................................16
POP UP MESSAGES...............................................................................................16
DEF LEVELS ..........................................................................................................18
MAIN MENU - DIAGNOSTICS .................................................................................19
MAIN MENU –SELF TEST .......................................................................................22
AUTO SELF TEST..................................................................................................23
DIGITAL INPUTS...................................................................................................24
SWITCHED OUTPUTS...........................................................................................25
ANALOG INPUTS ..................................................................................................26
VERSION ................................................................................................................27
MAIN MENU –SET UP..............................................................................................28
OVERVIEW ............................................................................................................28
DATA SETUP..........................................................................................................29
UNITS SETUP.........................................................................................................33
CONTRAST.............................................................................................................34
BRIGHTNESS .........................................................................................................35
SERVICE.................................................................................................................36
COMPASS...............................................................................................................40

Page 3of 45 072-101929
Every effort has been made to keep the information in this document current and
accurate as of the date of publication or revision. However, no guarantee is given
or implied that the document is error-free or that is accurate with regard to any
specification. AMETEK VIS reserves the right to modify product designs and
specifications without notice.
Document# 072-101929 Revision Table
REVISION
DATE
DESCRIPTION OF CHANGE
A
Initial Release
B
3/15/17
Updated screen menus to match rotated
version of LMC
C
3/30/17
Added Compass Screens, Trip, Fuel
Economy, and DEF

Page 4of 45 072-101929
DESCRIPTION
The CAN-Communicator (C-COM) Lightbar Message Center (LMC) combines the
advantages of a graphic display with a 28-telltale lightbar. This rugged and
versatile message center can be used exclusively, or as a compliment, to any
existing instrumentation simply by connecting it to an SAE J1939 (CAN) data bus.
The LMC displays data and diagnostics, both active and stored faults from the
individual ECMs, directly from the vehicle data bus.
There are 3 buttons for navigating the screens through an intuitive menu system,
displaying diagnostics, parametric data and popup warnings. Diagnostic
capabilities include both active and stored fault codes from the ECU. Data can be
viewed in a graphical or numeric presentation.
The message center is designed for additional flexibility to the user. The setup
menu screens provide customization of how the data is presented, units to be
switched to English or metric and setting of the display contrast and brightness. A
service alarm can also be set for hours or distance.
The graphics LCD is 340 pixels wide and 90 pixels high, providing clear, legible
graphics. Backlighting can be controlled through the menu or an external dimmer.
The 28 dead-fronted telltales are customizable.
LMC is sealed to IP67 specifications both front and rear of the gauge and operates
from 9 to 32 volts DC. The LMC has 2 CAN J1939 data bus interfaces, J1708 data
bus interface, analog and switched inputs, as well as switched outputs. One of the
CAN interfaces can be used as SAE J1587 to drive NGI gauges or to communicate
on the vehicle data bus
This user guide is intended to help you set up the C-COM LMC, understand
product features and navigate the menu system.

Page 5of 45 072-101929
SPECIFICATIONS
Physical Characteristics
Housing and bezel material: Black polycarbonate ABS plastic
Connector: 34-pin AMP superseal, polarized and locking
Environmental Characteristics
Temperature, humidity, shock, vibration, and salt spray: Meets or exceeds SAE
#J1455-1994-08
Operating Temperature: -40 to +85oC
Electrical Characteristics
Operating limits: 9 to 32 VDC, reverse polarity protected
Transient protection: Meets or exceeds SAE #J1455-1994-08
Electrical Inputs
Battery/ignition: 9 to 32 volts
Operating current: 3 amperes maximum
Backlighting: Variable through dashlight dimmer control, CAN J1939 message or
through menu selection
Discrete inputs: 8; configurable for switch to ground, switch to battery or analog
Data bus: 2; SAE J1939 (CAN), one can be used as SAE J1587 to drive NGI
gauges or to communicate on the vehicle data bus
Electrical Outputs
Switch to ground: Two, 500 mA each
Display Characteristics
Type: 340 x 90 monochrome, graphics LCD
Viewing angle: 12:00
Backlight color: Standard is White (can be customized to any color)

Page 6of 45 072-101929
Electrical Connections
Mating Connector Amp 4-1437290-0
Pin
Cluster's Input Name
Customer's Function
Channel Configuration
1
Battery
Battery
+12 V Input
2
Ground
Ground
Chassis Ground
3
Ignition
Ignition
+12 V Input
4
J1939 (+)
J1939 (+)
J1939 (+)
5
J1939 (-)
J1939 (-)
J1939 (-)
6
ABS or STG
Not Used
Not Used
7
General Purpose 7
Jacks Down
Ground Switched Input
8
General Purpose 5
Seat Belt
Ground Switched Input
9
General Purpose 6
Antenna Up
Ground Switched Input
10
NGI Power
NGI Power
NGI Power
11
NGI Ground
NGI Ground
NGI Ground
12
NGI (+)/J1939_2 (+)
NGI (+)
NGI (+)
13
NGI (-)/J1939_2(-)
NGI (-)
NGI (-)
14
General Purpose 1
Not Used
Ground Switched Input
15
General Purpose 2
Air Filter Restriction
Ground Switched Input
16
General Purpose 4
Cargo Door Ajar
Ground Switched Input
17
General Purpose 3
Spare
Ground Switched Input
18
Switched Output 2
Output 1
Ground Switched Output
19
Switched Output 1
Output 2
Ground Switched Output
20
NGI Backlight +
NGI Backlight +
NGI Backlight +
21
NGI Backlight -
NGI Backlight -
NGI Backlight -
22
Backlight
Backlight Dimmer Input
PWM
23
Analog 2
Fuel
Resistive Input
24
Analog 4
Ambient Air
Resistive Input
25
Analog 6
Efforts Control
Resistive Input
26
Left Turn/STB
Left Turn
+12 V Input
27
Right Turn/STB
Right Turn
+12 V Input
28
High Beam /STB
High Beam
+12 V Input
29
1708 (-)
J1708 (-)
J1708 (-)
30
General Purpose 8 / J1708 (+)
J1708 (+)
J1708 (+)
31
Analog 1
Lift Out
+12 V Input
32
Analog 3
Remote Button (Left)
+12 V Input
33
Analog 5
Remote Button (Down)
+12 V Input
34
Analog 7
Remote Button (Right)
+12 V Input

Page 7of 45 072-101929
Gauge Dimensions
Panel Cut-Out Dimensions

Page 8of 45 072-101929
Lightbar Telltale Icons
Telltale
Location
Description
LMC's Input
Name
Color
Alarm
1
Not Used
2
Not Used
3
Left Turn
Left Turn
Green
No Alarm
4
ABS System
Fault
J1939 Databus
Amber
No Alarm
5
Automatic
Traction Control
Lamp
J1939 Databus
Green
No Alarm
6
Stop Engine
J1939 Databus
Red
No Alarm
7
Check Engine
J1939 Databus
Amber
No Alarm
8
Malfunction
Indicator Lamp
(MIL)
J1939 Databus
Amber
No Alarm
9
Seat Belt
Seat Belt
Red
Chime (active for 6s
when ignition first turned
on) OR (Seat Belt input
active AND Park Brake
released)
10
Low Coolant
J1939 Databus
Red
No Alarm
11
Water in Fuel
J1939 Databus
Amber
No Alarm
12
High Beam
High Beam
Blue
No Alarm
13
High Idle
J1939 Databus
Green
No Alarm
14
Restricted Air
Filter
Restricted Air
Filter
Red
No Alarm
15
Park Brake
J1939 Databus
Red
No Alarm
16
Check Message
Active when
certain popup
messages are
present. See
popup message
table for which
messages will
light the icon
Amber
No Alarm
17
Aux Brake Active
J1939 Databus
Green
No Alarm
18
Wait to Start
J1939 Databus
White
No Alarm
19
Check
Transmission
J1939 Databus
Amber
No Alarm
20
Transmission
Range Inhibit
J1939 Databus
Amber
No Alarm

Page 9of 45 072-101929
Telltale
Location
Description
LMC's Input
Name
Color
Alarm
21
Cruise Control
Enabled
J1939 Databus
Green
No Alarm
22
Diesel Particulate
Filter (DPF)
J1939 Databus
Amber
No Alarm
23
High Exhaust
System
Temperature
(HEST)
J1939 Databus
Amber
No Alarm
24
Right Turn
Right Turn
Green
No Alarm
25
Cargo Door Ajar
Cargo Door Ajar
Amber
No Alarm
26
Hadley Ride
Height
J1939 Databus
Amber
No Alarm
27
Not Used
28
Not Used

Page 10 of 45 072-101929
SCREEN MENU OVERVIEW
START UP SCREEN
SELF TEST
DIAGNOSTICS
WARNINGS
MAIN MENUDATA SCREEN
SETUP

Page 11 of 45 072-101929
SCREEN MENU DETAIL
POWER UP
1. When power is first applied to C-COM LMC, the display will turn on all pixels for
three seconds.
2. The SPARTAN logo will then be displayed for three seconds.
3. Data screens are now displayed, unless a popup message(s) is active, which will
remain on the display until the condition goes away or the message is dismissed
with a button press.
Screen Blank for
3 seconds
Logo displayed
for 3 seconds
DATA SCREEN

Page 12 of 45 072-101929
DATA
73.1 M
73.1 MTrip 1
73.1 M
25.3 MTrip 2
73.1 M
300 FTrans Temp
73.1 M
150 FAir Temp
Fuel Ave 12 MPG
Fuel Inst 10 MPG
Fuel Left 105 M
100
0MPH
74 Cruise Spd
70 MPH
Heading
3000
0RPM
1950
NW
100
0PSI
18
1200 h V
Eng Hours
250
100 F9
180
75 14
Select
Trans Temp
175 F
R R
Monitor
150
0 PSI
125
Boost
90 PSI
Eng Load
45 %
150
0 PSI
125

Page 13 of 45 072-101929
1. Pressing any button while on a data screen will enable movement from that data
screen and activate icons that indicate what each button press will do. After 5
seconds without further button press, movement from that data screen will be
disabled and the movement icons will go away.
2. Data can be displayed in various formats. Press the right button while movement
is enabled to scroll through the current Data screen options. The last one selected
will remain as the primary Data screen.
3. The Data screens can be added, removed and edited in the Data Setup menu,
which is described in detail in the Setup Menu instructions.
4. Pressing the left button while movement is enabled will display the Main Menu.
5. While viewing either of the trip menus, Trip 1 and Trip 2, holding the Center button
will cause the trip to be reset.
6. To reset the Instantaneous Fuel, “Fuel Inst”, hold the Center button while viewing
the Instantaneous Fuel screen. This can take a few moments as the command to
reset is transmitted to the engine ECU.

Page 14 of 45 072-101929
MAIN MENU - OVERVIEW
1. Press the Right button to scroll through the Main Menu –Warnings, Diagnostics,
Self Test, and Setup. The item will be highlighted as it’s selected. Press the
Center button to access that selection.
2. To return to the Data screen press the Left button with any selection.
Warnings Screens Diagnostic Screens Self Test Screens Setup Screens
DATA SCREEN

Page 15 of 45 072-101929
MAIN MENU - WARNINGS
1. With the Warnings selected from the Main Menu, press the Center button to view
the warnings. Press the Right button, corresponding to the right arrow prompt on
the display, to view each warning message in the list. The total number of
messages is shown at the bottom of the display. If there are no warning
messages, “No Warnings” will be displayed.
2. Return to the Main Menu by pressing the Left button while any of the messages
are displayed.
MAIN MENU - Warnings
Selected
1/2
2/2
Remainder of Warnings
# / #

Page 16 of 45 072-101929
MAIN MENU –WARNINGS
POP UP MESSAGES
Message
LMC's Internal
Buzzer
External
Alarm Output
LMC's Input Name
Check
Message
Acknowledgeable
PARK BRAKE ON -
TRANS NOT IN NEUTRAL
Steady Tone
No
J1939 Databus
Yes
Yes
TRANS IN NEUTRAL -
PARK BRAKE NOT SET
Steady Tone
No
J1939 Databus
Yes
Yes
SEAT BELT WARNING
Chime
No
Seat Belt
Yes
Yes
JACKS DOWN
Steady Tone
No
Jack Down
Yes
Yes
WHEELCHAIR LIFT OUT
Steady Tone
No
Lift Out
Yes
Yes
CARGO DOOR OPEN
Steady Tone
No
Cargo Door Open
Yes
Yes
ANTENNA UP
Steady Tone
No
Antenna Up
Yes
Yes
HADLEY - NOT AT RIDE
HEIGHT
Steady Tone
No
J1939 Databus
Yes
Yes
STOP ENGINE
Steady Tone
No
J1939 Databus
Yes
Yes
WAIT TO START
No
No
J1939 Databus
Yes
Yes
LOW AIR PRESSURE
PRIMARY
No
Yes
J1939 Databus
Yes
Yes
LOW AIR PRESSURE
SECONDARY
No
Yes
J1939 Databus
Yes
Yes
LOW OIL PRESSURE
Steady Tone
Yes
J1939 Databus
Yes
Yes
HIGH BATTERY VOLTAGE
Steady Tone
No
J1939 Databus
Yes
Yes
HIGH COOLANT TEMP
Steady Tone
No
J1939 Databus
Yes
Yes
HIGH TRANSMISSION
TEMP
Steady Tone
No
J1939 Databus
Yes
Yes
LOW BATTERY VOLTAGE
Steady Tone
No
J1939 Databus
Yes
Yes
LOW COOLANT
Steady Tone
No
J1939 Databus
Yes
Yes
AIR FILTER
RESTRICTION
Steady Tone
No
Air Filter Restriction
Yes
Yes
WATER IN FUEL
Steady Tone
No
Yes
Yes
LOW FUEL
Chime (5 sec)
No
J1939 Databus
Yes
Yes
LOW DIESEL EXHAUST
FLUID
Chime (5 sec)
No
J1939 Databus
Yes
Yes
ENGINE DERATED - DEF
LOW
Steady Tone
No
J1939 Databus
Yes
Yes
ENGINE DERATED - DEF
EMPTY
Steady Tone
No
J1939 Databus
Yes
Yes
SPEED RESTRICTED -
DEF EMPTY
Steady Tone
No
J1939 Databus
Yes
Yes
CHECK ENGINE
Steady Tone
No
J1939 Databus
Yes
Yes
CHECK TRANSMISSION
Steady Tone
No
J1939 Databus
Yes
Yes
ABS SYSTEM FAULT
Steady Tone
No
J1939 Databus
Yes
Yes
DPF REGEN ACTIVE
No
No
J1939 Databus
Yes
Yes
HIGH EXHAUST SYSTEM
TEMP
No
No
J1939 Databus
Yes
Yes
DPF REGEN REQUIRED
No
No
J1939 Databus
Yes
Yes
DPF REGEN REQUIRED -
URGENT
Steady Tone
No
J1939 Databus
Yes
Yes

Page 17 of 45 072-101929
Message
LMC's Internal
Buzzer
External
Alarm Output
LMC's Input Name
Check
Message
Acknowledgeable
DPF REGEN REQUIRED -
CRITICAL
Steady Tone
No
J1939 Databus
Yes
Yes
STABILITY CONTROL
ACTIVE
No
No
J1939 Databus
No
Yes
TRACTION CONTROL
ACTIVE
No
No
J1939 Databus
No
Yes
NO DATA
No
No
J1939 Databus
Yes
Yes
NO DATA - ABS
No
No
J1939 Databus
Yes
Yes
NO DATA - ENGINE
No
No
J1939 Databus
Yes
Yes
NO DATA - PRESSURE
TRANSDUCER MODULE
No
No
J1939 Databus
Yes
Yes
NO DATA -
TRANSMISSION
No
No
J1939 Databus
Yes
Yes
TRANSMISSION RANGE
INHIBIT
No
No
J1939 Databus
No
Yes
TURN SIGNAL ON
Chime
No
Left Turn, Right Turn
No
Yes
SERVICE DUE
No
No
Service Alarm
Yes
Yes

Page 18 of 45 072-101929
DEF LEVELS
The DEF Gauge, part of the NGI system in the 4-in-1 multi-gauge, operates as stated in
the above table. LED icons will light as indicated, warning messages will be displayed in
the C-COM LMC, and certain audible tones may be activated.
Notes:
1. Final inducement level is activated when the DEF level is 0% and one of the
following conditions is met:
a. Engine is turned off and restarted, or
b. Engine is allowed to idle for one hour, or
c. Fuel tank is refilled without filling DEF
2. Once a low DEF warning is given, the DEF tank must be filled to at least 15% to
deactive the warning.
3. Once a low DEF warning is given, the Check Engine lamp will flash for 30 seconds
at key on.
4. LCD Messages and audible warnings can be dismissed by pressing any of the
three LCD navigation buttons.
LED Level Indicator DEF Level
DEF
Warning
Lamp
Check
Engine
Lamp
Stop
Engine
Lamp
Audible
Warning
LCD Message Engine Inducement
75%-100% Off Off Off
Off None None
50%-75% Off Off Off
Off None None
25%-50% Off Off Off
Off None None
10%-25% Off Off Off
Off None None
2.5%-10% On Off Off
Chime (5 sec)
LOW DIESEL EXHAUST
FLUID
None
Solid
0%-2.5% On On Off
Steady Tone
ENGINE DERATED -
DEF LOW
25% Torque Derate
Flashing
0% Flashing On Off
Steady Tone
ENGINE DERATED -
DEF EMPTY
40% Torque Derate
Flashing
0% Flashing On On
Steady Tone
SPEED RESTRICTED -
DEF EMPTY
5 MPH Speed Limit
40% Torque Derate
1,100 RPM Limit

Page 19 of 45 072-101929
MAIN MENU - DIAGNOSTICS
1. Once the center button is pressed to view Diagnostics from the Main Screen,
Active Faults or Stored Faults can be viewed. Press the Right button to switch
between Active and Stored, then the Center button to select. The current
selection will be highlighted.
2. Press the Left button to return to the Main Menu.
MAIN MENU -
Diagnostics Selected
Active Faults Screens
Stored Faults Screens
Active
Active
Stored

Page 20 of 45 072-101929
3. Upon selection of Active Faults, the Source ID will be displayed if there are Active
Faults from any devices on the vehicle. If there are no Active Faults, “No Active
Faults” will be displayed.
4. Press the Right button to scroll through any additional Source IDs.
5. Press the Center button to view the Fault Code details. Then press the Right
button to scroll through the Fault Codes. To return to the Source ID, press the
Left button. Then press the left button again to return to the Diagnostics menu.
Diagnostics Menu -
Active Faults Selected
SPN xxx
FMI xxx
1/5
Active
View # / #
Remainder of Sources
# / #
Source x
Remainder of Faults
Source 0
Comment [GG1]: The format of the Fault screen
when viewing the details is not exactly correct.
Table of contents
Popular Automobile Accessories manuals by other brands

Raptor Series
Raptor Series MAGNUM RT Series manual

Porsche
Porsche Mobile Charger Connect owner's manual

Wagan
Wagan TravelCharge Companion GO-Plus user manual

Circutor
Circutor Wallbox ePark Series installation guide

Whispbar
Whispbar K478W Fitting Instructions for Basic Carrier

Whispbar
Whispbar K524W Fitting instructions

Cruz
Cruz N 22-120 Assembly instructions

Fortin
Fortin EVO ALL Addendum - Suggested Wiring Configuration

Nexcom
Nexcom VTC 6210-R Series user manual

ConWys
ConWys 21500567C Fitting instructions

Masterbuilt
Masterbuilt HITCH-HAUL 30111014 HHRB Assembly, care & use manual warning & safety information

Prorack
Prorack K1242 instructions