manuals.online logo
Brands
  1. Home
  2. •
  3. Brands
  4. •
  5. Amperes
  6. •
  7. Control Panel
  8. •
  9. Amperes RP1104 User manual

Amperes RP1104 User manual

Popular Control Panel manuals by other brands

GENEVO PRiMA 6 installation manual

GENEVO

GENEVO PRiMA 6 installation manual

NAPCO X 255 - Programming instructions

NAPCO

NAPCO X 255 - Programming instructions

Next Systems UNIR1 230 instruction manual

Next Systems

Next Systems UNIR1 230 instruction manual

HORNER HE-XPW1E0 user manual

HORNER

HORNER HE-XPW1E0 user manual

DSC CLASSIC PC1555 instruction manual

DSC

DSC CLASSIC PC1555 instruction manual

Bosch Solution 2000 installation guide

Bosch

Bosch Solution 2000 installation guide

VRinsight MS Panel user manual

VRinsight

VRinsight MS Panel user manual

Zeiss SYCOP 3 Quick reference guide

Zeiss

Zeiss SYCOP 3 Quick reference guide

HULTSTEINS ECOFRIDGE DISPLAY user manual

HULTSTEINS

HULTSTEINS ECOFRIDGE DISPLAY user manual

Elkron C420 Programming manual

Elkron

Elkron C420 Programming manual

GST GST200-2 Installation and operation manual

GST

GST GST200-2 Installation and operation manual

Efka Variocontrol V810 instruction manual

Efka

Efka Variocontrol V810 instruction manual

RDZ PC-HRX user manual

RDZ

RDZ PC-HRX user manual

STG-BEIKIRCH MZ3 operation instruction

STG-BEIKIRCH

STG-BEIKIRCH MZ3 operation instruction

AMX AutoPatch CP-15 instruction manual

AMX

AMX AutoPatch CP-15 instruction manual

Cebora 208-10 instruction manual

Cebora

Cebora 208-10 instruction manual

Satel CA-6 KLED-S user manual

Satel

Satel CA-6 KLED-S user manual

Evolution IQ plus 800 installation manual

Evolution

Evolution IQ plus 800 installation manual

manuals.online logo
manuals.online logoBrands
  • About & Mission
  • Contact us
  • Privacy Policy
  • Terms and Conditions

Copyright 2025 Manuals.Online. All Rights Reserved.

RP1104
Thank you for selecting MatriMix System, a small scale matrix system that is suitable for installation in clubs,
offices, residential as well as shopping centres.
RP1104 is a remote zone controller with sensor touch buttons which allows the user to select input music
source, volume and tones. It shall be installed at remote location at individual zone and connected to the
MxP2288 controller via Cat5e / 6 UTP cable.
Introduction
Guide to Installation:
Instruction Manual
Precision Design,Absolute Confidence
MatriMix Remote Zone Control Panel
Power source 24V DC via MxP2288
Power consumption 100 mA
LCD panel 3.5” resistive touch screen
Communication RS485 ; 19.2 Kbps
Controls Volume / BGM source / tone controls / channel select
Cabling Cat 5e / 6
Distance Up to 500m
Dimensions (WxH) 86 x 86 mm
Color White
Weight 100 g
1 : Cut the wall hole or using Back Enclosure
2 : Cable Connection - Connect the cable to the jack located at the rear of the controller
WALL
72 mm
72 mm
RP1104 can be installed directly to the
partitioned wall, with the hole size as
shown.
3 : Install RP1104 to Back Enclosure
Back enclosure - surface or wall concealed
WALL
AB (RS485)
24V DC
Back Enclosure
or
REMOTE
PAGING MIC
M P 2288
12 x 8 ETHERNET MATRIX CONTROLLER
x
EP1200
CONNECTION
24V DC IN ; 1 A
+ -
REMOTE
PANEL 1
REMOTE
PANEL 2
CH4CH1 CH2 CH3
COM
NO
COM
NO
COM
NO
COM
NO
CONFIGURABLE REMOTE TRIGGER
EM / AC
CONT (NO)
RS485
A B
ETHERNET
PORT
MESSAGE PLAYER
IN ( LINE BAL )
+V -V A+ B-
24V DC RS485
RP1104
Remote Zone Control Panel
Made In Malaysia
2 pair screen cable
www.ampereselectronics.com
24V DC
AB (RS485)
If it is to fit at brick wall, use the
specially design back enclosure,
surface or concealed versions are
available.
Note: Ensure current capacity is sufficient for several units
of RP1104.
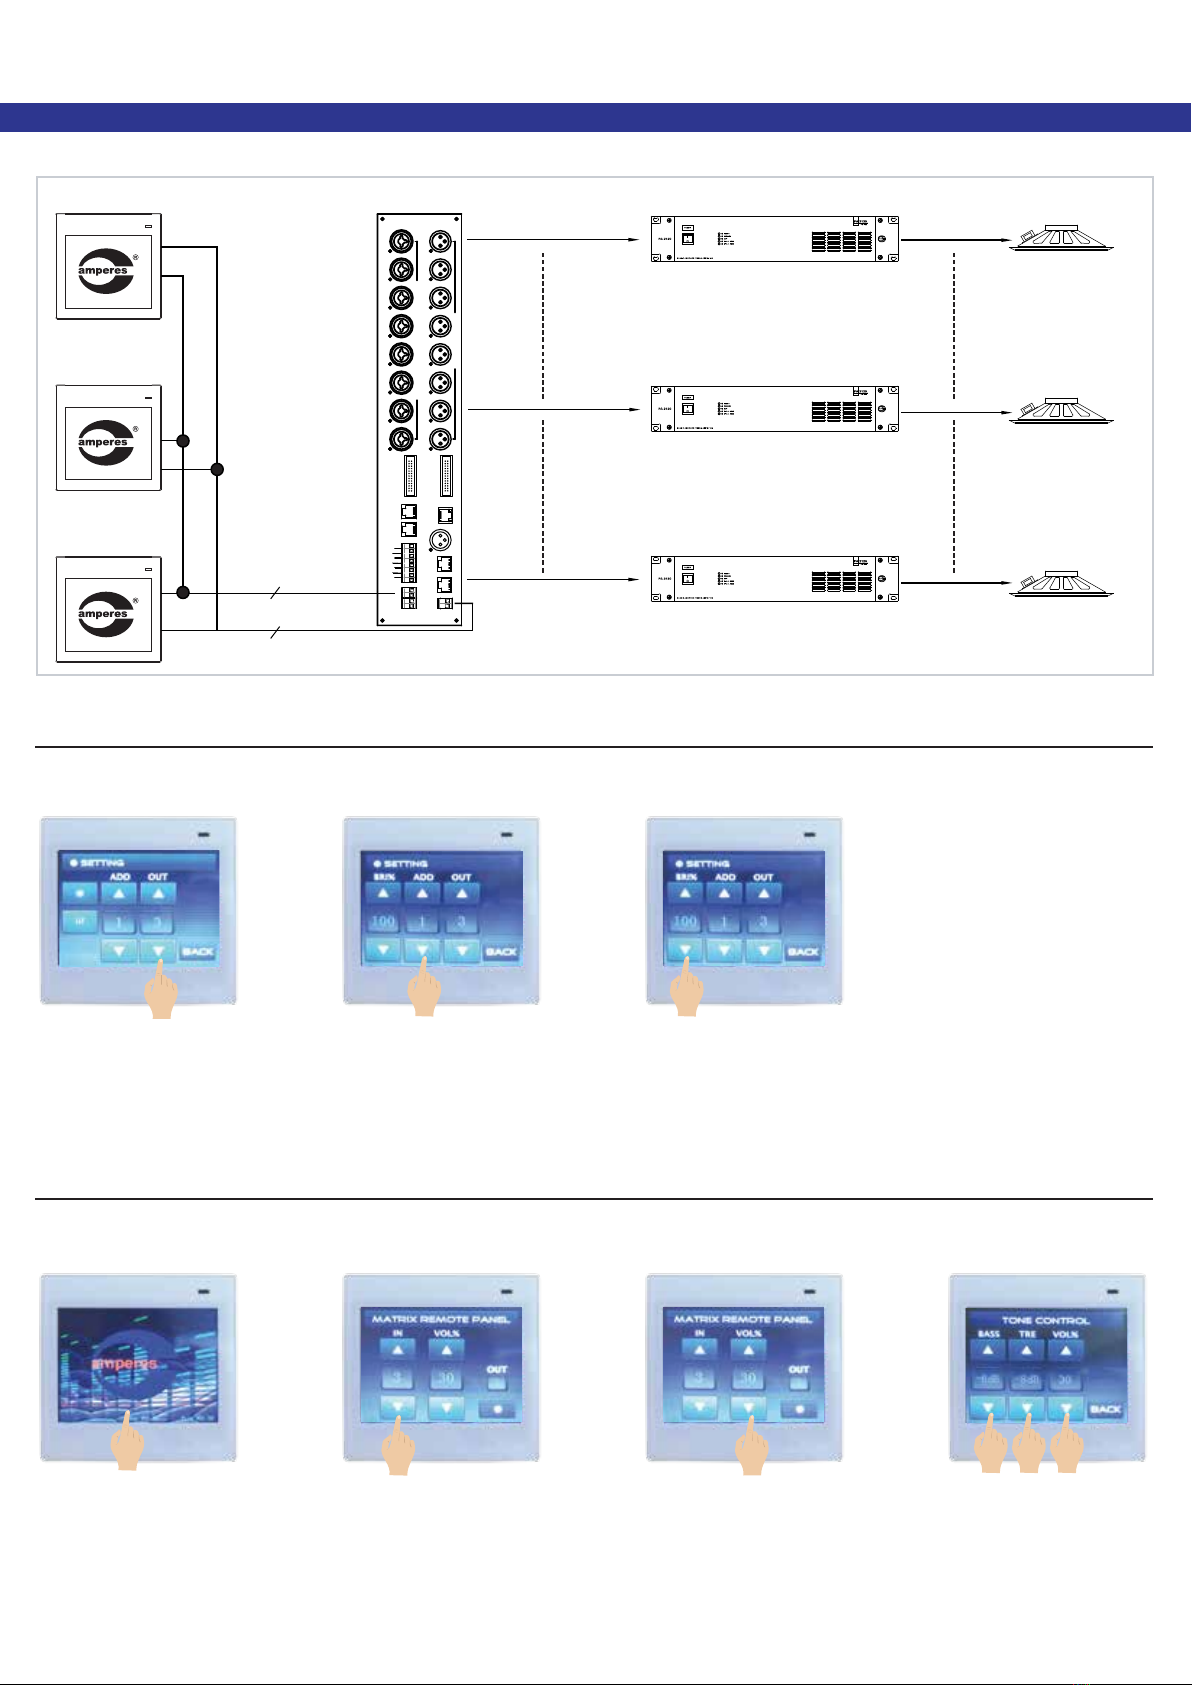
Connection Schematic
Operating The Unit
RP1104
Instruction Manual
MatriMix Remote Zone Control Panel
Touch the screen to switch to
setting mode.
1) Setup the Input
Touch the ‘UP’ and ‘DOWN’
key to select the desired
Input (BGM source of MxP).
2) Setup the Volume
Touch the ‘UP’ and ‘DOWN’
key to select the desired
Volume.
1) Setup the Output
Touch the ‘UP’ and ‘DOWN’
key to select the desired
Output ( channel output of
Matrix).
2) Setup the Address
Touch the ‘UP’ and ‘DOWN’
key to set the required
Address (address of the
matrix unit if more than 1
MxP is used).
3) Setup the Brightness
Touch the ‘UP’ and ‘DOWN’
key to select the desired
Brightness.
Note: Touch the ‘BACK’ key and the screen shall return to previous page.
REMOTE
PAGING MIC
M P 2288
12 x 8 ETHERNET MATRIX CONTROLLER
x
BALANCED CHANNEL OUTPUTS
BALANCED INPUTS ( XLR - MIC LEVEL / PHONE JACK - LINE LEVEL )
CH 6CH 5CH 4CH 3CH 2CH 1 CH 8CH 7
CH 8CH 7CH 6CH 5CH 4CH 3CH 2CH 1
CASCADE OUT
EP1200
CONNECTION
24V DC IN ; 1 A
+ -
REMOTE
PANEL 1
REMOTE
PANEL 2
CH4CH1 CH2 CH3
COM
NO
COM
NO
COM
NO
COM
NO
CONFIGURABLE REMOTE TRIGGER
EM / AC
CONT (NO)
RS485
A B
MATRIX CASCADING TERMINALS
( MAX STACKS : 12 UNITS )
CASCADE IN
ETHERNET
PORT
MESSAGE PLAYER
IN ( LINE BAL )
Speakers
RP1104
RP1104
RP1104
MxP2288
Speakers
Speakers
Power Amplifier
Power Amplifier
Power Amplifier
24V
AB
www.ampereselectronics.com
Out 1
Out 8
Note: Maximum number of RP1104 for each controller shall not exceed 8, otherwise please add additional power supply.
3) Setup the Tone Control
To setup ‘Tone Control’ -
(Bass, Treble and Volume)
just touch the ‘UP’ and
‘DOWN” key to select the
desired Tone Control.
Setting ( Zone Output Setting )
It is necessary to identify the link of RP to
the zone it is intended to control.
Enter the setting mode to key in the
address of RP (in case several control-
lers are used), the output (the zone of
which the panel is intended to control)
and brightness of the screen.