ampridge MightyMic Pro User manual

AmpRidge
MightyMic Pro
Multi-Function Smartphone
Wireless Microphone
User Manual

MightyMic Pro User Manual
1
Thank you for choosing the MightyMic Pro Bluetooth microphone. In order to use the mic as
a wireless microphone you will need to use a compatible App such as MoviePro or FilmicPro
for video recording or MightyMic Pro Recorder for audio recording. Please check our website
for the latest info on Apps and features
Safety Rules
● To ensure your safety before using the MightyMic Pro please carefully read through this
user manual
● Be wary of any sharp edges, uneven surfaces, metal parts, accessories and their
packaging so as to prevent any possible injuries to you or to the microphone
● Do not modify, repair, or dismantle the microphone. Do so may result in fire, electric
shocks, complete failure of this device, etc. All of which are not covered un the warranty
● Do not use any solvents or volatile liquids to clean the MightyMic Pro
● Do not use the MightyMic Pro in a hazardous location
● The package contains small parts. Please keep away from children
● You must select a qualified charger from a reliable manufacturer
● Do not use the USB charging cable on any other device because of possible damage
This unit contains Li-ion polymer batteries. Li-ion Polymer batteries are volatile. Failure to
read and follow the safety instructions may result in fire, personal injury and damage to
property if charged or used improperly. By purchasing and using this unit the buyer assumes
all risks associated with Li-ion batteries. Please dispose of properly
Introduction
●Bluetooth 5.0 Profile
●Up to 30 feet working range
●High quality internal microphone
●USB-C charging port with external battery support
●Supports external 3.5mm Smartphone microphones
●Internal/External microphone switch
●3 Position Auto-Gain microphone sensitivity switch
●Up to 9 hour rechargeable internal battery
●Auto-Shutoff if unpaired for 5 minutes
●Music Player/Telephone functions built-in
●Dual Cell-Phone pairing option
●Integrated clip for shirt, tie or belt mounting
Key Features

MightyMic Pro User Manual
2
General Functions
Function Required Action
Turn On Press and hold the “MF” button until the LED begins to flash. It
will normally auto-connect if previously paired
Pairing Mode When the device is OFF hold the “MF“ button until the blue/red
LED’s begins to flash. Pair the microphone to your device. The
microphone will turn off if not paired for 5 minutes
LED Indicator Light Flashing Blue-Power On and Paired
Flashing Blue/Red-Pairing mode
Quick flashing Red 3 times-Low Power warning
Turn Off
Hold the “MF“ button until the blue LED turns off to conserve
battery usage. The microphone will not automatically shut off if
not in use but will shut off if not paired for 5 minutes
Multi-Function (MF)
Button
Press the “MF” button for power ON/Off, to pause/play music or
for telephone functions
Delete Pairing
When powering on hold the “MF” button for about 8 seconds until
it powers on then turns off.
Battery Power Status Battery status will be shown on the top right corner of the phone
screen after paired. (Only on IOS devices)
Phone Calls See Phone Function Section
External
Microphone/
Headphone
Jack
Microphone
Power/
Multi-Function
Button (MF)
LED Status
Indicator
Microphone
Sensitivity
Switch
Internal/External
Microphone
Selector
USB-C Charging
Port
Volume/Next
Song Buttons
Description

MightyMic Pro User Manual
3
Pairing to an IOS or Android device
To use your Bluetooth Microphone, you must first pair it with a device. Once your
Bluetooth Microphone is paired to a specific device, they will remain paired while they
are within range.
Pairing Instructions:
● Turn on your Phone or device and insure the Bluetooth function is activated
● Hold the “MF” button on the front of the microphone until the blue/red LED’s begins
to flash
● In the Settings App on the device select the Bluetooth option. Look for a Bluetooth
device listed as “MightyMic Pro” to pair it to the Microphone
● The display should change from “Not Paired” to “Connected. If not, tap the device
listed to pair
● If you have paired before you may just need to touch the “MightyMic Pro” device to
reconnect or it may connect Automatically
Using the MightyMic Pro Microphone
For best results use in an open space without any barriers between the
microphone and the phone. People especially can cause interference.
We highly recommend you set your phone to airplane mode with Bluetooth
enabled otherwise you may have recordings interrupted by unwanted calls
To hear playback audio while the Bluetooth microphone is paired connect
headphones to the microphone or turn off Bluetooth to listen through the phone.
For IOS devices, open the Control Center and select the airplay button to
manually choose the desired playback option.
Pause Press the “MF” button to pause the music
Volume Up Hold down the “+” button to increase the volume
Volume Down Hold down the “-” button to decrease the volume
Next Track Quickly press the “+” button to move to the next track
Previous Track Quickly press the “-” button to move to the previous track
Music Functions
Using the Monitor Function
Many Apps support audio monitoring while recording. Connect headphones to the
3.5mm jack on the MightyMic Pro or into the monitor jack on the microphone to hear
sounds returned from the App. Due to transmission functions there will be some delay
of the monitor signal. This delay will not occur on the recording.

MightyMic Pro User Manual
4
LED Status LED Indication
Power On The Blue LED will flash twice when connected
Power Off The Blue LED will flash once then the Red LED will flash once
Pairing The Red and Blue LED’s will flash alternately
Unconnected The Blue LED will flash once every second
Standby Mode The Blue LED will flash twice every 3 seconds
Connected Standby Mode The Blue LED will stay ON continuously
Connected Working Mode The Blue LED will flash once every 5 seconds
Multi Point Connection The Blue LED will stay ON continuously
. The LED may flash
differently depending on the type of phone
Low Battery Power The Red LED will flash 3 times quickly
Charging The Red LED will stay ON continuously
Fully Charged The Red LED will turn OFF
LED Indicators
Using the MightyMic Pro for video recording
1) Connect the Bluetooth microphone before the app starts. You may need to select the
Bluetooth mic as an option in the settings of the App
2) With some Apps, if the Bluetooth microphone is connected after the app starts, the
Bluetooth microphone will start automatically and the microphone symbol may turn blue
to indicate a Bluetooth Microphone is active
3) If the Bluetooth Microphone is disconnected while the app is active, the app switches
back to the built-in microphone.
4) To confirm the microphone is connected do a test recording or go into the Settings
section. Upon leaving the Settings section the Bluetooth microphone normally will
become active again.
5) A video App is needed such as FilmicPro or MoviePro (IOS) or Cinema FV-5 (Android)
to do Bluetooth video recording. Please check our website for updates regarding this or
other supported Apps.
6) You may hear an audio delay while monitoring the recording. This is normal. This delay
will not occur on the recording
Using the MightyMic Pro for audio recording
The MightyMic Pro will support audio App’s designed to work with external Bluetooth
devices.
An audio App is needed such as the MightyMic Pro Recording App (IOS) to do Bluetooth
audio recording. Please check our website for updates regarding this or other supported
Apps.

MightyMic Pro User Manual
5
Function Required Action
Answer a Call Quickly press the “MF” button to answer the call
Rejecting a Call Press the “MF” button for about 1 second to reject a call
Select Audio Output After receiving a call, Press the “MF” button for about 1 second to
hear the call through the phone or Bluetooth unit
Ending the Call
Quickly press the “MF” button to end the call or end the call on your
phone
Redial the Last Number
Quickly press the “MF” button twice to redial the last phone number
Answer two calls at the
same time
Hold the “MF” button for about 1 second to answer the second call.
Hold the “MF” button again for 1 sec to switch
Answer two calls one by
one
Quickly press the “MF” button to end the first call. You can then
quickly press the “MF” button again to answer the second call or hold
for 1 second to reject the call
Voice Assistant (Siri)
Hold the “MF” button for about 1 second to start the voice assistant for
your phone
Phone Functions
Charging the Device
Make sure that your device is fully charged before the initial use.
The MightyMic Pro includes a USB-A to USB-C charging cable. This allows you to use any standard
phone charger (not included) to charge the Bluetooth device.
The USB-C connector is a much higher quality than other micro-USB charging ports and can pass
more power for faster charging
Insert the USB terminal of your charging cable into a USB-A Type phone charger and connect the
other terminal to the USB-C jack on the microphone. While charging, the red LED on the front will
remain on. When charging is completed, the LED will turn off
The MightyMic Pro can operate while charging or while being powered by an external battery source
Note: The USB-C charging port does not support data transfer. It is for charging only.
Pairing two Bluetooth devices to one Phone
Depending on the phone and App you may be able to pair the MightyMic Pro microphone and another
type of Bluetooth device at the same time. Such as a Bluetooth gimbal device and Bluetooth
microphone. If the combination does not work correctly you may need to change the pairing order to
get satisfactory results.
Reset the Device
Press the “MF” button for about 8 seconds with the power off. The red and blue LED’s will flash once
then the unit will enter into the pairing mode. Remove previous pairings from the device and re-pair

MightyMic Pro User Manual
6
Pair with two Phones
Use this function to receive phone calls from two different phones
● Pair the microphone to the first phone
● Press the “MF” button twice quickly to turn it into the pairing mode. The red and blue LED’s
will begin to flash to indicate the pairing mode.
● Pair the microphone to the second phone
● The two phones are now paired with the microphone
Note: The microphone will pair with the last paired phone automatically when powered on again.
Please make sure to enable the Bluetooth function when powering on again.
Note: You can only play music or record from one phone with 2 connections
If you wish to disconnect the paired phone and connect another phone you can press and hold
the “MF” button for about 5 seconds. The microphone will turn into the pairing mode again and
the blue and red LED’s will begin flashing again.
Microphone Sensitivity Adjustment
The microphone has auto gain adjustment. This feature sets the ideal sensitivity while
listening to the speaking volume. Speak for about 5 seconds near the microphone to set the
ideal volume before recording.
Best performance is normally achieved using an external microphone with the sensitivity
set to High (H)
The default sensitivity is set to High when the device is shipped. The options are as follows:
●High (H): 0 dB (Typical for most microphones and situations)
●Medium (M): - 3 dB (Typical for some external microphones)
●Low (L): - 6 dB (Typical for high volume external microphones)
To change the sensitivity move the sensitivity switch on the side of the device. You may hear
increased noise in the M and L positions.
Note: You may hear some popping when changing sensitivity or microphone input options. This is
normal and not recommended to change while recording.
External Microphones
The MightyMic Pro supports connecting external microphones designed for Smartphone
headphone jacks such as the MightyMic series of microphones. The microphone must have 4 pins
on the plug in order to work correctly. Earbuds with switches (Like EarPods) and 3-pin
microphones made for camera’s will not work with this device.
Simply insert the microphone into the headphone jack and move the switch from the internal
microphone setting (I) to the external microphone setting (E). To switch back to the internal
microphone you must move the switch back to the internal microphone setting (I) on the side of the
device.

Manual del usuario de MightyMic Pro
7
Micrófono externo /
conector para
auriculares
Micrófono
Potencia /
multifunción
Botón (MF)
Estado del
LED
Indicador
Interruptor de
sensibilidad de
micrófono
Selector de micrófono
interno / externo
Puerto de carga
USB-C
Botones de volumen
/ canción siguiente
Descripción
Funciones generales
Función Acción requerida
Encender Mantenga presionado el botón "MF" hasta que el LED comience
a parpadear. Normalmente se conectará automáticamente si
está emparejado previamente
Modo de emparejamiento Cuando el dispositivo esté apagado, mantenga presionado el
botón "MF" hasta que los LED azul / rojo comiencen a
parpadear. Empareja el micrófono con tu dispositivo. El
micrófono se apagará si no está emparejado durante 5 minutos.
Luz indicadora LED Azul parpadeante: encendido y emparejado Azul parpadeante /
rojo Modo de emparejamiento parpadeo rápido rojo 3 veces:
advertencia de bajo consumo
Apagar
Mantenga presionado el botón "MF" hasta que el LED azul se
apague para conservar el uso de la batería. El micrófono no se
apagará automáticamente si no está en uso, pero se apagará si
no está emparejado durante 5 minutos
Botón multifunción (MF) Presione el botón "MF" para encender / apagar, pausar /
reproducir música o para las funciones del teléfono
Eliminar
emparejamiento
Presione el botón "MF" para encender / apagar, pausar /
reproducir música o para las funciones del teléfono
Estado de energía de la
batería
El estado de la batería se mostrará en la esquina superior
derecha de la pantalla del teléfono después del emparejamiento.
(Solo en dispositivos IOS)
Llamadas telefónicas Ver la sección de funciones del teléfono

Manual del usuario de MightyMic Pro
8
Emparejamiento con un dispositivo IOS o Android
Para usar su micrófono Bluetooth, primero debe emparejarlo con un dispositivo. Una vez que su
micrófono Bluetooth esté emparejado con un dispositivo específico, permanecerán emparejados
mientras estén dentro del alcance.
Instrucciones de emparejamiento:
● Encienda su teléfono o dispositivo y asegúrese de que la función Bluetooth esté activada
● Hold the “MF” button on the front of the microphone until the blue/red LED’s begins to flash
● IEncienda su teléfono o dispositivo y asegúrese de que la función Bluetooth esté activada
● La pantalla debería cambiar de "No emparejado" a "Conectado". De lo contrario, toque el
dispositivo que aparece para emparejar
● Si se ha emparejado antes, es posible que solo necesite tocar el dispositivo "MightyMic Pro" para
volver a conectarlo o puede conectarse automáticamente
Usando el micrófono MightyMic Pro
Para mejores resultados, use en un espacio abierto sin barreras entre el micrófono y el
teléfono. Las personas especialmente pueden causar interferencia.
Recomendamos encarecidamente que configure su teléfono en modo avión con Bluetooth
habilitado; de lo contrario, puede tener grabaciones interrumpidas por llamadas no deseadas
Para escuchar la reproducción de audio mientras el micrófono Bluetooth está emparejado,
conecte los auriculares al micrófono o apague Bluetooth para escuchar a través del teléfono.
Para dispositivos IOS, abra el Centro de control y seleccione el botón Airplay para elegir
manualmente la opción de reproducción deseada.
Pausa Presione el botón "MF" para pausar la música
Sube el volumen Mantenga presionado el botón "+" para aumentar el volumen
Bajar volumen Mantenga presionado el botón "-" para bajar el volumen
Siguiente pista Presione rápidamente el botón "+" para pasar a la siguiente pista
Pista anterior Presione rápidamente el botón "-" para pasar a la pista anterior
Funciones musicales
Usar la función de monitor
Muchas aplicaciones admiten monitoreo de audio durante la grabación. Conecte los auriculares al
conector de 3,5 mm del MightyMic Pro o al conector del monitor del micrófono para escuchar los
sonidos que devuelve la aplicación. Debido a las funciones de transmisión, habrá algún retraso en la
señal del monitor. Este retraso no ocurrirá en la grabación.

Manual del usuario de MightyMic Pro
9
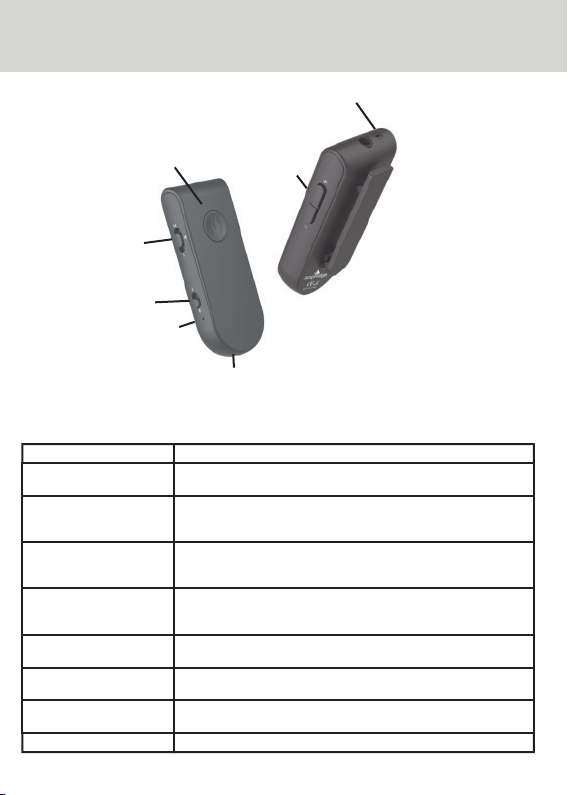
Estado del LED Indicación LED
Encendido El LED azul parpadeará dos veces cuando esté conectado
Apagado El LED azul parpadeará una vez, luego el LED rojo
parpadeará una vez
Emparejamiento Los LED rojo y azul parpadearán alternativamente
Desconectado El LED azul parpadeará una vez por segundo.
Modo de espera El LED azul parpadeará dos veces cada 3 segundos.
Modo de espera conectado El LED azul permanecerá encendido continuamente
Modo de trabajo conectado El LED azul parpadeará una vez cada 5 segundos.
Conexión multipunto El LED azul permanecerá encendido continuamente. El LED
puede parpadear de manera diferente según el tipo de
teléfono
Batería baja El LED rojo parpadeará 3 veces rápidamente
Carga El LED rojo permanecerá encendido continuamente
Completamente cargado El LED rojo se apagará
Indicadores LED
Uso de MightyMic Pro para grabación de video
1) Conecte el micrófono Bluetooth antes de que se inicie la aplicación. Es posible que
deba seleccionar el micrófono Bluetooth como una opción en la configuración de la
aplicación
2) Con algunas aplicaciones, si el micrófono Bluetooth está conectado después de que la
aplicación se inicia, el micrófono Bluetooth se iniciará automáticamente y el símbolo
del micrófono puede volverse azul para indicar que un micrófono Bluetooth está activo
3) Si el micrófono Bluetooth se desconecta mientras la aplicación está activa, la
aplicación vuelve al micrófono incorporado.
4) Para confirmar que el micrófono está conectado, realice una grabación de prueba o
vaya a la sección Configuración. Al salir de la sección Configuración, el micrófono
Bluetooth normalmente se activará nuevamente.
5) Se necesita una aplicación de video como FilmicPro o MoviePro (IOS) o Cinema FV-5
(Android) para hacer la grabación de video Bluetooth. Visite nuestro sitio web para
obtener actualizaciones sobre esta u otras aplicaciones compatibles.
6) Es posible que escuche un retraso de audio mientras supervisa la grabación. Esto es
normal. Este retraso no ocurrirá en la grabación
Usando el MightyMic Pro para la grabación de audio
MightyMic Pro admitirá aplicaciones de audio diseñadas para funcionar con dispositivos
Bluetooth externos
Se necesita una aplicación de audio, como la aplicación de grabación MightyMic Pro (IOS)
para hacer la grabación de audio Bluetooth. Visite nuestro sitio web para obtener
actualizaciones sobre esta u otras aplicaciones compatibles.

Manual del usuario de MightyMic Pro
10
Función Acción requerida
Responder una llamada Presione rápidamente el botón "MF" para responder la llamada
Rechazar una llamada Presione el botón "MF" durante aproximadamente 1 segundo para
rechazar una llamada
Seleccionar salida de audio Después de recibir una llamada, presione el botón "MF" durante
aproximadamente 1 segundo para escuchar la llamada a través del
teléfono o la unidad Bluetooth
Finalizando la llamada
Presione rápidamente el botón "MF" para finalizar la llamada o
finalizar la llamada en su teléfono
Volver a marcar el último
número
Presione rápidamente el botón "MF" dos veces para volver a marcar
el último número de teléfono
Responde dos llamadas
al mismo tiempo
Mantenga presionado el botón "MF" durante aproximadamente 1
segundo para contestar la segunda llamada. Mantenga presionado el
botón "MF" durante 1 segundo para cambiar
Responde dos llamadas
una por una
Presione rápidamente el botón "MF" para finalizar la primera llamada.
Luego puede presionar rápidamente el botón "MF" nuevamente para
responder la segunda llamada o mantener presionado durante 1
segundo para rechazar la llamada
Asistente de voz (Siri)
Mantenga presionado el botón "MF" durante aproximadamente 1
segundo para iniciar el asistente de voz para su teléfono
Funciones telefónicas
Carga del dispositivo
Asegúrese de que su dispositivo esté completamente cargado antes del uso inicial. El MightyMic Pro
incluye un cable de carga USB-A a USB-C. Esto le permite usar cualquier cargador de teléfono
estándar (no incluido) para cargar el dispositivo Bluetooth.
El conector USB-C es de una calidad mucho más alta que otros puertos de carga micro-USB y puede
pasar más potencia para una carga más rápida
Inserte el terminal USB de su cable de carga en un cargador de teléfono tipo USB-A y conecte el otro
terminal a la toma USB-C del micrófono. Mientras se carga, el LED rojo en el frente
permanezca en. Cuando se completa la carga, el LED se apagará
El MightyMic Pro puede funcionar mientras se carga o mientras funciona con una fuente de batería
externa
Nota: el puerto de carga USB-C no admite la transferencia de datos. Es solo para cargar.
Emparejar dos dispositivos Bluetooth con un teléfono
Dependiendo del teléfono y la aplicación, puede emparejar el micrófono MightyMic Pro y otro tipo de
dispositivo Bluetooth al mismo tiempo. Como un dispositivo de cardán Bluetooth y un micrófono
Bluetooth. Si la combinación no funciona correctamente, es posible que deba cambiar el orden de
emparejamiento para obtener resultados satisfactorios.
Restablecer el dispositivo
Presione el botón "MF" durante aproximadamente 8 segundos con la alimentación apagada. Los LED
rojo y azul parpadearán una vez y luego la unidad entrará en el modo de emparejamiento. Eliminar
emparejamientos anteriores del dispositivo y volver a emparejar

Manual del usuario de MightyMic Pro
11
Ajuste de sensibilidad del micrófono
El micrófono tiene ajuste automático de ganancia. Esta característica establece la
sensibilidad ideal mientras escucha el volumen de voz. Hable durante aproximadamente 5
segundos cerca del micrófono para establecer el volumen ideal antes de grabar.
El mejor rendimiento se logra normalmente utilizando un micrófono externo con la
sensibilidad establecida en Alta (H)
La sensibilidad predeterminada se establece en Alta cuando se envía el dispositivo. Las opciones
son las siguientes:
●Alto (H): 0 dB (típico para la mayoría de los micrófonos y situaciones)
●Medio (M): - 3 dB (típico para algunos micrófonos externos)
●Bajo (L): - 6 dB (típico para micrófonos externos de alto volumen)
Para cambiar la sensibilidad, mueva el interruptor de sensibilidad al costado del dispositivo. Es
posible que escuche un aumento de ruido en las posiciones M y L.
Nota: Es posible que escuche algunos estallidos al cambiar la sensibilidad o las opciones de
entrada del micrófono. Esto es normal y no se recomienda cambiar durante la grabación.
Micrófonos externos
El MightyMic Pro admite la conexión de micrófonos externos diseñados para tomas de auriculares
para teléfonos inteligentes, como la serie de micrófonos MightyMic. El micrófono debe tener 4
pines en el enchufe para funcionar correctamente. Los auriculares con interruptores (como
EarPods) y los micrófonos de 3 pines hechos para la cámara no funcionarán con este dispositivo.
Simplemente inserte el micrófono en la toma de auriculares y mueva el interruptor de la
configuración del micrófono interno (I) a la configuración del micrófono externo (E). Para volver al
micrófono interno, debe mover el interruptor a la configuración del micrófono interno (I) en el
costado del dispositivo.
Carga del dispositivo
Asegúrese de que su dispositivo esté completamente cargado antes del uso inicial.
El MightyMic Pro incluye un cable de carga USB-A a USB-C. Esto le permite usar cualquier cargador
de teléfono estándar (no incluido) para cargar el dispositivo Bluetooth.
El conector USB-C es de una calidad mucho más alta que otros puertos de carga micro-USB y puede
pasar más potencia para una carga más rápida
Inserte el terminal USB de su cable de carga en un cargador de teléfono tipo USB-A y conecte el otro
terminal a la toma USB-C del micrófono. Mientras se carga, el LED rojo en el frente
permanezca en. Cuando se completa la carga, el LED se apagará
El MightyMic Pro puede funcionar mientras se carga o mientras funciona con una fuente de batería
externa
Nota: el puerto de carga USB-C no admite la transferencia de datos. Es solo para cargar.

MightyMic Pro Manuel de l'utilisateur
12
Microphone
externe/casque
Jack
Microphone
Puissance /
Multifonction
Bouton (MF)
Etat de la LED
Indicateur
Interrupteur de
sensibilité du
microphone
Sélecteur de
microphone
interne / externe
Port de charge
USB-C
Boutons
Volume/Procha
ine chanson
La description
Une fonction Action requise
Allumer Appuyez sur le bouton «MF» et maintenez-le enfoncé jusqu'à ce
que le voyant commence à clignoter. Il se connectera
normalement automatiquement s'il a déjà été couplé
Mode d'appariement Lorsque l’appareil est éteint, maintenez la touche «MF» enfoncée
jusqu’à ce que les voyants bleu / rouge se mettent à clignoter.
Associez le microphone à votre appareil. Le microphone
s'éteindra s'il n'est pas jumelé pendant 5 minutes.
Voyant LED Bleu clignotant - sous tension et jumelé - bleu clignotant / rouge -
Mode de couplage - Rouge clignotant rapidement 3 fois -
Avertissement de faible consommation
Éteindre
Maintenez le bouton «MF» enfoncé jusqu'à ce que le voyant bleu
s'éteigne pour préserver l'utilisation de la batterie. Le microphone
ne s’éteindra pas automatiquement s’il n’est pas utilisé, mais
s’éteint s’il n’est pas couplé pendant 5 minutes.
Bouton multifonction (MF) Appuyez sur le bouton «MF» pour allumer / éteindre, pour mettre
en pause / écouter de la musique ou pour utiliser les fonctions du
téléphone
Supprimer le couplage
Lors de la mise sous tension, maintenez le bouton «MF» enfoncé
pendant environ 8 secondes jusqu'à ce qu'il s'allume puis
s'éteigne.
Etat de la batterie L’état de la batterie apparaîtra dans le coin supérieur droit de
l’écran du téléphone après le jumelage. (Uniquement sur les
appareils IOS)
Phone Calls Voir la section Fonction du téléphone

MightyMic Pro Manuel de l'utilisateur
13
Jumelage avec un appareil IOS ou Android
Pour utiliser votre microphone Bluetooth, vous devez d’abord le coupler à un appareil. Une fois que
votre microphone Bluetooth est associé à un périphérique spécifique, ils le restent tant qu'ils sont à
portée.
Instructions d'appariement:
● Allumez votre téléphone ou votre appareil et assurez-vous que la fonction Bluetooth est activée
● Maintenez le bouton «MF» situé à l’avant du microphone jusqu’à ce que les voyants bleu / rouge
se mettent à clignoter
● In l’application Settings de l’appareil, sélectionnez l’option Bluetooth. Recherchez un périphérique
Bluetooth répertorié comme «MightyMic Pro» pour le coupler au microphone.
● L’affichage devrait passer de «Non jumelé» à «Connecté». Si ce n'est pas le cas, appuyez sur le
périphérique répertorié pour l'appariement
● Si vous avez déjà effectué une liaison, il vous suffira peut-être de toucher le périphérique
«MightyMic Pro» pour vous reconnecter ou de vous connecter automatiquement.
Utilisation du microphone MightyMic Pro
Pour de meilleurs résultats, utilisez-le dans un espace ouvert sans aucune barrière entre le
microphone et le téléphone. Les gens en particulier peuvent causer des interférences.
Nous vous recommandons vivement de régler votre téléphone en mode avion avec Bluetooth
activé, sinon des enregistrements pourraient être interrompus par des appels indésirables.
Pour entendre le son de lecture lorsque le microphone Bluetooth est apparié, connectez un
casque au microphone ou désactivez Bluetooth pour écouter via le téléphone. Pour les
périphériques IOS, ouvrez le Centre de contrôle et sélectionnez le bouton de diffusion pour
choisir manuellement l'option de lecture souhaitée.
Pause Appuyez sur le bouton "MF" pour mettre la musique en
pause
Monter le son Maintenez enfoncé le bouton "+" pour augmenter le
volume
Baisser le volume Maintenez le bouton «-» enfoncé pour diminuer le
volume
Piste suivante Appuyez rapidement sur le bouton «+» pour passer à la
piste suivante
Piste précédente Appuyez rapidement sur le bouton «-» pour passer à la
piste précédente
Utilisation de la fonction de surveillance
De nombreuses applications prennent en charge la surveillance audio lors de l'enregistrement.
Connectez un casque à la prise jack 3,5 mm du MightyMic Pro ou à la prise moniteur du microphone
pour entendre les sons renvoyés par l'application. En raison des fonctions de transmission, le signal
du moniteur subira un certain retard. Ce délai ne se produira pas sur l'enregistrement.
Fonctions de musique

MightyMic Pro Manuel de l'utilisateur
14
Etat de la LED Indication LED
Allumer Le voyant bleu clignote deux fois lorsqu'il est connecté
Éteindre La LED bleue clignotera une fois puis la LED rouge clignotera une
fois
Appariement Les LED rouge et bleue clignoteront en alternance
Sans rapport La LED bleue clignotera une fois par seconde
Mode veille La LED bleue clignotera deux fois toutes les 3 secondes
Mode veille connecté La LED bleue reste allumée en permanence
Mode de travail connecté La LED bleue clignotera une fois toutes les 5 secondes
Connexion multi-points La LED bleue restera allumée en permanence. La DEL peut
clignoter différemment selon le type de téléphone.
Batterie faible La LED rouge clignotera 3 fois rapidement
Charge La LED rouge reste allumée en permanence
Complètement chargé La LED rouge s'éteindra
LIndicateurs LED
Utilisation du MightyMic Pro pour l'enregistrement vidéo
1) Connectez le microphone Bluetooth avant le démarrage de l'application. Vous devrez peut-
être sélectionner le microphone Bluetooth en tant qu'option dans les paramètres de
l'application.
2) Avec certaines applications, si le microphone Bluetooth est connecté après le démarrage de
l'application, le microphone Bluetooth démarre automatiquement et le symbole du
microphone peut devenir bleu pour indiquer qu'un microphone Bluetooth est actif.
3) Si le microphone Bluetooth est déconnecté alors que l'application est active, l'application
repasse sur le microphone intégré.
4) Pour confirmer que le microphone est connecté, effectuez un test d'enregistrement ou allez
dans la section Paramètres. En quittant la section Paramètres, le microphone Bluetooth
redevient normalement actif.
5) Une application vidéo, telle que FilmicPro ou MoviePro (IOS) ou Cinema FV-5 (Android), est
nécessaire pour effectuer un enregistrement vidéo Bluetooth. Veuillez consulter notre site
Web pour les mises à jour concernant cette application ou d'autres applications prises en
charge.
6) Vous pouvez entendre un retard audio lors du contrôle de l'enregistrement. C'est normal. Ce
délai ne se produira pas sur l'enregistrement
Utilisation du MightyMic Pro pour l’enregistrement audio
Le MightyMic Pro prend en charge les applications audio conçues pour fonctionner avec des
périphériques Bluetooth externes.
Une application audio telle que l'application Voice Memo App (IOS) est nécessaire pour
effectuer l'enregistrement audio Bluetooth. Veuillez consulter notre site Web pour les mises à
jour concernant cette application ou d'autres applications prises en charge.

MightyMic Pro Manuel de l'utilisateur
15
Une fonction Action requise
Répondre à un appel Appuyez rapidement sur le bouton "MF" pour répondre à l'appel
Rejeter un appel Appuyez sur le bouton «MF» pendant environ 1 seconde pour rejeter
un appel.
Sélectionnez la sortie audio Après avoir reçu un appel, appuyez sur le bouton «MF» pendant
environ 1 seconde pour entendre l'appel via le téléphone ou l'unité
Bluetooth.
Mettre fin à l'appel
Appuyez rapidement sur le bouton «MF» pour mettre fin à l'appel ou
pour terminer l'appel sur votre téléphone.
Recomposer le dernier
numéro
Appuyez rapidement deux fois sur le bouton «MF» pour recomposer
le dernier numéro de téléphone.
Répondre à deux appels
en même temps
Maintenez le bouton “MF” pendant environ 1 seconde pour répondre
au second appel. Maintenez à nouveau le bouton “MF” pendant 1
seconde pour passer
Répondre à deux appels
un à un
Appuyez rapidement sur le bouton «MF» pour mettre fin au premier
appel. Vous pouvez ensuite appuyer à nouveau rapidement sur le
bouton «MF» pour répondre au second appel ou rester en attente
pendant 1 seconde pour rejeter l'appel.
Assistant vocal (Siri)
Maintenez le bouton «MF» enfoncé pendant environ 1 seconde pour
lancer l'assistant vocal de votre téléphone.
Fonctions téléphoniques
Chargement de l'appareil
Assurez-vous que votre appareil est complètement chargé avant la première utilisation. Le MightyMic
Pro comprend un câble de charge USB-A à USB-C. Cela vous permet d'utiliser n'importe quel
chargeur de téléphone standard (non inclus) pour charger le périphérique Bluetooth.
Le connecteur USB-C est d'une qualité bien supérieure aux autres ports de chargement micro-USB et
peut transmettre plus d'énergie à un chargement plus rapide
Insérez la borne USB de votre câble de chargement dans un chargeur de téléphone de type USB-A et
connectez l'autre borne à la prise USB-C du microphone. Pendant le chargement, le voyant rouge à
l'avant s'allume
Rester sur. Lorsque le chargement est terminé, le voyant s'éteint
Le MightyMic Pro peut fonctionner pendant le chargement ou lorsqu'il est alimenté par une source de
batterie externe
Remarque: le port de charge USB-C ne prend pas en charge le transfert de données. C'est pour
charger seulement.
Coupler deux appareils Bluetooth à un seul téléphone
En fonction du téléphone et de l'application, vous pourrez peut-être coupler le microphone MightyMic
Pro et un autre type de périphérique Bluetooth en même temps. Comme un cardan Bluetooth et un
microphone Bluetooth. Si la combinaison ne fonctionne pas correctement, vous devrez peut-être
modifier l'ordre d'appariement pour obtenir des résultats satisfaisants..
Réinitialiser l'appareil
Appuyez sur le bouton «MF» pendant environ 8 secondes lorsque l'appareil est éteint. Les voyants
rouge et bleu clignoteront une fois, puis l’unité passera en mode de couplage. Supprimer les
appariements précédents de l'appareil et relier l'appariement

MightyMic Pro Manuel de l'utilisateur
16
Réglage de la sensibilité du microphone
Le microphone a un réglage de gain automatique. Cette fonction définit la sensibilité idéale
lorsque vous écoutez le volume de la parole. Parlez environ 5 secondes près du
microphone pour régler le volume idéal avant d’enregistrer.
Les meilleures performances sont normalement obtenues avec un microphone externe dont
la sensibilité est réglée sur Haute (H).
La sensibilité par défaut est définie sur normale lors de la livraison du périphérique. Les options
sont les suivantes:
●Élevé (H): 0 dB (typique de la plupart des microphones et des situations)
●Moyen (M): - 3 dB (typique de certains microphones externes)
●Low (L): - 6 dB (typique pour les microphones externes à volume élevé)
Pour modifier la sensibilité, déplacez le commutateur de sensibilité situé sur le côté de l'appareil.
Vous pouvez entendre une augmentation du bruit dans les positions M et L.
Remarque: Il se peut que vous entendiez un petit bruit lorsque vous modifiez la sensibilité ou les
options d'entrée du microphone. Ceci est normal et il n’est pas recommandé de le changer
pendant l’enregistrement.
Microphones externes
Le MightyMic Pro prend en charge la connexion de microphones externes conçus pour les prises
de casque Smartphone telles que la série de microphones MightyMic. Le microphone doit avoir 4
broches sur la fiche pour fonctionner correctement. Les écouteurs avec commutateurs (comme
EarPods) et les microphones à 3 broches conçus pour la caméra ne fonctionneront pas avec cet
appareil.
Insérez simplement le microphone dans la prise casque et déplacez le commutateur du réglage du
microphone interne (I) au réglage du microphone externe (E). Pour revenir au microphone interne,
vous devez ramener le commutateur sur le réglage du microphone interne (I) situé sur le côté de
l'appareil.
Chargement de l'appareil
Assurez-vous que votre appareil est complètement chargé avant la première utilisation.
Le MightyMic Pro comprend un câble de charge USB-A à USB-C. Cela vous permet d'utiliser
n'importe quel chargeur de téléphone standard (non inclus) pour charger le périphérique Bluetooth
Le connecteur USB-C est d'une qualité bien supérieure aux autres ports de chargement micro-
USB et peut transmettre plus d'énergie à un chargement plus rapide
Insérez la borne USB de votre câble de chargement dans un chargeur de téléphone de type USB-
A et connectez l’autre borne à la prise USB-C du microphone. Pendant le chargement, le voyant
rouge à l'avant s'allume Rester sur. Lorsque le chargement est terminé, le voyant s'éteint
Le MightyMic Pro peut fonctionner pendant le chargement ou lorsqu'il est alimenté par une source
de batterie externe
Remarque: le port de charge USB-C ne prend pas en charge le transfert de données. C'est pour
charger seulement.

MightyMic Pro Benutzerhandbuch
17
Mikrofon
Externes
Mikrofon /
Kopfhörer
Jack
Power /
Multifunktion
Knopf (MF)
LED Status
Indikator
Mikrofon-
Empfindlichk
eitsschalter
Interner/externer
Mikrofonwähler
USB-C
Ladeanschluss
Lautstärke /
Next Song-
Tasten
Beschreibung
Allgemeine Funktionen
Funktion Benötigte Aktion
Anschalten Halten Sie die Taste „MF“ gedrückt, bis die LED zu blinken
beginnt. Die Verbindung wird normalerweise automatisch
hergestellt, wenn sie zuvor gepaart wurde
Verbindungsmodus Wenn das Gerät ausgeschaltet ist, halten Sie die "MF" -Taste
gedrückt, bis die blauen / roten LEDs zu blinken beginnen.
Koppeln Sie das Mikrofon mit Ihrem Gerät. Das Mikrofon schaltet
sich aus, wenn es 5 Minuten lang nicht gekoppelt ist
LED-Anzeigelampe Blau blinkend Power On und PairedFlashing Blue / Red-Pairing-
ModusSchnelles rotes Blinken 3-mal-Low Power-Warnung
Ausschalten
Halten Sie die „MF“ -Taste gedrückt, bis die blaue LED erlischt,
um den Akku zu schonen. Das Mikrofon schaltet sich nicht
automatisch aus, wenn es nicht verwendet wird, sondern, wenn
es 5 Minuten lang nicht gekoppelt wird
Multifunktionstaste (MF) Drücken Sie die Taste „MF“, um das Gerät ein- oder
auszuschalten, die Musik anzuhalten / abzuspielen oder die
Telefonfunktionen zu aktivieren
Kopplung löschen
Halten Sie beim Einschalten die Taste „MF“ ca. 8 Sekunden lang
gedrückt, bis sie sich einschaltet und dann ausschaltet.
Batteriestatus Der Akkustatus wird nach dem Pairing in der oberen rechten
Ecke des Telefonbildschirms angezeigt. (Nur auf iOS-Geräten)
Telefonanrufe Siehe Abschnitt Telefonfunktion

MightyMic Pro Benutzerhandbuch
18
Pairing mit einem iOS- oder Android-Gerät
Um Ihr Bluetooth-Mikrofon zu verwenden, müssen Sie es zuerst mit einem Gerät koppeln. Sobald Ihr
Bluetooth-Mikrofon mit einem bestimmten Gerät gekoppelt ist, bleiben sie gekoppelt, solange sie sich
in Reichweite befinden.
Pairing-Anweisungen:
● Schalten Sie Ihr Telefon oder Gerät ein und stellen Sie sicher, dass die Bluetooth-Funktion
aktiviert ist
● Halten Sie die "MF" -Taste an der Vorderseite des Mikrofons gedrückt, bis die blauen / roten
LEDs zu blinken beginnen
● Wählen Sie in der App Einstellungen auf dem Gerät die Option Bluetooth. Suchen Sie nach einem
Bluetooth-Gerät mit der Bezeichnung „MightyMic Pro“, um es mit dem Mikrofon zu koppeln
● Die Anzeige sollte von „Nicht gekoppelt“ auf „Verbunden“ wechseln. Wenn nicht, tippen Sie auf
das aufgeführte Gerät, um es zu koppeln
● Wenn Sie zuvor gepaart haben, müssen Sie möglicherweise nur das „MightyMic Pro“ -Gerät
berühren, um die Verbindung wiederherzustellen, oder es wird möglicherweise automatisch eine
Verbindung hergestellt
Verwenden des MightyMic Pro-Mikrofons
Für beste Ergebnisse an einem offenen Ort ohne Hindernisse zwischen Mikrofon und Telefon
verwenden. Insbesondere Menschen können Störungen verursachen.
Wir empfehlen Ihnen dringend, Ihr Telefon in den Flugzeugmodus zu versetzen, wenn
Bluetooth aktiviert ist. Andernfalls werden die Aufzeichnungen möglicherweise durch
unerwünschte Anrufe unterbrochen
Um die Audiowiedergabe zu hören, während das Bluetooth-Mikrofon gekoppelt ist, schließen
Sie Kopfhörer an das Mikrofon an oder schalten Sie Bluetooth aus, um über das Telefon zu
hören. Öffnen Sie bei iOS-Geräten das Control Center und wählen Sie die Airplay-Schaltfläche,
um die gewünschte Wiedergabeoption manuell auszuwählen.
Pause Drücken Sie die Taste „MF“, um die Musik anzuhalten
Lautstärke erhöhen Halten Sie die Taste „+“ gedrückt, um die Lautstärke zu erhöhen
Lautstärke runter Halten Sie die Taste "-" gedrückt, um die Lautstärke zu verringern
Nächster Titel Drücken Sie kurz die Taste „+“, um zum nächsten Titel zu wechseln
Vorheriges Lied Drücken Sie kurz die Taste "-", um zum vorherigen Titel zu wechseln
Verwenden der Monitorfunktion
Viele Apps unterstützen die Audioüberwachung während der Aufnahme. Schließen Sie Kopfhörer an
die 3,5-mm-Buchse des MightyMic Pro oder an die Monitorbuchse des Mikrofons an, um die von der
App zurückgegebenen Töne zu hören. Aufgrund der Übertragungsfunktionen tritt eine gewisse
Verzögerung des Monitorsignals auf. Diese Verzögerung tritt bei der Aufnahme nicht auf.

MightyMic Pro Benutzerhandbuch
19
LED Status LED-Anzeige
Ein Die blaue LED blinkt beim Anschließen zweimal
Ausschalten Die blaue LED blinkt einmal und die rote LED einmal
Paarung Die rote und blaue LED blinken abwechselnd
Nicht verbunden Die blaue LED blinkt einmal pro Sekunde
Standby Modus Die blaue LED blinkt zweimal alle 3 Sekunden
Angeschlossener Standby-
Modus
Die blaue LED leuchtet dauerhaft
Verbundener Arbeitsmodus Die blaue LED blinkt alle 5 Sekunden
Mehrpunktverbindung Die blaue LED leuchtet dauerhaft. Die LED kann je nach
Telefontyp unterschiedlich blinken
Batterie schwach Die rote LED blinkt dreimal schnell
Aufladen Die rote LED leuchtet dauerhaft
Voll aufgeladen Die rote LED erlischt
LED-Anzeigen
Verwenden des MightyMic Pro für die Videoaufnahme
1) Verbinden Sie das Bluetooth-Mikrofon, bevor die App gestartet wird. Möglicherweise müssen
Sie das Bluetooth-Mikrofon in den Einstellungen der App als Option auswählen
2) Wenn bei einigen Apps das Bluetooth-Mikrofon nach dem Start der App verbunden wird, wird
das Bluetooth-Mikrofon automatisch gestartet und das Mikrofonsymbol wird möglicherweise
blau, um anzuzeigen, dass ein Bluetooth-Mikrofon aktiv ist
3) Wenn das Bluetooth-Mikrofon getrennt wird, während die App aktiv ist, wechselt die App
zurück zum integrierten Mikrofon.
4) Um zu bestätigen, dass das Mikrofon angeschlossen ist, führen Sie eine Testaufnahme
durch oder gehen Sie zum Abschnitt Einstellungen. Wenn Sie den Bereich Einstellungen
verlassen, wird das Bluetooth-Mikrofon normalerweise wieder aktiviert.
5) Für die Bluetooth-Videoaufnahme wird eine Video-App wie FilmicPro oder MoviePro (IOS)
oder Cinema FV-5 (Android) benötigt. Bitte überprüfen Sie unsere Website auf Updates
bezüglich dieser oder anderer unterstützter Apps.
6) Möglicherweise hören Sie eine Audioverzögerung, während Sie die Aufnahme überwachen.
Das ist normal. Diese Verzögerung tritt bei der Aufnahme nicht auf
Verwenden des MightyMic Pro für Audioaufnahmen
Der MightyMic Pro unterstützt Audio-Apps, die für die Verwendung mit externen Bluetooth-
Geräten entwickelt wurden.
Eine Audio-App wie die Voice Memo App (IOS) wird für die Bluetooth-Audioaufnahme benötigt.
Bitte überprüfen Sie unsere Website auf Updates bezüglich dieser oder anderer unterstützter
Apps.
Table of contents
Languages:
Popular Microphone manuals by other brands

Toa
Toa WM-358M user guide

Acoustic Magic
Acoustic Magic Voice Tracker II instructions

Sony
Sony ECM-CS10 Operating Instructions / Manual de instrucciones / Mode d’emploi / Manual de... Specifications

Sennheiser
Sennheiser MM 435 quick guide

Peavey
Peavey ALM-16 Specifications

Tema Telecomunicazioni
Tema Telecomunicazioni AD696/AA product manual