Amptek X-123 User manual

X-123 Quick Start Guide Rev A1
Page 1 of 4
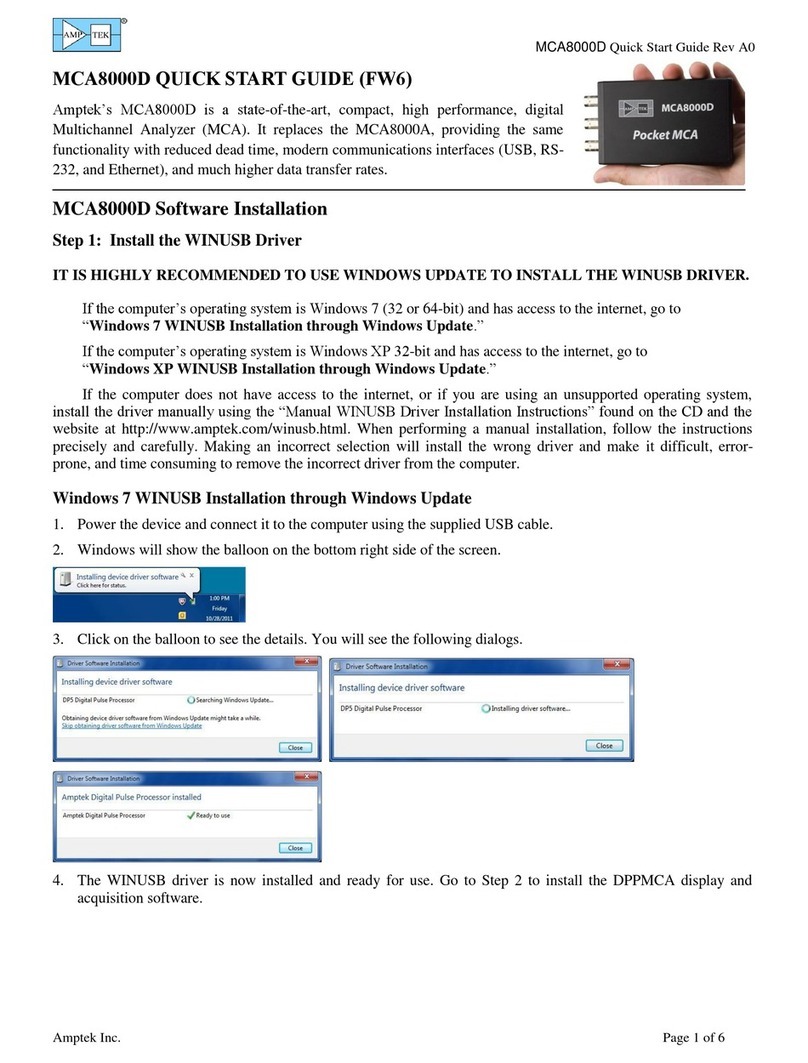
X-123 QUICK START GUIDE
Equipment List for an Amptek X-123 system:
•X-123 X-Ray Spectrometer.
•Mini USB cable.
•+5 VDC power supply.
•Amptek Installation CD.
•A PC (supplied by the user) with Windows 98SE or higher (Windows XP PRO SP2 recommended).
NOTE: The Amptek X-123 is a combination of other Amptek products. The x-ray detector and preamplifier are the same as
the XR100CR. The digital pulse processor is the DP4, and the power supply board is the PC4-3. Please refer to the user
manuals and specifications of those products (included on the CD) for more complete information.
Software Installation
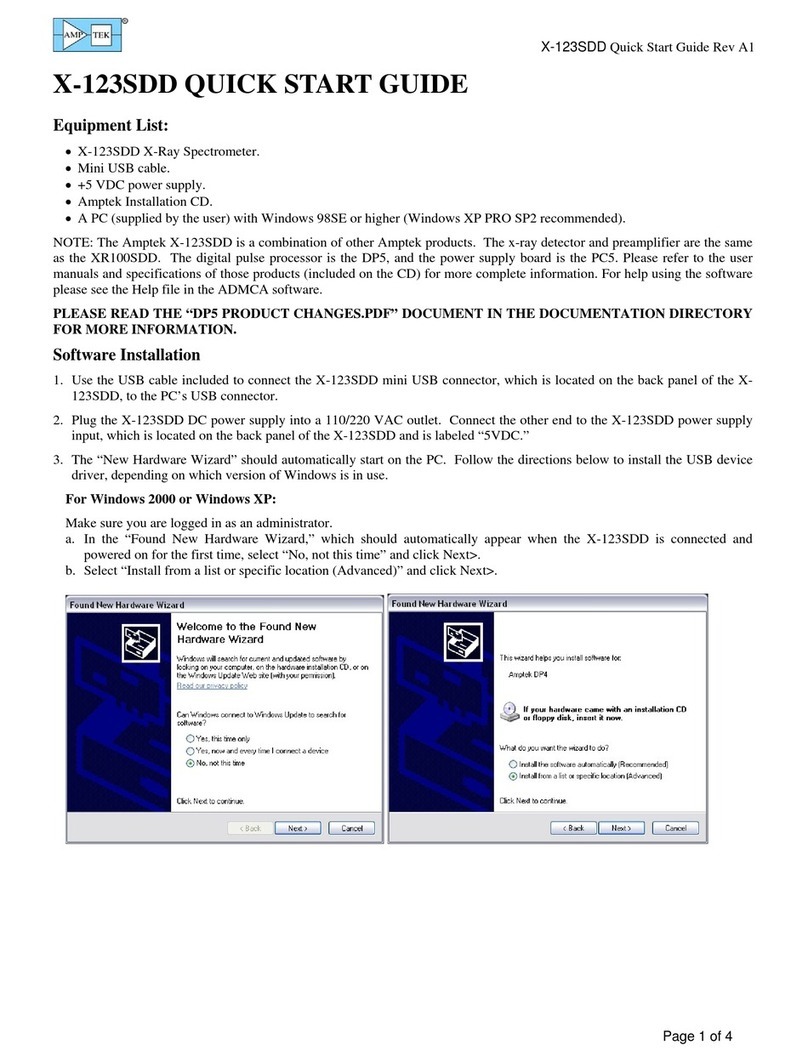
1. Use the USB cable included to connect the X-123 mini USB connector, which is located on the back panel of theX-123, to
the PC’s USB connector.
2. Plug the X-123 DC power supply into a 110/200 VAC outlet. Connect the other end to the X-123 power supply input,
which is located on the back panel of the X-123 and is labeled “5VDC.”
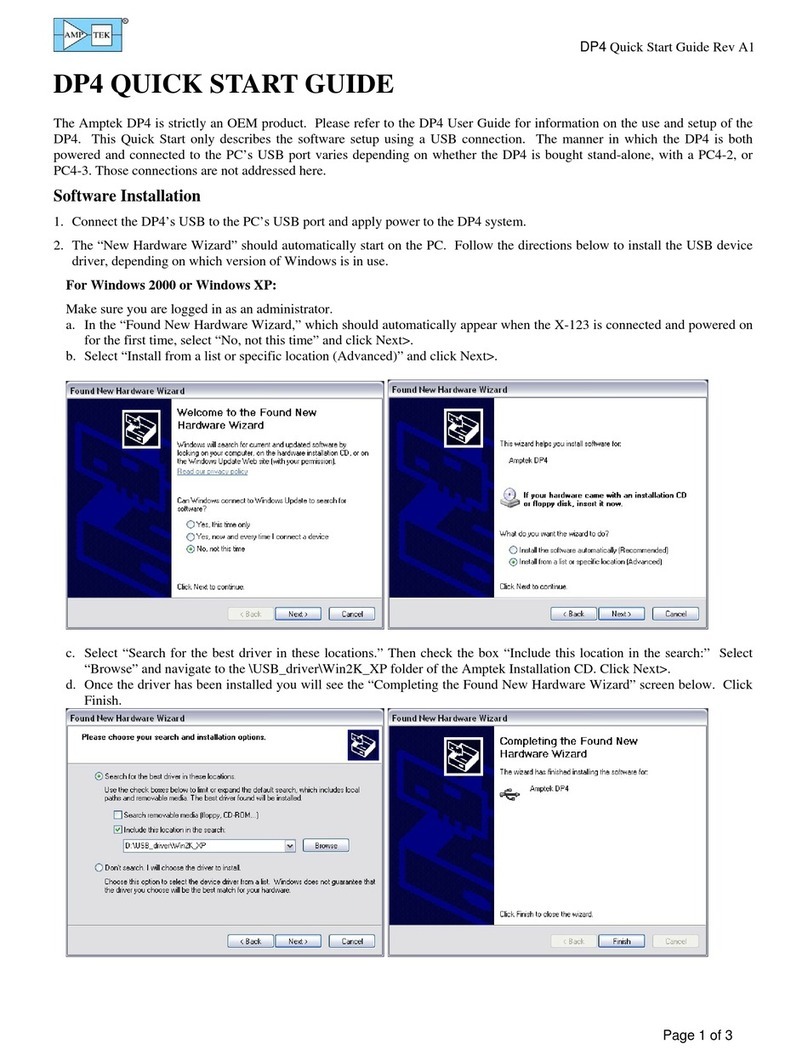
3. The “New Hardware Wizard” should automatically start on the PC. Follow the directions below to install the USB device
driver, depending on which version of Windows is in use.
For Windows 2000 or Windows XP:
Make sure you are logged in as an administrator.
a. In the “Found New Hardware Wizard,” which should automatically appear when the X-123 is connected and powered on
for the first time, select “No, not this time” and click Next>.
b. Select “Install from a list or specific location (Advanced)” and click Next>.
c. Select “Search for the best driver in these locations.” Then check the box “Include this location in the search:” Select
“Browse” and navigate to the \USB_driver\Win2K_XP folder of the Amptek Installation CD. Click Next>.
d. Once the driver has been installed you will see the “Completing the Found New Hardware Wizard” screen below. Click
Finish.

X-123 Quick Start Guide Rev A1
Page 2 of 4
For Windows 98 or Windows ME:
a. The “Add New Hardware Wizard” should automatically appear when the X-123 is connected and powered on for the first
time. Click Next >.
b. Select “Search for the best driver for you device” and click Next >.
c. Select only “Specify a location:”, click “Browse” and navigate to the \USB_driver\Win98_ME folder of the Amptek
Installation CD. Click Next >.
d. Windows is now ready to install the driver. Click Next >.
e. Click Finish. The USB driver should now be installed.
4. Now that the USB driver is installed, the display and control software can be loaded onto the PC. Locate the directory
called “ADMCA” on the Amptek Installation CD and copy the entire directory onto your computer. In that directory is the
“ADMCA.exe” file. Open this file to start the software. You can right-click on the ADMCA.exe file and create a shortcut
which can be palced on your desktop for easy access.
X-123 Connection Instructions
1. Verify that the X-123 is completely unplugged (both USB and power).
2. Use the USB cable to connect the X-123 USB connector, which is located on the back panel, to the PC’s USB connector.
3. Plug the DC power supply into a 110/220 AC outlet. Connect the other end to the X-123 power supply input, which is
labeled “5VDC” and is located on the back panel.
NOTE: Grounding is critical to obtaining the best performance. Specifically, we strongly recommend using a single point
ground for the system. To ensure this, use a 3-prong to 2-prong adapter on the power supply of any notebook computer.
This prevents the notebook from introducing a second ground into the system.
XR100CR
X-Ray Detector
and Preamplifier
DP4
DIgital Pulse
Processor
PC4-3
Power Supply
& Interface
Board +5VDC
USB/
RS232
+/-5V,
+3.3V
USB/
RS232
Detector H.V., Cooler Power, Preamp Power
X-123 Spectrometer
AC
Power
Adapter
Figure 1: Connection Diagram

X-123 Quick Start Guide Rev A1
Page 3 of 4
Figure 3: Properties dialogue box.
Figure 4: Acquisition spectrum for an 55Fe source.
Figure 2: Starting ADMCA
Quick Use of the X-123
1. Connect the X-123 and PC as described in the previous section.
2. Launch the ADMCA software by opening the ADMCA.exe file.
3. When the “Starting ADMCA” box appears as in figure 2, select DP4 and click on
“Connect.” The X-123 unit should now be connected to the software. To verify
this, confirm that the correct serial number for the X-123 is shown in the top right
corner of the software. The serial number can be found on the side of the X-123.
The USB symbol located at the bottom right corner of the software should be
green.
4. Now that the X-123 is connected, the proper configuration must be selected for
the detector. The ADMCA software includes configurations for most Amptek
detectors. These configurations are identified by the detector material, dimensions, and cooler type.
5. To select a configuration select “DP4/PX4 Setup” under the “DPP”
dropdown list in the software or by clicking the “acquisition setup”
button on the toolbar. The dialogue box shown in Figure 3 will appear.
The configurations can be selected through the dropdown menu
labeled “Read Amptek Detector Configuration.”
6. Once the correct configuration is selected from the dropdown menu the
indented grey area above the dropdown menu should read (for
example) “Loaded Si 6mm2/500um 2-Stage Cooler configuration.”
Click "Show Current Configuration" to view the settings. A box will
appear with the settings. Click OK to exit the box.
7. To apply the selected configuration, click the “Apply” button. Then
select the “OK” button to exit this dialogue box.
8. Now that the X-123 has the loaded the appropriate configuration for
that detector, an acquisition can be started. Place a source in front of
the detector. To start an acquisition, press the space bar. The space
bar will also stop an acquisition which is in progress. It may take the
detector a minute to stabilize, so if the acquisition does not look correct
wait a few minutes and then press the “A” key on the keyboard to clear
the acquisition and begin a new one. It can take up to 2 minutes for an
Amptek detector to stabilize after a configuration has been sent.
9. Once the detector has stabilized, adjust some of the thresholds which
prevent low-end noise and other unwanted counts from affecting the
spectrum. This can be done automatically by the software.
Follow these steps:
oMake sure that an acquisition has been started. Be sure
to REMOVE any sources from in front of the detector.
Open thet “DP4/PX4 Setup,” as shown previously.
oClick on the “MCA” tab and then click the “Tune Slow
Threshold” button. The software will automatically set
the slow threshold for the current Gain setting.
oClick on the “Shaping” tab and then click the “Tune
Fast Threshold” button. The software will automatically
set the fast threshold for the current Gain setting.
Depending on the DP4 inside of the X-123, this may be
greyed out. In this case the user will have to set the Fast
Threshold manually as described in the Notes and
Troubleshooting at the end of this document.
10. A common adjustment is to change the gain of the X-123.
This can be changed in the “Gain & Pole Zero” tab of the properties dialogue box. It is necessary to readjust the
thresholds whenever the gain is changed. This can be done automatically as explained in the previous step.

X-123 Quick Start Guide Rev A1
Page 4 of 4
Notes and Troubleshooting:
oBy default, the software accumulates the counts (MCA mode). During set-up it may be convenient to use “DELTA”
mode, where counts are not integrated but are updated every second (i.e. only one second’s worth of data are displayed
every second). Click the toolbar icon marked “MCA/DELTA Mode” to toggle between DELTA and MCA mode.
oIf no spectrum appears, check that the system is acquiring data. The “Status” on the right hand Info Panel should read
“acquiring.”
oSometimes no spectrum will appear if PUR is enabled and the Fast Threshold is set improperly (in the Properties-Shaping
tab). Turn PUR off and check if the spectrum appears. If it does, then the Fast Threshold needs to be set correctly.
Remove any source from in front of the detector and click the “Tune Fast Treshold” button. Put the source back and
check if the spectrum appears. If it does not, then you will have to adjust it manually as described below.
oThe Fast and Slow Thresholds can also be adjusted manually. First turn off PUR as described above. Then click the
cursor to channel 1 and press F8. This will set the Slow Threshold (LLD) to channel 1. This will show the noise of the
system. Click the cursor just to the right of the noise and then press F8. Press the “A” key to clear. There should be no
counts accumulating. Now put the device into “Delta” mode by clicking the Delta button on the toolbar. Open the
DPP/PX4 properties and go to the Shaping page. Adjust the Fast Threshold until 5 to 15 counts per second appear in the
Input Counts in the right-hand Info Panel. Now turn on PUR and click OK. Click the Delta button to get back to normal
MCA mode and put the source back in front of the detector. The Input Counts should slightly exceed the Counts.
oSometimes no spectrum will appear if the “Input Offset” is set incorrectly. For the X-123 the Input Offset is set by
apotentiometer on the DP4. See the DP4 User’s Manual for more information on setting the Input Offset.
oIf problems persist, there may be a communication or configuration problem. Unplug the X-123 power and close the
software. Then open the software and plug in the X-123 power adapter. In the bottom left-hand corner of the software
you should see a 1 Detected for the USB connection. Once you see this, click on Connect. Then go to the DP4/PX4
Propertires page and reload the appropriate default configuration as discussed above and try the acquisition again.
Other manuals for X-123
2
Table of contents
Other Amptek Measuring Instrument manuals