manuals.online logo
Brands
  1. Home
  2. •
  3. Brands
  4. •
  5. AMSL Diabetes
  6. •
  7. Medical Equipment
  8. •
  9. AMSL Diabetes V-Go Guide

AMSL Diabetes V-Go Guide

Other AMSL Diabetes Medical Equipment manuals

AMSL Diabetes t:slim X2 Installation and operation manual

AMSL Diabetes

AMSL Diabetes t:slim X2 Installation and operation manual

Popular Medical Equipment manuals by other brands

Itamar Medical WatchPAT Operation manual

Itamar Medical

Itamar Medical WatchPAT Operation manual

PROTEOR 1P650 KNEE Assembling and adjustment instructions

PROTEOR

PROTEOR 1P650 KNEE Assembling and adjustment instructions

Liberate Medical VentFree user manual

Liberate Medical

Liberate Medical VentFree user manual

Dicarre DA20 user guide

Dicarre

Dicarre DA20 user guide

Stryker Medical M Series Operation manual

Stryker Medical

Stryker Medical M Series Operation manual

Invacare ScanBed 750 user manual

Invacare

Invacare ScanBed 750 user manual

Getinge Arjohuntleigh Nimbus 3 Professional Instructions for use

Getinge

Getinge Arjohuntleigh Nimbus 3 Professional Instructions for use

Mettler Electronics Sonicator 730 Maintenance manual

Mettler Electronics

Mettler Electronics Sonicator 730 Maintenance manual

Pressalit Care R1100 Mounting instruction

Pressalit Care

Pressalit Care R1100 Mounting instruction

Denas MS DENAS-T operating manual

Denas MS

Denas MS DENAS-T operating manual

bort medical ActiveColor quick guide

bort medical

bort medical ActiveColor quick guide

AccuVein AV400 user manual

AccuVein

AccuVein AV400 user manual

agiliti NP Trio user manual

agiliti

agiliti NP Trio user manual

Rocket Medical Rocket Digital Oocyte Aspiration Pump Service manual

Rocket Medical

Rocket Medical Rocket Digital Oocyte Aspiration Pump Service manual

Monteris Medical Neuroblate Instructions for use

Monteris Medical

Monteris Medical Neuroblate Instructions for use

Otto Block 8E33 7 manual

Otto Block

Otto Block 8E33 7 manual

ADVANCED HOME CARE Helios Guide

ADVANCED HOME CARE

ADVANCED HOME CARE Helios Guide

NeuLog NUL-208 Guide

NeuLog

NeuLog NUL-208 Guide

manuals.online logo
manuals.online logoBrands
  • About & Mission
  • Contact us
  • Privacy Policy
  • Terms and Conditions

Copyright 2025 Manuals.Online. All Rights Reserved.

Insulin Patch Pump
for Type 2 Diabetes
You have been given this resource because your healthcare professional
has chosen this product as a suitable treatment option for you.
Patient Start Guide
Get Started with V-Go®
Start on V-Go®, stay on track
Learning something new can be challenging. We have the support you need to start and
stay on V-Go successfully.
• We have a dedicated 24/7 Australian-based Customer Care Team available on
1300 851 056.
Always read the label and use only as directed. Read the warnings available on
www.amsldiabetes.com.au/resources
Breakfast Lunch DinnerSnack
3
With V-Go, you can help control your blood glucose levels with fast-acting insulin and
1 application per day.†This means eliminating the need for multiple daily injections to
help improve blood glucose control throughout the day and night and at mealtimes.1-4
V-Go is a simple, all-in-one insulin
delivery system that fits your lifestyle
V-Go helps you because it delivers insulin much like your body is supposed to. It helps
you manage your Type 2 Diabetes by delivering a steady rate of insulin 24 hours a day
(basal). V-Go also enables you to give yourself a dose of insulin at mealtimes (bolus).*
*Follow the V-Go Instructions for Patient Use.
†A U-100 fast-acting insulin should be used with V-Go. Consult your healthcare professional to see which product is right for you.
INSULIN DELIVERY WITH V-Go
Fast-acting insulin,†1 application daily
On-demand dosing
at mealtimes (bolus)
Steady rate of insulin
24/7 (basal)
On-demand dosing
for snacks (bolus)
Back of the arm
Choosing a V-Go application site
• Apply V-Go vertically to the back of your arm or thigh, or horizontally
to your abdomen or back (avoiding folds of skin, muscle, or bone)
• Avoid areas with lots of hair or shave them
• Be sure you can easily operate V-Go before applying
• Make sure the site is clean and dry before applying
Insulin delivery that’s worn
like a patch
Abdomen or back,
avoiding folds of skin,
muscle, or bone
Where to
place your
V-Go
Thigh
5
pDo not take any other insulin injections in combination with V-Go
unless directed by your healthcare professional
pOnly wear V-Go in one of the recommended locations on the
previous page
pOnce V-Go is applied, make sure to press the Start Button until it
locks to begin the flow of insulin†
pUse the 2 Bolus Delivery Buttons to deliver the prescribed
amount of insulin (1 click = 2 Units) at mealtime
pAfter a full 24 hours, replace V-Go with a new filled V-Go. If V-Go
falls off, replace it with a new filled V-Go immediately
pIf you have any technical enquiries, contact the AMSL Diabetes
Customer Care Team on 1300 851 056*
Day 1: Start right*
*AMSL Diabetes does not give medical advice about insulin therapy. Discuss all medical therapies with your healthcare
professional.
†Further resources on the application of V-Go are available at amsldiabetes.com.au.
Fill this worksheet out with your
healthcare professional.
Time to apply a new V-Go each day:
At mealtimes, use the amount of insulin prescribed by your healthcare professional
(1 click = 2 Unit s).
How many times will I click the
V-Go Bolus Delivery Button?
How many insulin
units will there be?
Breakfast clicks = Units
Lunch clicks = Units
Dinner clicks = Units
Snack clicks = Units
Make sure to keep track of the number of clicks you give yourself at each meal.
• If you lose count, STOP clicking, monitor your blood glucose and follow the
plan agreed upon with your healthcare professional.
Follow-up appointments:
• Follow-up appointment with your healthcare professional (1st)
• Follow-up appointment with your healthcare professional (2nd)
Getting started with V-Go
Fill How to properly fill V-Go with fast-acting insulin*using EZ Fill
Using V-Go
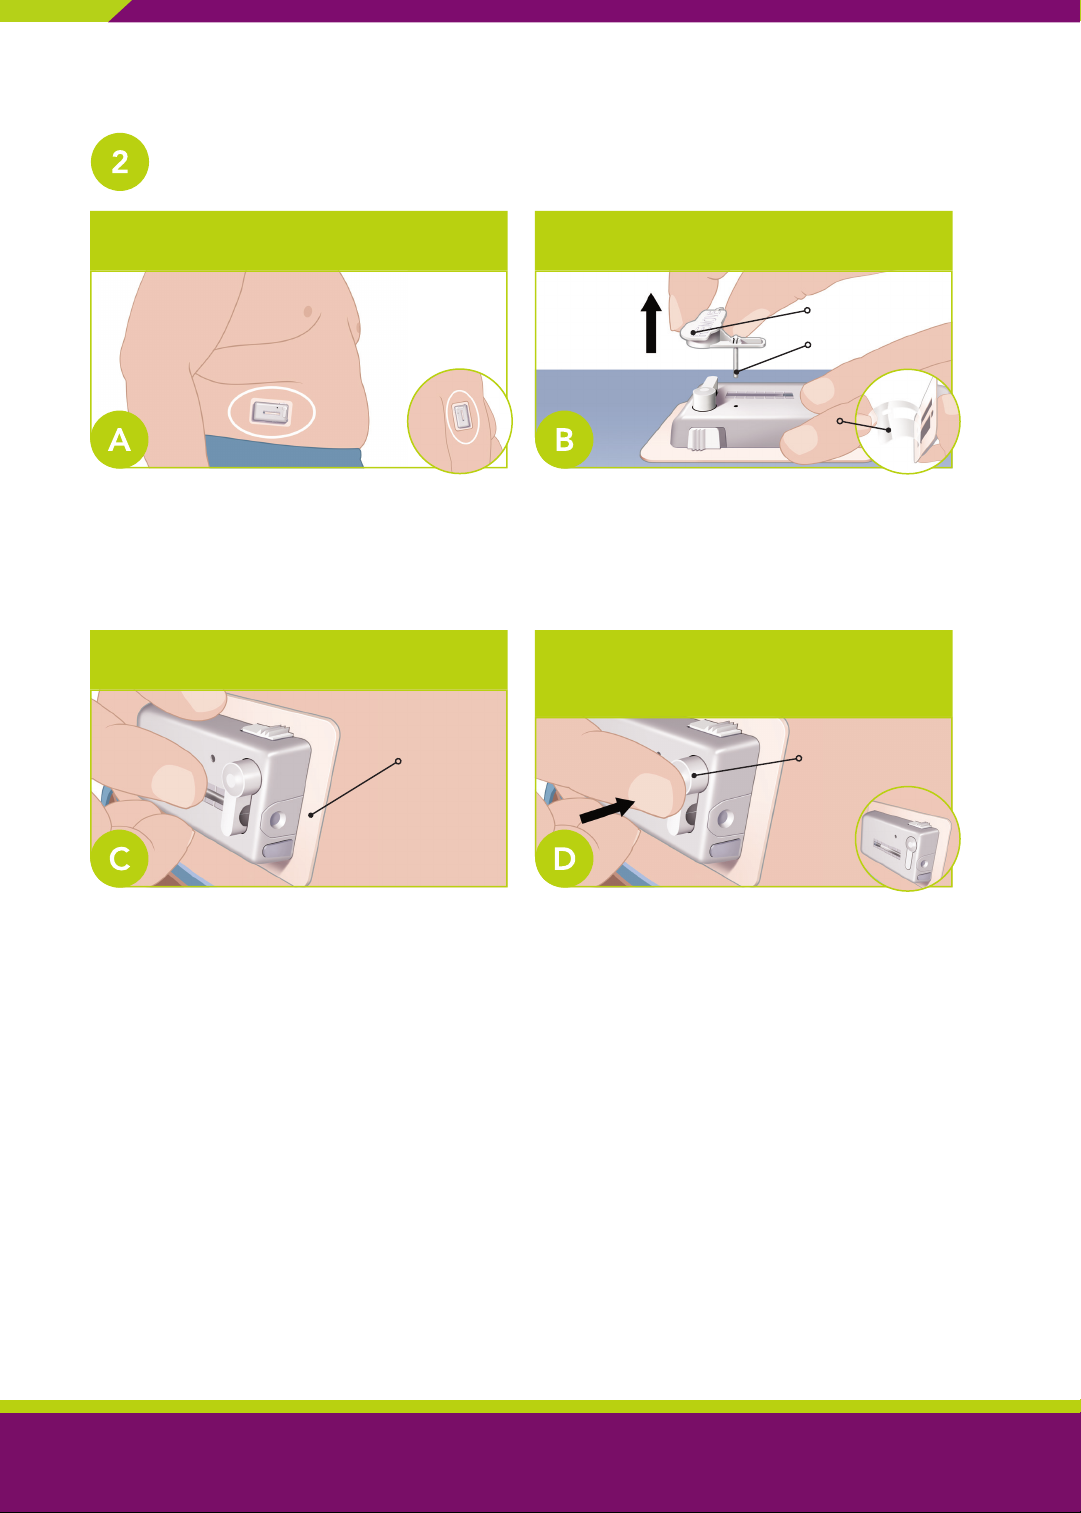
Remove plug and insert V-Go Insert vial and draw insulin into EZ Fill
1. Pull ribbed drawer handle and
lift plug out of EZ Fill; set aside
2. Slide V-Go into EZ Fill drawer
with adhesive side up and Button
Cover down
3. Hold V-Go down and push
drawer closed
1. Remove the insulin vial cap and
EZ Fill cap
2. Keep EZ Fill upright and turn insulin
vial upside down, pushing firmly into
vial holder
Fill with insulin and check V-Go Remove V-Go, check and clean
1. Slowly pull up plunger as far as it
can go; wait 5 seconds
2. Then slowly push plunger down
over 25 seconds
3. Watch V-Go fill with insulin in a
continuous flow of droplets
4. Check that V-Go is full— a few
small bubbles are normal
1. Remove V-Go; leave plunger in
down position
2. Ensure that V-Go is filled and there are
no large air bubbles
3. Clean and place plug back in EZ Fill;
store in the refrigerator (do not freeze)
V-Go
Button Cover
EZ Fill
Tab
Insulin Vial
Vial Holder
Plunger
Slowly
*A 100-U fast-acting insulin should be used with V-Go. Consult your healthcare professional to see which product is right for
you.
Please read the Instructions for Patient Use for additional information on how to use the V-Go Insulin Patch Pump or visit
amsldiabetes.com.au for additional resources.
7
Select and prepare site Remove button cover and liner
1. Select application site—avoid hairy
areas, skin folds, muscle and bone*
2. Clean area with alcohol swab
and let the area dry
1. Pull Button Cover straight up
and discard
2. Lift adhesive tab and remove
adhesive liner
Attach V-Go Insert needle to start 24-hour
preset basal rate of insulin
1. Press V-Go onto the skin for
5-10 seconds
2. Avoid pushing buttons during
application
1. With firm motion, press rounded
top of Needle Button completely
into V-Go until you hear a click and
button locks in place
2. Needle must lock to begin flow
of insulin
Adhesive Pad Needle Button
Cover Pin
Button Cover
Adhesive Liner
Wear How to correctly apply V-Go and begin the flow of insulin
*Ensure you can easily operate V-Go in this location before applying.
Activate Bolus Ready Button Deliver mealtime insulin
1. Locate and press the Bolus Ready
Button
2. Bolus Delivery Button will pop out
and you will hear a click
How to correctly remove V-Go
1. Push Bolus Delivery Button into
V-Go until it stops and clicks
(1 click = 2 Units of insulin)
After 24 hours, remove by
releasing needle
Remove and discard
1. In one motion, firmly slide and
press Needle Release Button
1. Ensure the Needle Release Button
has popped up
2. Carefully peel V-Go away from
the skin and discard according to
instructions for use
Peel
Slide Needle Release
Button
Press
Bolus
Delivery Button
Click
Bolus Ready Button
Go How to deliver mealtime insulin with V-Go
9
Tracking your blood glucose levels
Record your blood glucose (BG) reading before meals and the number of times you clicked
the V-Go Bolus Delivery Button.
Notes:
Day 1 / / / /
Day 2 / / / /
Day 3 / / / /
Day 4 / / / /
Day 5 / / / /
Day 6 / / / /
Day 7 / / / /
Avg. / / / /
Breakfast
BG/Clicks
Lunch
BG/Clicks
Dinner
BG/Clicks
Snacks
BG/Clicks
Bedtime
BG Only