logo
Brands
  1. Home
  2. •
  3. Brands
  4. •
  5. AMT
  6. •
  7. Water Pump
  8. •
  9. AMT 4230-97 Assembly instructions

AMT 4230-97 Assembly instructions

This manual suits for next models

1

Other AMT Water Pump manuals

AMT 07ES05C Series Assembly instructions

AMT

AMT 07ES05C Series Assembly instructions

AMT 3931-99 Assembly instructions

AMT

AMT 3931-99 Assembly instructions

AMT 3161-95 Assembly instructions

AMT

AMT 3161-95 Assembly instructions

AMT 3941-96 Assembly instructions

AMT

AMT 3941-96 Assembly instructions

AMT 4820-95 Assembly instructions

AMT

AMT 4820-95 Assembly instructions

AMT 2762-98 1-1/2HP Assembly instructions

AMT

AMT 2762-98 1-1/2HP Assembly instructions

AMT 3390-99 Assembly instructions

AMT

AMT 3390-99 Assembly instructions

AMT 5790-95 Assembly instructions

AMT

AMT 5790-95 Assembly instructions

AMT 3160-99 Assembly instructions

AMT

AMT 3160-99 Assembly instructions

AMT 3S5P User manual

AMT

AMT 3S5P User manual

AMT 2850-99 Assembly instructions

AMT

AMT 2850-99 Assembly instructions

AMT 3899-98 Assembly instructions

AMT

AMT 3899-98 Assembly instructions

AMT 4895 Assembly instructions

AMT

AMT 4895 Assembly instructions

AMT 3682 Assembly instructions

AMT

AMT 3682 Assembly instructions

AMT 489B-98 Assembly instructions

AMT

AMT 489B-98 Assembly instructions

AMT 489G-98 Assembly instructions

AMT

AMT 489G-98 Assembly instructions

AMT 5736 Assembly instructions

AMT

AMT 5736 Assembly instructions

AMT 2827-98 1/2HP Assembly instructions

AMT

AMT 2827-98 1/2HP Assembly instructions

AMT 5580 Assembly instructions

AMT

AMT 5580 Assembly instructions

AMT Crono S-PID 30 Operating instructions

AMT

AMT Crono S-PID 30 Operating instructions

AMT 2827-98 User manual

AMT

AMT 2827-98 User manual

AMT 2852-95 Assembly instructions

AMT

AMT 2852-95 Assembly instructions

AMT 1.5G2P User manual

AMT

AMT 1.5G2P User manual

AMT Contractor Series Assembly instructions

AMT

AMT Contractor Series Assembly instructions

Popular Water Pump manuals by other brands

Neptun NPHW 5500 operating instructions

Neptun

Neptun NPHW 5500 operating instructions

Sensidyne Gilian BDX-II Operation & service manual

Sensidyne

Sensidyne Gilian BDX-II Operation & service manual

Draper 47808 instructions

Draper

Draper 47808 instructions

Trolla 12820 manual

Trolla

Trolla 12820 manual

Sunfab SVH Series installation guide

Sunfab

Sunfab SVH Series installation guide

WilTec 50740 Operation manual

WilTec

WilTec 50740 Operation manual

Fieldmann FVC 5015 EK user manual

Fieldmann

Fieldmann FVC 5015 EK user manual

Everbilt EFSUB5-122HD Use and care guide

Everbilt

Everbilt EFSUB5-122HD Use and care guide

Graco Husky 3300e manual

Graco

Graco Husky 3300e manual

esotec 101018 operating manual

esotec

esotec 101018 operating manual

Becker BASIC VASF 2.80/1-0.AC230 operating instructions

Becker

Becker BASIC VASF 2.80/1-0.AC230 operating instructions

Sykes AmeriPumps GP100M Operation and maintenance instructions

Sykes AmeriPumps

Sykes AmeriPumps GP100M Operation and maintenance instructions

DUROMAX XP WX Series user manual

DUROMAX

DUROMAX XP WX Series user manual

BRINKMANN PUMPS SBF550 operating instructions

BRINKMANN PUMPS

BRINKMANN PUMPS SBF550 operating instructions

Franklin Electric IPS Installation & operation manual

Franklin Electric

Franklin Electric IPS Installation & operation manual

Xylem e-1532 Series instruction manual

Xylem

Xylem e-1532 Series instruction manual

Milton Roy PRIMEROYAL instruction manual

Milton Roy

Milton Roy PRIMEROYAL instruction manual

STA-RITE ST33APP owner's manual

STA-RITE

STA-RITE ST33APP owner's manual

https://manuals.online logo
https://manuals.online logoBrands
  • About & Mission
  • Contact us
  • Privacy Policy
  • Terms and Conditions

Copyright 2025 Manuals.Online. All Rights Reserved.

Specications Information and Repair Parts Manual 4230-97 and 4231-97
4230-250-00 1 3/2015
Please read and save this Repair Parts Manual. Read this manual and the General Operating Instructions carefully before attempting to assemble, install, operate
or maintain the product described. Protect yourself and others by observing all safety information. The Safety Instructions are contained in the General Operating
Instructions. Failure to comply with the safety instructions accompanying this product could result in personal injury and/or property damage! Retain instructions
for future reference. AMT reserves the right to discontinue any model or change specications at any time without incurring any obligation.
©2015 AMT Pump Company, A Subsidiary of The Gorman-Rupp Company, All Rights Reserved.
Periodic maintenance and inspection is required on all pumps to ensure proper operation. Unit must be clear of debris and sediment. Inspect for leaks and loose bolts. Failure to do so
voids warranty.
3/8-Inch Bronze Coolant Pumps
Refer to pump manual 1808-634-00 for General Operating and Safety Instructions.
OPERATION
1. Liquid level should always be at least 2” below the bottom of the motor.
Motor is NOT submersible.
2. Activate the unit. No controls are supplied with this unit. Dry running will
not harm pump or motor.
3. Familiarize yourself and others with all controls for this pump. Learn how
to stop pump/motor quickly in an emergency.
MAINTENANCE
Make certain that the unit is disconnected from the power source before
attempting to service or remove any component! Failure to do so could
result in electrical shock.
LUBRICATION
Remove pump from installation and lay on side. Find two oil slots on the side of
the motor (See Figure 2) and put in 4 or 5 drops of SAE 20W oil or its equivalent
every 6 months. Let pump lay on its side for a few minutes to let the oil saturate
the bearing. Do not over-oil. Over-oiling can shorten motor life. Replace rubber
grommets.
IMPELLER MOTOR REPLACEMENT PROCEDURE
1. Remove base volute housing (Ref. No. 9) by removing three mounting
screws (Ref. No. 5).
2. Remove impeller from impeller tubing (Ref. No. 7). If it doesn’t come off
easily, cut it off.
3. Unscrew motor adapter (Ref. No. 2) from motor exposing impeller tube
without impeller.
4. Cut tubing of impeller assembly diagonally so that it comes off motor
shaft. Do not cut motor shaft.
5. When replacing a new motor, a new impeller assembly must also be
installed.
6. Reassemble pump parts (Ref. Nos. 2, 4, and 6) back onto motor,
tightening screws (Ref. No. 3) into place.
7. Before pressing impeller assembly onto shaft, insert a piece of metal to
hold motor shaft from being pressed out.
8. Turn motor around onto xture and press impeller assembly onto shaft
using tool with guide pin that ts into impeller tube. Press unit in until there
is enough room so it touches neither the volute nor the volute cover while
running.
9. Turn unit on momentarily to see if unit vibrates. If it does, insert a
screwdriver into impeller assembly and bend slightly. Retest to see if
vibration is still there. If it has increased bend opposite way, etc.
10. Replace volute housing. Unit is ready to use.
DESCRIPTION
These coolant/recirculating pumps are heavy-duty units designed for a variety of applications involving evaporative coolers, fountains, laboratories, bilge pumping,
etc. Each pump is equipped with motor, 36” 3-conductor cord, brass tube column and bronze base and impeller. Handles liquids from 40º to 200º F (4º to 93º
C). For use with non-ammable liquids compatible with pump component materials. The motor on this pump is not intended to be submersed in liquid. The liquid
level should be at least 2” below motor bottom.
All 115V motors are equipped with automatic thermal protection. Check motor wiring before putting unit into service (see motor nameplate for specic wiring
diagram). These are manual units, no controls are supplied. All units are for use with nonammable, non-abrasive liquids, compatible with pump component
materials.
Outlet GPM of Water at Total Head in Feet Shut
Piping 1’ 3’ 5’ 8’ 10’ Off
3/4” ID 8.3 7.1 6.0 3.5 0.8 10.2 ft
1/2” ID 6.7 5.4 4.2 2.0 0.6 10.2 ft
3/8” ID 5.0 3.3 2.2 1.2 0.3 10.2 ft
Performance Chart
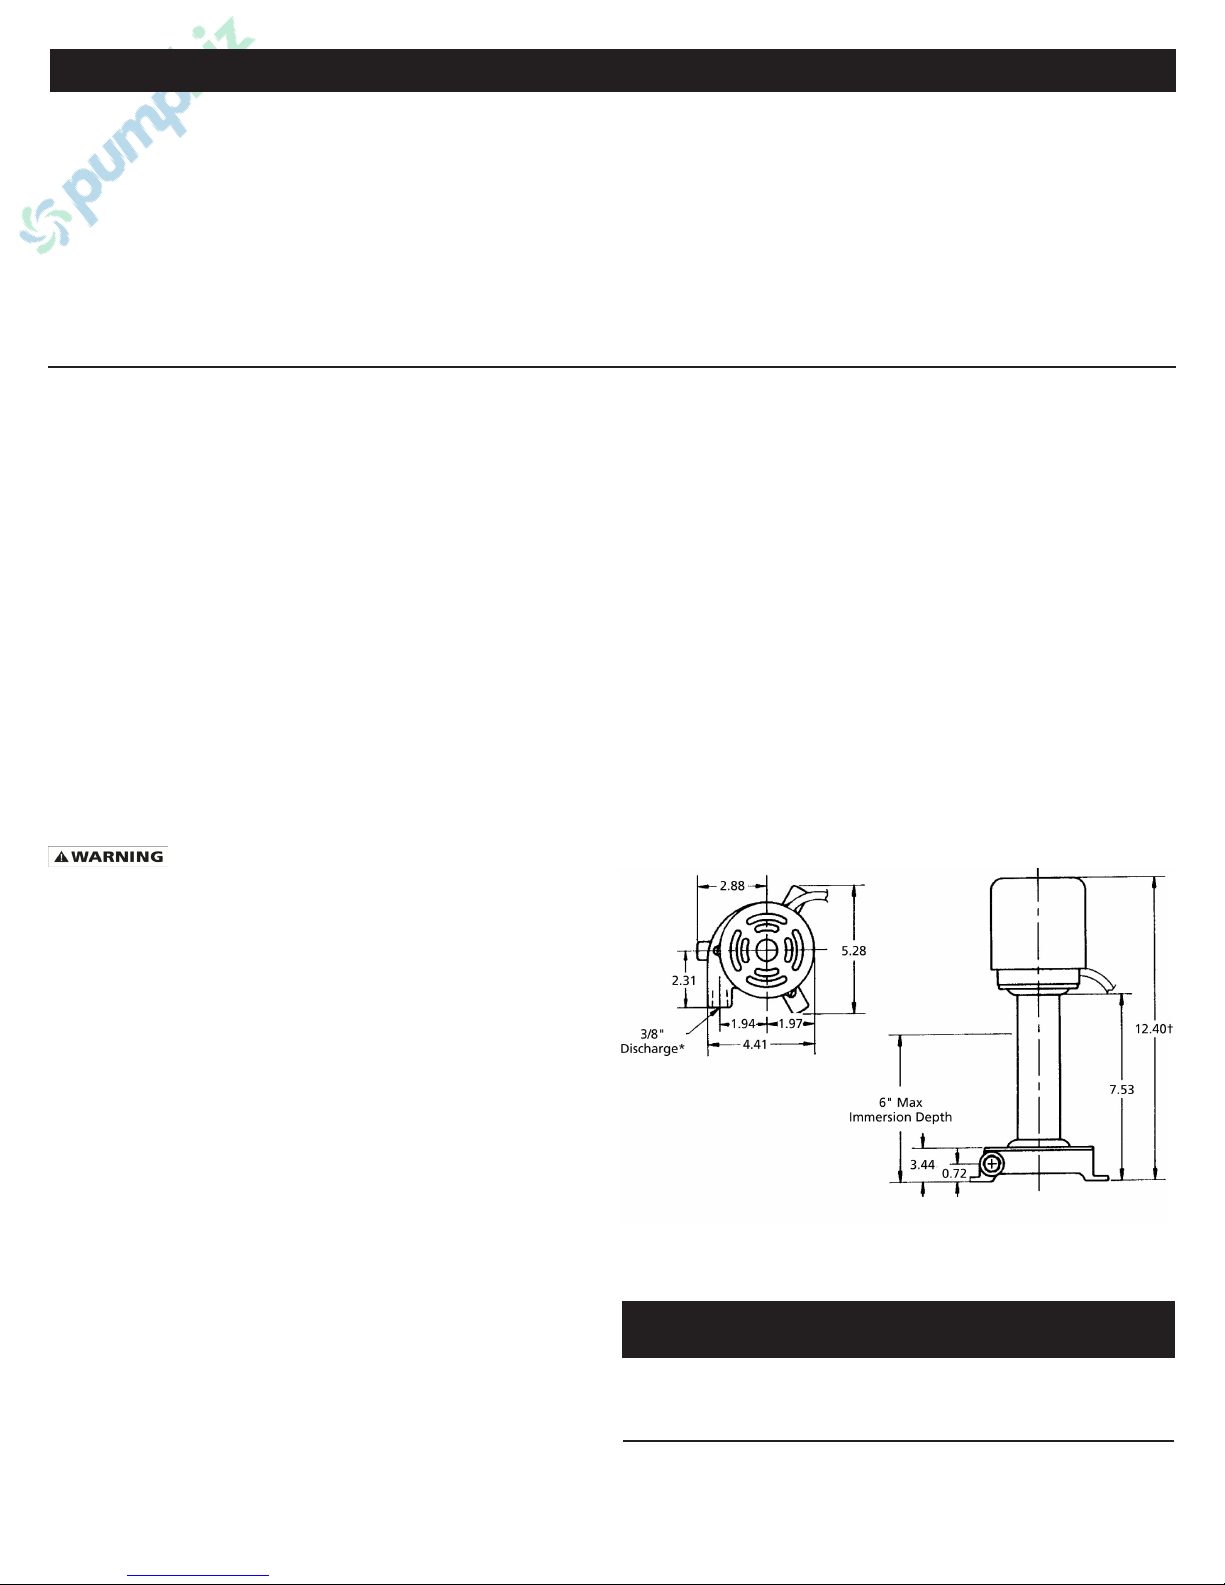
Figure 1 – Dimensions (inches)
NOTE: Dimensions are ±1/8”
(*) Standard NPT (female) pipe thread.
(†) This dimesion may vary due to
motor manufacturer’s specications.
Specications Information and Repair Parts Manual 4230-97 and 4231-97
4230-250-00 2 3/2015
For Repair Parts contact dealer where pump was purchased.
Please provide following information:
-Model Number
-Serial Number (if any)
Part description and number as shown in parts list
Figure 2 - Repair Parts Illustrations
3/8-Inch Bronze Coolant Pumps
Repair Parts List
Ref Part
No. Description Number Qty
1 Motor (4230-97, 115 VAC) 1626-055-00 1
Motor (4231-97, 230 VAC) 1626-056-00 1
2 Motor adapter 2200-002-01 1
3 #8-32 UNC Hex nut * 4
4 Tube column 2200-003-00 1
5 #8-32 UNC x 1/2" Mounting screw * 3
6 Volute cover 2201-000-01 1
7 Impeller assembly 2200-006-90 1
8 Volute gasket 2200-005-00 1
9 Volute 2200-000-01 1
(*) Standard hardware item, available locally.
www.amtpump.com