manuals.online logo
Brands
  1. Home
  2. •
  3. Brands
  4. •
  5. Amulet Hotkey
  6. •
  7. Server
  8. •
  9. Amulet Hotkey DXZC User manual

Amulet Hotkey DXZC User manual

solutions you can bank on
AMULET
HOTKEY
®
®
www.amulethotkey.com
DXZC Quick Start Guide v1.1, October 2014
HB-DXZC-0001
DXZC and DXZC-M Zero Clients
Quick Start Guide
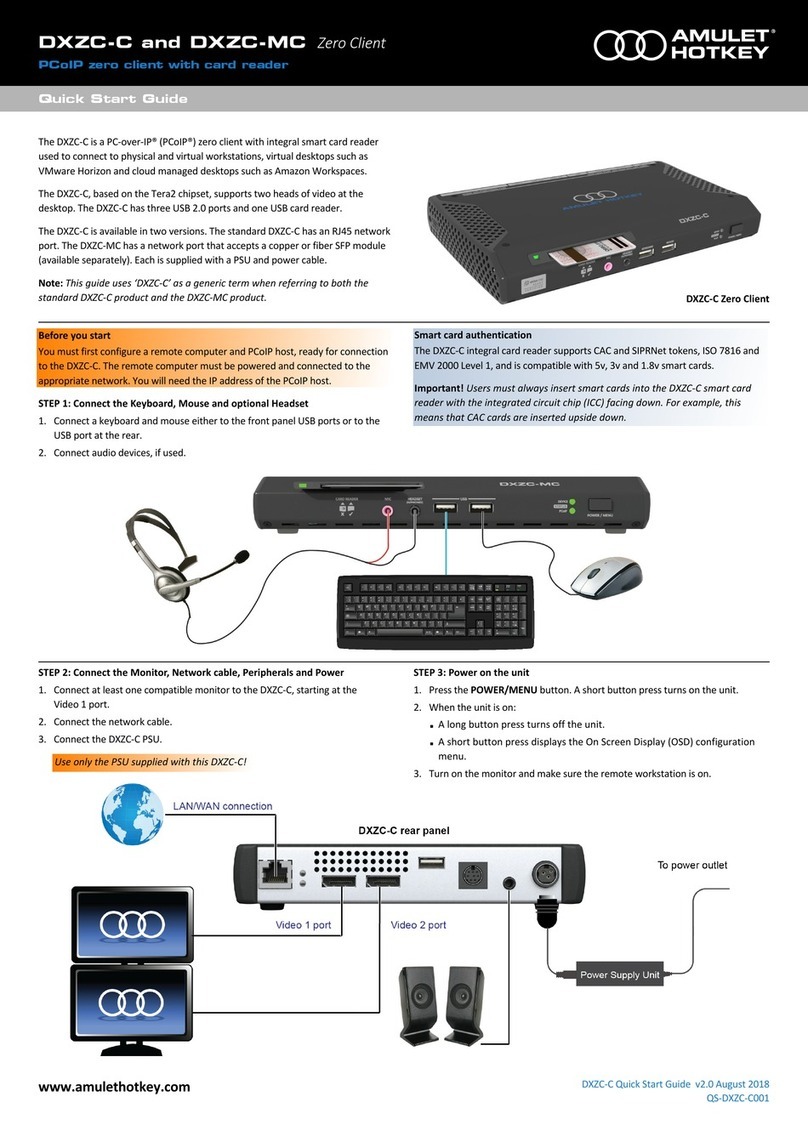
The DXZC is a PC-over-IP® (PCoIP®) zero client based on the Tera2 chipset and
supports two heads of video at the desktop. The DXZC is available in two versions.
The standard DXZC has an RJ45 network port. The DXZC-M has a network port
that accepts a copper or fiber SFP module (available separately). Each version is
supplied with a PSU and power cable.
Note: This guide uses ‘DXZC’ as a generic term when referring to both the
standard DXZC product and the DXZC-M product.
Before you start
You must have already configured a remote computer and PCoIP host, ready for
connection to the DXZC. The remote computer must be powered and connected
to the appropriate network. You will need the IP address of the PCoIP host.
Set up the DXZC
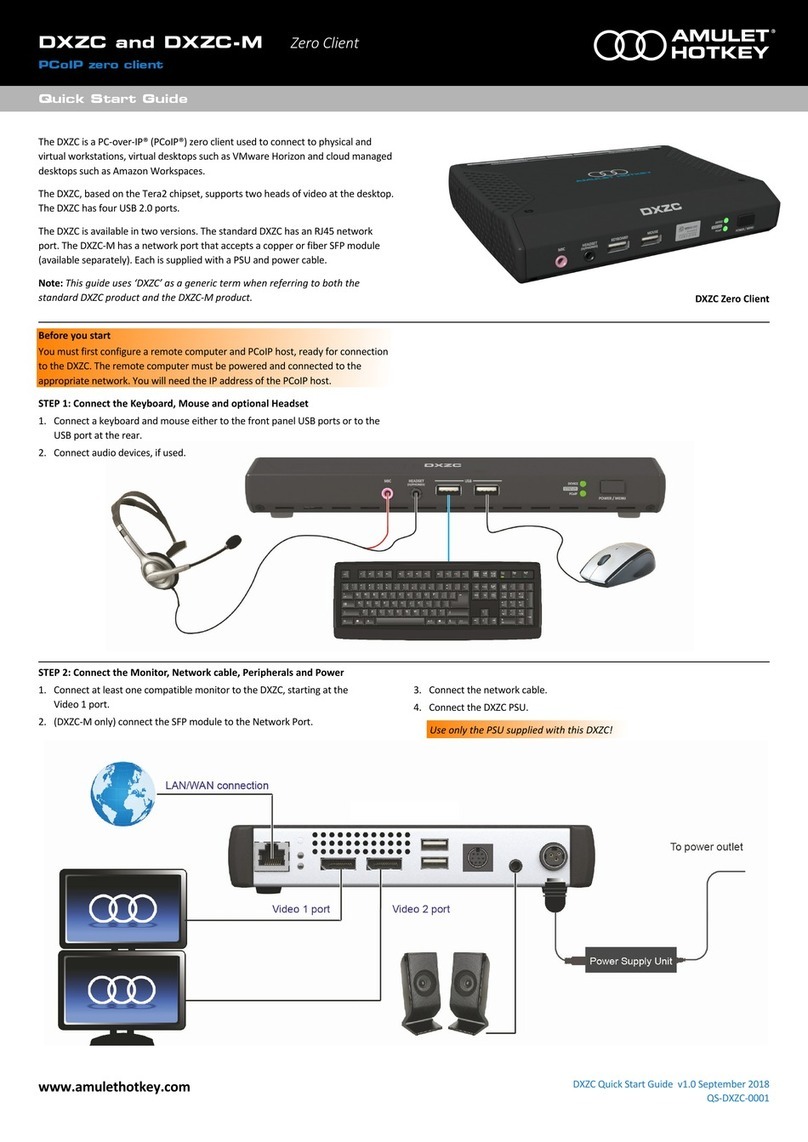
Using the diagrams below as a guide, connect the DXZC as follows:
1. Connect at least one compatible monitor to the DXZC, starting at the
Video 1 port.
2. Connect a keyboard and mouse to the front panel USB ports.
3. Connect audio devices, if used.
4. Connect the network cable.
5. Connect the DXZC PSU. Use only the PSU supplied with this DXZC!
6. Power up the DXZC, monitor and remote workstation.
Now establish a PCoIP connection.
Establish a PCoIP connection
After setting up your DXZC, you must establish a PCoIP session to connect the
DXZC to a remote PCoIP host (or virtual desktop). The connection methods are
summarized below.
■Static connections: To connect a DXZC directly to a specific PCoIP host card,
use the Direct to Host session connection type and provide the IP address
(or DNS name) for the PCoIP host. You must also configure a Direct from
Client session connection type on the host. Static connections are not
practical for very large PCoIP deployments.
■SLP Discovery: If your DXZC and PCoIP host reside on the same subnet, you
can use the Direct to Host + SLP session connection type to discover
available PCoIP hosts on the subnet. The OSD lists the first 10 hosts
discovered. Choose the one you want to connect to.
■Use a connection broker: These third party applications dynamically assign
DXZCs to host PCs based on the identity of the end-user. Use the Connection
Management Interface session connection type on both the DXZC and PCoIP
host. You will need to provide the IP address (or DNS name) for the
connection broker.
■Connecting the DXZC to a virtual desktop: DXZCs can use PCoIP to connect
to a virtual desktop in a VMware® View™ environment. You must provide
the IP address (or DNS name) of the View Connection Server. If you want
users to log on manually, choose the View Connection Server session
connection type. To set up automatic logons, choose the View Connection
Server + Auto-Logon session connection type.
Note: Use the On Screen Display, Administrative Web Interface or PCoIP
Management Console to establish the PCoIP connection. For full details about
these connection methods, see the Session Connection Types section of the
Teradici PCoIP® Zero Client and Host Administrator Guide, available to registered
users from the Teradici Support Center.
POWER / MENU switch: A short button press turns on the unit. When the
unit is on:
■A long button press turns off the unit.
■A short button press displays the On Screen Display configuration menu.
LED indicators, front panel: Show the PCoIP link status and power status:
■PCoIP LED: Shows the PCoIP link status. Green, active PCoIP link over copper
connection. Blue, active PCoIP link over fibre connection. Green or blue
flashing, PCoIP link is available but not in session.
■DEVICE LED: Shows the power status of the unit. Red, in standby. Amber, in
standby and can be woken by WOL or USB activity. Amber flashing, unit
starting up. Green, unit is on and connected to network. Green flashing, unit
on but no network connection.
LED indicators, rear panel. LEDs by the network port show network status:
■Upper LED: Off, no network connection. Green constant, network.
Green flash, network traffic detected.
■Lower LED: Off, no network connection or 10 Mbit/s connection. Amber, 100
Mbit/s connection. Green, 1 Gbit/s connection.
More DXZC documentation is available on the Amulet Hotkey website.
Multifunction
power switch
DEVICE LED
PCoIP LED
DXZC front
PCoIP host
2x USB devices
PSU
DXZC rear
Network status LEDS
solutions you can bank on
AMULET
HOTKEY
®
®
www.amulethotkey.com
DXZC Quick Start Guide v1.1, October 2014
HB-DXZC-0001
DXZC and DXZC-M Zero Clients
Quick Start Guide
©2014 Amulet Hotkey Ltd. All rights reserved.
Information in this document is subject to change. No part of this document may be reproduced through any means including (but not limited to) electronic or
mechanical, without express written permission from Amulet Hotkey Ltd. Amulet Hotkey Ltd may have patents, patent applications, trademarks or copyrights or other
intellectual property rights covering subject matter in this document. PC-over-IP, PCoIP and the PCoIP logo are registered trademarks of Teradici Corp. Amulet Hotkey and
‘solutions you can bank on’ are registered trademarks of Amulet Hotkey Ltd. Other product names and company names listed within this document may be trademarks of
their respective owners. Amulet Hotkey products are designed and built in the UK.
Technical Support
Europe: [email protected]
N America: [email protected]
Product documentation and downloads
www.amulethotkey.com/resources
EMEA and APAC Sales
+44 (0)20 7960 2400
[email protected]
[email protected]
N America Sales
+1 (212) 269 9300
[email protected]
Defence and Security
[email protected]
Head Office
Amulet Hotkey Ltd
+44 (0)1626 837900
Cavalier Road, Heathfield Industrial Estate, Newton Abbot,
Devon TQ12 6TQ, UK
Caution
To reduce the risk of electric shock, do not remove any circuit board or power
supply covers. There are no user serviceable parts inside; refer to qualified
personnel.
Warning
To reduce the risk of fire or electric shock, do not expose this appliance to rain
and moisture. The appliance should not be exposed to dripping or splashing and
no objects filled with liquids should be placed on or near the appliance.
Safety instructions
1. Clean the product only with a dry cloth.
2. Keep the product away from liquids.
3. Install in accordance with these instructions.
4. Do not install near significant sources of heat.
5. Ensure the product is properly earthed.
6. Only use attachments and accessories approved by Amulet Hotkey.
Refer all servicing to qualified personnel.

Other manuals for DXZC

2

This manual suits for next models

1

Other Amulet Hotkey Server manuals

Amulet Hotkey DXMP 5000 User manual

Amulet Hotkey

Amulet Hotkey DXMP 5000 User manual

Amulet Hotkey DXZ4-A User manual

Amulet Hotkey

Amulet Hotkey DXZ4-A User manual

Amulet Hotkey DXZ4 series User manual

Amulet Hotkey

Amulet Hotkey DXZ4 series User manual

Amulet Hotkey DXZC-C Operating and maintenance instructions

Amulet Hotkey

Amulet Hotkey DXZC-C Operating and maintenance instructions

Amulet Hotkey DXZC series User manual

Amulet Hotkey

Amulet Hotkey DXZC series User manual

Amulet Hotkey CoreStation Series User manual

Amulet Hotkey

Amulet Hotkey CoreStation Series User manual

Amulet Hotkey DXZC Operating and maintenance instructions

Amulet Hotkey

Amulet Hotkey DXZC Operating and maintenance instructions

Amulet Hotkey DXZ4-A User manual

Amulet Hotkey

Amulet Hotkey DXZ4-A User manual

Popular Server manuals by other brands

HP ProLiant MicroServer Installation sheet

HP

HP ProLiant MicroServer Installation sheet

IBM System x3400 Type 7975 Problem determination and service guide

IBM

IBM System x3400 Type 7975 Problem determination and service guide

Velleman VWS2E manual

Velleman

Velleman VWS2E manual

HP ProLiant ML310 Generation 5p user guide

HP

HP ProLiant ML310 Generation 5p user guide

Fujitsu PRIMERGY TX150 S8 Upgrade and maintenance manual

Fujitsu

Fujitsu PRIMERGY TX150 S8 Upgrade and maintenance manual

Fujitsu PRIMERGY TX150 S4 Information guide

Fujitsu

Fujitsu PRIMERGY TX150 S4 Information guide

Sharp MX-5110N Configuration guide

Sharp

Sharp MX-5110N Configuration guide

Vivotek VS8100-v2 user manual

Vivotek

Vivotek VS8100-v2 user manual

Themis RES-12DCX installation manual

Themis

Themis RES-12DCX installation manual

Gigabyte E263-S30-AAD1 user manual

Gigabyte

Gigabyte E263-S30-AAD1 user manual

Sun Microsystems Sun Ultra 450 Product notes

Sun Microsystems

Sun Microsystems Sun Ultra 450 Product notes

Lenovo ThinkSystem SD665 V3 Neptune DWC Configuration guide

Lenovo

Lenovo ThinkSystem SD665 V3 Neptune DWC Configuration guide

Dell PowerEdge M710 Technical guidebook

Dell

Dell PowerEdge M710 Technical guidebook

Dell DL4300 Getting Started With Your System

Dell

Dell DL4300 Getting Started With Your System

IBM p5 510 quick start guide

IBM

IBM p5 510 quick start guide

Xerox FreeFlow SP 3 manual

Xerox

Xerox FreeFlow SP 3 manual

OSS OSS-EOS-2U-41 user manual

OSS

OSS OSS-EOS-2U-41 user manual

Fujitsu SPARC Enterprise M8000 Service manual

Fujitsu

Fujitsu SPARC Enterprise M8000 Service manual

manuals.online logo
manuals.online logoBrands
  • About & Mission
  • Contact us
  • Privacy Policy
  • Terms and Conditions

Copyright 2025 Manuals.Online. All Rights Reserved.