BIGFOOT LINE ARRAY SOUND SYSTEM
WIRELESS MICROPHONE CHANNEL SELECTION - BUILT-IN RECEIVER
ANCHOR AUDIO WIRELESS MICROPHONES
OPERATING THE WIRELESS MICROPHONE TRANSMITTER
1
2
1. Choose any available wireless channel from 1 thru 16
2. Set the WIRELESS CHANNEL SELECTION knob to the channel you chose in step 1
If you have two wireless receivers,
repeat above for the second
receiver. Remember, each receiver/
transmitter pair must be set
to different channels to avoid
interference.
WIRELESS 2
VOLUME CONTROL
WIRELESS 1 CHANNEL
SELECTION
WIRELESS 1 RX
INDICATOR LIGHTS
WIRELESS 2 RX
INDICATOR LIGHTS
WIRELESS 1
VOLUME CONTROL
WIRELESS 2 CHANNEL
SELECTION
BATTERY INFORMATION FOR BIGFOOT LINE ARRAY
AC OPERATION & BATTERY CHARGING
Bigfoot sound systems include an automatic charging system designed to properly charge and maintain the systems
built-in batteries. To charge batteries, plug the system into an AC outlet. The BATTERY LEVEL INDICATOR will light when
charging. The CHARGE STATUS LED will light bright red which indicates charge process has begun and green indicates
full battery. Charge your system overnight to replenish drained batteries.
SYSTEM STORAGE & BATTERIES
Fully charge batteries before storage. For extended periods of storage, either leave powered off system plugged into an
AC outlet or charge the system at least once each month for a minimum of 24 hours.
1. Unscrew battery cover on bottom of microphone
2. Set the CHANNEL SELECTOR dial to match the
channel setting of your receiver
3. Replace battery cover and tighten firmly
1. The channel selection dial is located on the
side of the transmitter
2. Set the CHANNEL SELECTOR dial to match the
channel setting of the receiver
3. Adjust the GAIN dial for proper voice pickup
The wireless RX indicators will light
(only one indicator will light at a time)
when the wireless signal is
being transmitted and received.
CHANNEL SELECTION -
HANDHELD TRANSMITTER
CHANNEL SELECTION -
BELTPACK TRANSMITTER
BUILT-IN BATTERTY MAINTENANCE
To preserve battery life, the built-in batteries MUST be FULLY charged before te first use. Regardless of length of
operation, it is recommended that batteries be fully charged as soon as possible after each use.
OPERATING THE BLUETOOTH TRANSMITTER
POWERING UP THE BLUETOOTH
PAIRING A DEVICE
FREQUENTLY ASKED QUESTIONS
1
2
3
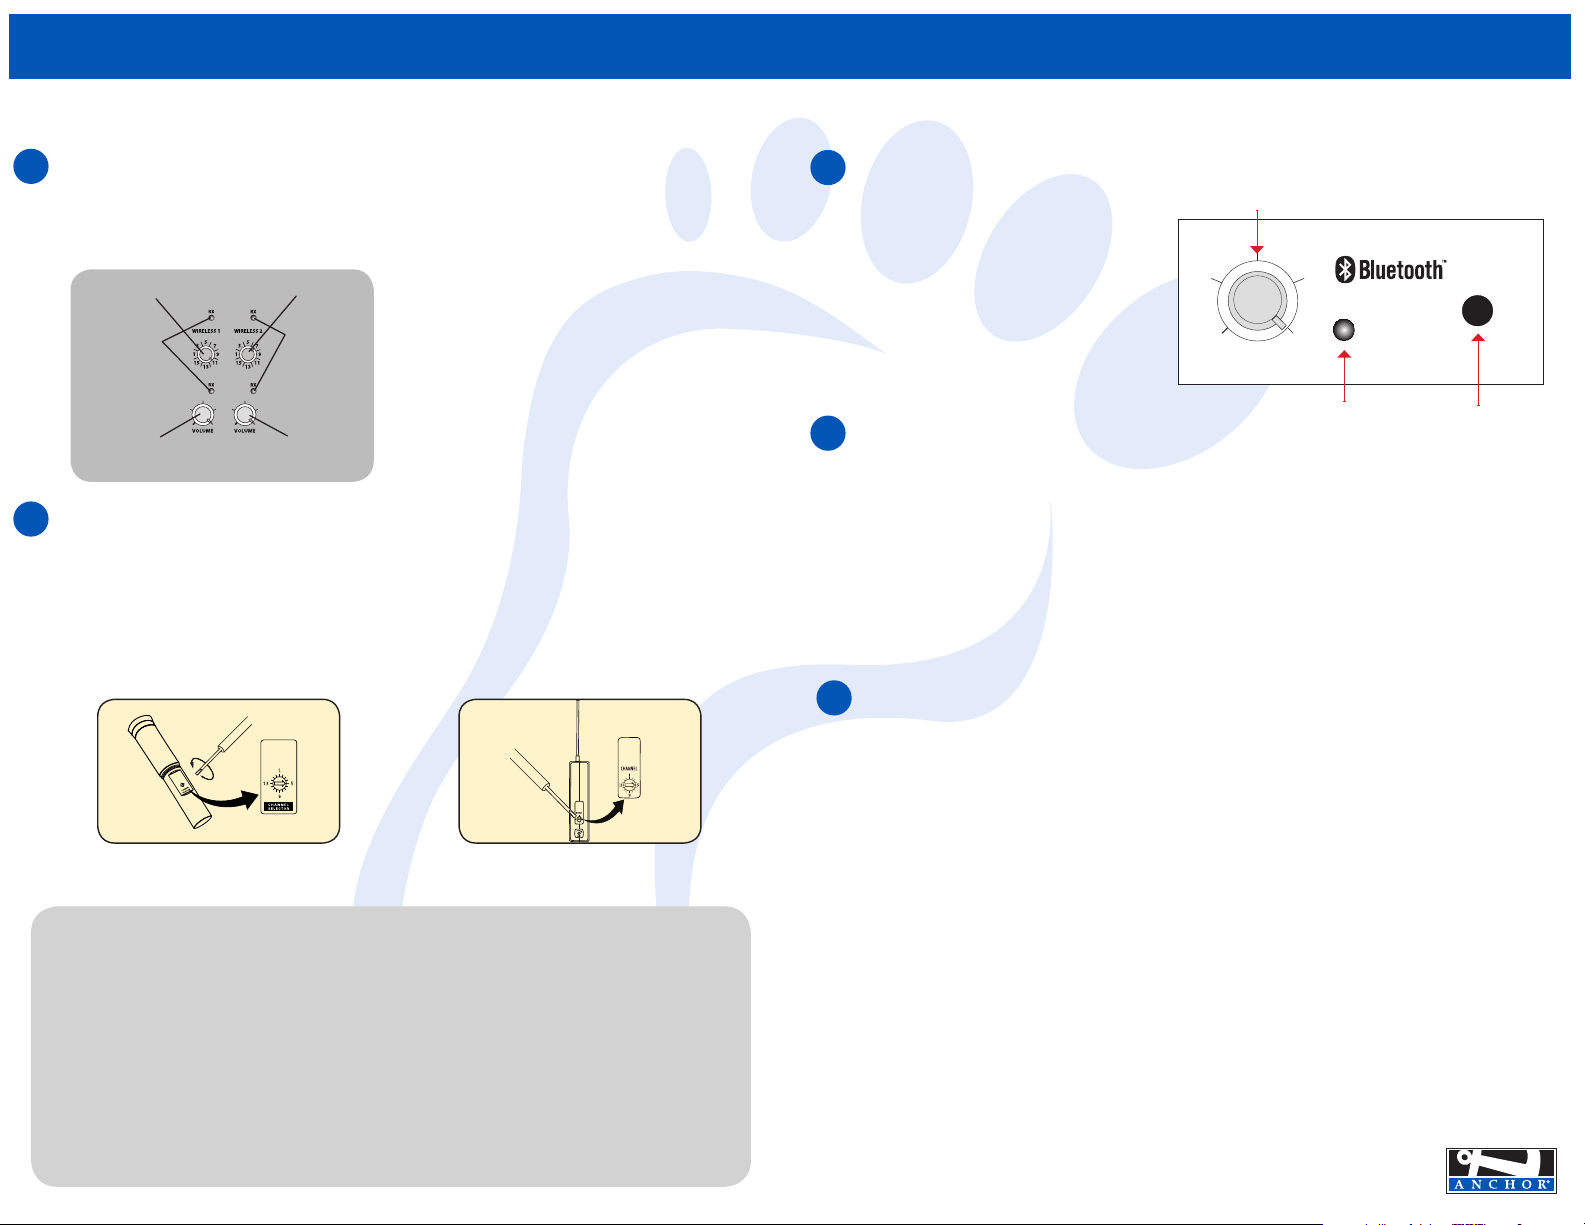
1. Turn on the Bluetooth with the volume knob (it
will make a boot up noise)
2. Before hooking up your device, take a moment
to go over what the different LED light signals
mean:
a. No light: indicates either Blutooth is off,
or it is in sleep mode and cannot connect
b. Blinking light: indicates pairing mode,
this is when you should connect
c. Solid light: indicates connection, your
device is connected
PAIRING BUTTONINDICATOR LIGHT
VOLUME/POWER KNOB
PAIRING
VOLUME
1. Press the pairing button (it will acknowledge pairing mode with a beep) this mode will last 90 seconds. If no
device is paired within the 90 seconds, the Bluetooth will enter sleep mode.
2. When the Bluetooth module is in pairing mode, it is discoverable and will show up on the selection list of your
Bluetooth enabled device.
3. Select the Bluetooth titled “Anchor Audio” to pair your device with the Anchor Audio sound system.
4. If a previously paired device is in range and discoverable, the unit should automatically make a connection,
however this may depend on your individual device.
5. When the device has successfully connected to the Bluetooth, the Bluetooth module will beep to signify
connection and the Blue LED will become solid.
6. Now you can play audio from your Bluetooth device to the Anchor Audio portable sound system. You can adjust
volume by using the Bluetooth module’s knob, as well as the volume control on your device.
What is the range of Anchor Audio Bluetooth?
The Anchor Audio Bluetooth range is 100 ft. line of sight.
My sound system is auto-connecting to a device, but I don’t know which one. Can I disconnect directly
from the sound system?
Yes, if your unit is auto-connecting to a device that you cannot identify (for example, you’re in a room with other
people who have connected to the unit in the past), you may need to manually disconnect that pair from the sound
system itself. Just hold the ‘pairing’ button for two seconds, and the sound system will disconnect from the device it
is currently connected to and immediately go into pairing mode.
What kind of modes can my phone be in that allow the Bluetooth connection to still work?
Bluetooth will work in modes such as Airplane mode and Do Not Disturb (or the equivalent). Just be sure to still have
your Bluetooth setting turned on. To simplify the process, put your phone in the desired mode first, and then secure
the Bluetooth connection as moving into these modes may cause disconnection.
What happens if I get a phone call?
Incoming and outgoing calls should pause the audio stream. The audio from the call should not be transmitted via
Bluetooth. To avoid interrupting audio, set device in Airplane mode, then enable Bluetooth, ensure your connected,
and you should not encounter any interruptions in your audio stream.
*Bluetooth connection and behavior may depend on your individual device settings and capabilities, all testing was done using an
Apple iPhone.
NOTE: All Anchor Audio sound system Bluetooth connections will be named “Anchor Audio.” If
you’re using multiple systems, be sure to keep track of each connection.
800.262.4671 • anchoraudio.com
MADE IN THE USA
SIX YEAR WARRANTY


