manuals.online logo
Brands
  1. Home
  2. •
  3. Brands
  4. •
  5. Anchor
  6. •
  7. Speakers
  8. •
  9. Anchor AN-1000X+ Instruction manual

Anchor AN-1000X+ Instruction manual

Other manuals for AN-1000X+

3

This manual suits for next models

2

Other Anchor Speakers manuals

Anchor Beacon BEA-6000 User manual

Anchor

Anchor Beacon BEA-6000 User manual

Anchor AN-1000X User manual

Anchor

Anchor AN-1000X User manual

Anchor Xtreme XTR-6000 User manual

Anchor

Anchor Xtreme XTR-6000 User manual

Anchor Liberty LIB-6000 User manual

Anchor

Anchor Liberty LIB-6000 User manual

Anchor MEGA-DP1-AIR-B User manual

Anchor

Anchor MEGA-DP1-AIR-B User manual

Anchor GO GETTER Instruction manual

Anchor

Anchor GO GETTER Instruction manual

Anchor AN-1000X User manual

Anchor

Anchor AN-1000X User manual

Anchor MegaVox PRO MEGA-6000 User manual

Anchor

Anchor MegaVox PRO MEGA-6000 User manual

Anchor AL-WB User manual

Anchor

Anchor AL-WB User manual

Anchor ClassACT CA-130U1 User manual

Anchor

Anchor ClassACT CA-130U1 User manual

Anchor LIBERTY PLATINUM User manual

Anchor

Anchor LIBERTY PLATINUM User manual

Anchor AN-30 User manual

Anchor

Anchor AN-30 User manual

Anchor Liberty LIB-6000HCU1 User manual

Anchor

Anchor Liberty LIB-6000HCU1 User manual

Anchor MiniVox Instruction manual

Anchor

Anchor MiniVox Instruction manual

Anchor TourVox Instruction manual

Anchor

Anchor TourVox Instruction manual

Anchor Beacon Instruction manual

Anchor

Anchor Beacon Instruction manual

Anchor AL-TX User manual

Anchor

Anchor AL-TX User manual

Anchor AN-1000X+ User manual

Anchor

Anchor AN-1000X+ User manual

Anchor AN-MINIU2 User manual

Anchor

Anchor AN-MINIU2 User manual

Anchor Xtreme XTR-6000CU1 User manual

Anchor

Anchor Xtreme XTR-6000CU1 User manual

Anchor AN-1000X User manual

Anchor

Anchor AN-1000X User manual

Anchor LIBERTY PLATINUM User manual

Anchor

Anchor LIBERTY PLATINUM User manual

Anchor Xtreme XTR-6000CU2 User manual

Anchor

Anchor Xtreme XTR-6000CU2 User manual

Anchor MiniVox PB-25U1 User manual

Anchor

Anchor MiniVox PB-25U1 User manual

Popular Speakers manuals by other brands

Electro-Voice LR4S engineering data

Electro-Voice

Electro-Voice LR4S engineering data

Definitive Technology Sound Cylinder user guide

Definitive Technology

Definitive Technology Sound Cylinder user guide

AudioSource LS545 user manual

AudioSource

AudioSource LS545 user manual

Paso C402-T Instructions for use

Paso

Paso C402-T Instructions for use

Altec Lansing 416-8C LF SPEAKER manual

Altec Lansing

Altec Lansing 416-8C LF SPEAKER manual

Kenwood KFC-1072 Servise manual

Kenwood

Kenwood KFC-1072 Servise manual

Peavey ProSys 112 user guide

Peavey

Peavey ProSys 112 user guide

JBL Control Contractor 60 Series installation instructions

JBL

JBL Control Contractor 60 Series installation instructions

Aura STORM-8 owner's manual

Aura

Aura STORM-8 owner's manual

Oontz ANGLE 3 PLUS quick start guide

Oontz

Oontz ANGLE 3 PLUS quick start guide

Electro-Voice LR4A engineering data

Electro-Voice

Electro-Voice LR4A engineering data

Rave RK-650-ICA-B owner's manual

Rave

Rave RK-650-ICA-B owner's manual

Flux Reference Series installation manual

Flux

Flux Reference Series installation manual

Lanzar AQAWBS64BK installation manual

Lanzar

Lanzar AQAWBS64BK installation manual

DAPAudio DCS-6230 manual

DAPAudio

DAPAudio DCS-6230 manual

Aluratek ABS03F quick start guide

Aluratek

Aluratek ABS03F quick start guide

Kenwood KES-5A instruction manual

Kenwood

Kenwood KES-5A instruction manual

Sonance ORIGINAL SERIES instruction manual

Sonance

Sonance ORIGINAL SERIES instruction manual

manuals.online logo
manuals.online logoBrands
  • About & Mission
  • Contact us
  • Privacy Policy
  • Terms and Conditions

Copyright 2025 Manuals.Online. All Rights Reserved.

For a complete Owner’s Manual, visit anchoraudio.com
Please check your new unit carefully for any damage which
may have occurred during shipment.
*Please keep the product box(es) that your Anchor Audio product(s) was
shipped in, so it is available in the event the product(s) need to be shipped
back to Anchor Audio for any reason.
AN-1000X+ | AN-30 | AN-MINI
QUICK START MANUAL
MOUNTING THE SPEAKER MONITORS
NEED MORE HELP?
anchoraudio.com | 800.262.4671 | [email protected]
RECOMMENDED BRACKET
AN-1000X+
SB-3BK+, SB-360BK+,
RM1BK+, or RM12BK+
AN-30 SB-30
1. Attach mounting bracket securely to the wall/ceiling with pre-
drilled holes.
2. Remove Allen head cap screws from the bracket mounts on
the unit.
3. Align the bracket arm with mounting hole on unit.
4. Attach both sides of the speaker securely to mounting bracket.
HAVING TROUBLE WITH YOUR SOUND SYSTEM?
CONDITION POSSIBLE SOLUTIONS
No Sound (Power LED: OFF)
•Turn POWER knob clockwise to turn ON
•Check battery level, charge battery, or plug in AC cord
No Sound (Power LED: ON)
•Check your source audio and turn up volume of source audio
•Make sure all cables are completely plugged in
•Turn up volume control
Wireless Mic will not Connect to
System
•Check battery level of microphone
•Un-pair all microphones from the system then re-pair the
microphones
Connected Wireless Mic but No Sound
(Solid Green LED)
•Check the Mute button on the microphone or belt pack
•Raise volume on the microphone and system
•Check battery level of microphone and system
Poor Wireless Range /
Poor Wireless Audio Quality
•Check battery level of microphone and system
•Re-position system away from any possible interference
sources
•Minimize obstructions between the system and wireless
microphone
•If wireless range continues to be poor, call Anchor Audio Tech
Support
Distorted Sound
•Check battery level, charge battery, or plug in AC cord
•Lower system volume
•Lower source audio volume
•Wireless belt pack - ensure Mic and/or Line Level setting is
correct
Excessive Feedback (Squelching)
•Lower the volume on the microphone (handheld or belt pack)
•Do not stand within at least 10 feet in front of the speaker
with the mic(s)
Excessive Hum or Noise
•Use shielded cables
•Use a balanced microphone
RECHARGEABLE BATTERY KIT
OPTIONAL ACCESSORY
For applications where the AN-Mini/MiniVox PA system is used frequently, the RC-30
rechargeable battery kit is available. This kit includes 10 rechargeable NiMH batteries and an
AC charging adapter. When fully charged, the batteries provide approximately 10 - 12 hours of
operation. New batteries must be charged for at least 6 hours prior to first use.
USING THE RECHARGEABLE BATTERY KIT (RC-30)
1. Install the 10 rechargeable NiMH batteries into the unit. The battery compartment is double sided.
2. Insert the charger plug into the Power Input Jack labeled DC IN
3. Plug the AC adapter into a power outlet for 4-6 hours to fully charge
CYCLING THE BATTERIES
For extended battery life, we recommend you fully charge the batteries once each month during periods of
infrequent use. Always fully recharge batteries before storing.
CAUTION: NEVER recharge other types of batteries. Doing so can result in battery explosion.
Use only rechargeable Nickel-Metal Hydride (NiMH) batteries.
NOTE: PA System CAN Be Used While Charging!
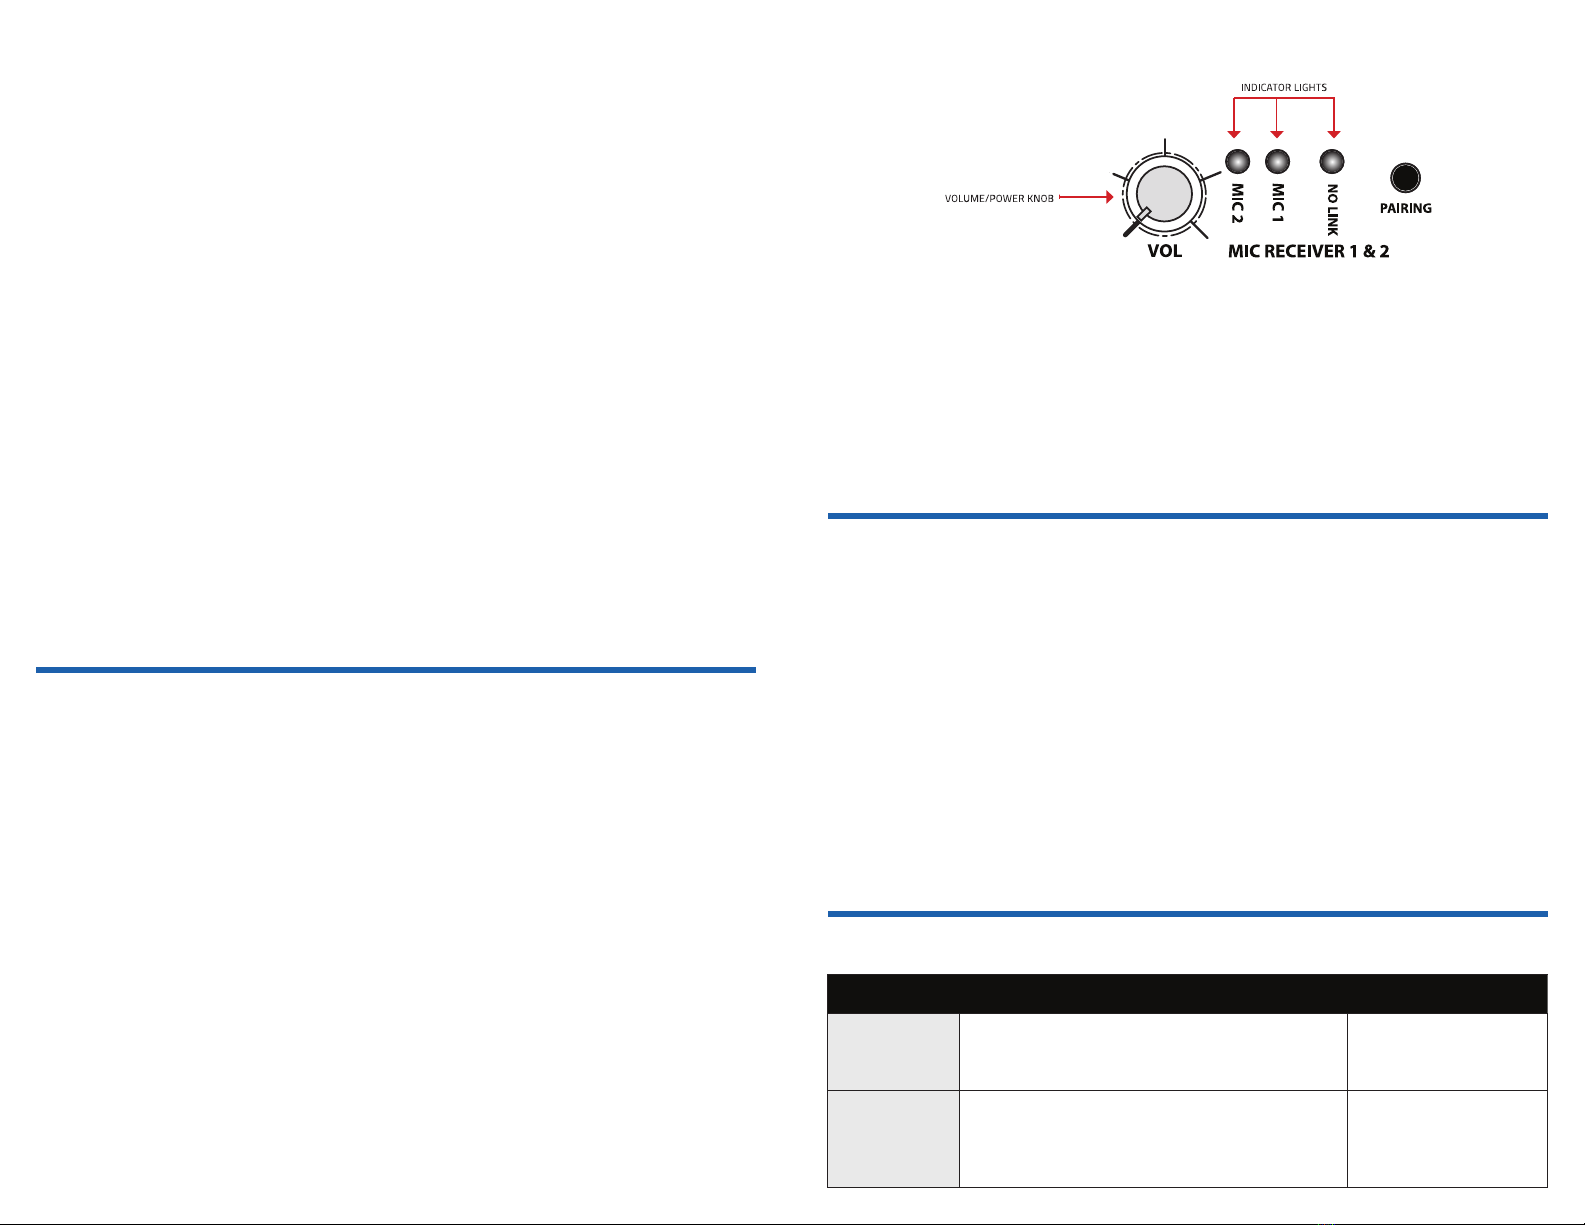
BASIC SYSTEM OPERATION PAIRING ANCHORLINK WIRELESS MICROPHONES
CONNECTING MULTIPLE SPEAKER MONITORS
1. Turn on Mic Receiver (Volume knob clockwise) then hold Pairing button until green light for Mic 1 flashes,
release button.
2. Turn on Mic then press and hold Mute button until Mic red light turns off, release button.
3. Press and hold Mute button again until Mic green light flashes.
4. The Mic is paired when the green light is solid on both the Mic and Mic Receiver.
5. Repeat these steps for Mic 2 on the same Mic Receiver (Mic 1 will stay paired through this process).
NOTE: You may pair only one microphone at a time. Each Mic Receiver included supports two wireless microphones.
One Mic Receiver = Two wireless microphones supported. You will only need to pair your microphone once.
UN-PAIR WIRELESS MICROPHONES
1. Start with the speaker On and the Mic Receiver in the Off position (Volume knob turned counter-
clockwise until “click”).
2. Press and hold the Pairing button on the Mic Receiver.
3. While holding the Pairing button, turn on the Mic Receiver (Volume knob clockwise).
4. Continue to hold the Pairing button. Lights will appear in the order listed below.
Process takes approximately 25 seconds:
• Mic 2 – Green blinking
• No Link – Red blinking
• Pause
• Mic 1 – Green blinking
• No Link – Red
5. Once the No Link red light is solid, both Mics have been un-paired
NOTE: This process un-pairs both Mics from a Mic Receiver. The Mics are not needed to un-pair from the Mic Receiver.
INSTRUCTIONS RECOMMENDED CABLE
AN-1000X+
To daisy chain these units, simply connect the line out
of one unit to the line in of another. Multiple units can
be connected using this setup. SC-50 or SC-50EX
AN-30
AN-MINI
When daisy chaining multiple AN-30 or AN-MINI units,
use a 3.5 mm (AUX) cable. Simply connect the line out
of one unit to the line in of another. Mutliple units can
be connected using this setup. MINI-15ST
AN-1000X+
1. Position the speaker to face your audience
2. Set volume control on front of speaker to minimum
3. Plug in AC power cord to a wall power outlet
4. Plug a microphone into the Mic Input or an external audio source into a Line In
5. Turn the power switch on the rear panel ON (red LED on front panel should light)
6. Adjust volume, bass, and treble controls to desired levels
AN-30
1. Position the speaker to face your audience
2. Insert the AC power cord to the input labeled DC IN and then plug in to a wall power outlet
3. Connect an external audio source using a 3.5 mm (AUX) cable or 1/4“ cable to the Line In.
4. To power on the unit, turn the main system volume knob clockwise, which also controls the wired inputs.
Adjust volume as needed.
AN-MINI
1. Position the speaker to face your audience
2. Connect a microphone to the 1/4“ Mic Input. Or to connect an external audio device, use a 3.5 mm (AUX)
cable in the Line In.
3. To power on the unit ensure that you have (10) AA batteries in your battery tray. Turn the main system
volume knob clockwise, which also controls the wired inputs. Adjust volume as needed.