Andrew James Leaf Blower And Vacuum User manual

1
Please read the manual fully before using the appliance and keep the
manual safe for future reference.
Electric Leaf Blower and Vacuum

2
Standard Safety Instrucons Page 3—4
Specic Safety Instrucons Page 4—5
Warning Symbols Page 6
Technical Data Page 7
Appliance Components Diagram Page 8
Preparing the blower vac prior to use Pages 9—12
Operang the blower vac Page 13 –14
Emptying the bag Page 15
Helpful hints and ps Page 15
Trouble shoong Page 16
Maintenance and storage Page 17
Disposal Page 18
Electrical Supply Informaon Page 18—19
UK and EU Guarantee Page 20
Contact details Page 21
Contents Page

3
General Safety Instrucons
When using any electrical power tool, basic safety precauons should always be
followed including:
Always ensure the voltage on the rang label corresponds to the voltage in
your home.
Check the power cord and plug regularly for any damage. If the cord or the
plug is damaged, it must be replaced by a qualied electrician or a service
repair centre. If in doubt please contact our customer service team.
The power tool is intended for domesc use only. Industrial or commercial
use will void the warranty. The supplier cannot be held responsible for injury
or damage if the power tool has been used for anything other than its
intended use.
Incorrect operaon and use can damage the power tool and cause injury to
the user.
Do not use the appliance if it has been dropped or damaged in anyway. If the
unit has been damaged take the unit for examinaon and or repair by an
authorised service agent.
Do not immerse or expose the motor assembly, plug or the power cord in
water or any other liquid for any reason.
If the supply cord is damaged, it must be replaced by the manufacturer or by
someone who is suitably qualied to avoid a potenal hazard.
If it is necessary to use an extension cord, ensure that the extension cord is
equal to or greater than the power consumpon of the appliance to avoid
overheang of the appliance and the extension cord. Do not use any other
power tool or appliance on the extension cord. Do not place the extension
cord in a posion where it can be pulled on by children or animals or be
tripped over. Ensure the extension cord is suitable for outdoor use.
Always remove the plug of the power tool safely. Do not pull on the power
tool cord to remove the plug from the electrical socket.
Never handle or operate the power tool with wet hands.

4
Specic Safety Instrucons
Work Area
Keep the work area clean and well lit.
Do not operate power tools in explosive atmospheres, such as in the
presence of ammable liquids, gases, or dust.
Keep children and bystanders away whilst operang a power tool.
Electrical Safety
Avoid body contact with earthed or grounded surfaces such as pipes,
radiators, ranges and refrigerators. There is an increased risk of electric
shock.
Do not expose power tools to rain or wet condions. Water entering the
power tool will increase the risk of electric shock.
Personal Safety
Use safety equipment. Always wear eye protecon.
Avoid accidental starng. Ensure the switch is in the o posion before
plugging in.
Remove any adjusng key or wrench before turning the appliance on as a
wrench or key aached to a rotang part can cause injury.
Do not wear loose clothing or jewellery. Keep long hair, gloves and clothing
away from moving parts.

5
Power tool use and care
Do not force the power tool. Use the correct power tool for the job you are
doing.
Do not use a power tool if the switch cannot turn it on or o.
Disconnect the plug from the power source before making any adjustments,
changing accessories or storing power tools. Disconnect if the appliance is
le unaended, being cleaned, being moved from one place to another or
when the extension cord has become entangled.
Store power tools out of the reach of children.
Maintain power tools. Check the condion of the power tool prior to
operaon. If damaged have the power tool serviced by a qualied
electrician.
Use the power tool, accessories and tool bits etc., in accordance with these
instrucons and in the manner intended for the parcular type of power tool
(taking into account the working condions and the work to be performed).
Do not start the tool when it is upside down or when it is not in the
operang posion.
Do not allow the blower vacuum to pick up any smouldering or burning
materials like ashes, cigaree bus etc.
Do not aempt to pick up breakable objects like china, plascs, glass.
Do not use the vacuum without the collecon bag being ed.
Do not use the blower or vacuum funcons on gravel surfaces.
Only operate the power tool when there is adequate lighng.

6
Warning Symbols
Symbol
WARNING!
This warning symbol is displayed on the garden vacuum to remind you of the
safety precauons you should take whilst using it.
WARNING!
The garden vacuum should only be used by those persons who have read
and understood all the safety and operang instrucons contained in the
Instrucon Manual. Be aware of the safety of all persons in the work area at
all mes.
WARNING!
Switch the garden vacuum o and disconnect it from the mains supply
before making adjustments, cleaning blockages, or starng any cleaning and
maintenance procedures.
WARNING!
Keep other people out of the danger area!
WARNING!
Do not use the vacuum in the rain. Avoid damp condions.
WARNING!
When using this garden vacuum, always wear protecve glasses and ear
protectors.
WARNING!
Read this safety and operang instrucons in this booklet and keep it in a
safe place for future reference.
WARNING!
Dangerous feed orice. Keep hands and feet out of the openings while the
machine is running.
WARNING!
Rotang fans. Keep hands and feet out of the openings while the machine is
running.
ENVIRONMENTAL PROTECTION
Waste electrical products should not be disposed of with household waste.
Please recycle where facilies exist. Check with your local authority for
recycling advice.

7
Technical Data
Voltage 240 V
Frequency 50Hz
Input power 2500 W
Insulaon Class ll
Maximum air speed 270 km/h
Idle speed 14000r/min
Net weight 3.4kg
Mulching rao 10:1
Sound pressure level; LPA 95dB (A), KpA:3.0 dB (A)
Sound power level; LWA 107dB(A)
Vibraon 4.95m/s2

8
Components Diagram
1. Shoulder harness 8. Collecon bag
2. Trigger 9. Hook for collecon bag
3. Strap 10. Wheel assemble
4. Power cord and plug 11. Blower head
5. Label sck locaon 12. Front tube
6. Selecon knob 13. Middle tube
7. Collecon bag connector

9
Preparing the Leaf blower prior to use
The leaf blower vacuum requires some assembly prior to rst me use. This
includes the ng of the blow/vac tube to the housing, the ng of the collecon
bag and the ng of the wheel.
Assembly of the tubes (Fig. A)
1. Insert the middle tube (13) into the front tube (12) aligning the screw hole in
the middle tube.
2. Place a screw in the screw hole on the middle tube and ghten with a
screwdriver unl secure.
Assembly of the wheel bracket
1. Insert the wheel bracket from the lower end tube unl it reaches the rib and
cannot move any further.
2. Place a clutch screw into the screw hole on the wheel bracket. This can be
ghtened using a normal 5mm at head screw driver.
3. Tighten the screw rmly.
Screw
Driver

10
Assembly of the wheels (Fig. B)
1. Put the nut into the hexagon shaped hole on the wheel.
2. Insert the wheel axes into the front tube.
3. Insert the other wheel axes into the second side of the front tube.
4. Place the screw into the screw hole on the wheel and ghten rmly.
5. Insert the wheel bracket from the end of the lower tube unl it reaches the
rib posion and cannot move any further.
6. Place a screw in the screw hole on the wheel bracket and ghten rmly.

11
Assemble the blower head (Fig.C)
1. Insert the blower head into the front tube unl the groove on the blower
head aligns with the rectangular hole.
Fig.C
Fing the collecon bag (Fig.D)
1. Aach the push on collecon bag connector (7) to the housing. Push the
ng of the collecon bag directly onto the underside hook of the front
tube.
Fig.D
Blower head
Collecon bag connector housing hook ng

12
Assemble the shoulder harness and strap (Fig.E)
1. Connect the latch on the shoulder harness (1) to the column hole in the main
housing.
2. Tighten the column nut rmly.
3. Adjust the strap to a comfortable posion.
latch strap column nut
Fig E.
13
Operang the leaf blower vacuum
Prior to using the leaf blower vacuum, ensure you have read and understood
the instrucon manual.
Ensure you are wearing suitable clothing and safety equipment.
Ensure the aachments have been ed correctly.
Be aware of people, animals and objects around you.
To turn the blower vacuum on
1. Plug the power cord into the power supply.
2. Ensuring the leaf blower vacuum is directed in a safe direcon, push the
switch trigger forward (look for the ‘1’ symbol) and the blower vacuum will
start.
To turn the blower vacuum o
1. Pull the switch trigger towards yourself (look for the ‘O’ symbol) and the
blower vacuum will stop.
Note: Do not leave unaended, unplug from the power supply.
Selecng the blower operaon (Fig H)
1. Rotate the blower selecon knob (6) towards
the back of the housing. When the blower
operaon is selected, air is drawn up through
the large vacuum tube then expelled at a high
velocity in the blower tube. Do not direct the air
ow from the blower vacuum towards another
person.
On O
Trigger
Fig H.

14
Selecng the vacuum operaon (Fig I)
1. Rotate the blower/vacuum selecon knob (7) forwards. When the vacuum
operaon is selected, air and debris are drawn up through the large vacuum
tube and forced through the mulching impellor. The debris is then mulched
and blown down into the collecon bag.
Please note: Always ensure the collecon bag is correctly aached as “Fing the
collecon bag” secon, pg 11.
Always be aware of what is being drawn up into the blower/vacuum tube. This
product is only designed for garden debris such as leaves, twigs and garden
cungs.
Using the blower/vacuum selecon knob
When using the blower/vacuum selecon knob (6), do not force the knob. The
knob should move with very lile resistance. If the lever is dicult to move,
disconnect the power supply, remove the collecon bag and ensure debris, dirt or
mud has not jammed the lever inside the large round outlet.
When selecng either operaon, ensure the selecon knob is fully in one posion
or another, not half way.
Fig I.

15
To empty the collecon bag
The collecon bag is aached to the blower tube and housing in 2 places. It is not
necessary to remove the collecon bag from the machine when the bag needs to be
emped.
1. Locate the zip at the rear of the bag.
2. Open the zip and empty the contents.
3. Ensure the zip is closed before operang the blower/vacuum.
Helpful hints and ps
Always try and vacuum dry leaves, cungs or general garden debris.
Wet materials are dicult to mulch and can also cause the blower vacuum
to clog.
If the leaves etc. are damp, then use the blower selecon to pile the leaves
into one area and allow them to dry, before vacuuming and then mulching.
Avoid using the vacuum on areas where there are stones or other hard
objects. These objects will damage the impellor of the blower vacuum.
It is not advisable to use the blower vac to pick up soil. Soil generally
contains moisture and when combined with other garden debris it can clog
up the blower vacuum.
For beer performance and comfort, it is recommended the collecon bag is
emped when it becomes approximately half full. This reduces the weight
and also allows the vacuum operaon to perform at its highest level.

16
Troubleshoong
Problem Possible cause Soluon
Motor won’t start No mains power
Connecon lead
defect
Motor or switch
defect
Check fuse
Contact Customer
Services to have the lead
checked or replaced.
To solve the problem
contact Customer
services.
Reduced
vacuuming power
Machine is
clogged/blocked
Bag too full
Extension cable too
long. Socket too
far away from main
connecon and
cross-secon of
connecon lead
too small.
Empty bag
Extension cable at least
1.5mm2, maximum 25m
long. Cross secon of at
least 2.5mm2 in longer
cables.

17
Maintenance and storage
Prior to cleaning or any maintenance, always ensure the power plug has been
removed from the power supply.
When you have nished using the blower vacuum, always check to make sure the
product is clean and free of dirt and debris. Remove the collecon bag and check
the area inside the outlet tube is clear from debris and dirt. Operate the selector
lever backwards and forwards to ensure the correct operaon.
Do not hose or submerge any part of the blower/ vacuum.
Do not use solvents to clean the blower /vacuum.
Store the blower/vacuum in a dry place, out of reach of children.
Power cord maintenance
If the power cord needs replacing, the task must be carried out by an authorised
service centre. Please contact Customer Services.
18
Disposal of the appliance
Please note that this Andrew James product is mark with this Symbol:
This means that this product must not be disposed of together with
ordinary household waste, as electrical and electronic waste must be
disposed of separately.
In accordance with the WEEE direcve, every member state must ensure correct
collecon, recovery, handling and recycling of electrical and electronic waste.
Private households in the E.U. can take used equipment to special recycling staons
free of charge. In certain member states used apparatus can be returned to the
dealer where they were bought on the condion you buy new products. Contact
your retailer, distributor or the municipal authories for further informaon on
what you should do with electrical and electronic waste.
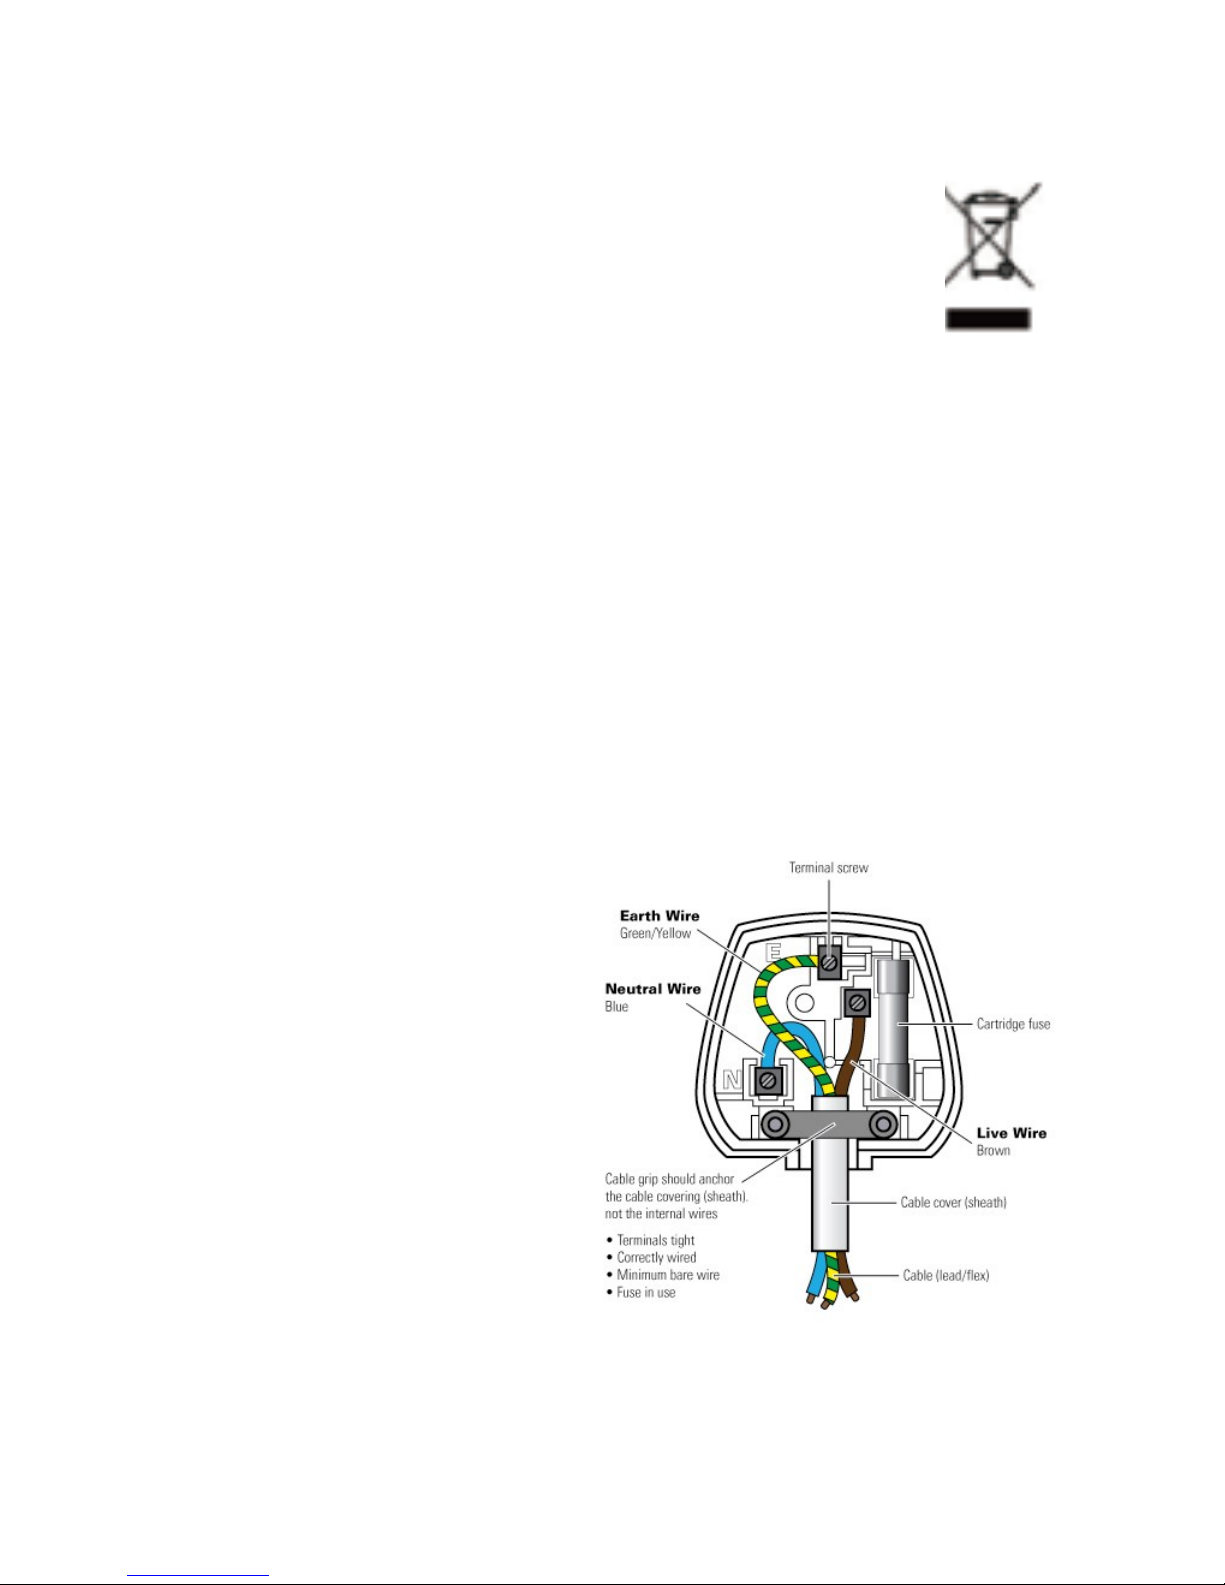
Electrical informaon
Please note:
It is extremely important that the wires or cores in the ex are connected to the
correct terminals in the plug. If the
colour of the mains lead of the
appliance does not correspond with
the coloured markings idenfying the
terminals in your plug proceed as
follows:
The Live (Brown) wire connects
to the right- most live (L)
terminal nearest to the fuse.
The Neutral (Blue) wire
connects to the le-most
neutral (N) terminal.
The Earth (Green and Yellow) wire connects to the central, top most
earthed (E) terminal.

19
Warning:
If the appliance is double insulated indicated by the double insulated symbol:
it should not have an earth wire or earth connecon.
Plug
The plug must be protected by the correct AMP fuse; this will be indicated on the
case of the plug. Only BSI or ASTA approved fuses should be used. When changing
the fuse always replace it with a fuse that is of the same idencal rang as the
original. If you are unsure about which plug or fuse to use, always refer to a
qualied electrician.
Please note aer replacing the fuse, ensure that the cover is correctly ed back
onto the plug. Never aempt to run the appliance if the plug does not have a cover.
If a moulded plug is ed and has to be removed take great care in disposing of the
plug and severed cable, it must be destroyed to prevent it from engaging into a
socket.
If the supply cord is damaged it must be replaced by a service agent or a similarly
qualied person in order to avoid a hazard.
All of our electrical appliances conform to pre-exisng EC Direcves 2006/95/EC
(Low Voltage Direcve) and 2004/108/EC (EMC Direcves).
For further informaon please visit hp://www.esc.org.uk/industry/product-
safety/product-tesng-screening/kitchen-appliances/

20
UK and EU Guarantee
Your new Andrew James product comes with a 24 month guarantee and a 2 year
xed warranty, eecve from receipt conrmaon. Your receipt or order number
is required as proof of purchase date so it is imperave that you keep it safe. This
guarantee only applies if the item has been used solely for the use intended, and
all instrucons have been followed accordingly. Please note this product is only for
domesc not commercial use.
Abuse of your product will invalidate the guarantee. Returned goods can only be
accepted if repackaged properly within the original colour product box, and
presented with the original receipt of sale/order number. This does not aect your
statutory rights.
Returned products must be cleaned and returned to us in as close to delivery
condion as possible.
If your product develops a problem within the rst 12 months of the xed
warranty, we will pay all shipping costs to have it returned to us. Aer 12 months
the customer will be liable for the cost of returning the product to us. We will then
pay to have the repaired/replaced item shipped back to the customer.
If you wish to return your item for a full refund, you have the right to do so within
the rst 7 days. For our returns policy please go to
www.andrewjamesworldwide.com
Customers are responsible for any taxes applied to our products when they are
shipped outside of the EU.
All of our prices are inclusive of VAT.
Once a product has been returned to us, we will aim to repair or replace it within
30 days of receipt.
The guarantee does not cover any defect arising from improper use, damage, build
-up of lime scale or repair aempts made by third-pares. Also, the guarantee
does not cover normal wear and tear of individual parts.
Table of contents
Other Andrew James Blower manuals

Popular Blower manuals by other brands


KitchenAid
KitchenAid UXB1200DYS installation instructions

Style selections
Style selections NAOS K4 Installation and operating instructions

MTD
MTD 249-688A owner's manual

RIDGID
RIDGID R8604301 Operator's manual

DeWalt
DeWalt DCMBA572X1 Original instructions

Clemas & Co
Clemas & Co CS220 140B Operator's manual