Anga AGE-2208 User manual

H.264 Standalone DVR
USER MANUAL_V3.0.01

2
INDEX
Chapter one Products Introduce.....................................................................................3
1.1 Technical Parameter................................................................................................................................... 3
1.2 Performance................................................................................................................................................ 4
Chapter Two Hardware.......................................................................................................5
2.1 H.264 standalone 4CH/8CH/16CH/24CH/32CH DVR........................................................................... 5
Chapter Three Operation.................................................................................................10
3.1Operation instruction...............................................................................................................................10
3.2 Powering On............................................................................................................................................. 13
3.3 Shutdown.................................................................................................................................................. 15
3.4 Multi Channel........................................................................................................................................... 15
3.5 Preview......................................................................................................................................................15
3.6 Recording operation................................................................................................................................. 16
3.7 Playback video..........................................................................................................................................17
3.8 How to control PTZ..................................................................................................................................18
3.9 Alarm control............................................................................................................................................ 20
3.10 Display Adjust........................................................................................................................................ 20
Chapter Four Menu Operation Guide...........................................................................21
4.1 Recording Setup....................................................................................................................................... 21
4.2 Camera...................................................................................................................................................... 24
4.3 Network Setup.......................................................................................................................................... 26
4.4 System Setup............................................................................................................................................ 31
4.5 System Management................................................................................................................................ 35
Chapter Five IE Preview.................................................................................................. 37
5.1 Logging on interface................................................................................................................................37
5.2 System Settings.........................................................................................................................................39
5.3 State control.............................................................................................................................................. 41
Chapter Six QMEYE phone software for use.......................................................... 44
6.1 Instructions of Android............................................................................................................................ 45
6.2 Instructions of IPhone.............................................................................................................................. 63
Chapter Seven FAQ (Frequently Asked Questions).................................................80

3
Power
This DVR select the adaptor is DC12V; please make sure the power supply voltage before use the
machine.
If do not use the machine for a long time, please turn off the power of DVR machine, and let the electric plug
away from power socket;
... safety
This DVR only for indoor use, as for prevent short circuit or electric danger, please do not let the DVR in the
raining or humid area.
In case any solid or liquid inside the case of DVR, please turn off the power immediately, and ask the qualified
technician check it before reboot the DVR;
The DVR is the precision machine, there is nothing for repair by customers themselves in it, when it break
down, please ask the qualified technician to check and repair, or contact with the agents of it.
... Installation
Please keep the DVR in level for installation;
Pay attention to equipment ground;
For the first time to install the DVR, please make sure if the hard disk drive install or not;
Prevent to open the case and change the hard disk drive in electrified;
Propose to select the performance of hard disk drive will be 7200 rotating speed person second;
Please select the appropriate installation site, so let the air can be free flow inside the DVR, prevent the
machine overheating;
Please do not install the DVR nearby the radiator, air chute etc. heat source,
or where the direct sunlight, too much dust, or mechanical vibration or attack;
Chapter one Products Introduce
1.1 Technical Parameter
Video input Composite 1.0Vp-p/75Ω,BNC×4/ BNC×8/ BNC×16/ BNC×24/ BNC×32
Video output Composite 1.0Vp-p/75Ω,BNC×1, VGA×1
Resolution Preview D1 704×576(PAL),720×480(NTSC)
CIF 352×288(PAL),320×240(NTSC)
Recording D1 704×576(PAL),720×480(NTSC)
CIF 352×288(PAL),320×240(NTSC)
Frame rate Preview/ recording
4ch 100fps(PAL), 120fps(NTSC)
8ch 200fps(PAL), 240fps(NTSC)
16ch 400fps(PAL), 480fps(NTSC)
24ch 600fps(PAL), 720fps(NTSC)
32ch 600fps(PAL), 720fps(NTSC)
Audio input -8dB~22k,RCAx4(4ch)
Audio output -8dB~92dB,RCAx1
Audio decode ADPCM
Alarm input
Input low level alarm, user setting normal open or normal close, Varies
according to the model

4
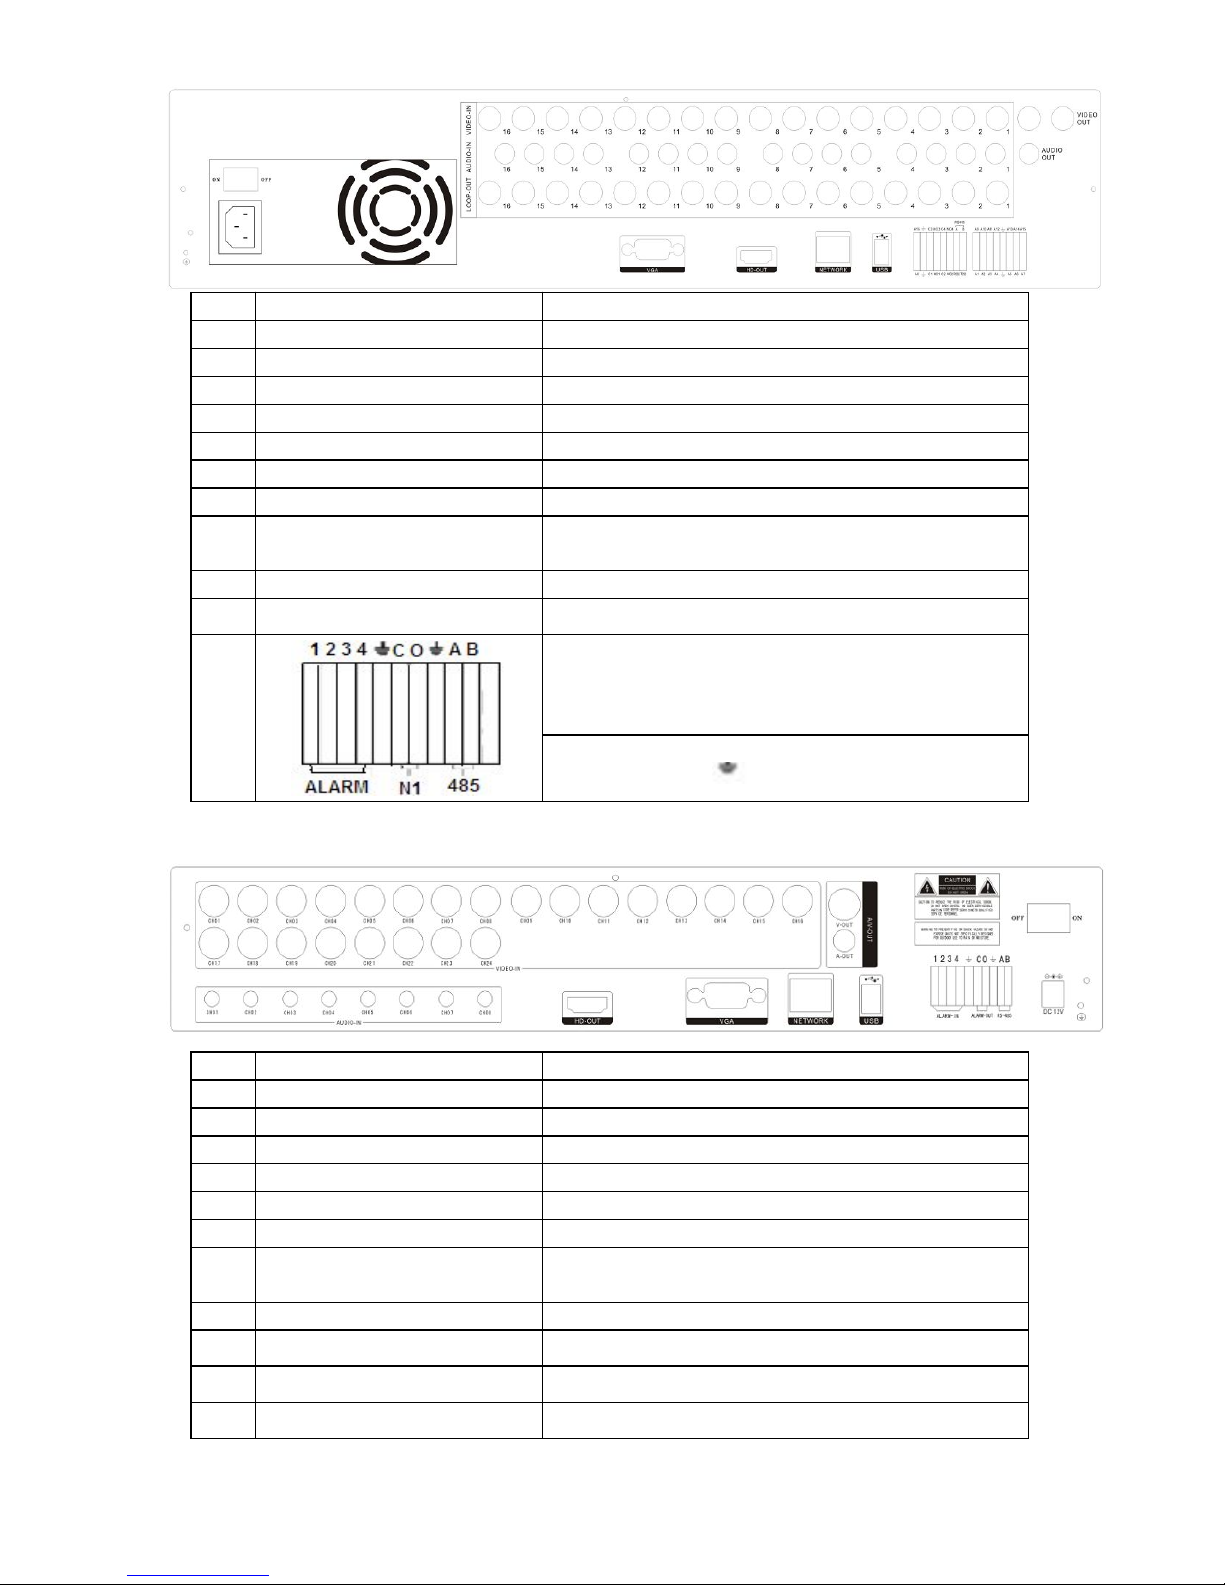
Alarm output 1ch output or 2ch output; Varies according to the model
Recording mode Manual recording, timing recording , motion detection recording and external
alarm recording
Simplex/duplex/ triplex triplex(recording, playback , LAN transmission)
LAN RJ45(10M/100M self-adapting)
PTZ control Yes
Communication RS485×1,USB2.0×2
USB USB mouse control
Hard disk drive 1or2or4x SATA(4TB or above)
Remote control unit Yes
Dimension Main board size : 220mm x 112mm
Power supply AC110-230V
1.2 Performance
Real-time
monitoring
Turn-by-turn analog video output and
VGA interface, according to TV monitor
or VGA monitor to live view in
1/4/8/9/16/24/32 or more video channel
to monitoring the recording streaming
and the record file capacity in Every
hours every channel, to presentation the
status of video channel, recording,
dynamic detection, video loss,
monitoring lock-up. You can view the
system log in local DVR.
Storage
function
Internal 1or2 or 3SATA interface, MAX
4TB hard disk drive, the file of hard
disk drive include cover mode
circulation recording and none cyclical
recording, the storage data to use the
proprietary format, can not falsify the
data, make sure the data safety.
Compression
format
Video compression format:: H.264
Support 8ch video and audio signal,
video
and audio maintaining stability in
synchronous.
Backup
function
Through USB interface to backup. ( for
example USB drive and mobile hard
disk drive etc.) The video file can be
downloaded by Client software
through LAN to laptop hard disk drive.
Recording
and
playback
function
* Multiplex, to achieve real time recording
to be independent at the same time to
single channel playback, research and
backwards, network monitoring, network
search download etc.
* Multiple recording mode: Manual,
normal, alarm, linkage, dynamic
detection recording etc. turn-by-turn
pre-recording function.
* Can playback the record file in DVR
through network, to achieve quick-search
the recording file and recording type,
multiple playback type: SLOW, Fast
Forward, Backwards, step Forward.
Display the exact time of event occurred
while recording file playback.
Network
Operation
function
* through network to real time remote
monitoring;
* PTZ control
* recording research and real time
playback;
* system setting parameter modify and
the system software upgrade;
* remote monitoring alarm process and
view the system log message;
* to use embedded TCP/IP protocol and
Embedded Operation System, can
access the DVR through client software
program bundle in the package;
*Management Model: use enhancement
user management, password mode to
make sure the valid user to login the
system, flexible convenient and fast to
set the different permission user

5
requirement.
Alarm
linkage
function
8ch alarm input ( alarm event mode can
be set normal open or normal close
selection),and turn-by-turn video loss
alarm, dynamic detection alarm, the
alarm device may be smoke detection
censer, temperature detector, IR
detector. Possess 4ch relay switch
alarm output, flexible convenient and
fast to achieve alarm linkage and
lighting control at site.
They’re possess protective circuit in
Alarm input and alarm output port,
make sure the device not to damaged.
Communication
port
* Possess specific interface, achieve
alarm input and PTZ control;
* possess a standard Ethernet interface,
achieve the network remote
monitoring.
PTZ
control
* Support PTZ decoder through RS485
communicate
* scalable multiple decoder protocol,
easy to achieve to control the pan
driver and speed dome camera
function.
Intelligent
operation
* mouse operation function;
* In menu for same setting and to
process shortcut copy operation
Chapter Two Hardware
2.1 H.264 standalone 4CH/8CH/16CH/24CH/32CH DVR
2.1.1 Hard disk Installation
For the first use, please install the hard disk
○
1
Remove the screws on both
○
2
extracted from the next cover up
○
3
connect hard disk and mother board
sides of shell

6
○
4
fix the screw of hard disk
○
5
close cover
○
6
install the screws on both sides of shell
2.1.2 Rear panel
4CH
Item Interface Description
1 VIDEO IN 4ch video input
2 AUDIO IN 4ch audio input
3 V-OUT 1ch video output
4 A-OUT 1ch audio output
5 VGA VGA monitor
6HD-OUT HDMI interface
7NETWORK RJ45 for internet
8USB First USB for backup or upgrade system of DVR; Second
USB for mouse
9ON/OFF Power supply switcher
10 DC-12V Power adaptor port
11
ALARM IN:1 2 3 4 alarm input port
RS-485:A, B
ALARM OUT: N1 alarm output port, every channel connect
GND、OUT、COM;
every two channel OUT, COM port is for GND;
8CH

7
Item Interface Description
1 VIDEO IN 8ch video input
2 AUDIO IN 4ch or 8ch audio input
3 V-OUT 1ch video output
4 A-OUT 1ch audio output
5 VGA VGA monitor
6HD-OUT HDMI interface
7NETWORK RJ45
8USB First USB for backup or upgrade system of DVR; Second
USB for mouse
9ON/OFF Power supply switcher
10 DC-12V Power adaptor port
11
ALARM IN:IN1-IN4 alarm input port
RS-485:A , B
ALARM OUT: N1 alarm output port, every channel connect
GND、OUT、COM;
every two channel OUT, COM port is for GND;
16CH

8
Item Interface Description
1 VIDEO IN 16ch video input
2 AUDIO IN 4ch audio input
3 V-OUT 1ch video output
4 A-OUT 1ch audio output
5 VGA VGA monitor
6HD-OUT HDMI interface
7NETWORK RJ45 for internet
8USB/ MOUSE First USB for backup or upgrade system of DVR;Second
USB for mouse
9ON/OFF Power supply switcher
10 DC-12V Power adaptor port
11
ALARM IN:4CH alarm input port
RS-485:A, B
ALARM OUT: N1 N2 for alarm output port, every channel
connect C and O; port is for GND;
24CH
Item Interface Description
1 VIDEO IN 24ch video input
2 AUDIO IN 8ch audio input
3 V-OUT 1ch video output
4 A-OUT 1ch audio output
5 VGA VGA monitor
6 NETWORK RJ45 for internet
7 USB/ MOUSE First USB for backup or upgrade system of DVR;Second
USB for mouse
8 ON/OFF Power supply switcher
9 DC-12V Power adaptor port
10 HD-OUT HDMI interface
11 TALK AUDIO TALKBACK

9
12
ALARM IN:16CH alarm input port
RS-485:A, B RS485-S A,B
ALARM OUT: N1 N2 for alarm output port, every channel
connect C and O; port is for GND;
32CH
Item Interface Description
1 VIDEO IN 32ch video input
2 AUDIO IN 8ch audio input
3 V-OUT 1ch video output
4 A-OUT 1ch audio output
5 VGA VGA monitor
6 NETWORK RJ45 for internet
7 USB/ MOUSE First USB for backup or upgrade system of DVR;Second
USB for mouse
8 ON/OFF Power supply switcher
9 DC-12V Power adaptor port
10 HD-OUT HDMI interface
11 TALK AUDIO TALKBACK
12
ALARM IN:16CH alarm input port
RS-485:A, B RS485-S A,B
ALARM OUT: N1 N2 for alarm output port, every channel
connect C and O; port is for GND;
2.1.3 Alarm input port
8chanel alarm input, the mode of alarm input is no restriction (possible is normal open also normal close);
the GND alarm detector connect to COM under parallel connection (the power of alarm detector supply by
external power supply;
the ground terminal of alarm detector join-up in parallel with DVR;
the NC of alarm detector connect with the input end (alarm) of DVR;
when you want to reset the remote alarm of triggered , the +12V power supply of alarm detector supply by DVR,

10
for example, smoke detector.
When you select the external power supply, please share the GND with DVR;
Alarm input circuit:
Alarm inlet connection:
2.1.4 Alarm
output port
4 way switching
value alarm output,
selectable in normally open contact, also selectable in normally closed contact, the external alarm
device should be
need VCC;
Chapter Three Operation
3.1Operation instruction
3.1.1 Remote control AND Front panel keypad

11
Table:
S/
N
Keypad
Name
Operating
instruction
S/
N
Keypad
Name
Operating
instruction
1
【POWER】
Power ON/OFF
8
【ENTER 】
【OK】
This button is used as “ enter ”
and “ ok ” key in most
circumstances
2【MENU】Access main menu
3【ESC】
Exit operation or enter upper
menu
Close soft keyboard
Close current window
Exit from current control
Return to last menu
Exit from PTZ control under
preview state
9【PTZ】
Access/exit from PTZ control
under preview state
4
【 】
Slow playback,1/2×, 1/4×,
1/8× and single frame play
10 【+/-】
Volume or number
increase/reduction Select item
of the list
5
【 】
Fast playback, 2×,4× and 8×
11
【ZOOM
IN/OUT】
Lens control

12
playback
12
【0~9 10+】
Digital input Corresponding;
Channel is magnified in full
screen under preview state
13
【FN】Short cut
6
【 】 Playback stop 14
【 】
Switching of
1/4/8/9/16/24/32Preview mode
【 】
Play / Pause
15
【ALARM】Alarm reset
【▲.▼.
】
Four-way to move the focal
point in main menu, up and
down to move in the normal
window, to control pan driver
to move in
the PTZ control windows
【REC】
To mode of recording 16
【CLEAR】
Clear alarm
7
【SEARCH】
Search for playback time
choosing
3.1.2 How to use mouse of DVR (for right hand mouse)
1 Left key single click
To any function menu icon click the mouse left key into the menu
To run the control point out operation
Change again select frame or motion detection piece mode
Click the assemble frame popping to pull down the list
In the input frame, can select digit, character, lowercase, block letter, left click
mouse on the keyboard of character input, that’s. ← say move back, _say
blank,Shift say switch case .

13
2 Right click mouse
Right click mouse, popping the shortcut menu, as follows;
Through the menu can be switching preview screen window mode, start
replays, PTZ control. Four pictures playback mode, the point of the right mouse
button, Can in a single picture, four pictures, eight pictures (8 road playback), 16
screen (16 road playback), twenty four picture, thirty two picture,
broadcast control switch view show or hide broadcast control bar.
3
Double click left
button
To run the ActiveX Control ActiveX special operation, For example, double click
the certain item of record listed file, then the system will playback the segment
record video.
4
Dragging the mouse
Depress the left key and dragging the mouse, banding select Motion detection
area, depress right key of mouse and Dragging, cancel the banding select area.
Dragging playback Progress Bar back and forth to dolly moves, to achieve the
playback position adjustment. Dragging the audio and video regulation
parameter bar dolly moves, to achieve the parameter adjustment.
3.2 Powering On
Boot-strap
If【POWER】pilot lamp off, please follow the operation step by step:
First step: if the power does not plug into, please plug into the power, then the DVR begin to start, by now, if the
DVR still inactive, to enter the next step;
Second step: turn on the power supply of the DVR at the back panel, DVR begins to start.
If【POWER】pilot lamp to offer RED, press the 【POWER】key, DVR begins to start.
set user:admin Password:Don't need to input
The video output mode of DVR ’s the default setting is multi picture channel mode after starting the DVR , if the
time of start the DVR is in the Timing Recording Setting, the DVR will automatically to start the Timing Recording
function, the corresponding channel’s recording pilot lamp will be light, the DVR is normal operation.

14
Button Description Button Description
Main Menu PTZ control
Wizard language Alarm control
Multi channel Display setup
Recording Control
Exit
Playback Back up
If before starting, the system not to install hard disk, into the system, will tip: system didn't detect any hard disk
connection!
Note:
In this dialog, you can select language and quickly set lots of parameters.
Generally,the hisilicon system includes the following 22 kinds of languages: simplified Chinese, English, Italian,
Turkish, Thai, Russian, Japanese, French, Portuguese, Spanish, Hebrew, Traditional Chinese, Polish, Korean,
Persian, German, Srpski , Czech, Greek, Arabic, Indonesia, Vietnamese language and so on.

15
3.3 Shutdown
There are two safety mode for Shutdown
Enter【Exit】,select【Power Down】.
Abnormal shutdown
Through the rear panel to shutdown
During the DVR running, directly to turn off the power through the rear panel power switch, please avoid as much
as possible to do it. (especially while the DVR recording).
Directly to pull up the power cable of DVR
While the DVR running, directly to pull up the power cable of DVR, please avoid as much as possible to do it.
(especially while the DVR recording).
Caution: In some area, the power supply is irregularity, it will cause the DVR working not normal-operation, the
DVR will be damaged in serious. In this surroundings, suggest select the stabilized voltage supply.
3.4 Multi Channel
1/4/8/9/16/24/32 preview screen mode switch
3.5 Preview
After log in system of DVR, system will automatically directly enter the preview mode
In the preview picture, you can see the overprint date, time, channel name, if the date and time is not correct show on

16
the picture, re setting the date. There is a alarm input mode icon. (the meaning of every kind of icon as following
table)
Channel picture attention
3.6 Recording operation
Customer according needs to select the different kind of recording mode in this system. For the
different kind of recording mode you set, the channel will be showed the mark on everyone channel.
Manual recording
Note: Manual recording operational requirement the user should have “recording” permission.
Please make sure the hard disk drive has been installed and it has been formatted.
1)Input manual recording operation menu
Single click right key of mouse or In main menu=> recording control can into manual recording operation menu.
Under preview mode, press REC key or on the Remote controller unit key into recording control operation menu, as
follows:
2) The explanation of manual recording operation menu
【manual Rec】Priority level highest, no matter currently what status of every channel, after carry out the
manual press, corresponding channel will be record common in progress;
【Automatically】Setting channel recording by setting condition to record under Timing, Motion detection and Alarm
in Recording Setting;
【Stop Rec】All video channel stop recording;
1
Channel is video when channel
video pictures showed this symbol
2
Channel happen when dynamic
test, channel video pictures
showed this symbol
3
Channel open sound, the channel
video pictures showed this symbol

17
3.7 Playback video
Button Description Button Description
Synchronous/asynchronous play
Hide / display list
Speed slow
recording date
Speed normal Recording Date
Speed fast Select Playback Time
Sound off/on Play/pause/stop
Voice adjustment
rewind
1/4/8/9/16/24/32 screen(switch
image)
Note:
1) During playback the Playback Tool will show the file playback speed, channel, timing, playback speed etc.
information in the Playback control panel;
2) Can’t same time to select the Fast forward operation function in over 2 channel, only progress in anyone channel;
3) Can drag the Playback Speed toolbar by mouse;
4) In this dialog you can select the video precise to the second.

18
3.8 How to control PTZ
【Zoom】Lens in the current play far closer picture, use the mouse wheel also can undertake variable times control.
【Focus】Slight adjusting the focal length
【Iris】Aperture size adjustment
【Speed】Through the slider adjust rotation step interval, PTZ mainly used to control direction operation, the step
length of turning the faster PTZ.
【Preset】Adjust the camera Angle, direction , the corresponding input and clicking on 【setup】button, preset points
will be set in the present PTZ.
Input preset points and click on【Transfer】button, the camera will be transferred to the preset point corresponding
position. Click【clear】button, this preset points will be cleared

19
【Setup】Click 【Pattern Start】the trajectory of said no corresponding, click the 【Add Preset 】and 【Delete
Preset】,【Clear Tour】the cruise lines.
【Pattern Start】begin to track record, was registered date 【Pattern Stop】,thus set up from the corresponding track
circuit.
【Left Limit】Began to limit scanning Settings, was registered date 【right Limit 】, thus set up corresponding limit
scanning.
【Add Preset】Add preset points to the cruise lines.
【Delete Preset】Cruise lines from deleting preset points.
【Clear Tour】Remove the cruise line designated.
Note: some equipment doesn't fully support all function, depending on the specific PTZ equipment
【Control】PTZ Control
【Tour Scan】Point between cruise control.
【Pattern Scan】Track patrol control.
【PTZ Reset】Remove all Settings, original reset to the original state.
【Limit Scan】PTZ boundary scan control.
【Auto Pan】Remove the cruise line designated
Note: some equipment doesn't fully support all function, depending on the specific PTZ equipment.

20
3.9 Alarm control
【Set Alarm】Selection need protection channel, click confirm corresponding channel after in protection status
【Clear Alarm】Remove protection condition, not alarm input to react
【Alarm Output】Open the alarm output. In the premise of no trigger alarm input, user can operate the output. for
example, some alarm switch is connected with a lamp, lamp is open when alarm is triggered
【All】Can choose all the channels
3.10 Display Adjust
(1)Video
【Video Effect】Optional: standard, downy, sharp, custom.
【Default】Restoring default effect, for custom video effects, copy standard effect parameters.
Through the slider fluctuation sliding, respectively adjustable brightness, contrast and saturation, tonal, etc.
(2)Monitor
Table of contents
Other Anga DVR manuals
Popular DVR manuals by other brands

Hunt Electronic
Hunt Electronic HVRM-T1600M Install & user's guide

Strong
Strong SRT 5495T user manual

PACOM
PACOM 4-CHANNEL user manual

PSA Products
PSA Products Pinkerton quick start guide

Formosa Industrial Computing
Formosa Industrial Computing 3A-100 Series user manual

Videcon
Videcon Viola 2VIO2-M4BL user manual

iCatch
iCatch 411ZA quick start guide

United Technologies
United Technologies TVR-1204C-500 quick start guide

Burg Wächter
Burg Wächter BWPVR-4821i quick guide

Mitsubishi Electric
Mitsubishi Electric DX-TL900U Specification sheet

Bosch
Bosch Divar -Digital Versatile installation instructions

Philips
Philips LTC3905/50 Install and operation instructions