Antari Z-1500 III User manual

Z-1500 III / Z-3000 III
Stage Fog Machine
User Manual
- English
-中文
© 2023 Antari Lighting and Effects Ltd.

0
1. Introduction ................................................................................................................................................. 1
2. Safety Information....................................................................................................................................... 1
3. Package Contents & Inspection................................................................................................................... 2
4. Machine Details........................................................................................................................................... 3
5. Technical Label Information........................................................................................................................ 3
6. Fog Liquid ................................................................................................................................................... 3
7. Setting and Manual Operation..................................................................................................................... 4
8. Control Settings ........................................................................................................................................... 4
9. Machine Status ............................................................................................................................................ 5
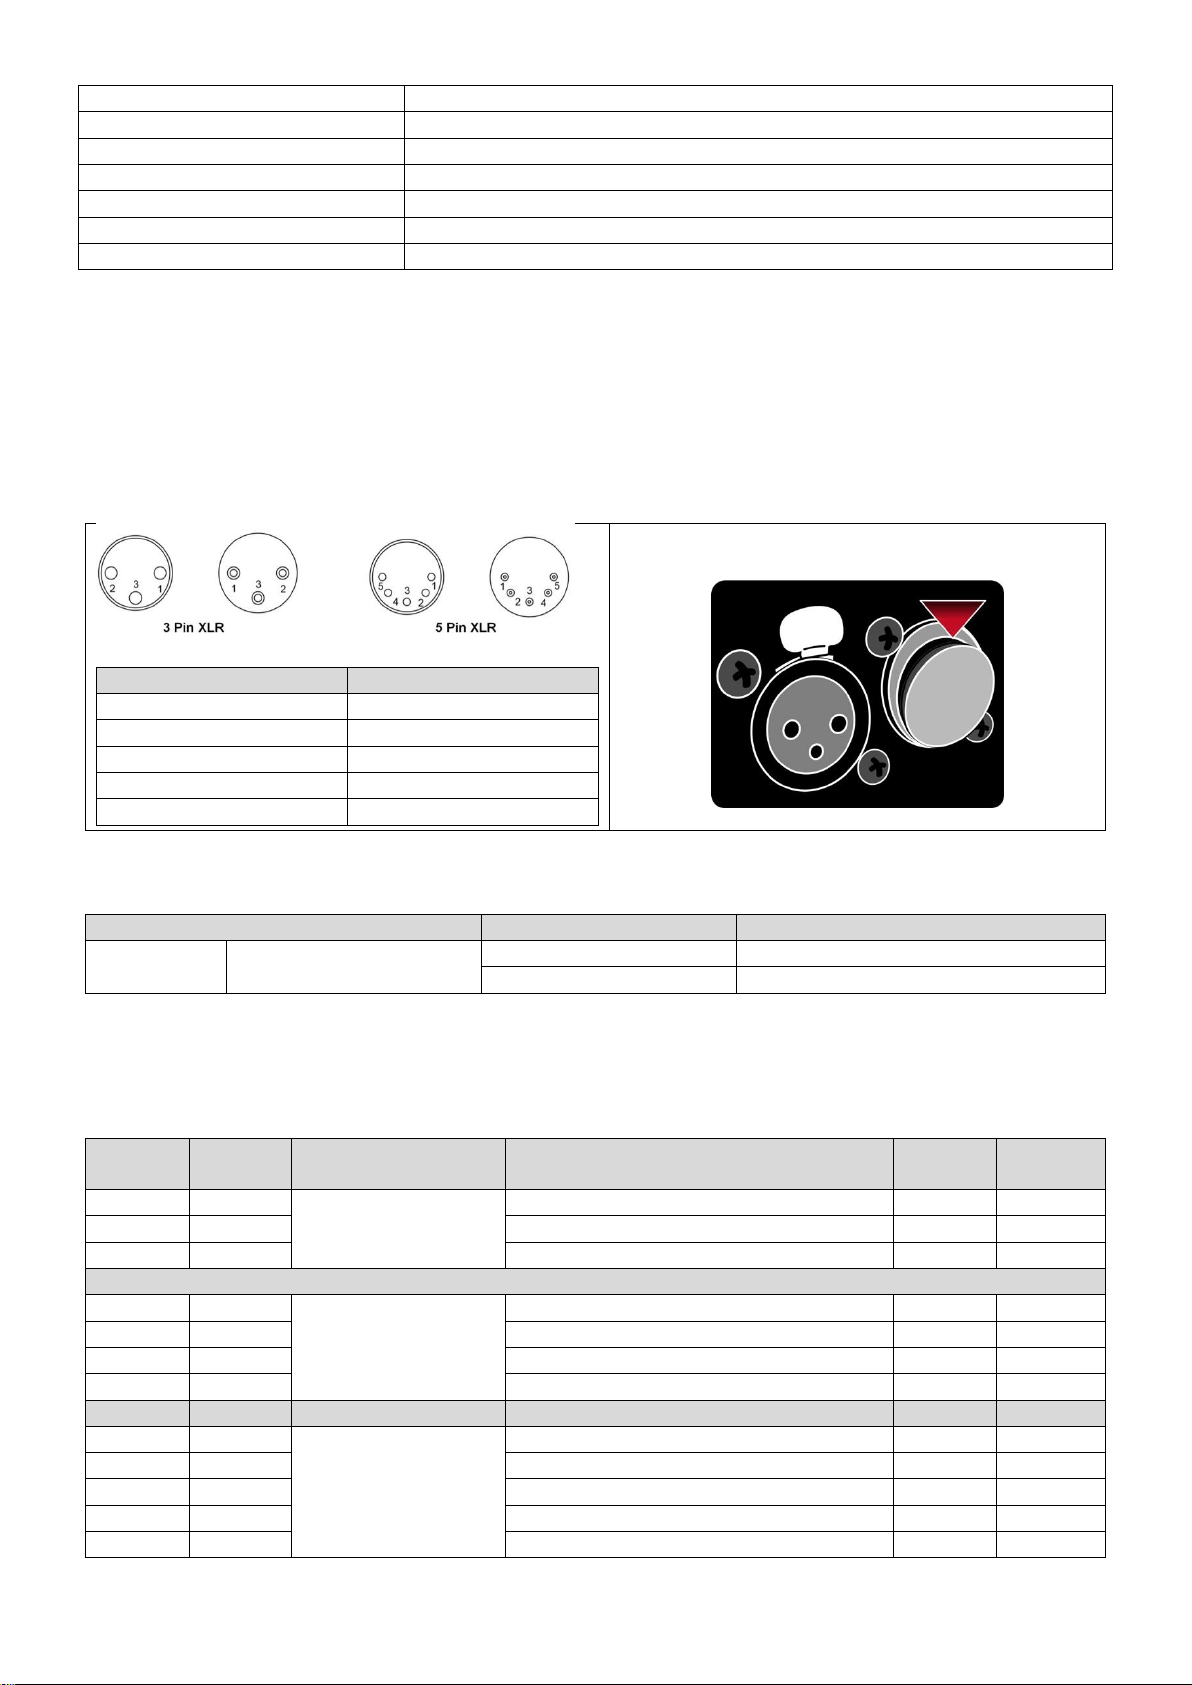
10. DMX Connection ........................................................................................................................................ 6
11. RDM Function............................................................................................................................................. 6
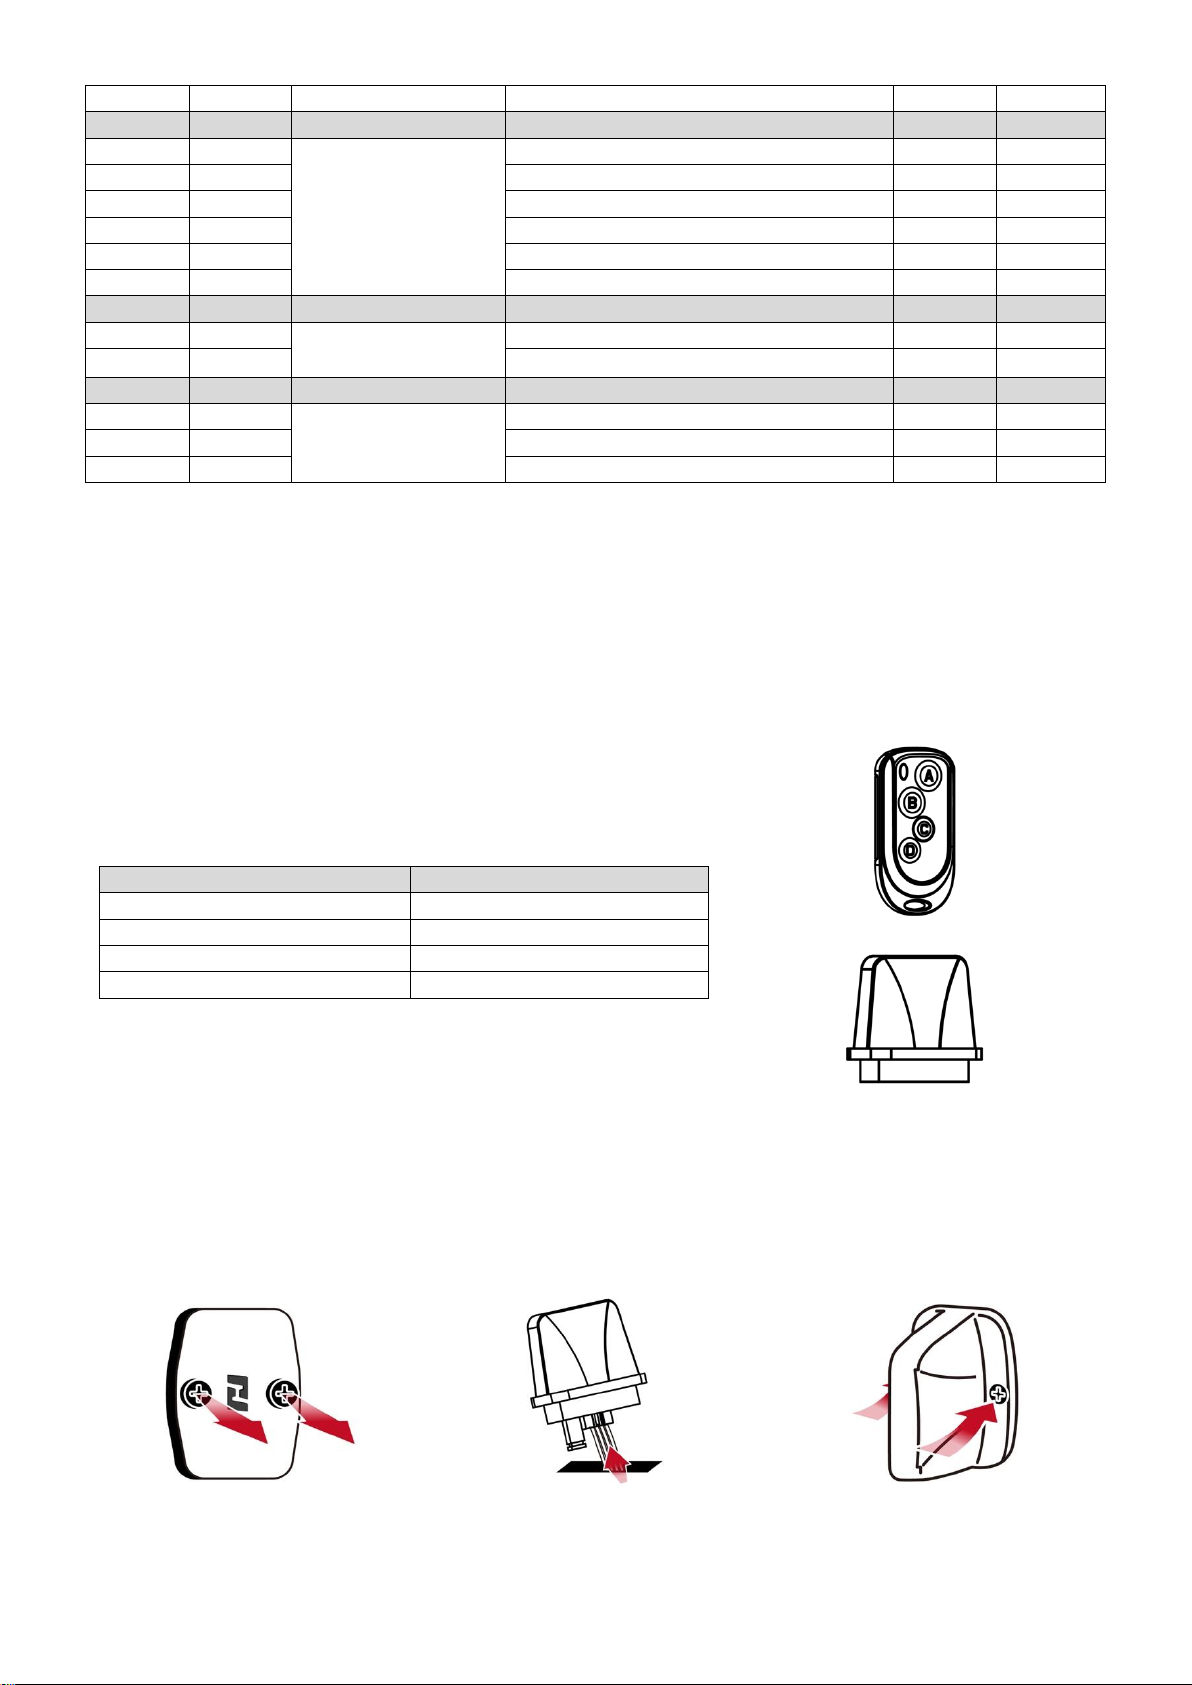
12. WTR-20 Wireless Remote (Optional) ......................................................................................................... 7
13. Service and Maintenance............................................................................................................................. 8
14. Technical Specifications .............................................................................................................................. 9
15. Warranty Disclaimer.................................................................................................................................... 9
16. Machine Dimension..................................................................................................................................... 9
1. 前言............................................................................................................................................................11
2. 安全注意事項............................................................................................................................................11
3. 包裝內容與檢查....................................................................................................................................... 12
4. 機器訊息................................................................................................................................................... 13
5. 技術標籤資訊........................................................................................................................................... 13
6. 煙霧水....................................................................................................................................................... 13
7. 設定與手動操作說明............................................................................................................................... 14
8. 控制設定................................................................................................................................................... 14
9. 機器狀態................................................................................................................................................... 15
10. DMX 說明................................................................................................................................................. 16
11. RDM 功能................................................................................................................................................. 16
12. WTR-20 無線控制器(選配)..................................................................................................................... 17
13. 維護和保養............................................................................................................................................... 18
14. 技術規格................................................................................................................................................... 19
15. 保固聲明................................................................................................................................................... 19
16. 機器尺寸圖............................................................................................................................................... 19
Appendix I – Grounding Instruction.................................................................................................................. 21

1
User Manual
1. Introduction
Please read all the user manual before operating the machine, and place the manual where the user can refer to it at
all time. The manual includes how to install and operate the machine under safe condition and explain all the labels
printed on the machine. If you encounter any problem, contact your local Antari dealer for assistant immediately.
2. Safety Information
DANGER
If the danger is not avoided, it will cause death or serious injury
WARNING
If the warning is not heeded, it can cause death or serious injury.
CAUTION
If the precaution is not taken, it may cause minor or moderate injury.
DANGER
Must connect the machine to the correct rated voltage or it might lead to an electrical shock or a burn and may
cause serious consequences.
Must connect the machine to a protected circuit and ensure it is properly grounded to avoid the risk of
electrocution. For grounding instruction, please refer to Appendix I on page 21.
Do not operate the machine with a bundled power cord, it could lead to a fire hazard.
When operating the machine, do not point at people, animals, or fire.
WARNING
Machine’s nozzle is extremely hot, please keep at least 50cm distance from the nozzle when the machine is
running.
Please operate the machine on a flat, level hard and well ventilated surface area, reserve at least 50cm space
around the machine and make sure there is no flammable gas or material nearby.
Do not disassemble, repair or modify the machine, it may cause damages, malfunction, risk of electrical shock
or result in fire.
The machine can only be operated by adults or professionals, is not intended for use by person with reduced
physical sensory, mental capabilities, or lack of experience and knowledge including children.
Do not leave the machine running unattended, make sure all powers are off when leaving.
Children should be supervised to ensure that they do not play with the machine.
Do not use the machine upside down or tilt it, it might cause damages or malfunction.
Please store the fluid inside in a well ventilated area without direct sunlight and keep out of reach of children.
In case of eye contact or accidentally swallow the fluid, please seek medical attention immediately.

2
CAUTION
Keep the machine dry at all time. The machine is not waterproof, do not expose the machine to water, rain, or
moisture environment.
Please make sure the power outlet is not damaged or loose before plug in the power cord.
If the power cord is damaged, it must be replaced by Antari or its local dealers, otherwise the warranty will be
void.
Before operating the machine, please sure the fluid is filled in the fluid tank to avoid the pump in idling state
which could lead to overeat or malfunction.
Before transporting the machine, please make sure the fluid is drained and tank is empty. (Recommend using
original package)
The machine is for indoor use only.
Do not operate the machine in any area with unstable voltage.
If you experience strange sound or malfunction, turn off the power and unplug the power cord immediately
and contact your local Antari dealer for assistant.
Do not contact any moving part.
Only use accessories recommended or sold by Antari.
Please make sure the power is off when not using the machine and unplug the power cord if not intend to use
for a long period of time.
To disconnect, turn all controls to the off position, then remove plug from outlet.
Do not unplug by pulling on cord. To unplug, grasp the plug, not the cord.
Unplug from outlet before servicing or cleaning.
Do not operate the machine with a damaged cord or plug, or after the machine malfunctions or is dropped or
damaged in any manner. Return machine to the nearest authorized service facility for examination, repair, or
electrical or mechanical adjustment.
To ensure the lifespan of the machine, please only use the fluid manufactured by Antari, do not use other fluid
or additive, otherwise it may clog the heater and cause malfunction.
Before operating the machine, please read all warning labels on the machine, description as below;
Top Cover Printing
WARNING!
HOT NOZZLE!
KEEP AT LEAST 50 CM DISTANCE
LIQUID
ONLY USE MANUFACTURER DESIGNATED FLUID.
Front Cover Printing
WARNING!
DISCONNECT POWER BEFORE CHANGING FUSE
USE ONLY WITH ADULT SUPERVISION
DO NOT OPERATE WITHOUT LIQUID
FOR INDOOR USE ONLY. KEEP DRY
NO USER SERVICEABLE PARTS INSIDE
3. Package Contents & Inspection
3.1 Package Contents
Immediately upon receiving the machine, carefully unpack the carton, check the content to ensure it is the correct
model and all parts are included. If any part appears to be damaged or missing during transportation, please contact
your local dealer and return in original package for inspection.
Z-1500 III
Z-3000 III
1 x Z-1500 III Fog Machine
1 x Z-3000 III Fog Machine
1 x 6 Liters Fluid Tank
1 x Neutrik powerCON Cable Connector
1 x User Manual or Scan QR Code on the Machine

3
3.2 Optional Accessories
Item Code
Description
WTR-20
Wireless Remote (W-2 Transmitter/W-2 Receiver)
4. Machine Details
01. Fog Nozzle
06. LCD Display
02. Handle
07. Rotary Knob
03. Fluid Tank Cap
08. Two in One Power & Breaker Switch
04. 6 Liter Fluid Tank
09. Neutrik powerCON Cable Connector
05. Wireless Connector
10. XLR 3-Pin & 5-Pin DMX
5. Technical Label Information
Please read the technical label information on the back of the machine before operating it.
1. Model Name
5. Breaker/Fuse
2. Input Voltage
6. QR CODE for User Manual
3. Frequency
7. Serial No.
4. Rated Power
6. Fog Liquid
CAUTION!
Always turn off the power before filling the fluid tank. Do not add flammable
liquid to the fluid tank. If fluid gets inside the machine, please contact your local
Antari dealer for assistant.
Only the fog liquid manufactured by Antari can be used, do not mix or dilute the fog liquid. Due to improper
storage or using other fluid might clog the heater and cause malfunction.
The machine is tested and calibrated with the specific fog liquid to get the best performance.
Please empty the fluid in the tank before switching to another fluid to avoid mixing.
Only the essence manufactured by Antari can be used, and add according to the ratio recommended by Antari
(Recommended ratio is 1:1000), if using other essence or different ratio might clog the heater and cause
malfunction.

4
The warranty on your fog machine will be void if you use fog liquid other than that recommended by the
Antari.
7. Setting and Manual Operation
WARNING
Machine falling off might cause serious injury, please make sure it is secure
and firm on the overhead.
Step 1. Place the machine on a flat, level hard and well ventilated surface area and reserve at least 50 cm open
space around the machine, and make sure there is no flammable gas or material nearby;
Step 2. Fill the fluid tank with Antari approved fog liquid, and make sure the tube is not twisted;
Step 3. Connect the machine to the power outlet. Please read the technical label on the back of the machine and
make sure the power outlet is the correspond to the rated voltage for the machine;
Step 4. Turn on the machine, warm up process takes approximately 10 minutes. Once the machine has reached
operating temperature, the LCD display will show “Ready To Fog”. Now the machine is ready for
operation;
Step 5. To start fogging in Volume Mode, please press the [VOLUME] knob on the right side of the control panel.
To stop fogging, please press the [VOLUME] knob again. This will run based on “volume” setting in the
menu;
Step 6. To start fogging in Timer Mode, please press the [TIMER] knob of the left side of the control panel, to
stop fogging press [VOLUME] knob again. This will run based on “interval” & “duration” setting in the
menu;
Step 7. To enter the setting menu, press [TIMER] knob and hold for 3 seconds, rotate the [TIMER] knob to scroll
through options, press [TIMER] knob to enter the option; rotate the [TIMER] knob to adjust value; press
[TIMER] knob to confirm selection and press [VOLUME] knob to return to the previous page;
Step 8. To turn off the machine, please make sure the machine is not operating then turn of the power. If you will
not use the machine a long period of time, please remove the power cord.
8. Control Settings
Z-1500 III / Z-3000 III Fog Machine can be operated in the following modes. The machine can only accept 1 type
of signal at a time. When using different control modes at the same time, the machine will work according to built-
in control priority as follow:
Manual
Timer
DMX512
Wireless
8.1 Control Panel Description
[TIMER] knob Middle is LCD Display [VOLUME] knob
Ready to Fog

5
Fogging in Volume Mode
Rotary Knob
Operating Method
Action
VOLUME knob (Right)
Rotate
Adjust Output Volume
VOLUME knob (Right)
Press once
Activate/Deactivate Fogging
VOLUME knob (Right)
Press and Hold
Activate Force Fogging (100% output)
Fogging in Timer Mode
Rotary Knob
Operating Method
Action
TIMER knob (Left)
Press once
Activate Timer Mode
VOLUME knob (Right)
Press once
Deactivate Timer Mode
VOLUME knob (Right)
Rotate
Adjust Output Volume
VOLUME knob (Right)
Press and Hold
Activate Force Fogging (100% output)
Menu and Setting
Rotary Knob
Operating Method
Action
TIMER knob (Left)
Press and Hold for 3 seconds
Enter Setting Menu
TIMER knob (Left)
Rotate
Scroll Through Menus
TIMER knob (Left)
Press once
Enter/Confirm Selection
TIMER knob (Left)
Rotate
Adjust for Preferred Value
VOLUME knob (Right)
Press once
Return to Previous Page
8.2 Menu Options Description
Options
Description
Timer Interval
1-200 sec
Timer Duration
1-200 sec
Timer Output
1-100% / NONSTOP
Volume Output
1-100% / NONSTOP
DMX512
001-512
Wireless Remote
Pair / Unpair
Fluid Sensor
On / Off
Run Last Set
On / Off
LCD Backlight
Always On / Auto Off
Keypad Sound
On / Off
Fluid Type
FLG / FLR / FLZ / FLY / FLJ / FLH
Language
English /中文/日本語
Factory Reset Proceed?
Yes
9. Machine Status
9.1 Machine Status with LCD Display
Screen
Description
Antari “Model” v1.0
Software Version
AC Voltage
AC-120V 60Hz
Input Voltage
Energy 100% WS
Ready to Fog
Ready to Fog
W – Wireless Control Function Activate
S – Fluid Sensor Function Activate
Remote Output 100%
Activate Fogging by Cable Remote
Volume Output 100%
Manually Activate Fogging
Interval 200 sec
Duration 200 sec
Running at Timer Mode, Interval time
Running at Timer Mode, Duration time
DMX512 Add: 001
DMX in use
Manual Output
Priming Fluid
Run Sleep 180 sec
Sleep Mode, Countdown 180 sec

6
Warm Up 10 %
Warming Up
Empty Fluid
No Fluid.
Heater Overheat
Heater is Overheated.
Heater Fault
Heater Malfunction
Thermal Line Off
Thermal Line Break Off
Line Reversed
Thermal Line Reverse Connection
Wrong!! AC Power
Incorrect AC Power
**If LCD control panel display “Warning”, please stop operating and turn off the machine immediately. Please
contact your local Antari dealer for assistance.
10. DMX Connection
10.1 DMX Connector Pin Assignment
This machine has a XLR 3-Pin and 5-Pin connector for DMX connection. The diagram below indicates pin
assignment information;
Pin
Function
1
Ground
2
Data-
3
Data+
4
N/A
5
N/A
**There is a protection cap on DMX IN, please
remove it with your finger before operation.
10.2 DMX Channel Function
1 Channel Mode
DMX Value Range
Function
Channel 1
Fog Output Level
0 – 5
Off
6 – 255
1 – 100%
11. RDM Function
Z-1500 III / Z-3000 III Fog Machines are RDM enabled, allowing control system to configure, monitor and
manage. See below table for supported RDM parameters.
GET
Allowed
SET
Allowed
Category
RDM Parameter ID’s(Slot 21-22)
Value
Required
NetworkManagement
網路管理
DISC_UNIQUE_BRANCH
0x0001
O
0x0002
O
0x0003
O
O
RDM Information
RDM 資訊
QUEUED_MESSAGE
0x0020
O
STATUS_MESSAGES
0x0030
O
SUPPORTED_PARAMETERS
0x0050
O
O
PAPAMETER_DESCRIPTION
0x0051
O
O
Product Information
產品資訊
DEVICE_INFO
0x0060
O
O
PRODUCT_DETAIL_ID_LIST
0x0070
O
DEVICE_MODE_DESCRIPTION
0x0080
O
MANUFACTURER_LABEL
0x0081
O
O
DEVICE_LABEL
0x0082

7
O
SOFTWARE_VERSION_LABEL
0x00C0
O
O
O
DMX512 Setup
DMX512 設定
DMX_PERSONALITY
0x00E0
O
DMX_PERSONALITY_DESCRIPTION
0x00E1
O
O
DMX_START_ADDRESS
0x00F0
O
O
SLOT_INFO
(0x0120)
O
SLOT_DESCRIPTION
(0x0121)
O
DEFAULT_SLOT_VALUE
(0x0122)
O
Sensors
感應器
SENSOR_DEFINITION
0x020
O
O
SENSOR_VALUE
0x0201
O
Control
控制
DEVICE_HOURS
0x0400
O
O
IDENTIFY_DEVICE
0x1000
O
O
O
POWER_STATE
0x1010
12. WTR-20 Wireless Remote (Optional)
WTR-20 Wireless Remote is an optional accessory for Z-1500 III / Z-3000 III Fog Machines, it included a W-2
wireless transmitter and a W-2 wireless receiver. If you already purchased the wireless model, it’s ready to use. If
you purchase the WTR-20 Wireless Remote afterwards, please follow the instruction below. If you encounter any
problem, please contact your local Antari dealer for assistant.
12.1 W-2 Wireless Transmitter & Receiver
Battery:27A 12V
Effective Range:The effective range is approximately 50
meter, depends on actual condition, it may vary.
W-2 wireless transmitter has 4 buttons, each function as follow:
W-2 Wireless Transmitter
Button
Function
[A]
Start Fogging
[B]
Stop Fogging
[C]
Increase fog output
[D]
Decrease fog output
W-2 Wireless Receiver
12.2 W-2 Wireless Receiver Installation
If you purchased the WTR-20 Wireless Remote afterwards, please follow the instructions below to install the
receiver. If you encounter any problem, please contact your local Antari dealer for assistant.
Graph 1
Graph 2
Graph 3

8
1. Please see graph 1, remove the cover from the pointed place;
2. You will see a white cable like graph 2, pull it out and connect to the W-2 wireless receiver;
3. Screw it back to the machine like graph 3 and follow the instruction on 12.3 for pairing.
12.3 Pair & Unpair
Each receiver can pair up to 5 transmitters, please follow the steps below to pair or unpair the module;
Step 1. Press and hold the [TIMER] knob for 3 seconds to enter menu;
Step 2. Rotate the [TIMER] knob to [Wireless Remote];
Step 3A. Press the [TIMER] knob to show <Pair>, please press it again to show <Wait>, then please press [Button
A] of your W-2 Wireless Transmitter and wait display shows < Set Ok> to complete the pair procedure.
Step 3B. Press the TIMER knob to show <Unpair>, please press it again to show <Wait> and then shows < Set
Ok> to complete the unpair procedure.
13. Service and Maintenance
DANGER!
Disconnect the power cord before starting maintenance operation!
Always keep the machine clean.
Can use air compressor, vacuum or a soft brush to remove the dust on the machine.
Can use a slightly damp cloth to clean the casing.
Before store the machine, please make sure the machine is completely cool down to avoid moisture inside
causing malfunction.
It is recommended to run the machine at least once a month in order to maintain the machine’s best
performance and output condition.
Excessive dust and build up liquid residue will reduce the performance and cause overheat.
13.1 Breaker Reset (2 in 1 Power Switch)
The 2 in 1 power switch combines power and breaker function.
Please follow below steps to reset the breaker;
Step 1: Please switch to the OFF position;
Step 2: Wait 60 seconds;
Step 3: Flip switch to ON position.
**If the breaker (switch) still jumps off after reset, please contact
your local Antari dealer for assistance.
Breaker Specification
100-120V = 15A 250V
220-240V = 9A 250V
Wireless Remote
Pair
Wireless Remote
< Pair >
Wireless Remote
< Wait >
Wireless Remote
< Set Ok >
Wireless Remote
< Unpair >
Wireless Remote
< Wait >
Wireless Remote
< Set Ok >

9
14. Technical Specifications
Z-1500 III
Z-3000 III
Input Voltage
US Model: AC 100-120V, 50/60Hz 12.5A
EU Model: AC 220-240V, 50/60Hz 6.5A
EU Model: AC 220-240V, 50/60Hz 11 A
Rated Power
1500W
2500W
Warming-up Time
10 minutes (approx.)
Fluid Consumption
150 ml/min (100% output)
250 ml/min (100% output)
Fluid Tank Capacity
6 Liters (1.59 Gallon)
Compatible Fluid
Antari FLG Heavy Fog Fluid、Antari FLR Light Fog Fluid、
Antari FLY Super Fog Fluid、Antari FLZ Long Hang Time Fog Fluid
、Antari FLJ Light Hang Time Fog Fluid、FLH Dense Long Hang Time Fog Fluid
Ambient Temp. Range
0°C – 40°C (32°F – 104°F)
Interface
Manual、Timer、DMX512、Wireless (Optional)
Connection
XLR 3-Pin and 5-Pin (DMX) 、Neutrik powerCON (Power)
DMX Channels
1 Channel
Included Accessories
N/A
Optional Accessories
WTR-20 Wireless Remote
Dimension
L 674 W 235 H 278 mm
(L 26.50 W 9.25 H 10.94 inch)
L 712 W 275 H 278 mm
(L 28.03 W 10.82 H 10.94 inch)
Weight
13.3 kg (29.32 lbs.)
19.1 kg (42.10 lbs.)
15. Warranty Disclaimer
We guarantee the merchandise manufactured by us to be free from defect in material and workmanship for a period
of one year. Our obligation and liability under this warranty shall be restricted to repair or replacement at our
factory or local authorized dealer. We assume no liability of the products that are improperly used or used for any
purpose other than that for which they are specially designed. This warranty shall not apply to any merchandise
which has been repaired, altered or assembled outside our factory in any way so as in our judgment to affect its
performance, nor which has been subjected to misuse, negligence, or accident nor to any merchandise operated
contrary to our printed instructions. We will not allow or be liable of any loss or any damages of any kind in
connection with the use, sale, or repair of any merchandise purchased from us.
16. Machine Dimension
Z-1500III

10
Z-3000III

11
中文使用說明書
1. 前言
在操作本機器之前,請務必仔細詳閱本說明書然後請將本說明書放置在機器使用者可隨時查閱之處存放。
此說明書包含如何安全的安裝及操作本機器以及說明所有在機器上的標示。如果您有任何操作上的問題,
請立即聯繫當地的 Antari 經銷商尋求協助。
2. 安全注意事項
危險
若不確實避免這些指示,可能導致嚴重人身傷害甚至死亡。
警告
若不確實遵循這些指示,可能導致嚴重人身傷害甚至死亡。
注意
若不確實注意這些指示,可能導致人身傷害甚至死亡,嚴重程度視情況而定。
危險
請務必使用正確電壓。如果使用錯誤電壓,可能會遭受危險的電擊燒傷或更嚴重的後果。
請務必將機器連結到有保護的電路,並確保有正確地接地,以避免觸電的危險。關於接地方式請參考
第21 頁附錄 I。
請勿在捆綁電源線的情況下使用,可能會發熱導致火災。
操作機器時請 勿 將 機 器 對 著 人 體 、動物或火 焰使用。
警告
機器的噴嘴非常燙。當機器工作時,請遠離噴嘴 50 公分以上。
請於堅固、平坦、穩定且通風良好的表面上使用機器。請勿遮蓋機器散熱部份,機器周邊至少應保留
50 公分的空間並確認附近沒有易燃性物質或可揮發性氣體。
請勿隨意拆卸、修理或改造機器,這可能會導致機器故障、損壞、觸電危險或造成火災。
本機器僅限有行為能力之成人或專業人員操作,不預期提供生理、感知、心智能力、經驗或知識不足
者之使用者(包含孩童)使用本機器。
請勿在無人看管時讓機器運作,並 於 外 出 離 去 時 確 實關閉 電 源 。
孩童應受監督,以確保孩童不能操作或嬉戲玩本機器。
請勿將機器倒放或傾斜使用,可能導致機器動作不正常或損壞。
請將液體存放在室內孩童無法取得之處,保持通風及避免陽光直射。如果有觸碰眼睛或誤食機器,請
立即尋求醫生的協助。
注意
本機器無防水設計,請隨時保持機器乾燥,嚴禁將其潑水、浸水、淋雨或放在潮溼的環境。

12
在插 入 電 源 插 座前 ,請確認電 源 插 座無損壞或鬆動。
若電源線損壞,必須使用原廠電源線或組件進行更換,否則將導致保固無效。
請在使用機器之前,先填裝好煙霧水,避免機器幫浦空轉過熱造成損害。機器在搬運前或使用完畢
後,請清空油桶。
在運輸本機器前,請確認機器的油箱已清空並且包裝完整。(建議使用原廠包裝)
本產品僅限室內使用。
請勿在電壓不穩定的地區使用本機器。
如果機器出現異常聲音或有任何不正常現象時,請立即停止工作,將電源關閉及拔下機器電源線,並
請聯繫當地的 Antari 經銷商尋求協助。
請勿觸碰機器內部運轉零件。
只能使用原廠建議或販售之配件。
請確認機器不在使用的狀態下電源已關。如果長時間不使用機器,請拔掉電源線。
關閉機器時,將所以控制開關轉到關閉的位置,然後再將插頭從插座拔除。
拔除電源線時,請抓住插頭不是電線。
在保養及清潔前,請把電源線從插座拔除。
在電線或插座有損毀、機器故障或有掉落或損壞的情形發生時,請勿操作機器。請將機器送回最近的
維修站,做檢查、維修及電源或機械的調整。
為確保機器的使用壽命,請使用 Antari 原廠製造之煙霧水,勿使用其它非 Antari 原廠製造煙霧水或添
加劑,否則可能會導致電熱管阻塞和故障。
在使用本機之前,請詳細閱讀機器上的警語標示,說明如下:
上蓋印刷
WARNING! 警告!
HOT NOZZLE! 出煙口高溫!
KEEP AT LEAST 50 CM DISTANCE 請保持至少 50 公分的距離
LIQUID 液體
ONLY USE MANUFACTURER DESIGNATED FLUID. 僅使用原廠認可的液體
前蓋印刷
WARNING! 警告!
DISCONNECT POWER BEFORE CHANGING FUSE. 更換保險絲前請務必斷開電源
USE ONLY WITH ADULT SUPERVISION. 僅在成人監督下使用
DO NOT OPERATE WITHOUT LIQUID. 請勿在沒有液體的情況操作本機台
FOR INDOOR USE ONLY. KEEP DRY. 僅限室內使用 請保持乾燥
NO USER SERVICEABLE PARTS INSIDE. 內部無使用者可維修之零配件
3. 包裝內容與檢查
在收到機器後,請立即小心地打開包裝紙箱,檢查所有內容,確認您所購買的機型及配件。如果有任何部
件因運輸過程出現損壞或缺少,請立即連絡經銷商,並以原包裝退回檢查。
3.1 包裝內容
Z-1500 III
Z-3000 III
1 台 Z-1500 III 煙霧機
1 台 Z-3000 III 煙霧機
1 個 六公升油桶
1 個 六公升油桶
1 條 Neutrik powerCON 電源線
1 本 說明書或掃描機身 QR CODE

13
3.2 選配說明
品項
描述
WTR-20
無線控制器
(W-2 無線發射器和 W-2 無線接收器)
4. 機器訊息
01. 噴煙口
06. 液晶顯示器
02. 把手
07. 控制旋鈕
03. 油桶蓋
08. 二合一電源&斷路器開關
04. 六公升油桶
09. Neutrik powerCon 電源線連接頭
05. 無線控制器連接頭
10. XLR 3-Pin & 5-Pin DMX 連接頭
5. 技術標籤資訊
使用本機器前,請詳閱技術標籤上的訊息
1. 機器型號
5. 斷路器/保險絲
2. 工作電壓
6. 說明書 QR CODE
3. 頻率
7. 機器流水序號
4. 瓦特數
6. 煙霧水
危險
將液體加入機器之前,請務必先拔除電源線。請勿添加易燃液體。如果發現液體
流入機器內部,請洽 Antari 原廠或其經銷商尋求協助。
僅能使用 Antari 原廠製造之煙霧水,不可混用或稀釋。若因保存不當而變質或使用非原廠煙霧水,將
可能造成電熱管堵塞而導致機器故障。
本機器是使用專屬的煙霧水做測試與校正來取得最佳的效能。

14
如需更換另一種液體,請在使用前,先將油桶中的液體清空,以避免混合。
僅能使用 Antari 原廠製造之香精,並依照原廠建議比例添加(原廠建議比例為 1:1000),如果使用非原
廠的香精或比例添加有誤,將可能造成電熱管阻塞而導致機器故障。
如果使用非原廠製造之煙霧水或香精而導致煙霧機損壞將不在保固範圍內。
7. 設定與手動操作說明
警告
機台掉落可能會造成嚴重傷害,請確保本機台安裝牢固且不會掉落。
步驟1. 將機器平放在堅固、平坦、穩定且通風良好的表面上,機器周圍至少應保留 50 公分的空間並確
認附近沒有易燃性物質或可揮發性氣體;
步驟2. 使用 ANTARI 原廠專用煙霧水注入機器所附的油桶,並注意不要折到油管;
步驟3. 將機器連接電源,連接之前,確認機器背後技術標籤上所標示要求功率,是否與電源插座相符;
步驟4. 啟動機器電源後,使機器開始加熱。機器加熱到可工作溫度大約需要 10 分鐘。當機器達到工作
溫度時,螢幕會顯示“Ready to Fog”,表示機器已經準備好可進行操作;
步驟5. 欲在手動模式啟動噴煙,請按下控制面板上左邊的[VOLUME]旋鈕;停止噴煙,請再次按下
[VOLUME]旋鈕。這個會按照選單中的“輸出量”運行;
步驟6. 欲在定時模式啟動噴煙,請按下控制面板上左邊的[TIMER]旋鈕;停止噴煙,請再次按下
[VOLUME]旋鈕。這個會按照選單中的“間隔時間” 與 “噴煙時間”運行;
步驟7. 長按[TIMER]旋鈕 3秒鐘進入設定選單,旋轉[TIMER]旋鈕瀏覽選項。按下[TIMER]旋鈕進入選
項,旋轉[TIMER]旋鈕修改數值,然後再次按下[TIMER]旋鈕確認。按下[VOLUME]返回上一頁;
步驟8. 需關閉本機時,請確認機器已停止運轉,再將電源開關關閉即可,長時間不使用時請移除電源
線。
8. 控制設定
Z-1500 III / Z-3000 III 煙霧機可以使用下列操作模式,機器每次接受一種訊號。當同時間使用多種訊號時
機器將根據原廠內建訊號的優先順序來進行工作:
手動控制
定時控制
DMX512
無線控制
8.1 控制面板說明
左方為 TIMER 旋鈕 中間為液晶顯示器 右方為 VOLUME 旋鈕
手動噴煙模式
旋鈕
操作方式
動作
VOLUME 旋鈕 (右方)
旋轉
調整煙霧輸出量
VOLUME 旋鈕 (右方)
按一下
啓動/關閉 噴煙
VOLUME 旋鈕 (右方)
按住不放
啓動強制噴煙(100%輸出)
Ready to Fog

15
定時噴煙模式
旋鈕
操作方式
動作
TIMER 旋鈕 (左方)
按一下
啓動 TIMER 模式
VOLUME 旋鈕 (右方)
按一下
關閉 TIMER 模式
VOLUME 旋鈕 (右方)
旋轉
調整煙霧輸出量
VOLUME 旋鈕 (右方)
按住不放
啓動強制噴煙(100%輸出)
進入設定選單模式
旋鈕
操作方式
動作
TIMER 旋鈕 (左方)
按住約 3秒鐘
進入設定選單
TIMER 旋鈕 (左方)
旋轉
瀏覽清單
TIMER 旋鈕 (左方)
按一下
確定
TIMER 旋鈕 (左方)
旋轉
調整數值
VOLUME 旋鈕 (右方)
按一下
返回前一頁
8.2 選單說明
選項
設定值
定時間隔時間
1 – 200 秒
定時噴煙時間
1 – 200 秒
定時輸出量
1 – 100% / NONSTOP
手動輸出量
1 -100% / NONSTOP
DMX512
001-512
無線遙控
配對 / 取消配對
油量感應器
開啓 / 關閉
自動啟動
開啓 / 關閉
LCD 背光
持續開啟 / 自動關閉
按鍵音
開啓 / 關閉
煙油選項
FLG / FLY / FLZ / FLR / FLJ / FLH
語言選項
English / 中文/ 日本語
恢復原廠設定
執行
9. 機器狀態
9.1 機器狀態說明
面板畫面
說明
Antari “型號”
軟體版本 v1.0
機器軟體版本
AC Voltage
AC-120V 60Hz
電源電壓
Antari “型號” WS
噴煙就緒
噴煙預備中
W代表 Wireless 無線控制功能已啓動。
S 代表 油量感應器功能已啓動。
線控輸出量 100%
線控器執行中
手動輸出量 100 %
手動噴煙執行中
間隔時間 200 秒
啟動時間 200 秒
定時噴煙執行
DMX512 地址 001
DMX 執行中

16
手動強制噴煙
強制抽油執行中
休眠倒數 180 秒
休眠倒數:180 秒
機器加熱中 10 %
加熱中
無煙油
空油
機器過熱
加熱器過熱
電熱管異常
加熱器故障
溫度線斷開
溫度線斷開
溫度線反接
溫度線反接
錯誤的 AC 電源
錯誤的 AC 電源
**控制面版出現警告的訊息,請立即停止操作機器並闗閉電源之後,請與當地的 Antari 經銷商尋求協助。
10. DMX 說明
10.1 DMX 說明
本機提供 XLR 3-PIN 和5-PIN 的DMX 連接頭。PIN 的接點說明如下;
Pin
功能
1
接地
2
數據-
3
數據+
4
NA
5
NA
**DMX IN 連接頭上有一個保護蓋,操作前,請
用手指撥開即可將其取下。
10.2 DMX 通道功能
1 通道模式
DMX 數值範圍
功能
通道 1
煙霧輸出量
0-5
關閉
6-255
1-100%
11. RDM 功能
Z-15000 III / Z-3000 III 煙霧機配有 RDM 功能,讓使用者可以經由 DMX 網路使用 RDM 功能進行機台的設
定、監控、管理。請參考下表相關 RDM 支援參數;
GET
Allowed
SET
Allowed
Category
RDM Parameter ID’s(Slot 21-22)
Value
Required
NetworkManagement
網路管理
DISC_UNIQUE_BRANCH
0x0001
O
0x0002
O
0x0003
O
O
RDM Information
RDM 資訊
QUEUED_MESSAGE
0x0020
O
STATUS_MESSAGES
0x0030
O
SUPPORTED_PARAMETERS
0x0050
O
O
PAPAMETER_DESCRIPTION
0x0051
O
O
Product Information
產品資訊
DEVICE_INFO
0x0060
O
O
PRODUCT_DETAIL_ID_LIST
0x0070
O
DEVICE_MODE_DESCRIPTION
0x0080
O
MANUFACTURER_LABEL
0x0081

17
O
O
DEVICE_LABEL
0x0082
O
SOFTWARE_VERSION_LABEL
0x00C0
O
O
O
DMX512 Setup
DMX512 設定
DMX_PERSONALITY
0x00E0
O
DMX_PERSONALITY_DESCRIPTION
0x00E1
O
O
DMX_START_ADDRESS
0x00F0
O
O
SLOT_INFO
(0x0120)
O
SLOT_DESCRIPTION
(0x0121)
O
DEFAULT_SLOT_VALUE
(0x0122)
O
Sensors
感應器
SENSOR_DEFINITION
0x020
O
O
SENSOR_VALUE
0x0201
O
Control
控制
DEVICE_HOURS
0x0400
O
O
IDENTIFY_DEVICE
0x1000
O
O
O
POWER_STATE
0x1010
12. WTR-20 無線控制器(選配)
WTR-20 無線控制器組包含一個 W-2 的無線發射器及 W-2 無線接收器,此為 Z-1500 III / Z-3000 III 煙霧機
的選購配件。若您採購的版本已含無線功能即已安裝至機器上,可直接使用。若是後續採購 WTR-20 無線
控制器,請按照下方說明進行安裝與配對。如果遇到任何困難與問題,請與當地的 Antari 經銷商尋求協助。
12.1 W-2 無線發射器&無線接收器
發射器:使用 27A 12V 電池
收發距離:有效距離為 50 公尺,實際收訊狀況根據現場環境
因素而有所不同。
W-2 無線發射器配有 4個按鈕,控制功能為:
W-2 無線發射器
按鈕
功能
[A] 鍵
啓動噴煙
[B] 鍵
關閉噴煙
[C] 鍵
增加煙霧輸出量
[D] 鍵
減少煙霧輸出量
W-2 無線接收器
12.2 W-2 無線接收器安裝說明
如果是後續採購 WTR-20 無線控制器,請按照下方說明進行安裝與配對。如果遇到任何困難與問題,請與
當地的 Antari 經銷商尋求協助。
圖1
圖2
圖3

18
1. 請看圖一,取下蓋子;
2. 請看圖二,取下後,你會看到一條白色的線,請拉出來接在 W-2 無線接收器上;
3. 請看圖三,將接收器鎖回去原本的地方,然後按照 12.3 的步驟開始配對。
12.3 配對 & 取消配對
每個接收器可以配對最多 5個控制器,請參考下面步驟配對和取消配對控制器。
步驟 1:按住左邊[TIME]鍵3秒進入主選單;
步驟 2:旋轉[TIMER]鍵到[無線遙控 配對];
步驟 3A:按下[TIMER]鍵後旋轉待畫面出現<配對>,再按一次 TIMER 鍵會出現<稍後>,此時按下 W-2 無
線發射器 A鍵,待畫面顯示<設定完成>後,即完成本次配對。
步驟 3B:按下[TIMER]鍵後旋轉待畫面出現<取消配對>,再按一次 TIMER 鍵會出現<稍後>,此時待畫面
顯示<設定完成>,即完成本次取消配對。
13. 維護和保養
危險!
維修保養之前,請務必拔除電源線!
隨時保持機器清潔。
可以使用空氣壓縮機、吸塵器或軟刷除去機器上的灰塵。
機殼可使用濕布擦拭。
在存放或收起機器前,請確認機器完全冷卻,避免機器內部潮濕導致故障。
建議每月至少讓機器運轉一次,以保持機器處於最佳的性能和輸出條件。
機器上過多的灰塵、液體殘餘累積的髒污會降低機器工作性能,導致散熱不良。
13.1重置斷路器 (二合一電源開關)
此二合一開關結合電源和斷路器功能。請依照以下步驟重置
斷路器;
步驟 1: 請將此二合一開關切到 OFF 的位置
步驟 2: 等待 60 秒
步驟 3: 再將此二合一開關切到 ON 的位置即完成重置
若重置斷路器後,依然跳掉的話,請與當地 Antari 經銷商聯
繫,尋求協助。
斷路器規格
100-120V = 15A 250V
220-240V = 9A 250V
無線遙控
配對
無線遙控
< 配對 >
無線遙控
< 稍後 >
無線遙控
< 設定完成 >
無線遙控
< 取消配對 >
無線遙控
< 稍後 >
無線遙控
< 設定完成 >
This manual suits for next models
1
Table of contents
Other Antari Fog Machine manuals

Antari
Antari SW-250 User manual

Antari
Antari HZ-500 User manual

Antari
Antari Z II Series User manual

Antari
Antari W-508 User manual

Antari
Antari Z-1200 III User manual

Antari
Antari Z-3000II User manual

Antari
Antari ICE User manual

Antari
Antari Z-1000X MK3 User manual

Antari
Antari DNG-200 User manual

Antari
Antari FT-50 User manual

Antari
Antari HZ-500 User manual

Antari
Antari Z-1520 RGB User manual

Antari
Antari Z-1520 RGB User manual

Antari
Antari Fog cooler DNG-100 User manual

Antari
Antari PM-1 User manual

Antari
Antari W-515 User manual

Antari
Antari S-120 User manual

Antari
Antari F-80Z User manual

Antari
Antari W-715 Fog Jet User manual

Antari
Antari HZ-350 User manual