Anvid Products Sienna SSC-0312 User manual

INSTRUCTION MANUAL
Eco Steamer
SSC-0312

1
INTRODUCTION
Thank you for choosing Sienna for your household cleaning needs. Our steamer
products use the active power of steam without the use of chemicals; making it a
green product that is safe for the ecosystem. You have begun the first step into
transforming your house into a green, environmentally safe home. Our Sienna steam
products are a modern way of cleaning that is efficient and far more sanitary than
conventional methods.
With the power of germ killing steam, dirt and grime can be eliminated in a matter of
seconds. The tiny hot vapor molecules penetrate porous surfaces being cleaned,
expanding and forcing dirt, debris, and bacteria to the surface. When used correctly,
our steamers can kill dust mites and certain types of bacteria pathogens such as
salmonella and E-coli on contact.
Since you do not need chemicals in order to use our products, not only will you see the
savings in your wallet, but you have provided a safer place for you and your family to
live in. We encourage you to improve your way of life, better the environment, and
spend time enjoying your clean chemical free floor.
Eco
The Eco Steamer is an innovative product that cleans and sanitizes your home by
harnessing the natural cleaning power of hot steam vapor. This unique steamer is well-
suited to clean a variety of surfaces that lift dirt and debris from stubborn areas. The
o
Eco heats water up to 212 F
The user-friendly design is intended to tackle the toughest dirt
and debris. The Eco requires no assembly, just attach the tools and go. It features a
1350-watt heating element, a 40.6 fl oz water tank, 12 piece accessory kit, and much
more.
, once heated produces steam instantly. It has over 30
minutes of steam time.

SAFETY GUIDELINES
The Sienna Eco (SSC-0312) Steamer is for indoor domestic use only. Any commercial
use will void warranty. It is designed for sanitizing and cleaning an array of surfaces
such as windows, ceramic tile, carpet, grout and more.
Safety Instructions:
WARNING: BE SURE TO READ AND FOLLOW ALL SAFETY INSTRUCTIONS
BEFORE USING YOUR STEAMER. PROPER CARE AND MAINTENANCE WILL
HELP TO EXPAND THE LIFE OF YOUR STEAMER.
When using an electrical appliance, basic precautions should always be followed. To
reduce the risk of fire, electric shock, or injury:
!Be sure to unplug the electrical cord when appliance is not in use and while servicing.
!Do not leave the steamer unattended while young children, pets or infirm persons
are around.
!Children should be supervised and cautioned that the steamer is not a toy and
should not be played with.
!Do not direct steam towards people, pets, electrical appliances, or electrical outlets.
!Do not immerse the steamer in water or other liquids.
!Do not handle steamer with wet hands.
!Do not pull power cord to disconnect appliance from socket or use cord as a handle.
Be sure to keep cord away from heat, water, and sharp edges.
!Do not use if cord or plug is damaged.
!Do not use extension cords or outlets with inadequate current carrying capacity.
!Do not use steamer on any steam sensitive material such as velvet, leather, wax
polished furniture or floors, synthetic and other delicate fabrics.
!Do not use on unsealed hardwood floors. By doing so, you may remove the sheen
from the steam. It is recommended to test an isolated area with the steam mop
before proceeding. As a precaution, you should check the manual made by the floor
manufacturer for proper care instructions.
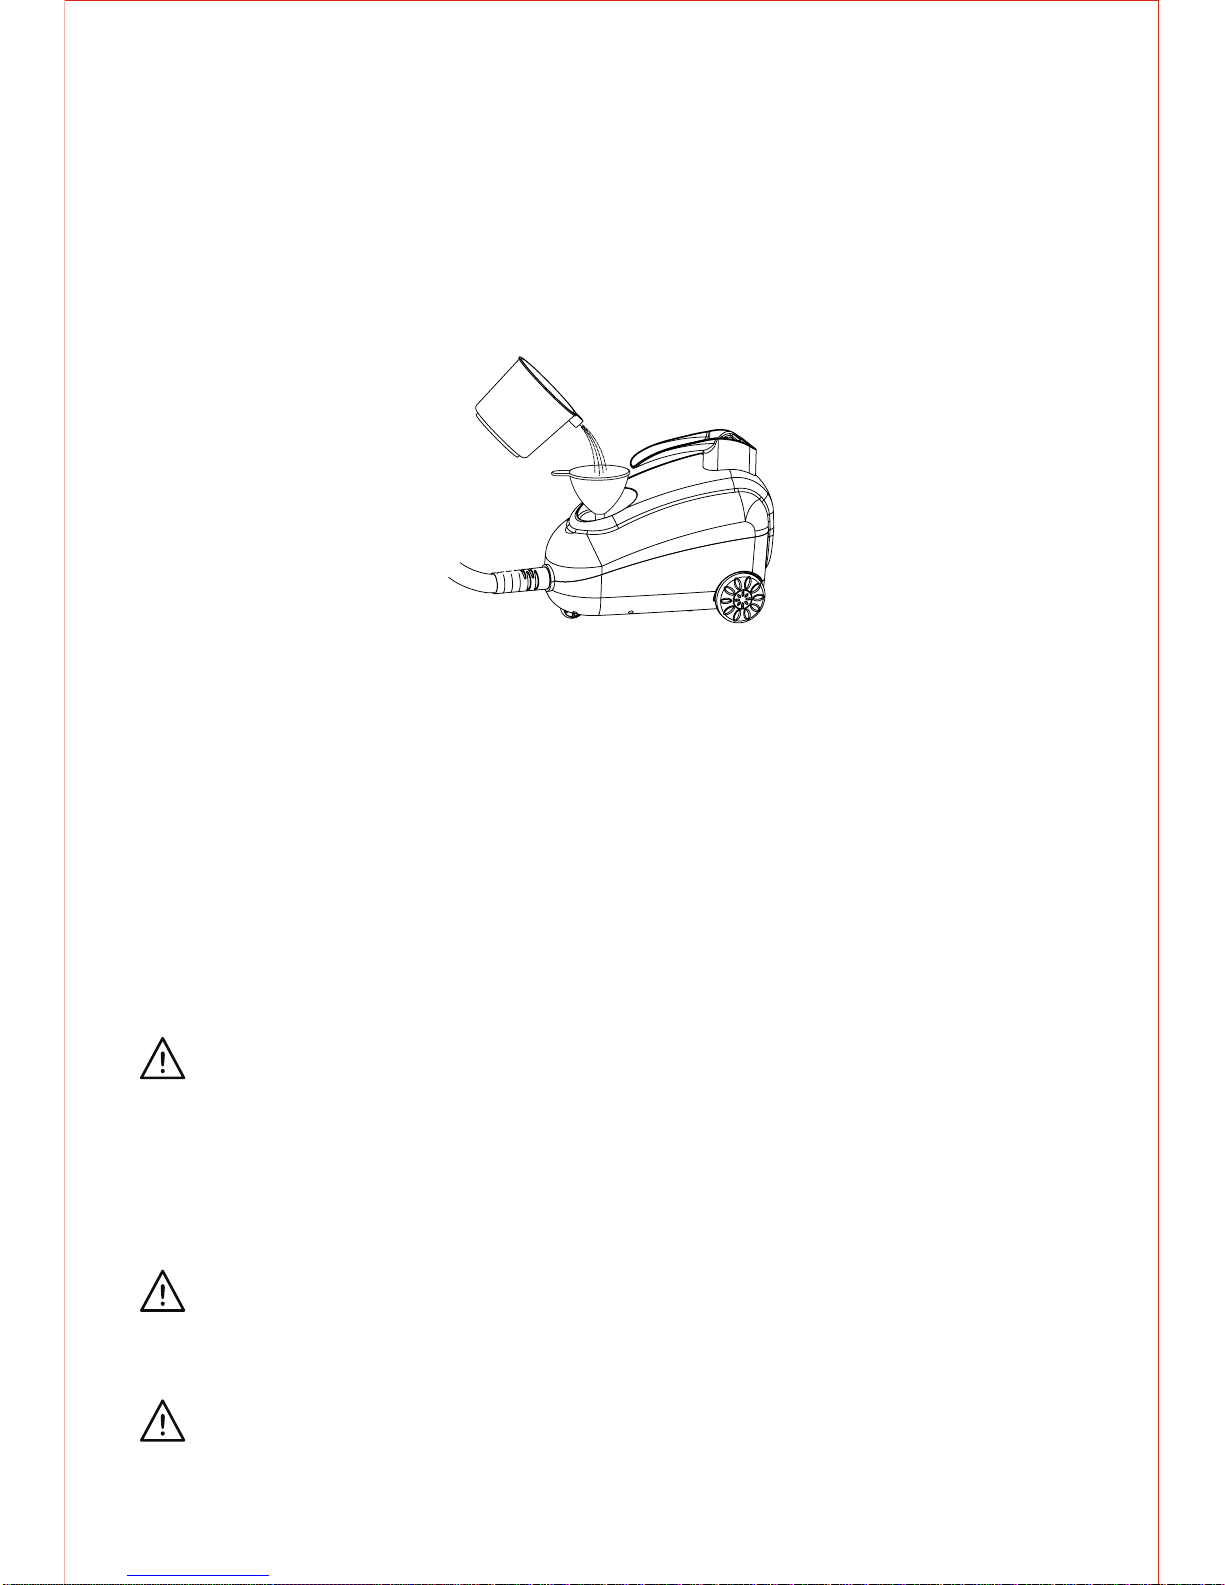
!Never put cleaning detergents or chemicals into the steamer as it will make the
product unsafe and damage the unit.
!Use only manufacturer's recommended accessories.
!Stop using steamer if circuit breaker activates. Beware of risk of shock.
!Wear proper shoes when operating your steamer. Open-toed shoes, slippers or bare
feet may cause you to slip and fall or cause hot steam on your feet.
!Allow your steamer to cool down before storing in a cool, dry place.
2

KEY FEATURES
A.
B.
C.
D.
E.
F.
G.
H.
I.
J.
K.
L.
M.
N.
O.
P.
Q.
R.
S.
ROUND BRUSH
FUNNEL
MEASURING CUP
TRIGGER HANDLE
STEAM TRIGGER
HOSE
EXTENSION ARM
WATER TANK CAP
BASE HANDLE
ON/OFF SWITCH
STEAMER BODY
CONNECTOR
FLOOR BRUSH HEAD
FLOOR CLOTH PAD
GLASS SQUEEGEE
TRIANGLE FABRIC PAD
STEAM LOCK SWITCH
ANGLE CONCENTRATOR
TRIANGLE FABRIC BRUSH
3
AB
C
D
E
F
G
H
IJ
KL
M
N
O
P
Q
RS
N

ASSEMBLY AND USE
Connector:
Use the connector (N) to attach the floor brush head (O) to the extension tube(s) (I) to
clean floor surfaces. It can also be used for the triangle fabric brush (R) for cleaning
surfaces such as upholstery. To connect the parts together, match the flat side of the
connector (N) tip to the rectangular bump in the extension tube (I) or triangle fabric
brush (R). Push the connector (N) all the way in and turn 180 degrees for a tight fit.
Extension Arm(s):
The extension arm(s) (I) can be inserted into the trigger handle (E). You can attach the
angle concentrator (Q), floor brush head (O), or the triangle fabric brush (R) to extend
your reach. To attach, press firmly on the purple button located on the trigger handle
(E) and insert into the hole at the end of the extension arm (I). To remove, press firmly
on purple button and pull out extension arm (I).
Floor Brush Head/Floor Cloth Pad:
Lay the floor cloth pad (P) on the ground. Lay floor brush head (O) down on top of pad.
Press firmly down on purple clamps located on the floor brush head (O) and insert ends
of cloth pad inside clamp.
o
180
4

Triangle Fabric Brush/Triangle Brush Pad:
The triangle fabric brush (R) can be inserted into the trigger handle (E) or extension
arm (I) using the connector (N). To attach, align holes and push together until it locks
into place. To remove, press firmly on the purple button located on the trigger handle
(E) or extension arm (I) and pull.
Glass Squeegee:
The glass squeegee (S) connects onto the triangle fabric brush (R) and can be used for
mirrors or windows. Insert the tabs on rear of the squeegee (S) into the hooks located
on the bottom rear of the triangle fabric brush (R) and firmly snap the pieces together.
Angle Concentrator/Round Brush:
Attach the angle concentrator (Q) to the trigger handle (E) or extension arm (I). You
can attach the round brush (A) if you need additional scrubbing. Fit tip of concentrator
into the end of the round brush.
IMPORTANT: Make sure the accessory is pushed as far as possible onto tip to ensure
the fit is sealed. This will prevent steam from seeping out unwanted areas and prevent
injury.
5

NOTE: The steamer does not require distilled water. Residents in areas with hard water
should use distilled water for better performance.
USE:
1) Before plugging in your steamer, unscrew the water tank cap. Use the measuring
cup and funnel to fill water tank completely. Screw water tank cap back onto the
steamer body firmly.
2) Plug in steamer and turn on/off switch on. Light will illuminate when unit is working.
Be sure to wait a few minutes to ensure steamer is ready for use. Be sure desired
attachments are already in place before you turn on your steamer.
3) Upon initial use, press trigger and aim steam/water into a sink. In order for the unit
to prime, it will need to push out any water that has been trapped in the hose before it
can begin to produce steam. Once steam begins spewing out, the steamer will be
ready to use.
4) When using the steamer for a long period of time you can slide the steam lock
switch to the lock position so that steam will emit on its own without pulling trigger. To
control the steam, slide switch to unlock position.
5) When steamer stops emitting steam simply unplug the unit, wait for it to cool down
and refill the water tank with water.
NOTE: It is recommended that another high wattage appliance is not operated on the
same circuit to avoid a circuit overload.
WARNING: ON SURFACES THAT HAVE BEEN TREATED WITH WAX, THE
WAX MAY BE REMOVED BY THE HEAT AND STEAM ACTION. DO NOT USE ON
UNSEALED WOOD FLOORS OR LET UNIT STAND ON ANY WOOD FLOOR FOR AN
EXTENDED PERIOD OF TIME. THIS MAY CAUSE THE WOOD GRAIN TO RISE.
IT IS RECOMMENDED THAT A SECTION BE TESTED IN AN ISOLATED AREA OF
THE FLOOR. IT IS ALSO RECOMMENDED THAT YOU CHECK THE USE AND CARE
INSTRUCTIONS FOR CLEANING FROM THE FLOOR MANUFACTURER TO ENSURE
STEAM CLEANING IS ACCEPTABLE FOR YOUR WAXED SURFACE.
WARNING: NEVER RUN THE STEAMER WITHOUT WATER.
6) When you finish cleaning, unplug power cord from outlet then release pressure from
steamer. Be sure to empty water tank and carefully remove any accessories for drying.
CAUTION: The cloth pad may be very hot.
6

SUGGESTED USES
Angle Concentrator/Round Brush:
The angle concentrator combined with the round brush can be used to clean grout,
around faucets, sinks, appliances, blinds, vehicle rims, grills, etc.
Floor Brush Head/Floor Cloth Pad:
The floor brush head combined with the floor cloth pad can be used to clean hard floor
surfaces such as tile, sealed hardwood, linoleum, stone, and laminate.
Triangle Fabric Brush/Triangle Brush Pad:
The triangle fabric brush combined with the triangle brush pad can be used on different
upholstered furniture as well as curtains, pet beds and bedding.
Triangle Fabric Brush/Squeegee:
The triangle fabric brush combined with the squeegee can be used on flat surfaces such
as windows, shower walls, and mirrors.
7

CLEANING AND MAINTENANCE
CAUTION: Prior to cleaning or maintaining your steamer, isolate the unit
by removing the cord from the power socket and avoid immersing the unit in
water.
1) The microfiber cloth pad(s) can be machine washed in hot water and air dry.
Do not use bleach or fabric softener. Allow to dry fully before use.
2) Wipe steamer with soft cloth when/if necessary.
3
Product Specs:
Voltage supply: 120, 60 Hz
Output: 1350 W
Water tank capacity: max. 40.6 fl oz.
Cord: 16.4 ft.
Weight: 10.34 lbs.
Protection class: 2
) Periodically, when unit is cooled, removed water cap, using your measuring cup add
one cup of water into the unit. Replace cap and shake unit to lift any calcium build
up left in water tank. Open cap and pour out water in sink. Repeat as necessary.
8

TROUBLESHOOTING
CAUTION: Prior to cleaning or maintaining your steamer, isolate the unit
by removing the cord from the power socket.
PROBLEM SOLUTION
LED is not on
No steam ŸEnsure water tank is full.
ŸCalcium and mineral deposits can build up and impact
the performance of your steamer, use distilled water if
necessary.
Pale residue left
on floor
ŸThis can be caused by leaving the steamer in the same
spot for too long. Residue can be removed with household
white vinegar or a decalcifying product.
ŸAlternatively, reheat the area for one minute to remove
residue (do not overheat area.)
Steamer is leaking
water
ŸT
ŸThe microfiber cloth pad may be overused and needs to be
changed out with additional cloth pad(s) provided. Cloth
pads can be cleaned in washer and air dry. Over time,
however, the cloth pads can start to wear.
ŸBe sure microfiber cloth pad is attached properly.
ŸIf the unit should continue to leak water, unplug and wait 5
minutes before trying again.
ŸRun the unit for several seconds to push left over water
and/or condensation out from hose.
Ÿ
urn off and unplug unit immediately.
Determine where leak is coming from. If it is coming from
body of unit, discontinue use and contact customer service.
Ÿ
Simply turn power button back on and proceed.
ŸEnsure steamer power cord is correctly plugged into
a 120V AC power outlet only.
ŸEnsure circuit breaker is operational.
ŸTry operating steamer from another power outlet.
ŸIf unit is still not working, call customer service
at 1-888-574-3662.
Ensure auto shutoff feature has not been engaged.
CUSTOMER SUPPORT
For problems with your Sienna Steamer, please refer to Troubleshooting guide.
Additional inquiries should be directed to our Customer Service department by calling
You may purchase replacement pads and accessories on our website at:
www.buysiennaproducts.com.
9

ONE YEAR LIMITED WARRANTY
Our Sienna product warranty extends only to the original customer
purchaser of the product. It is warranted by the manufacturer to be free
from all defects in materials or workmanship for a period of one year
from the date of original purchase. This warranty is subject to the
following conditions, exclusions and exceptions.
Exclusions:
This warranty does not cover normal wear and tear of parts and does not
apply to any product that has been tampered with or used for
commercial purposes. This warranty does not cover damage caused by
misuse, abuse, negligent handling or damage due to mishandling in
transit or shipping. This warranty does not cover damage or defects
caused by or resulting from repairs, service or alterations to the product
or any of its parts, which have been performed by a repair person not
authorized by the manufacturer. This warranty is effective only if the
product is purchased and operated in the USA or Canada, and does not
extend to any units which have been used in violation of written
instructions furnished by the manufacturer, or to units which have had
the serial number removed, altered, defaced or rendered illegible.
Performance:
During the limited warranty period, the manufacturer will replace free of
charge a defective product or part that is covered by this warranty. As a
matter of warranty policy, the manufacturer will not refund the purchase
price. A refurbished or replacement product will be covered by this
warranty for the balance of the initial one year warranty period.
To contact
Write: Anvid Products, Inc.
1401-1499 Greenville Road
Livermore, CA 94550
E-mail: [email protected]
Or call: 1-888-5SIENNA (1-888-574-3662)
Please refer to your product name and model number when contacting
Customer Service.
Customer Service:
10

Customer
a copy of your receipt with your
product along with your Warranty form.
Service will give you further instructions for returning a defective
product. When returning a defective product, carefully pack the item to avoid
damage in shipping, the manufacturer cannot assume responsibility for loss
or damage during incoming shipment. We recommend that you insure the
package, as damage in shipping including the shipping cost is not covered
under our warranty. Be sure to include
Limitation of Remedies: No representative or person is authorized to assume
for the manufacturer any other liability in connection with the sale of our
products. This limited warranty is not transferable and any sale, transfer or
other disposition of the product voids this limited warranty. There shall be no
claims for defects or failure of performance or product failure under any
theory of tort, contract or commercial law including, but not limited to,
negligence, gross negligence, strict liability, breach of warranty and breach of
contract.
ANY IMPLIED WARRANTIES, OBLIGATIONS, OR LIABILITIES,
INCLUDING, BUT NOT LIMITED TO, THE IMPLIED WARRANTY OF
MERCHANTABILITY AND FITNESS FOR A PARTICULAR PURPOSE,
SHALL BE LIMITED TO THE DURATION OF THIS WARRANTY. Some
states do not allow limitations on how long an implied warranty lasts, so the
above limitations may not apply to you.
REPAIR OR REPLACEMENT SHALL BE THE SOLE REMEDY OF THE
PURCHASER UNDER THIS LIMITED WARRANTY, AND IN NO EVENT
SHALL THE MANUFACTURER BE LIABLE FOR ANY SPECIAL,
INCIDENTAL, OR CONSEQUENTIAL DAMAGES, LOSSES OR EXPENSES
YOU MAY INCUR IN CONNECTION WITH YOUR PURCHASE OR USE OF
THE PRODUCT OR FOR ANY BREACH OF THIS OR ANY OTHER
WARRANTY, EXPRESS OR IMPLIED, WHATSOEVER. Some states do not
allow the exclusion or limitation of special, incidental, or consequential
damages, so the above limitation may not apply to you. This limited warranty
gives you specific legal rights, and you may also have other rights which vary
from state to state.
Copyright 2013 Anvid Products, Inc. Made in China Printed in China
11
Table of contents
Other Anvid Products Kitchen Appliance manuals