Aobosi Digital Air Fryer User manual

2
The Air fryer is an easyandhealthywayto prepare your favorite fried foods and
snacks. The air fryeruses hot air incombinationwithhigh-speedair circulationanda
top grill to prepare a varietyoftastydishes in ahealthy,fast and easyway.Your
ingredients are heatedfromall sides at once and there is no need to addoil to most
ofthe ingredients.
Read thisuser manual carefullybefore you use the appliance and save it for future
reference.
Weare notresponsible for inaccurateuse due to introductionnegligence or
failure to followthedirections.
DANGER
-Never immerse the housing, whichcontains electrical components and the
heatingelements, in water nor rinse it under thetap.
-Do not let anywater or other liquid enter the appliance to prevent electric
shock.
-Alwaysput theingredients tobefried in the basket, to preventitfromcoming
intocontact with the heating elements.
-Do not cover theair inlet and air outlet openings while the appliance is
operating.
-Do not fillthepanwith oil as this maycause a fire hazard.
-Never touch the inside ofthe appliance whileit is operating.
WARNING
-Checkifthe voltage indicated on the appliance corresponds to the local
mains voltage before you connect the appliance.
-Do not use the appliance ifthe plug, the mains cord or the appliance itselfis
INTRODUCTION
IMPORTANT

3
damaged.
-Ifthe mains cord is damaged, youmust haveit replaced byProfessionals; a
service center authorized bysellers or similarlyqualified persons in order to
avoid a hazard.
-This applianceshould not be used bychildrenaged 15 or under and by
persons with reduced physical, sensoryor mental capabilities, or lackof
experience and knowledge.
-Childrenshould be supervised to ensure that theydonot playwith the
appliance.
-Keep the appliance and its mains cord out ofthe reachofchildrenyounger
than 15 whentheapplianceis switched on or is coolingdown.
-Keep the mains cord awayfromhot surfaces.
-Do not plug in the appliance or operatethecontrol panel withwethands.
-Onlyconnect theapplianceto an earthed wall socket. Always make sure
that the plug is inserted intothe wall socket properly.
-This applianceis not intended tobe operatedbymeans ofan external timer
or a separate remote control system.
-Do not place the appliance on or near combustible materials suchas a
tablecloth or curtain.
-Do notplace theappliance against a wallor against other appliances. Leave
at least 10cmfree space on thebackand sides and 10cmfree space above
the appliance.
-Do not place anything on top ofthe appliance.
-Do not use the appliance for anyother purpose than described in this
manual.
-Do not let the appliance operate unattended.
-During hot air frying,hotsteamis released through the air outlet openings.
Keepyour hands and face at a safe distance fromthe steamand fromthe
air outlet openings.Also be careful ofhot steamand air when you remove
the pan fromthe appliance.
-The accessible surfaces maybecome hot duringuse.

4
-Immediatelyunplug the appliance if yousee darksmoke coming out ofthe
appliance. Wait for the smoke emission to stopbefore you remove thepan
fromthe appliance.
CAUTION
-Placetheapplianceon a horizontal, even and stable surface.
-This applianceis intended for normal household use only.It is not intended
for use in environments such as staffkitchens ofshops, offices, farms or
other workenvironments. Nor is it intended to be usedbyclients inhotels,
motels, bed and breakfastsand other residential environments.
-Ifthe appliance is usedimproperlyor for professional or semi-professional
purposes or ifit is not used accordingto the instructions in the user manual,
the guaranteebecomes invalid and sellers refuses anyliabilityfor damage
caused.
-Always return the appliance to a service center authorized bysellers for
examinationor repair.Do not attempt to repair theappliance yourself,
otherwise the guarantee becomes invalid.
-Always unplugtheappliance after use.
-Let theappliance cooldown for approximately30minutes beforeyou handle
or cleanit.
-Make sure the ingredients prepared in this appliancecome out
golden-yellow insteadofdarkor brown. Remove burntremnants. Do not fry
fresh potatoes at a temperature above 180 C (to minimize the production of
acrylamide).
ELECTROMAGNETIC FIELDS (EMF)
This appliance complies withall standards regarding electromagnetic fields (EMF).If
handledproperlyandaccordingtothe instructions in this user manual,the appliance
is safe to use based on scientific evidenceavailable today.

5
1. Remove all packaging material.
2. Remove anystickers or labels fromthe appliance.
3. Thoroughlycleanthebasket and the panwith hotwater,somewashing-up
liquid and a non-abrasive sponge.
Note:Youcan also cleanthese parts in the dishwasher.
4. Wipe the inside and outside ofthe appliance with a moist cloth.
This is an air fryer that works on hot air. Do not fill the pan withoil or frying
fat.
1. Placetheapplianceon a stable, horizontal andlevel surface.
2. Carefullypull the pan out ofthe air fryer.
3. Put the ingredients in the basket.
4. Placethebasket in the panproperly.
5. Slide the basket and panbackinto the air fryer.
Note:The basket is equippedwith abuttonguardthat ensures safe
detachment. Simplypush the button out to detach thebasket fromthe pan.
6. Plug the power cord into dedicated outlet.
NEVER:
•Never place the appliance on non-heat-resistant surfaces.
•Never fill the pan with oil oranyother liquid.
•Never put anythingontopoftheappliance.This disrupts theairflowand
affects the hot air frying result.
•Never fillthe basket beyond theMAXindicationor exceedtheamount
indicatedinthetable(see section ‘Settings’), as this couldaffect the quality
ofthe end result.
•Never use the pan without the basket in it.
BEFORE FIRSTUSE
PREPARING FOR USE

7
1. Whenairfryer is plugged, the “Power”iconwillblink,and then it willstay
in readymodel before anybutton is pressed.
2. Keeppressing the “Power”iconfor 3seconds, thecontrolpanelwill be
unlocked. You can either select aQuickmenuusingthe “M”button or
manuallyset the Temperature and then the Time.
3. Press power icon to start/cancel.
4. Whenthe cookingcycle iscomplete, it will be shut downafter 4beeping
sounds (onlythe “Power”icon is displayed).
5. After finished, pullthe pan out ofthe airfryer and place it ona
heat-resistant surface, press the basket releasebutton andliftthe basket
out of the pan. Carefullypour the ingredients out ofthe basket onto plate.
Cookingwith Quick menus
Keeppressingthe “M”iconenablesyou to scroll through the 7quick menus on
the panel (Including: Frozen fries, Homemadefries,Chicken nuggets, Chicken
thighs, Shrimp, Fish, Cake).
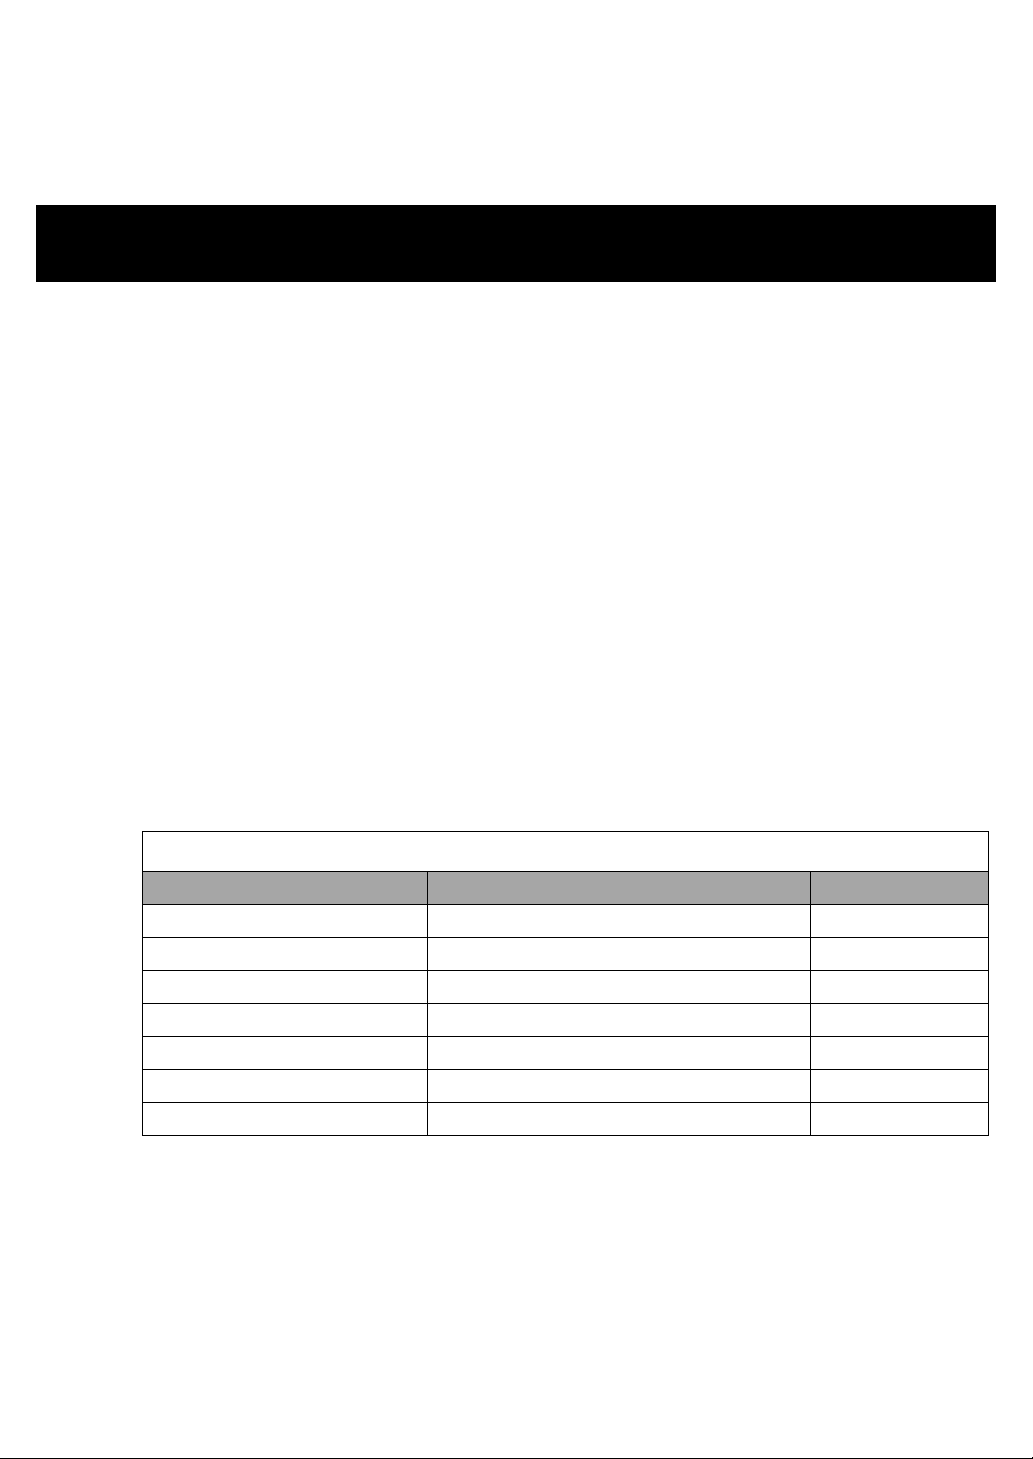
QUICK MENUS COOKING CHART
Quick Menus TEMPERATURE TIME
Frozen fries 200 /392℉16 min
Homemade fries 200 /392℉13 min
Chicken nuggets 180 /356℉15 min
Chicken thighs 180 /356℉20 min
Shrimp 200 /392℉10 min
Fish 200 /392℉12 min
Cake 200 /392℉17 min
CookingwithManual setting
Once you are familiar withthe appliance, you maywant to experiment with your
own recipes. You do not need to select a quickmenu, simplychoose the time
and temperature that suitsyour personal taste.
GENERALOPERATING INSTRUCTIONS

8
The and icon enable you to add or decrease cooking temperature 9℉/5
at a time. Keeping the button held down will rapidlychange the Temperature.
Temperature control range:140-392℉/ 60 200 .
The and icon enable you to add or decrease cooking time, 1minute at a
time. Keepingthe button helddownwill rapidlychangethe time. Timecontrol
range: 1 min to 60 minutes.
*Note:Up/Down(Timer)showsas :Up/Down(Temperature)showsas :
℉/℃
The Heating icon showsthat the heating element isworking (or micro switch is
on); and it willdisappear when the fryer pan is pulledout or the temperature is up
to the specified temperature.
The Fan icon showsthatthe motor is working; andit will disappear whenthe
fryer bowl is pulled out.
Cooking the next dishes
Ifyou need to use thefryer againfor next dishes, simplyunlockthe productas
aforesaid, selecting the “M”or setthe time and temperature up to yourpersonal
taste. *Note: Whenthe first dishis finished, the air fryer is instantlyreadyfor
preparing another dish. Ifthe temperature inside the fryer is the same as
the temperature next dishrequired, the Heatingicon willdisappear.
Whenthe temperatureinside <temperaturerequired, the heating
element will workand heating icon will appear.

9
The tableonthenextpagehelpsyou toselect thebasic settings for theingredients
you want to prepare.
* Note: Keep in mind that these settings are indications. As ingredients differ in
origin, size, shapeas wellas brand, we cannotguaranteethebest settingfor
your ingredients.
Because the rapid air technologyinstantlyreheats the air inside the appliance,
pulling thepan brieflyout ofthe appliance during hotair frying barelydisturbs the
process.
TIPS
-Smaller ingredients usuallyrequireaslightlyshorter preparationtimethan
larger ingredients.
-Alarger amount ofingredients onlyrequires aslightlylonger preparation
time, asmaller amount ofingredients onlyrequires aslightlyshorter
preparation time.
-Shaking smaller ingredientshalfwaythroughthepreparationtimeoptimizes
the end result and can helpprevent unevenlyfried ingredients.
-Addsome oil to fresh potatoes for acrispyresult.Fryyouringredients inthe
airfryer within a fewminutes after you added the oil.
-Do not prepareextremelygreasyingredients such as sausages inthe
airfryer.
-Snacksthatcan bepreparedin anovencanalso beprepared intheairfryer.
-The optimal amount for preparing crispyfries is 500 grams.
-Use pre-made doughto preparefilledsnacksquicklyandeasily.Pre-made
dough also requires a shorter preparation time than home-made dough.
-Youcanalsousetheairfryerto reheat ingredients.Toreheatingredients,set
the temperature to 150 C for up to 10minutes.
-Checkifthe ingredients are ready.Ifthe ingredientsare not readyyet,
simplyslide the pan backinto theappliance and set the timer to afewextra
SETTING

10
minutes.
* Note: Add 3 minutes to the preparation time whenyou start fryingwhile the airfryer
is still cold.
Min-max
Amount
(g)
Time
(min) Temperature
(C/ ) Shake
Extra
Information
Potatoes & fries
Thin frozen fries 300-700 12-16 200 /392℉Shake
Thick frozen
fries 300-700 12-20 200 /392℉Shake
Home-made
fries (8x8 mm) 300-800 18-25 180 /356℉Shake add ½tbsp. ofoil
Home-made
potato wedges 300-800 18-22 180 /356℉Shake add ½tbsp. ofoil
Home-made
potato cubes 300-750 12-18 180 /356℉add ½tbsp. ofoil
Rosti 250 15-18 180 /356℉0
Potato gratin 500 18-22 180 /356℉
Meat & Poultry
Steak 100-500 10-15 180 /356℉
Pork chops 100-500 10-14 180 /356℉
Hamburger 100-500 7-14 180 /356℉
Sausage roll 100-500 13-15 200 /392℉
Drumsticks 100-500 18-22 180 /356℉
Chicken breast 100-500 10-15 180 /356℉
Snacks
Spring rolls 100-400 8-10 200 /392℉Shake Preheat air fryer
Frozen chicken
nuggets 100-500 6-10 200 /392℉Shake Preheat air fryer
Frozen fish
fingers 100-400 6-10 200 /392℉Preheat air fryer
Stuffed
vegetables 100-400 10 160 /320℉

11
Ifsomeingredients requireshakinghalfwaythroughthe preparationtime(see
Setting table on page 10).
1. Toshaketheingredients, pullthe pan out ofthe fryer bythe handle(the
fryer will automaticallyshut down), and carefullyshake the ingredients.
2. After done, slide the pan backinto the air fryer.The fryer will
automaticallycontinue to work.
Caution: Do not press thebasket release button during shaking.
Tip: Toreduce the weight, youcan removethebasket fromthe pan and
shakethe basket only.Todo so, pullthepan outoftheappliance, place
it on a heat-resistant surface and press the basket release button.
Tip: Ifyousetthetimer to halfthepreparationtime, you hear thetimer
bellwhen youhaveto shakethe ingredients. However,this means that
you haveto setthetimer againtotheremainingpreparationtimeafter
shaking.
For best results, we adviseto use pre-baked (e.g. frozen) fries. If youwantto make
home-made fries, followthe steps below.
1. Peel the potatoes and cut theminto sticks.
2. Soakthe potato sticksin abowl for at least 30 minutes, takethemout and
drythemwith kitchen paper.
3. Pour ½tablespoon ofoliveoil in abowl, put the stickson top and mix until
the sticks are coated with oil.
4. Removethesticksfromthe bowl withyour fingers or akitchen utensilso that
excess oil stays behind in the bowl.Put the sticks in the basket.
* Note: Do not tilt the bowl toput all the sticksin the basket in onego, toprevent
excess oil fromending up on thebottomofthe pan.
5. Frythe potato sticks according to the instructions.
MAKING HOMEMADE FRIES
HOW TO SHAKE

12
Clean the appliance after everyuse.
The pan, basket and the inside ofthe appliance have anon-stickcoating. Do
not use metal kitchen utensils or abrasivecleaning materials to clean them,as
this maydamage the non-stickcoating.
1. Remove the power cord fromthe wall socket andlet the appliance cool down.
* Note: Remove the pan tolet the airfryer cool down more quickly.
2. Wipe the outside oftheappliance with a moist cloth.
3. Cleanthe pan and basket with hot water,somewashing-upliquidanda
non-abrasive sponge.
You can use a degreasing liquid to removeanyremaining dirt.
* Note: The pan and basket are dishwasher-safe.
Tip: Ifdirt is stuckto the basket or the bottomof the pan, fillthe pan with hot
water with somewashing-up liquid.Put the basket inthe panandlet thepan
and the basket soakfor approximately10 minutes.
4. Clean the inside ofthe appliance with hotwater and a non-abrasive sponge.
5. Clean the heating element with a cleaning brush to remove anyfood residues.
6. Placetheapplianceintheclean, dryplace.
CLEANING& STORAGE

13
Problem Possible cause Solution
The airfryer is not turning on. The appliance is not
plugged in.
plug the appliance intoa grounded wall
socket
You havenot set thetimer. Press and to set the required
preparation time to switchon the
appliance.
The fry basket didn’ttouch
the micro switch.
Details as
https://youtu.be/OuEkSGddTA8
The ingredients fried withthe air
fryer are not done.
The amount ofthe
ingredients inthebasketin
too much.
Put smaller batches of ingredients in the
basket. Smaller batches are fried more
evenly.
The set temperature is too
low.Press and to set the required
temperature (see section ‘Settings’in
chapter ‘Using theappliance’).
The preparationtime istoo
short. Press and to set the required
preparation time (see section ‘Settings’).
The ingredients are fried
unevenlyin the air fryer.
Certain types of the
ingredients needto be
shaken halfwaythrough
the preparationtime.
Ingredientsthat lieon topof or across each
other (e.g. fries) need tobe shakenhalfway
through the preparation time. See section
‘Settings’inchapter ‘Using theappliance
Fried snacksare notcrispyafter
frying
You used atype of snacks
meant to be prepared in a
traditional deep fryer.
Use oven snacks or lightlybrush some oil
onto the snacks for a crispier result.
Pan does not slide into fryer
properly
Over filledbasket. Do not fillthe basketbeyondthe MAX
indication
The basket is not placedin
the pan correctly.
Push the basket down into thepan until
you hear a click.
TROUBLESHOOTING

14
White smokecomes outof the
appliance
It’snormal for white smoke
to appear when prepping
greasyingredients.
When you frygreasyingredients inthe
airfryer, a large amount of oil will leakinto
the pan. The oil produceswhite smokeand
the pan may heat up more thanusual. This
doesnot affect the appliance or the end
result.
The pan still contains
grease residues
White smoke is caused bygrease heating
up in thepan. Makesureyoucleanthepan
properlyafter each use.
Fresh friesare fried unevenlyin
the airfryer
You did not soak the
potatosticks properly
before you fried them
Soak thepotatosticksin abowlfor at least
30 minutes, take themout anddrythem
with kitchen paper
You did not use the right
potatotype.
Use fresh potatoesandmake sure they
stayfirmduring frying
Fresh friesare not crispywhen
theycome out of the airfryer.
The crispinessof the fries
depends on the amount of
oil and water in thefries.
Cut the potato stickssmaller for a crispier
result. Addslightlymore oil fora crispier
result.
Cut the potato stickssmaller for a crispier
result.
Add slightlymore oil fora crispier result.

15
To return your products, please see your deliverynote.
After Sales Support Email:info@iaobosi.com
Http://www.iaobosi.com
Thankyou for purchasingour product, which hasbeen made to meet high
qualitystandards. The manufacturer’swarrantycovers the product for aperiod
of12 months fromthe date ofpurchase against manufacturing faults.
Ifyour product failsdueto adefect inmaterial or workmanship within12 months,
please return it to the place ofpurchase.
This warrantydoes not affect your statutoryrights.
Anywarrantyis invalid if the product has been misused or subject to negligence
or an attempted repair other than byour own service centre.
Due to continuousproduct improvement, wereservethe right to change the
product specification without prior notice.
"
GUARANTEE
Table of contents
Other Aobosi Fryer manuals