aosong AW5145W User manual

User Manual AW5145W
-1-
Wireless Temperature & Humidity
Transmitter
AW5145W User Manual

User Manual AW5145W
www.aosong.com Revision V1.0-May 2017
-2-
1 Product Overview
The AW5145W is a new type of temperature and humidity transmitter, using high quality
digital capacitive sensor of the company's exclusive research and development. The
AW5145W has the special feature of high measurement precision, strong anti-jamming
capability, as well as the characteristics of strong stability, which guarantees excellent
performance measurement of the products. The AW5145W can satisfy all the general
application requirements.
The AW5145W can be applied to most industrial-grade environment with strong in
anti-jamming capacity, high measuring accuracy and wide measuring range. A TFT color
display with high clarity has been provided, displaying temperature and humidity values in
real time. The interior design has alarm function module, which can achieve high/low
temperature alarm and high/low wet alarm. The AW5145W has WIFI signal output and the
standard MODBUS TCP communication protocol with the maximum range of up to 50
meters. It supports the installation of multi-network type temperature and humidity
monitoring system, which can reach up to 254. The AW5145W is an excellent basic
industrial grade temperature and humidity transmitter.
The AW5145W can be widely used in industrial workshop, telecom base station,
communication room, HAVC, intelligent buildings, offices, museums, archives, etc. The
AW5145W achieves an ideal solution for all kinds of application environment temperature
and humidity measurement monitoring.
2 Sensor Performance

User Manual AW5145W
www.aosong.com Revision V1.0-May 2017
-3-
2.1 Relative Humidity (%RH)
Parameter
Condition
Min
Typ.
Max
Units
Resolution
0.1
%RH
Measuring range
0
99.9
%RH
Drift
Typical
0.1
%RH/yr
Response time
2
s
2.2 Temperature (℃)
Parameter
Condition
Min
Typ.
Max
Units
Resolution
0.1
℃
Operating range
-20
±0.5
60
℃
Drift
Typical
0.1
℃/yr
Response time
2
s
2.3 Other specifications
1) Power consumption: ≤50mA(24V)
2) Supply voltage: 9~36VDC / USB 5V
3) Output signal: 2.4G wireless WIFI(IEEE802.11n)
4) Communications protocol: Standard MODBUS TCP
5) Storage Capacity: 12800 points(Maximum)
6) Product Net Weight: 125.79g

User Manual AW5145W
www.aosong.com Revision V1.0-May 2017
-4-
3 Dimensions
Figure 1 Dimension (Units: mm)
4 Panel Schematic and Product Installation
4.1 Panel Schematic
Figure 2 Panel schematic introduction
Note:
1 OK Key: Enter
2 MENU Key: Manual
3 UP Key: UP Selection
Antenna
MENU
OK
UP
DOWN
Internal probe

User Manual AW5145W
www.aosong.com Revision V1.0-May 2017
-5-
4 DOWN Key: Down sDelection
4.2 Installation
1 Paste the plotting sheet in the desired position of the product before installation.
2 Follow the position of the plotting sheet, and drill a fixed hole, then use two M4 screws
(supplied in the attachment) to fix on the wall.
3 Hang the product on the wall. The hanger is shown in figure 4.
Figure 3 Plotting sheet fixing Figure 4 Fixing hanger
5 System Setup Menu
Figure 5 Main interface symbol explanation
5.1 System Startup Interface
After the power is turned on, the system will start automatically. After the system startup
successfully, the LCD will display temperature and humidity by default. After 30 seconds, the
Plotting sheet

User Manual AW5145W
www.aosong.com Revision V1.0-May 2017
-6-
display screen will be locked automatically. There is a lock screen symbol on the top left of
the screen.
5.2 LCD Display Unlock
The display will be automatically locked if the device does not make any key settings within
30 seconds. To unlock the screen, press the "OK" button to unlock, then you can setup the
menu.
5.3 Network Setting
5.3.1 Router Configure
Transmitter can connect to the router when successfully obtained the SSID and password of
the router by "AOSONG cloud platform APP". Then the transmitter can connect to the
Internet. There are two ways to configure the router, "get IP address automatically" and "set
IP address manually". Normally, only "get IP address automatically" is used, and "set IP
address manually" is used only when the IP address of the device need to be static.
(1)The steps to connect to the router by "get IP address automatically "mode are shown as
follows:
1)Long press the “OK” key to unlock the screen.
2)Press "MENU" key to enter the setup menu, select "Net Setting", press "OK" key to enter
the submenu and select "Router Config", press "OK" key to enter the submenu and select
"Auto IP".
3)Press the "OK" button, then the screen prompt "Press OK To Start". The mobile phone
which install the "AOSONG cloud platform APP" and device should connect to the same
router. Open the "AOSONG cloud platform APP" after the mobile phone connect to the
router successfully. "SSID" indicates the name of the router that the mobile phone is
currently connected to. Enter the router password in the "Password input box", select the
number of transmitters to be configured in the "Device number", and then click "OK" to start
configuring. The configuration interface are shown as below:

User Manual AW5145W
www.aosong.com Revision V1.0-May 2017
-7-
Figure 6 Configuration
4)After the configuration is successful, the transmitter prompts "Config Success". If the
configuration is not successful in 5 minutes, the transmitter will prompt "Config timeout,
press OK restart". Press "MENU" to return to the previous menu when configuration is
successful. After returning to the main interface, "SSID" shows the name of the router, WIFI
symbol shows the signal strength.
5)When press the "MENU" key during the configuration process, the transmitter will prompt
"cancel configuration?", press the "UP" key or "DOWN" key to select "Yes" or "No", select
"YES" and press "OK" key to cancel the configuration; select "NO" and press "OK" key to
continue configuration.
(2)The steps of obtaining SSID and password of router in "set IP address Manually " way to
connect to the router are shown as follows:
1)Long press the "OK" key to unlock the screen.
2)Press the "MENU" key to enter the setup menu, select "Net Setting", then press "OK"
key to enter the submenu and select "Router Config", then press "OK" key to enter the
submenu, press the "UP" key or "DOWN" key to select "manual IP". Press "OK" key and
select "Net Address" to set network address, the default network address is

User Manual AW5145W
www.aosong.com Revision V1.0-May 2017
-8-
"192.168.001.010".The value"192" is displayed in highlight state. Press "OK" key, then the
value "192" will be twinkling and now you can press the "UP" key or "DOWN" key to change
its value. Press the "OK" key to finish setting .Then press the "UP" key or "DOWN" key to
change the other three values.
Note: The network address manually set can not be the same as the network address of
other network nodes in the LAN. Otherwise, it will cause communication failure.
3)Set the "Subnet Mask" (default 255.255.255.0) and "Default Gateway" (default
192.168.1.1) options as described above. After setting, enter the "Start configuration" option,
prompting "Press OK to start configuration".
4)Refer to the "get IP address automatically" mode Step 3) 4) 5) to configure.
5.3.2 Communication Mode setting
(1)Long press the “OK” key to unlock the screen.
(2)Press "MENU" key to enter the setting menu, select "Net Setting", press "OK" key to enter
the submenu and select "Server Type", press the "UP" key or "DOWN" key to select TCP or
UDP, press "MENU" key to finish.
5.3.3 Server Address Setting
(1)Long press the “OK” key to unlock the screen.
(2)Press "MENU" key to enter the setting menu, select "Network Setting", press "OK" key to
enter the submenu and select "Server Address" to set. The default Server address is
14.23.92.147, do not need to modify.
5.3.4 Server Port Setting
(1)Long press the “OK” key to unlock the screen.

User Manual AW5145W
www.aosong.com Revision V1.0-May 2017
-9-
(2)Press "MENU" key to enter the setting menu, select "Net settings", press "OK" key to
enter the submenu and select "Server Port" to set. The default Server port is 9002, do not
need to modify.
5.4 Alarm Settings
The transmitter supports temperature and humidity alarm function, you can set the
temperature and humidity alarm value for alarm.
5.4.1 High Temperature Alarm Settings
(1)Long press the “OK” key to unlock the screen.
(2)Press "MENU" key to enter the setting menu, select "Alarm Setting", press "OK" key to
enter the submenu and select "Temperature HAR", then press "OK" key to enter
"Temperature HAR" interface.
(3)Press the "UP" key or "DOWN" key to set the high temperature alarm value and alarm
switch.
5.4.2 Low Temperature Alarm Settings
(1)Enter the setting menu, select "Alarm Setting", press "OK" key to enter the submenu and
select " Temperature LAR", then press "OK" key to enter "Temperature LAR" interface.
(2)Press the "UP" key or "DOWN" key to set the low temperature alarm value and alarm
switch.
5.4.3 High Humidity Alarm Settings
(1)Enter the setting menu, select "Alarm Setting", press "OK" key to enter the submenu and
select " Humidity HAR", then press "OK" key to enter "Humidity HAR" interface.
(2)Press the "UP" key or "DOWN" key to set the high humidity alarm value and alarm switch.
5.4.4 Low humidity alarm settings
(1)Enter the setting menu, select "Alarm Setting", press "OK" key to enter the submenu and

User Manual AW5145W
www.aosong.com Revision V1.0-May 2017
- 10 -
select "Humidity LAR", then press "OK" key to enter "Humidity LAR" interface.
(2)Press the "UP" key or "DOWN" key to set the low humidity alarm value and alarm switch.
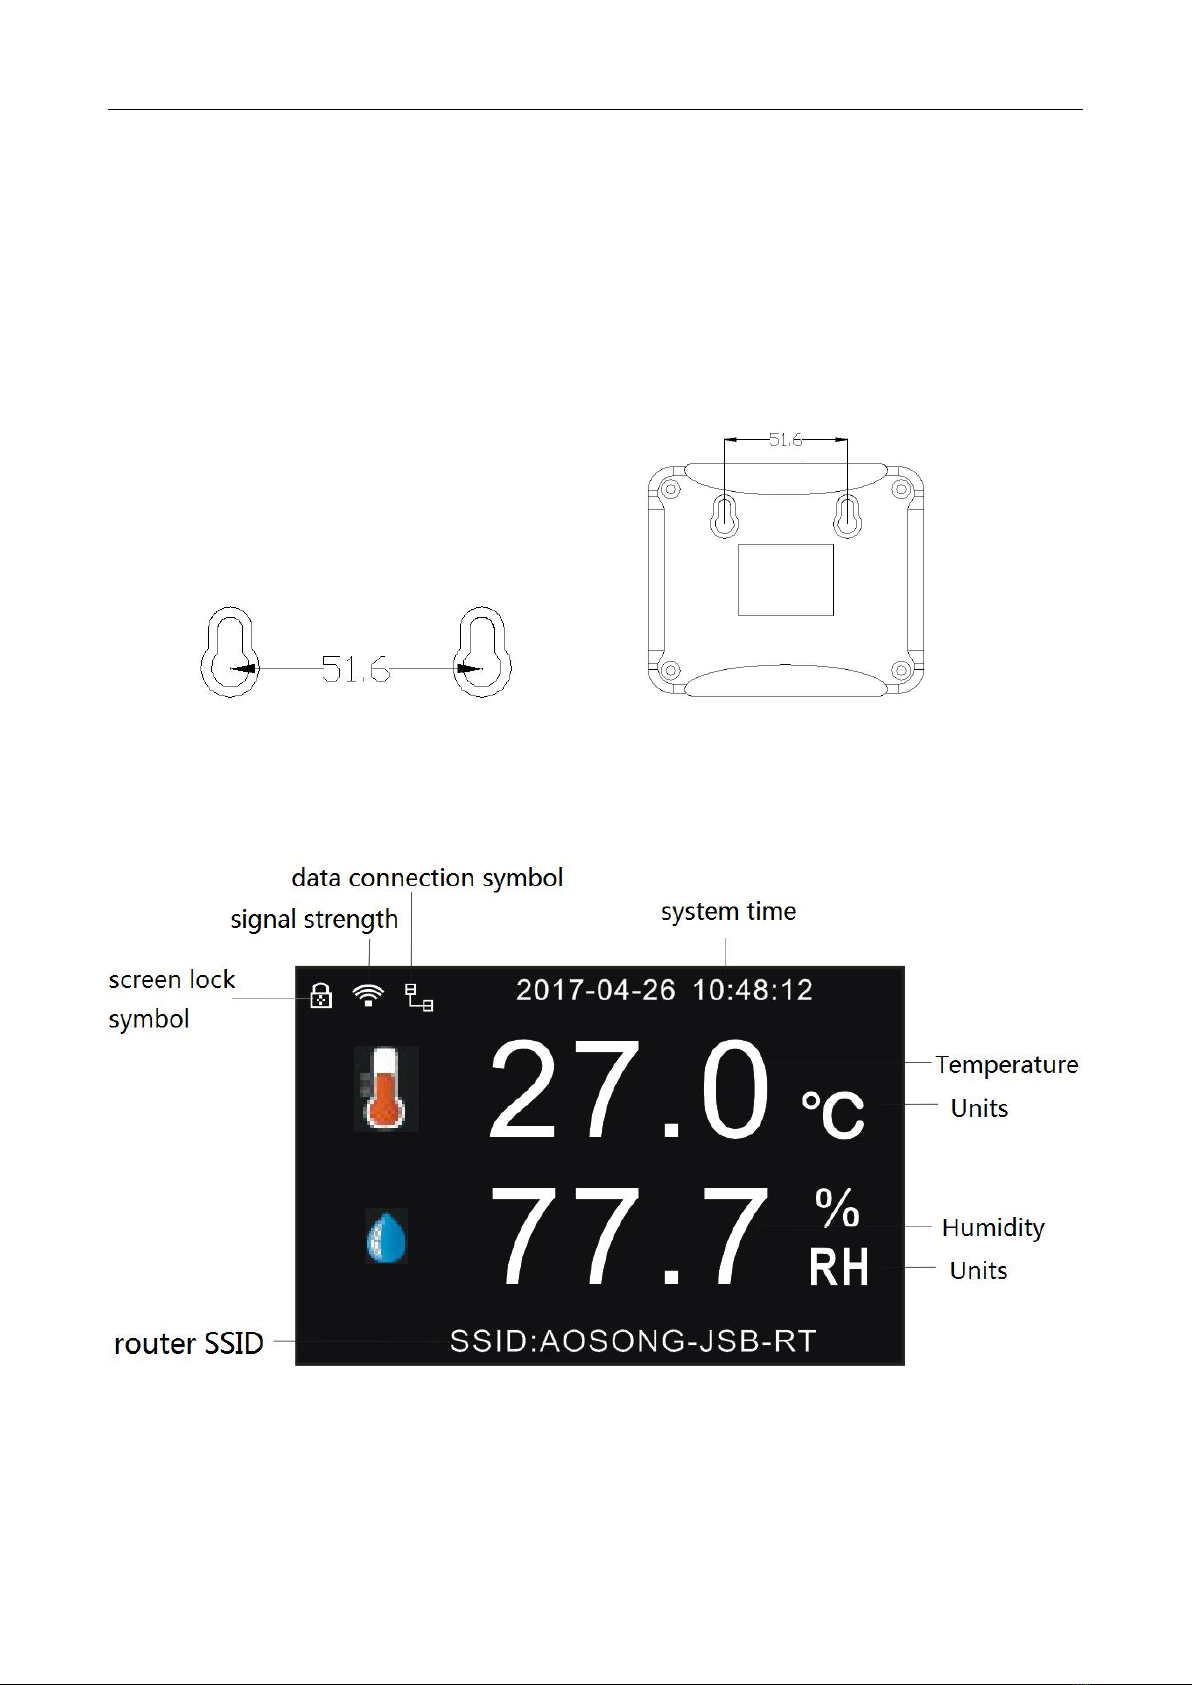
When the monitoring environment value reaches the pre-set temperature and humidity
alarm value, the device will automatically alarm. The device will beep and the LCD screen
will display corresponding alarm symbols.(HAR means High Alarm Range; LAR means Low
Alarm Range)
5.5 Parameter settings
5.5.1 System Time Setting
Enter the "System Time" menu, press the "OK" key, the "year" highlighted in red, press the
"UP" key or "DOWN" key to set the year value, press the "OK" key to select the other options
to set. Press "MENU" key to finish and return back.
5.5.2 Upload Interval Setting
Enter the "Upload Interval" menu, press the "OK" key, the Options that can be set switch
between "normal upload interval value", "units" and "alarm upload interval value". Press the
"UP" key or "DOWN" key to set the corresponding value. Two kind of switchable units were
minute and second.
5.5.3 Record Setting
(1)Record mode setting
Enter the "Record Mode" submenu, press "UP" key or "DOWN" key to select between
"AUTO", "OPEN", and "CLOSE". By default, "OPEN" is selected and the record is always on.
When "AUTO" is selected, the device will not record if connect to the network and start to
record when the network is abnormal.
(2)Record frequency setting
Enter the "Record Interval" submenu, press "OK" key to select the option to set and press
the "UP" key or "DOWN" key to change the value. The units is minute.

User Manual AW5145W
www.aosong.com Revision V1.0-May 2017
- 11 -
(3)Record cycle setting
Enter the "Record Cycle" submenu and press the "UP" key or "DOWN" key to change the
cycle switch. When "Record Cycle" is closed, the device will stop recording when the record
point reach 12800 point. When the "Record Cycle" is open, the first record is overwritten
when the record is full.
(4)Record clear setting
Enter the "Record Clear" submenu, press the "UP" key or "DOWN" key to select "Yes"
option and then press "OK" key to clear the record, then record is empty and start recording
from point 1 again.
6 System Setting
6.1 Language Setting
(1)Enter the "System Setting" menu and press "OK" to enter the submenu. Select
"Language" and press "OK" to enter the "Language" interface.
(2)Press the "UP" key or "DOWN" key to switch system language between Chinese and
English.
6.2 Temperature Units Setting
(1)Enter the "System Settings" menu, select "Temperature Units" and press "OK" to enter.
(2)Press the "UP" key or "DOWN" key to switch temperature units between ℃and ℉.
6.3 Recover Setting
(1)Enter the "System Setting" menu and select "Recover", press "OK" to enter "Recover"
interface.
(2)Press the "UP" key or "DOWN" key to select "Yes" option and then press "OK" key to start
recover process. The recover process will take several seconds.

User Manual AW5145W
www.aosong.com Revision V1.0-May 2017
- 12 -
6.4 System Information
(1)Long press the "OK" key to unlock the screen.
(2)Press "MENU" key to enter setting menu, enter the "System Setting" menu, select
"System Information", press "OK" key to enter and view the system information
parameters.
7 Monitoring software of upper monitor installation guidelines
If user needs to use the computer temperature and humidity monitoring system, it is
necessary to install the "Temperature and Humidity Monitoring System" software in the
computer first. Link: http://www.aosong.com/cn/downloads/index.asp.
The installation and setup steps are as follows:
1. Download and install the Microsoft Corp NET2.0 support library (If it is installed already,
no need to install again)
2. Enter the company's official website download center, and download the upper monitor
software "Temperature and Humidity Monitoring System". Decompress the file and
double-click the “TH_Monitor.exe” file to complete the software installation. The software
interface is shown below:
3. Based on 3 Network settings -->3.2 Communication mode setting, set the transmitter
communication mode to UDP.

User Manual AW5145W
www.aosong.com Revision V1.0-May 2017
- 13 -
4. The transmitter supports both transit and broadcast modes. Using the transit mode, data
is uploaded directly to the server through the internet, then upper monitor software get the
data from sever to display. Using the broadcast mode, upper monitor software communicate
with the equipment directly in the LAN, not through the internet.
5. Transit mode related settings:
1) Set the transmitter remote address to 14.23.92.147 and remote port to 9002. In the
default situation, it is no need to modify.
2) Click on “New Device” button of the menu bar, and new device dialog box pop-up. Select
“TCP network”, “transit mode”, then enter the device access code and ID number. The
device access code is fixed to 12345678, and the device ID number can be obtained by
querying “device information”, and ID number is 24 bits. Click “OK” to add new device.
3) After the equipment added complete, click on the "start" button of the menu bar, and the

User Manual AW5145W
www.aosong.com Revision V1.0-May 2017
- 14 -
upper monitor start to communicate with transmitter. After communication success, the
device name color of upper monitor changed from grey to green, and the top of screen of
transmitter display upper monitor connected symbol.
6. Broadcast mode related setting
1) Click on the menu bar, select "system" >>”system property”, and select "communication
settings" in the system property dialog box. Change the waiting ACK time and polling interval,
both recommend to be set to "500ms". Click “OK” after finished.
2) Click on "Scanner" symbol (magnifier symbol) of the menu bar, then scanning device
dialog box pop-up. Select "send UDP", and click "scan" button. The upper monitor software
will scan the transmitter in the same network segment, and wait for the scan to complete.
7. After the scan complete, click "finish" button, and new devices will add to the system
automatically. The main interface pop-up scan to the device list. Click on the "start" button of
the menu bar, and the upper monitor start to communicate with transmitter. After
communication success, the device name color of upper monitor changed from grey to
green, and the top of screen of transmitter display upper monitor connected symbol.
The use of software and control parameter settings for details please see software help files
or software instructions. If there is any doubt please directly contact the professional and

User Manual AW5145W
www.aosong.com Revision V1.0-May 2017
- 15 -
technical personnel of Aosong company for help.
※Temperature and Humidity Correction
The system sometimes has a certain measurement deviation value. The temperature
deviation value is ±0.5℃, and the humidity deviation value is ±3%RH, both regard as the
normal phenomenon. The temperature and humidity correction settings can be set by the
system hidden menu:
1. Long-press the OK button to unlock the display.
2. Then press the OK button and hold, and press the down select button at the same time,
that is, open the correction menu.
3. The temperature and humidity correction value can be set by the menu operation and the
up/down select button.
8 License Agreement
1) Without the written permission of the company, it shall not copy or disseminate the
content of this specification in any form, nor shall it be disclosed to a third party.
2) The company and the third party have the ownership of the software, and the user can
only use it after signing the contract or obtaining the software license.
3) The contents of this instruction manual are subject to change without prior notice.
9 Warning and Personal Injury
Do not apply this product to safety protection devices or emergency shutdown devices, and
any other applications that may cause personal injury due to the malfunction of the product,
unless otherwise authorized. Please refer to the product data sheet and Application guide
before installation, processing, use, or maintenance of the product. Failure to comply with
the recommendations may result in death and serious bodily harm. The company will not be
liable for all damages resulting in personal injury or death, and avoid the company managers
and employees, agents, distributors and other subsidiary may have any claim, including all
the costs and compensation costs, legal fees etc.

User Manual AW5145W
www.aosong.com Revision V1.0-May 2017
- 16 -
10 Quality Assurance
The company provides quality assurance for 12 months for the original purchaser of the
products (calculated from the date of shipment), in accordance with the technical
specifications of the data book of the product published by the company. If the product is
proved to have its own quality problems during the warranty period, the company will provide
free maintenance or replacement. The user must meet the following conditions:
1) The purchaser must notify the company of the defect in writing within 14 days of
discovery.
2) The purchaser shall pay the shipping charges for product mailed back to company.
3) The product should be within the warranty period.
The company is solely responsible for products that are defective in situations where the
technical conditions of the product are met. The company applies its products to those
special applications without any warranties or statements, as well as any commitment to the
reliability of the products applied to products or projects.
Table of contents