Dejero EnGo 3x User manual

User Guide
June 2022
D-UG145-DRAFT

www.dejero.com
2 | Dejero EnGo 3x User Guide
Dejero Labs Inc.
410 Albert Street, Suite 200
Waterloo, Ontario, N2L 3V3
+1 519 772 4824
Copyright, Trademarks, and Patents
Copyright © 2022 Dejero Labs Inc.
Dejero is a trademark of Dejero Labs Inc. QuickTime is a trademark of Apple Inc. Wi-Fi is a
trademark of the Wi-Fi Alliance. Linux is the registered trademark of Linus Torvalds in the U.S.
and other countries.
All other trademarks are the property of their respective owners.
Dejero products or portions thereof are protected by patents granted and pending.
Symbols and Conventions
This document uses the following symbols and conventions:
Note: Shares important related information, reminders, recommendations, and suggestions.
Tip: Shares helpful tips or alternative ways to accomplish a goal.
Caution: Means that the action you take could cause harm to your equipment or device, cause
you to lose data, or void your warranty.
Warning: Describes an action that could cause you physical harm. Follow the guidelines in this
document or the device itself when handling electrical equipment.

www.dejero.com
3 | Dejero EnGo 3x User Guide
Contents
Safety Warnings and Hazards 5
Handling and Operating Conditions 7
About the Dejero EnGo 3x 8
What’s included 10
About Dejero Control 11
Powering the EnGo 11
Starting the EnGo 13
Using the EnGo 13
Connecting to the EnGo 14
About the EnGo backpack 17
Inserting the EnGo into the backpack 18
About the Preview screen 23
Changing SIM modules 25
Configuring the EnGo 26
Using GateWay Mode 36
Managing Wi-Fi connections 38
Managing return feeds 39
Managing SIM cards 40
Transmitting live 43
Enabling stream encryption 44
Using the Intercom feature 45
Using Record mode 47
Transferring files 52
About warning and error states 52
Using Control for remote management 53
Setting the display orientation 53
Viewing connection information 54
About stream indicators 55
Using the Wired Remote 56
Troubleshooting 58
Warning and error messages 61
Technical specifications 67

www.dejero.com
4 | Dejero EnGo 3x User Guide
Additional help 71

www.dejero.com
5 | Dejero EnGo 3x User Guide
Warranty and Liability
Reasonable care has been taken in preparing the information in this document. However, this
document may contain omissions, technical inaccuracies, or typographical errors. Dejero Labs
Inc. does not accept responsibility of any losses due to the use of this document. Product
specifications are subject to change without notice.
Due to the nature of wireless communication, transmission and reception of data can never be
guaranteed. While Dejero strives to provide high-quality video transmission without significant
delays, environmental and cellular network conditions beyond Dejero’s control may result in
data delay, corruption, or loss.
Dejero accepts no responsibility for and is not liable for any loss or damage, including, but not
limited to, revenue or personal injury, resulting from delays in, errors in, or failure to transmit or
receive data using the Dejero platform.
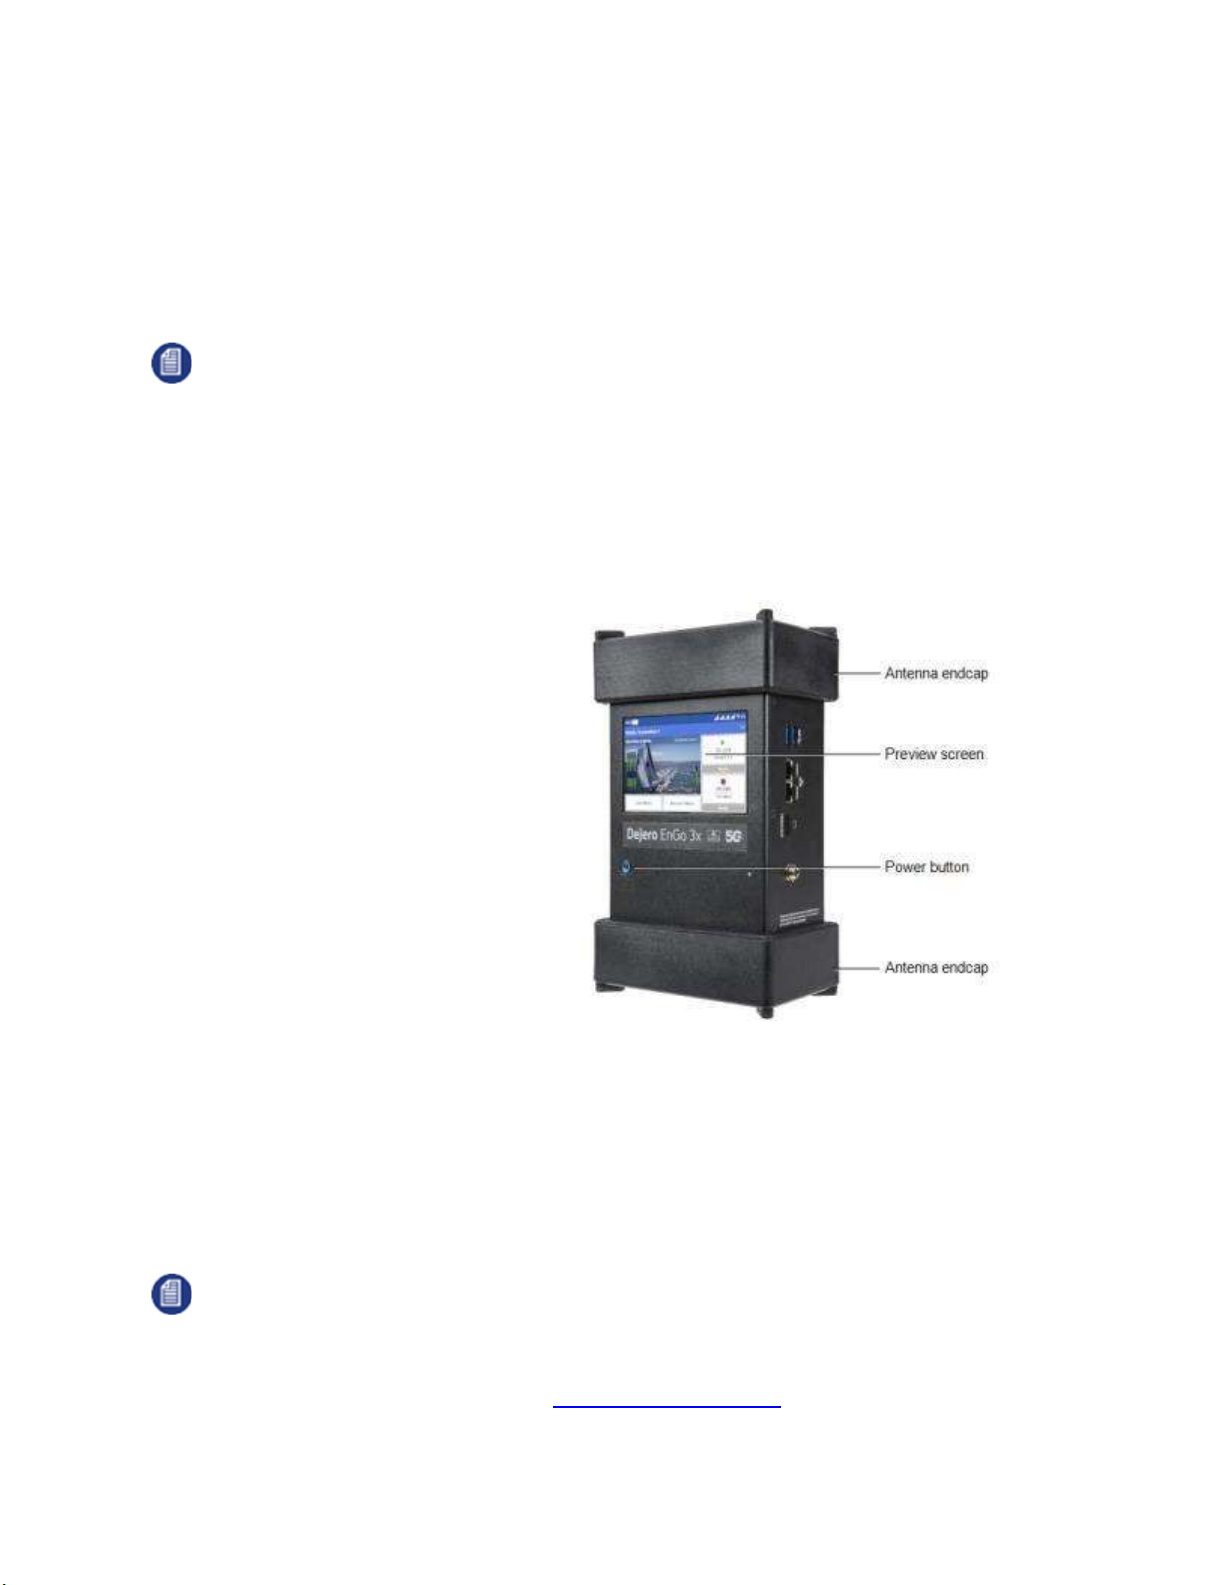
Warranty on the Dejero EnGo 3x is voided if the device is opened or the endcaps are removed.
For details, see Handling and Operating Conditions below.
Safety Warnings and Hazards
Read this section in its entirety before operating the Dejero EnGo 3x.
Federal Communications Commission statement
EnGo complies with Part 15 of the Federal Communications Commission (FCC) rules for a
Class A device. These limits are designed to provide reasonable protection against harmful
interference when the equipment is operated in a commercial environment. This equipment
generates, uses, and can radiate radio frequency energy and, if not installed and used in
accordance with this guide, may cause harmful interference to radio communications. Operation
of this equipment in a residential area is likely to cause harmful interference in which case the
user will be required to correct the interference at their own expense.
Changes or modifications made to the EnGo device not expressly approved by Dejero could
void the user's authority to operate the equipment.
Industry Canada statement
EnGo complies with Industry Canada ICES-003 Class A specifications.
EnGo contains license-exempt transmitters or receivers that comply with Innovation, Science,
and Economic Development Canada's license-exempt RSSs. Operation is subject to the
following two conditions:
1. This device may not cause interference.
2. This device must accept any interference, including interference that may cause undesired
operation of the device.
EnGo operation is restricted to the indoor use for the frequency band 5150 – 5250 MHz.

www.dejero.com
6 | Dejero EnGo 3x User Guide
The PMN is EM12-G.
RF Exposure Notice
THIS DEVICE MEETS THE GOVERNMENT REQUIREMENTS FOR EXPOSURE TO RADIO
WAVES.
EnGo is a radio transmitter and receiver. It is designed and manufactured not to exceed the
emission limits for exposure to radio frequency (RF) energy set by the Federal Communications
Commission of the U.S. Government and Industry Canada.
Explosive Atmosphere
The EnGo should be powered off in an area with a potentially explosive atmosphere such as
fuelling areas, fuel or chemical transfer or storage areas, below deck on boats, or in areas
where the air contains chemicals or particles such as grain, dust or metal powders. It is rare, but
there is potential for PC-like devices, such as the EnGo, to generate sparks, which could trigger
an explosion. Do not store the EnGo in the compartment of a vehicle that contains flammable
gas, liquid, or explosives.
Blasting or Construction Sites
The EnGo should be powered off in areas where blasting is in progress, where explosives may
be present, or near any other equipment that is susceptible to radio interference.
Hospitals
The EnGo should be powered off near medical equipment or life support systems, or near any
other equipment that is susceptible to radio interference. Hospitals or other medical facilities
often ask visitors, patients, and staff to switch off all electronic devices in some areas. Please
make sure that you follow any local rules and regulations.
Aircraft
The EnGo should be powered off and not operated in any aircraft, whether in flight or on the
ground; systems onboard the aircraft could be affected by radio interference.
The EnGo 3x has an internal lithium-ion battery rated less than 100 watt-hours (Wh). The
battery, if left inside the EnGo, is rated by the TSA and FAA as safe for travel on aircraft as
checked luggage or as a carry-on. The internal battery should not be transported on an aircraft if
it is removed from the EnGo.
Driving
The driver or operator of any vehicle should not operate the EnGo while in control of that
vehicle. Doing so will detract from the driver’s or operator’s control and operation of that vehicle.

www.dejero.com
7 | Dejero EnGo 3x User Guide
In-vehicle use
Dejero Labs Inc. (Dejero) is not liable for any liabilities, obligations, loss, damage, personal
injury, special, incidental or consequential damages for personal injury or other damage of any
nature arising, including but not limited to those arising under any contract, warranty, negligence
or in theory of contract or tort law, directly or indirectly as a result of the improper installation or
use of its products in a vehicle or any other application. In order to safely install and use Dejero
products full consideration of vehicle occupants, vehicle systems (i.e., the location of fuel lines,
brakes lines, electrical, drive train or other systems), airbags and other safety equipment is
recommended. Dejero specifically disclaims any responsibility for the improper use or
installation of its products not consistent with the original vehicle manufacturer’s specifications.
Personal Health and Safety
For personal health and safety, the operator must maintain a minimum distance of 10 mm from
the EnGo while it is powered on, except when using the touch screen.
Medical Implant Devices
It is possible that the radio modems in the EnGo may interfere with some types of medical
devices (such as cardiac pacemakers or implant defibrillators), when operated close to the
device. If you have one of these devices, you should seek advice from your doctor before
operating the EnGo. For personal health and safety, persons concerned about exposure should
maintain a minimum distance of 10 mm from the EnGo while it is powered on, except when
using the touch screen.
Hearing Devices
People with hearing aids or cochlear implants may experience interfering noises when using or
when nearby mobile devices. The level of interference depends on the type of aid or implant,
the type of mobile device, and the distance between the two. Increasing the distance between
the EnGo and the hearing device may reduce interference.
Electrical Safety
The socket-outlet shall be installed near the equipment and shall be easily accessible.
Li-ion (rechargeable) battery notice
Warning: The battery installed in this device may present a risk of damage, fire, or chemical burn
if mistreated. Do not attempt to disassemble the device to access or replace the internal battery.
Only authorised Dejero personnel can service the internal battery and the unit.
Handling and Operating Conditions
Read this section in its entirety before operating the EnGo.

www.dejero.com
8 | Dejero EnGo 3x User Guide
Handle Device with Care
While the EnGo is durable, it is possible to damage the device if it is dropped or thrown. Please
handle with care. Damage sustained as the result of mishandling the EnGo renders the
warranty null and void.
Do Not Open the Case
The EnGo case should remain sealed at all times to protect the sensitive electronics inside and
ensure the safety of the operator. Opening the case renders the warranty null and void.
Do Not Disassemble the Product
Only authorized Dejero personnel can open, modify, or repair the EnGo unit. Unless authorized
by Dejero personnel, any attempt by the user to open, disassemble, or repair the device renders
the warranty null and void.
Use Only Approved Power Adapters
Use only the power adapter that is included with the EnGo 3x. You cannot use the power
adapter from an EnGo hardware version 1.3 or earlier to charge the EnGo 3x.
Keep Air Vents Clear
If the air vents are blocked, the EnGo may overheat and shut down. These vents are located on
the top and bottom of the device in the black plastic antenna endcaps. Please keep these areas
clear and unobstructed to ensure adequate airflow.
Keep Device as Cool as Possible
For optimal performance, keep the EnGo in well-ventilated areas, away from heat sources and
direct exposure to sunlight. Avoid operating the EnGo in temperatures outside of the ambient
range (0°C to +45°C / 32°F to 113°F).
Keep Device Dry
Keep the EnGo dry. Keep it covered during inclement conditions, while still ensuring adequate
air flow to keep the EnGo cool. Do not expose it to liquid, moisture, or excessive humidity. The
EnGo backpack is designed to be weather-resistant, but not weatherproof. Using the EnGo with
backpacks other than those supplied by Dejero is not recommended and will void the warranty.
About the Dejero EnGo 3x
The Dejero EnGo 3x is reliable, simple to use, and built tough for field use. It is designed for
mobile video professionals who demand high performance.

www.dejero.com
9 | Dejero EnGo 3x User Guide
EnGo 3x efficiently encodes and securely transmits high-quality live video from the field while
also empowering mobile teams to work more efficiently with resilient, high-bandwidth, wireless
internet access.
Featuring Dejero's renowned Smart Blending Technology, the dependable EnGo 3x reliably
performs in the most challenging network conditions.
Worn in a backpack or mounted in a vehicle for use with roof-top antennas, EnGo 3x is ideal for
newsgathering, sports coverage, live event production, and transmitting real-time video from
drones.
Unmatched reliability
World-class RF and antenna design, combined with unique Smart Blending Technology,
enables ultra-reliable transmission in the most challenging environments.
Low latency over bonded cellular
True glass-to-glass latency as low as 0.5 seconds over bonded cellular networks. Optimized
encoding and transmission techniques makes this possible.
Built tough for field use
Vibration-, shock-, and crash-tested, the rugged design features aircraft-grade aluminum
construction and polycarbonate ABS bumpers.
Enhanced security
A Trusted Platform Module that authenticates your device, combined with AES256 encryption
and a security-hardened Linux OS, ensures that your content is transmitted securely.
Additional features
● Smart Blending Technology: Aggregate 3G/4G/LTE-A, external 5G, Wi-Fi®, Ethernet, and
portable satellite connections.
● Hybrid encoding technology: Hardware/software encoding dynamically adapts in real-time
based on the complexity of the video scene being captured and the network throughput.
● Resilient wireless technology: Advanced RF and antenna design for ultra-reliable
transmission and reception.
● Easy to use: 5" capacitive touch screen provides confidence monitoring, status information,
and in-field control.
● Ergonomic backpack: Includes shoulder-mounted wired remote, sun shade, simplified cable
management, and space for optional external battery.
● Vehicle Antenna Dock: Mount inside a vehicle and connect to external antennas with
optional dock.
● Internal and external battery options: Over three hours of battery life from rechargeable
internal battery, plus optional use of external ENG camera batteries for extended runtime.

www.dejero.com
10 | Dejero EnGo 3x User Guide
● IFB and Intercom: One-way IFB and two-way, full-duplex Intercom voice communication.
● Return video: Connect an external display to the HDMI output to view a low-latency feed
from the studio.
● UAS interoperability: Works seamlessly with unmanned aerial systems to capture real-time
video from unique vantage points.
Note: EnGo 3x can transmit and receive encrypted live transmissions (including IFB).
What’s included
The EnGo includes the following items:
●
EnGo mobile transmitter
●
Power adapter with country-specific
cord
●
EnGo backpack, which includes:
● A power cable that connects
directly to a D-Tap port on a
battery or the included V-Mount or
Gold Mount battery plates
● A backpack cover for weather
protection
● An SDI cable
● An HDMI cable
● Audio extension cables (3.5 mm
and XLR) for IFB
● Audio extension cable (3.5 mm) for
Intercom
● A Wired Remote
Note: The touch screen on the EnGo is a capacitive screen. If you are wearing gloves, you must
remove them before using the screen.
For important quick start information, visit dejero.com/engo3x-tips. You can also access this
information by scanning the following QR code:

www.dejero.com
11 | Dejero EnGo 3x User Guide
About Dejero Control
When you manage the EnGo with Dejero Control, you can:
● Assign live and recorded video, as well as file transfers, from the EnGo to a Dejero receiver.
● Geolocate the EnGo mobile transmitter.
● Preview and route feeds from the EnGo.
● Remotely control and configure the EnGo.
● Review analytics about the performance of the EnGo.
● Add metadata that is associated with uploaded clips.
Powering the EnGo
When the EnGo is on, it runs on its internal battery. The EnGo does not supply power to the
camera.
The following icons appear on the Preview screen to indicate the battery’s status. The percent
that appears with each battery icon indicates the remaining charge.
Running on auxiliary power (either a power source or an auxiliary
battery). If the internal battery needs charging, the battery icon indicates
that the battery is charging.
Running on internal battery.
Running on internal battery, but the remaining charge is 20% or less.
Running on internal battery, but the remaining charge is 5% or less.
If the power level falls below 2%, the EnGo turns off automatically.

www.dejero.com
12 | Dejero EnGo 3x User Guide
Battery error, but the EnGo is running on auxiliary power. For more
information, select > Warning.
Battery error. For more information, select > Warning.
Charge the EnGo
When the battery is low, you must charge the EnGo. Charge the battery in EnGo fully prior to
using it for the first time.
Note: The battery might not charge if the temperature is below 10° C / 50° F or above +45° C /
113° F, or if it has encountered a problem that caused the battery to fail.
Charge the EnGo using a power outlet
Note: Use only the power adapter that is included with the EnGo 3x. You cannot use the power
adapter from an EnGo hardware version 1.3 or earlier to charge the EnGo 3x.
1. Connect the one end of the power cord to its power adapter.
2. Connect the power cord that is connected to the power adapter to the DC IN port on the side
of the EnGo.
3. Plug the other end of the power cord into a power outlet.
About the Power button settings
The Power button on the EnGo provides information about the charging or battery status of the
EnGo.
Light setting Description
No light The EnGo is off. If it is connected to an external power source, the
internal battery is fully charged.
Solid blue light The EnGo is on and the battery is charged to greater than 20%.
A solid blue light also appears if the EnGo is on and connected to an
external power source. If the EnGo is off, the external power source is
still charging the battery.

www.dejero.com
13 | Dejero EnGo 3x User Guide
Blue light flashing
once every 2
seconds for
approximately 30
seconds
The EnGo is off and connected to an external power source but the
battery is fully charged. After approximately 30 seconds, the blue light
stops flashing.
Blue light flashing
approximately
twice a second
The EnGo is on and the internal battery is below 20%. The EnGo is not
connected to an external power source so the battery is not charging.
Charge the EnGo using an auxiliary battery
Use the included power cord to connect to a D-Tap port on an auxiliary battery or the V-Mount
or Gold Mount battery plates to charge the EnGo.
1. Connect the power cord to the DC IN port on the side of the EnGo.
2. Perform one of the following actions:
● Connect the power cord directly to an auxiliary battery.
● Connect the power cord to the battery plate. Slide an auxiliary battery onto the battery
plate.
Note: When you connect an auxiliary battery to the EnGo, the battery both powers and charges
the EnGo (if the internal battery needs charging). Because it performs both functions, the battery
level in the auxiliary battery drains faster.
Starting the EnGo
1. On the front of the EnGo, press and hold for approximately one second.
While the transmitter turns on and establishes a network connection, start-up messages appear
on the Preview screen.
Using the EnGo
You can use the EnGo in one of the following operation modes:
● Live: Transmit live video over network blending of cellular, Wi-Fi, Ethernet, or satellite
connections to the Dejero receivers.
● Recording: Record video for later transmission. Use this mode when a live feed is not
required, or when bandwidth is limited or not available.

www.dejero.com
14 | Dejero EnGo 3x User Guide
● Live and Recording: Transmit live while also recording high-quality video to use later. Use
this mode when network bandwidth is limited but you still need to broadcast live.
● Clip or File Transfer: Quickly transfer photos, scripts, graphics, or edited video packages to
the Dejero receivers using the blended network connectivity.
● Record and Auto Transfer: Record a clip and transfer it to the receiver simultaneously. Use
this mode when you need to have the clip available on the receiver quickly.
● Wi-Fi Hotspot: Access the internet over a single network connection, preserving the
remaining connections for video.
● GateWay Mode: Use all available connections for internet access or to provide increased
capacity for data-intensive applications.
Note: Audio and video data transmitted by the EnGo 3x can be encrypted using AES 256
encryption. For more information, see "Enabling stream encryption" on page .
Connecting to the EnGo
You can use the connection ports on either side of the EnGo to connect video and audio,
Ethernet, IFB, or Intercom. You can also use the USB ports on the EnGo.
Note: By default, Ethernet port 1 on the EnGo 3x is configured as a WAN port and Ethernet port 2
is configured as a LAN port. To configure both Ethernet ports as WAN ports, contact Dejero
Support.

www.dejero.com
15 | Dejero EnGo 3x User Guide
Connect video and audio
The EnGo supports SDI video input with embedded audio.
1. Plug the included SDI cable into the video camera’s output port.
2. Plug the SDI cable into the video input port on the EnGo.
3. Make sure that all cables are firmly connected.
The EnGo selects the correct video input automatically. If you do not see video on the screen,
make sure that the cables are connected properly and that you are using a supported video
format.
If the video format is not detected automatically, you may need to configure the video settings.
For more information, see "Configuring the EnGo" on page .
Note: You can use the HDMI output on the EnGo to connect directly to an external display.
Connect Ethernet
Using an optional Ethernet connection, you can choose to transmit using Ethernet only or
broadcast over Ethernet and cellular networks simultaneously.
If multiple networks are available, you can plug in a second Ethernet cable for additional
throughput.
Note:By default, Ethernet port 1 on the EnGo 3x is configured as a WAN port and Ethernet port 2
is configured as a LAN port. To configure both Ethernet ports as WAN ports, contact Dejero
Support.
1. On the side of the EnGo, plug an Ethernet cable into one of the ports.
2. Verify that UDP port 6001 is open on the network for inbound and outbound traffic. (In most
cases, the network rules do not require any changes.)
The Ethernet adapter is configured to obtain IP address details automatically using DHCP. For
more information, see "Configuring the EnGo" on page .
Connect IFB
IFB acts as a one-way audio communication tool from Dejero receivers to the EnGo. It enables
communication and cueing from the studio crew to the reporter in the field. The station sends a
program feed to the reporter’s earpiece, which is connected to the EnGo.
Note: Connecting IFB is optional.

www.dejero.com
16 | Dejero EnGo 3x User Guide
You can use IFB at any time – regardless of whether the EnGo is transmitting a live stream. To
use IFB when the EnGo is not live, both the EnGo and the receiver that you are using must be
using software version 5.3 or later.
For more information on Dejero receivers, visit support.dejero.com to read the receiver user
guides.
IFB audio output can be balanced or unbalanced. For more information on switching between
them, see "Switch between balanced and unbalanced IFB audio output" on page .
1. Connect your audio device (such as an earpiece, headset, or IFB amplifier input) to one of
the provided audio extension cables (either 3.5 mm or XLR).
2. Plug the adapter into the 3.5 mm connector on the side of the EnGo.
As soon as an audio source is connected to the receiver, an IFB indicator appears on the right
side of the screen. It shows the following information:
● I = Idle
● R = Receiving
● .1-.9 = IFB is active and the delay is less than 1 second
● 1-9 = IFB is active and delay is less than 10 seconds
● X = IFB is active and the delay is 10 seconds or more
The indicator starts at I and, when IFB is active, it shows the volume and the delay interval.
As the EnGo receives voice packets from the receiver, the sound level varies.
Use the USB ports
The EnGo has two USB 3.0 ports. You can use these ports for connecting USB memory sticks
(for file transfers) or for connecting support peripherals (such as a keyboard or mouse).
Note: Use low-power USB devices with the EnGo, such as memory sticks or supporting
peripherals. To reduce power consumption and the potential for overheating, do not connect
devices that require a lot of power.
Set up Intercom
You can use the Intercom feature to enable real-time two-way audio communication between
the EnGo in the field and a supported Dejero WayPoint receiver at the studio.
In the studio, an external audio interface connects to the WayPoint receiver over USB. This
device receives audio inputs from an external source that are mapped to the WayPoint outputs.
In the field, you can connect a headset with a 3.5 mm connection to the EnGo 3x to receive and
send Intercom audio communication.

www.dejero.com
17 | Dejero EnGo 3x User Guide
If you are using a WayPoint 104 receiver, you can also use the MOTU-4PRE, the Behringer
UMC404HD, or the Dante Virtual audio card.
Note: IFB works independently of the Intercom feature.
1. Ensure that the WayPoint receiver and the audio interface device are configured properly.
For more information, visit support.dejero.com to read the appropriate Dejero WayPoint User
Guide and the Dejero Intercom Reference Guide.
2. Connect a headset with a 3.5 mm connection to the EnGo.
3. Use Control to assign the EnGo to an output on the WayPoint receiver.
4. Ensure that Intercom is enabled on the EnGo. For more information, see "Enable Intercom"
on page .
About the EnGo backpack
The EnGo backpack provides easy access to the EnGo.

www.dejero.com
18 | Dejero EnGo 3x User Guide
Inserting the EnGo into the backpack
When the EnGo is inside the backpack, ensure that the cables are not bent and the connections
are not under stress.
1. Use the four zippers at the top of the backpack to open the top compartment fully.
2. Connect the SDI cable to the correct input port on the side of the EnGo. For more
information on using an HDMI cable with the EnGo instead, see "Insert an HDMI cable into
the EnGo backpack" on page .
3. If necessary, use either the 3.5 mm or XLR audio extension cable to connect the IFB audio
cable to the IFB output port.
4. If necessary, connect the 3.5 mm extension cable that is labeled "Intercom" to the Intercom
headset port on the EnGo.
5. Set the EnGo inside the top compartment of the backpack with the screen facing out and the
video and IFB ports facing down. Ensure that the EnGo sits down fully on the foam base with
the cables inside the channel.
6. To secure the EnGo, wrap the zip cords around the antenna endcaps at either end of the
EnGo, ensuring that the foam spacer is in between.
7. Route the Wired Remote USB cable from the shoulder strap of the backpack into the slot at
the top of the backpack.
8. Connect the Wired Remote cable to a USB port on the top side of the EnGo.
9. If you want to power the EnGo using an auxiliary battery, perform the following actions:
a. In the battery compartment, ensure that the D-Tap connector is connected to the battery
plate.
b. Ensure that the battery plate is held in place with the hook-and-loop fasteners.
c. Slide the auxiliary battery onto the battery plate.

www.dejero.com
19 | Dejero EnGo 3x User Guide
d. Connect the power cable to the DC IN port on the EnGo.
10. Close the top of the backpack. As you close the top, ensure that the Wired Remote and
power cables lay inside the foam channels at the top of the backpack. The foam should rest
on the EnGo 3x, not the cables.
Note: You must secure the EnGo in the backpack with the zip cords. If you do not, the EnGo can
move around or fall out.
Use the EnGo inside the backpack
When the EnGo is inside the backpack, you do not need to remove it to view the screen or
interact with it.
Tip: When using the EnGo outdoors, you can use the sun shade to make viewing the screen
easier.
1. Open the cable storage compartment.
2. Remove the ends of the IFB and SDI cables from the compartment.
3. Connect these cables to the external cables that you use to connect to your external camera
or IFB system feeds. The external camera and IFB cables are not provided with the
backpack.
4. Ensure that the IFB and SDI connections lay inside the cable storage compartment and then
close the compartment.

www.dejero.com
20 | Dejero EnGo 3x User Guide
5. Close the top of the backpack.
6. To view the EnGo with the sun shade, perform the following actions:
a. Lift the front access panel from the bottom.
b. Unfold the triangle flaps from behind the panel.
c. Press the edges of the triangle flaps down on to the hook-and-loop fasteners on the sides
of the front access panel.
7. To view the EnGo screen without the sun shade, perform the following actions:
a. Lift the front access panel from the bottom.
b. Open the triangle flaps from the inside of the sun shade to the outside and press them
flat.
c. Roll the sun shade up toward the cable storage compartment.
Table of contents
Other Dejero Transmitter manuals