Appion TEZ 8 User manual

OPERATING MANUAL
COPYRIGHT 2010 - APPION INC - ALL RIGHTS RESERVED
APPIONTM, TEZTM, TEZOMTM AND MEGASEALTM ARE TRADEMARKS OF APPION INC.
TM

2
Table of Contents
Warnings and Safety Information 3
Machine Usage 3
Standard Setup 3
Shut Down Procedure 4
Hose Attachment 4
Remote Exhaust Vent Connection 4
Debris Monitor/Catch Tube 4
Positive Pressure Relief 5
Changing the Oil 5
How Often Should You Change the Oil? 6
Helpful Hints 7
Why Should You Use a High Vacuum Pump? 7
Vacuum Gauge Placement 7
The Greater the Flow the Faster You Go 8
Excessive or Trapped Moisture in a System 8
Extension Cords and Low Voltage 9
Care and Maintenance 9
Cleaning the Input Debris Screen 9
Troubleshooting Guide 10
Electrical Diagram 10
Parts Diagram 11
Manufacturers Limited Warranty 12

3
Warnings and Safety Information
This machine is for use by trained and certied professionals only.
Always wear gloves and eye protection when using this machine or handling refrigerants.
Read all Material Safety Data Sheets (MSDS) for any compounds that you are likely to encounter.
Failure to do so could lead to injury or death. This equipment is not to be used with any combustible
or ammable materials, doing so could lead to injury or death.
To reduce the risk of re, extension cords must be at least 12AWG and not longer than 15 ft. This
equipment should be used in areas with mechanical ventilation providing at least four air changes
per hour, or be located at least 18” above the oor. Do not use this equipment near any spilled
or open containers of gasoline or other ammable liquid.
Remove all refrigerant from the system before connecting the vacuum pump. Attempting to
evacuate the system while it is under high pressure may cause damage to the vacuum pump.
To reduce the risk of equipment damage or re, do not leave the TEZ8 running while unattended.
Disconnect the TEZ8 from the power supply before any maintenance or service of the TEZ8 to
reduce the risk of electrical shock or injury.
Keep out of reach of children at all times.
Machine Usage
Caution: Always use a grounded 3-prong outlet.
Caution: Always remove all refrigerant from the system before connecting the vacuum pump.
We recommend using the Appion G5Twin for this purpose. Equipment damage may
occur if the evacuation is started while the AC/R system is under high pressure.
Note: For the deepest nal vacuum, ensure that all ttings and hose connections are properly
and tightly secured before beginning the evacuation process.
Note: Before beginning the evacuation process, verify that the Debris Monitor/Catch tube (located
in the right-front corner of the TEZ8) is free and clear of any debris or oil.
Standard Setup
1.
2.
3.
Install a fresh TEZOM oil cartridge into the front of the Appion TEZ8 Vacuum Pump before
using (See Page 5: Changing the Oil for further details).
Connect the pump to the system according to the AC/R manufacturer’s guidelines.
A. Install a vacuum-rated ball valve or manifold between the system and the TEZ8 to
allow for isolation of the system at the end of the evacuation process.
If you are using a vacuum gauge, attach it to the access port on the system that is farthest
from the TEZ8.

4
Shut Down Procedure
1.
2.
3.
4.
Close the manifold valve between the pump and the system.
Slowly remove the hose from the pump inlet to remove any residual oil from the pump.
Turn the power switch OFF.
Keep inlet ports capped when not in use to prevent moisture accumulation inside the pump.
Standard Setup Continued
Turn the power switch ON.
Note: The TEZ8 is designed with a soft start to prevent unnecessary stress and wear on
the pump. Open the cap on the 1/4” inlet port when starting the vacuum pump to allow it to
start easier. Close the 1/4” port cap tightly once the TEZ8 is running at full speed.
Evacuate the system, following standard servicing procedures.
4.
5.
Hose Attachment
The input assembly can be swiveled to allow easy
access to the desired ports, depending on hose and
system port availablity.
To change the orientation, loosen the screw collar
under the ports by turning it counterclockwise. You
can then swivel the input ttings to face the desired
direction. Once you have oriented the ttings, tighten
the screw collar by turning it clockwise.
Tighten Loosen
The TEZ8 is equipped with four input ttings of different sizes. These ttings should be kept
sealed with the included Appion MegaSealTM caps when the pump is not being used to prevent
moisture from accumulating inside the pump. For increased ow and shorter evacuation times,
multiple inputs may be used at once.
Debris Monitor/Catch Tube
The TEZ8 is equipped with a clear Debris Monitor/Catch Tube located in the right-front corner of
the machine which allows you to observe the incoming airow for debris, oil or any other material
which could damage the pump. Be sure to empty and clean this tube after every job.
Note: Monitor this tube regularly during operation, as liquids present in the tube may raise the
vapor pressure at the pump and drastically increase evacuation times.
Remote Exhaust Vent Connection
A Remote Exhaust Vent Connection is located on top of the front face of the TEZ8. It is threaded
for connection to a standard garden hose, which can be used to vent exhaust to another location.
To minimize any back pressure on the pump, be sure the hose is free of any obstructions and is
the shortest length needed to reach the desired exhaust location.

5
1.
2.
3.
4.
5.
6.
Turn ON the Appion TEZ8 momentarily with one of the inlet
ports open to remove any residual oil from the pump. Then
turn the machine OFF and unplug from power source.
Open the large door on the left side of the machine to gain
access to the TEZOM oil cartridge.
While holding the lower part of the TEZOM, pull the
cartridge out of the side of the vacuum pump. (Fig. 1)
Locate and remove the cap and protective seal from the
top of a new TEZOM. The cap can be used to seal the old
TEZOM for easy disposal. (Fig. 2)
Note: Dispose of the waste oil in accordance with your
local regulations.
Locate the at side of the new TEZOM and hold the
cartridge so that this is facing toward the machine.
Place the oil suction tube into the new TEZOM and insert
the top of the TEZOM rst to make sure the oil suction tube
remains inside the cartridge. (Fig. 3)
Fig. 2
Changing the Oil
It is a good idea to always use clean fresh oil in your Appion TEZ8 vacuum pump. This not only
prolongs the life of the pump, but also helps you to achieve a rapid and deep ultimate vacuum.
Changing the oil in the Appion TEZ8 is as easy as installing a new TEZOM oil cartridge following
the procedure below. Replacement TEZOM Oil Cartridges can be purchased from your local
wholesaler.
Note: Be sure to only use genuine Appion TEZOM Oil Cartridges in your TEZ8 vacuum pump to
ensure optimal performance. The use of other vacuum oil may inhibit the ultimate vacuum depth
Fig. 3
Fig. 1
Positive Pressure Relief
If there is residual pressure in the system when the pump is attached to the system, the Debris
Monitor/Catch Tube will automatically disengage to relieve any positive pressure, preventing
damage to the TEZ8.
Once the pressure has been relieved, restart the TEZ8 and the suction will draw the tube back into
position, reseating itself on the double o-ring seal. If the catch tube does not reseat completely,
simply open the protective door and press the tube upwards into position.
that can be achieved.
Note: The re-use or relling of an Appion TEZOM Oil Cartridge
may introduce contaminants and debris into the pump, resulting
in lost performance or damage to the TEZ8.

6
7.
8.
Gently push the bottom of the cartridge forward until the
TEZOM is secured in place. (Fig. 4)
Close the protective door until the latch engages, and
continue with the evacuation process.
Fig. 4
Changing the Oil Continued
How Often Should You Change the Oil?
A vacuum pump can only pull a vacuum as deep as the vapor pressure of the sealing oil. When
oil becomes saturated or contaminated, the vapor pressure rises and the evacuation process
can slow to a halt.
It is recommended that the oil in your TEZ8 be changed and a fresh TEZOM installed at the
beginning of every new job. Doing this will ensure that your TEZ8 is supplied with clean, dry oil
with ultra-low vapor pressure maximizing the performance of your TEZ8.
With the clearly visible oil cartridge located on the front of the TEZ8, you can easily monitor and
identify wet or dirty oil. As the oil becomes more opaque, this indicates an increased level of
contamination. For example, as moisture is drawn into the TEZOM Cartridge, the oil will take
on a white, milk-like appearance. Similarly, other contaminants from the system will turn the oil
dark and sludge may accumulate in the cartridge.
Imagine that your TEZOM oil cartridge is like a paper towel that the TEZ8 is using to dry the
system. If the system has a signicant amount of moisture in it, your paper towel gets saturated
quickly and stops absorbing the moisture as it should. At this point you have to decide wether or
not you can wait for the paper towel to dry and continue to use the same one or discard it and
get a fresh paper towel to dry more, faster.
The moisture absorbed in TEZOM oil may eventually evaporate but it takes time. Just like
changing to a fresh paper towel, replacing the TEZOM cartridge speeds the evacuation process
up by keeping the oil clean and dry.
Large tonnage systems or systems that have been exposed to excessive moisture may require
more than one oil change to quickly complete the evacuation process. While this would be very
difcult with another vacuum pump, the TEZ8 has been designed so that you may remove and
replace the TEZOM cartridge while the pump is running without breaking the vacuum.
Changing the oil in the Appion TEZ8, while it is running, is as easy as installing a new TEZOM
oil cartridge following the above procedure steps 2 through 8.
Note: When you change the TEZOM cartridge while the pump is running, some oil from the oil
return will drip out after the old TEZOM cartridge has been removed and before the new one is
in place. This is normal and should be cleaned up as soon as the new cartridge is in place.

7
Helpful Hints
Why Should You Use a High Vacuum Pump?
Air Conditioning and Refrigeration systems are designed and tested to operate at their most efcient only
when they are completely evacuated and charged with virgin refrigerant. Any moisture left in a system
before it is charged will decrease the system’s efciency and can lead to system damage and potentially
system failure.
Damage caused by moisture is one of the leading causes of failures in AC/R systems. Moisture
combines with refrigerants to create acids that corrode copper plating inside the system. Refrigeration
oil readily absorbs water and can turn into a sludge, losing its lubricating ability. The only way to remove
moisture from a system is to completely evacuate the system and pull a deep vacuum throughout the
entire system.
As the pressure in a system decreases, the boiling point of water also decreases. The following chart
shows that you can get water to boil at 72° F by creating a vacuum of 29.12 Inches Hg (just over 20,000
microns) in a system.
Temperature in °F Inches of Mercury Microns* Pounds/Sq. In. (Pressure)
212° 0.00 759,968 14.696
205° 4.95 535,000 12.279
194° 9.23 525,526 10.162
176° 15.94 355,092 6.866
158° 20.72 233,680 4.519
140° 24.04 149,352 2.888
122° 26.28 92,456 1.788
104° 27.75 55,118 1.066
86° 28.67 31,750 .614
80° 28.92 25,400 .491
76° 29.02 22,860 .442
72° 29.12 20,320 .393
69° 29.22 17,780 .344
64° 29.32 15,240 .295
59° 29.42 12,700 .246
53° 29.52 10,160 .196
45° 29.62 7,620 .147
32° 29.74 4,572 .088
21° 29.82 2,540 .049
6° 29.87 1,270 .0245
-24° 29.91 254 .0049
-35° 29.915 127 .00245
-60° 29.919 25.4 .00049
-70° 29.9195 12.7 .00024
-90° 29.9199 2.54 .000049
Vacuum Gauge Placement
For a system to be adequately dehydrated, a deep vacuum must be achieved throughout the entire system,
not just the point where the vacuum pump is connected. For the most accurate reading of vacuum depth
throughout the system, it is recommended that you attach a vacuum gauge at an access port on the system
that is farthest from the TEZ8.
*Remaining pressure in system in microns.

is dramatically affected by the diameter and length of the hoses being used to evacuate. Using a 3/8”
hose will allow FOUR times more throughput than a 1/4” hose. A 1/2” hose will allow 16 TIMES more
throughput than a 1/4”hose.
Even if you have to connect to a 1/4” access port, due the principals of ow in a vacuum as they relate to
pumping speeds, the use of a larger diameter hose will dramatically decrease your evacuation time.
Imagine that you are driving and encounter an accident on a busy highway. Trafc slows down while
everyone gathers into one lane in order to pass the accident. An entire highway full of cars being forced
into one lane for an entire trip is similar to how using small diameter hoses restricts throughput during
an evacuation.
Now, imagine that instead of being forced into one line for the entire trip, the accident is quickly passed
and the cars spread out into all of the lanes, returning trafc to full speed. This is how the principals of
ow in a vacuum operate: the greater the ow, the faster you go.
It is best if a system has multiple access ports at different points along the system. By attaching to as many
access ports as possible and evacuating from them simultaneously into the TEZ8, a technician can reach
the deepest vacuum throughout the entire system, in the least amount of time.
8
The Greater the Flow the Faster You Go
The rate of ow during the evacuation of a system is referred to as “throughput.” The throughput depends
on the resistance to ow and the pressure drop between the entrance and exit of a hose or channel.
Large
Helpful Hints Continued
diameter hoses and clear evacuation paths will ensure
the most throughput and shortest evacuation times
.
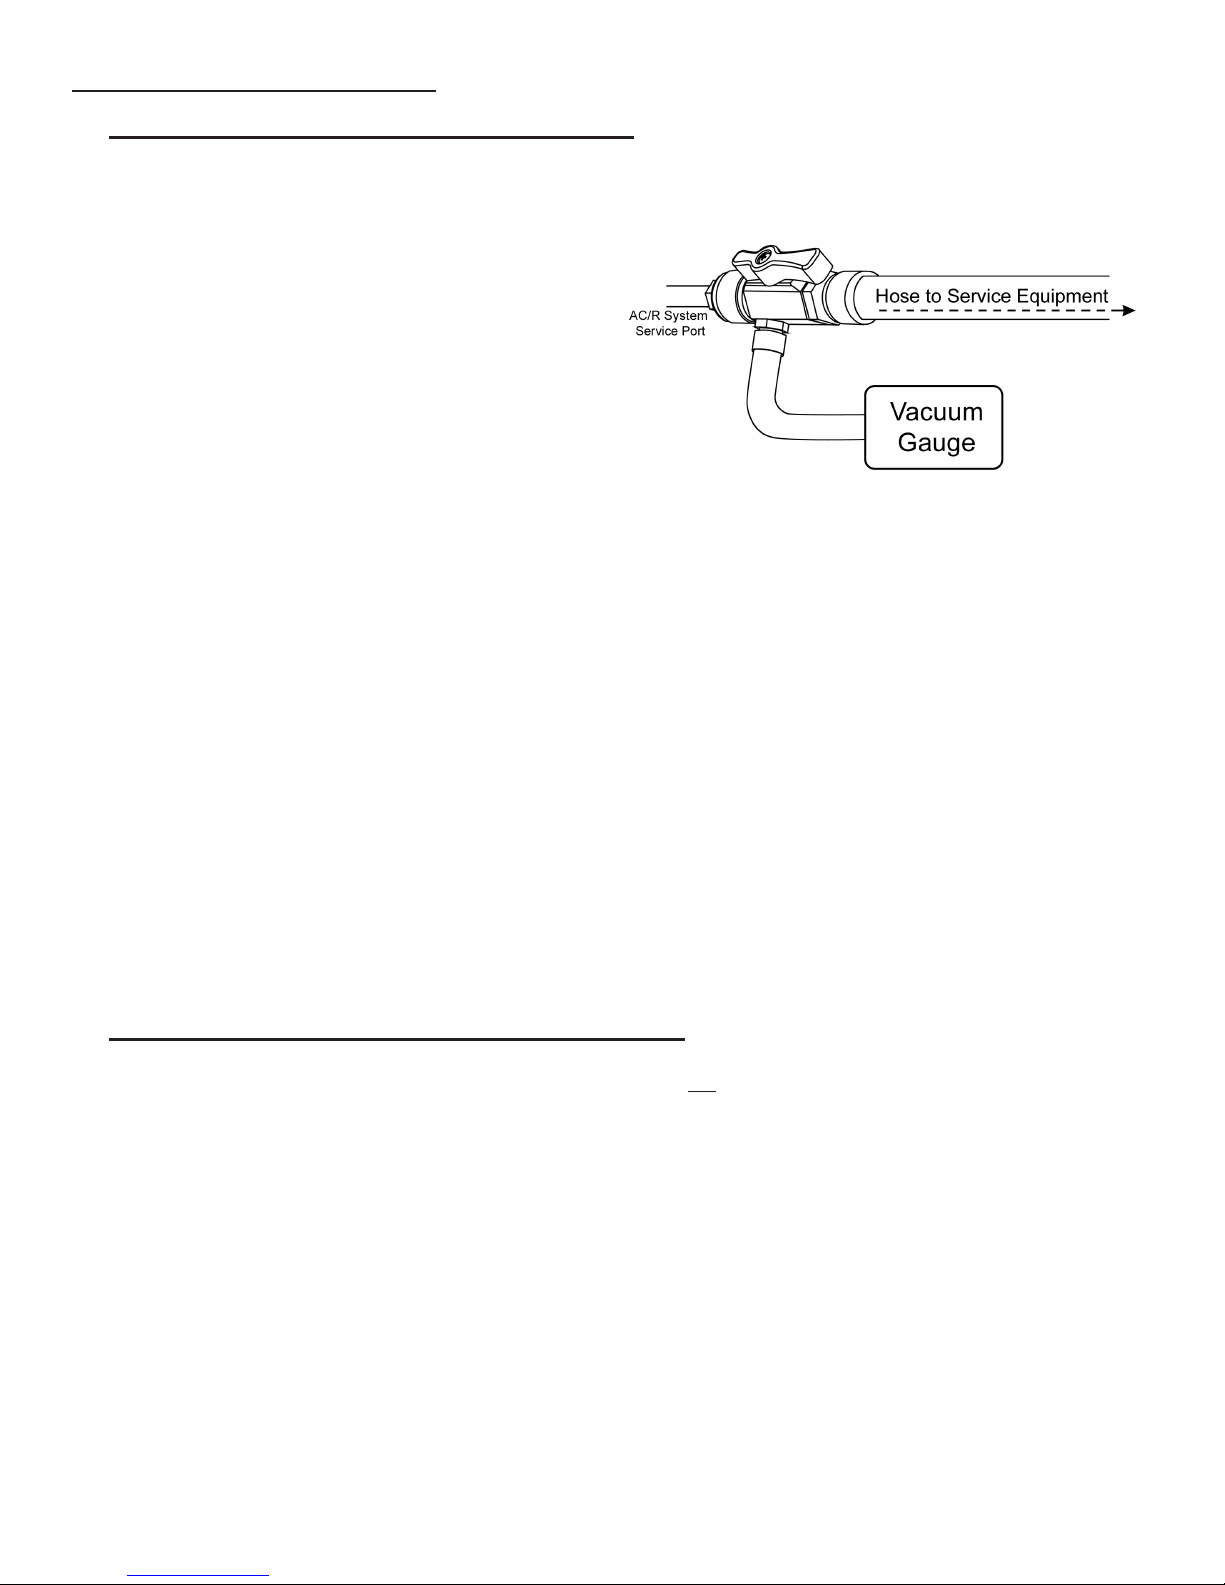
Remove restrictions such as core depressors in
hoses or Schaeder-type valve cores to ensure
maximum ow. It is recommended to use an Appion
Vacuum-Rated Valve Core Removal Tool (see right)
in order to properly remove the access valve cores
and maintain a good seal for a deep vacuum.
When a system is in a vacuum the pumping speed
Excessive or Trapped Moisture in a System
It may be more difcult to pull a deep vacuum if the system oil has had signicant exposure to atmospheric
air/moisture. Frequent oil changes due to contaminated TEZOM oil can be an indication that there is
excessive moisture in a system.
Systems that use POE oil (approximately 100 TIMES more hydroscopic than mineral oil) can absorb a
considerable amount of moisture when opened to atmosphere. Purging the system with dry nitrogen prior to
evacuation can help clear the system of POE oil and moisture to reduce evacuation time considerably.
During the process of pulling a vacuum it is also possible that water or liquid may get trapped within the
system. This is not uncommon and usually happens where the system has low points or “traps” that can
catch moisture. While you are evacuating the system, look over the system for places on the outside of
the piping where condensation or frost are forming. At any locations where you nd condensation or frost
on the outside of the piping you can be fairly certain that moisture is collecting inside.
Two possible methods for combating trapped liquid are applying heat to the outside of the piping with a
heat gun or by blowing nitrogen through the affected part of the system.
Example Valve Core Removal Tool Setup

Helpful Hints Continued
Extension Cords and Low Voltage
Vacuum pumps will work best when the voltage at the machine (while it is running) is between
115 and 122 volts.
Check that the voltage coming from the source outlet is adequate. Please note that the circuit
could have many other items on it e.g. light xtures, appliances, or other motors. All of these extra
loads on the circuit will cause a lower voltage and reduced performance.
Likewise, long and thin extension cords also starve the motor of necessary voltage and can cause
very dangerous overheating of the motor and extension cord. Extension cords should be at least
12AWG and not longer than 15 ft.
9
Care and Maintenance
Cleaning the Input Debris Screen
The TEZ8 is equipped with a clear monitor tube located in the right-front corner of the machine
which allows you to observe the incoming airow for debris, oil, or any other material which could
damage the pump.
A small lter screen is located in the tting at the top of this monitor tube to prevent large debris
from entering the pump and causing damage. For best results, this screen should be cleaned
regularly.
Open the door located on the right side of the ma-
chine to access the clear monitor tube.
Grab the monitor tube and pull it straight down to
release it from the input tting, then remove it from
the machine. (Fig. 1)
Remove the screen from the input tting, clean it
thoroughly and place it back into the tting. If the
screen is damaged, it should be replaced. (Fig.
2)
Connect the monitor tube back up to the pump with
the tube opening facing towards the top. Make sure
that the spring is pushing against the bottom of the
1.
2.
3.
4.
Fig. 1
Fig. 2

Symptom Cause Solution
Pump will not start. Power cord not plugged in or
plugged into a bad outlet.
Motor in thermal overload.
Check power cord, try a
different outlet.
Allow motor to cool down.
Open case and check wire
connections.
Open 1/4” inlet cap and start
pump. Close cap tightly for
evacuation.
Poor vacuum.
Oil murky or dark in color.
Loose hose connection.
Oil contaminated.
Low oil level.
Miscalibrated gauge
Oil contaminated.
Check all hose connections and
are caps for any leaks.
Replace with new oil.
Recalibrate gauge, or try a
different gauge.
Replace with new oil.
Loose wire in machine.
Electrical Diagram
Troubleshooting Guide
Appion TEZ8 Wiring
10
Pump is designed to “soft start”

11
Parts Diagram
Left Side Panel
Exhaust Chamber
Exhaust Port Cover
Input Assembly
Handle
Power Switch
1.
2.
3.
4.
5.
6.
Back Panel
Power Cord
Right Side Panel
Motor Bracket
Fan Blade
Motor
7.
8.
9.
10.
11.
12.
Pump Assembly
Debris Screen
Oil Port Cover
Front Panel
Debris Tube Spring
Debris Tube
13.
14.
15.
16.
17.
18.
Debris Tube Door
TEZOM Door
TEZOM Support
Front Panel Insert
19.
20.
21.
22.
Appion reserves the right to make changes to product and specications without notice.

Manufacturers Limited Warranty
Manufacturer warrants that the equipment will, under normal
and anticipated use, be free from defects in refriger-ant
related parts for a period of one (1) year from and
after the date of shipment, and be free from defects in
electrical related parts for a period of ninety (90) days from
and after the date of shipment, but in all cases excluding
consumables and other matters as hereinafter provided.
Labor is NOT covered and shall be the sole cost and
responsibility of the Purchaser. The obligation of Manufac-
turer under this limited warranty is limited to the supplying
of parts (excluding consumables and all plastic parts) as
hereinabove specically provided. Parts shall be new or
nearly new. Manufacturer assumes no liability for failure in
performing its obligations therunder if failure results, directly
or indirectly, from any cause beyond its control, including but
not limited to, acts of God, acts of government, oods, res,
shortages of materials, strikes and other labor difculties or
delays or failures of transportation facilities.
Manufacturer shall be liable to replace the applicable parts
only if (i) Manufacturer is properly notied by Purchaser
upon discovery of the alleged defects, (ii) defective parts
are returned to Manufacturer upon authorization with all
transportation charges prepaid by
Purchaser, (iii) Manufacturer’s examination of the parts
discloses to its satisfaction that the defects were not
caused by the Purchaser or its agents and (iv) the parts
are otherwise covered by Manufacturer’s limited warranty.
Purchaser shall be responsible to select the means of
transportation and bear the cost of inbound and out-bound
freight expense associated with any replacement parts, and
all risk of loss attendant thereto.
Notwithstanding anything contained in this warranty to the
contrary, (i) this limited warranty shall become null and void
upon the use of any improper chemicals or in the event any
modications or improper service or installation is performed
on the equipment, (ii) this limited warranty does not apply to
consumable materials such as, but not limited to, indicator
lamps, fuses, all uids, lters, coatings, seals, etc., and (iii)
this limited warranty is applicable only to Purchaser, and no
subsequent purchasers of the equipment from Purchaser
shall be entitled to any warranty whatsoever from Manu-
facturer, express or implied.
THIS WARRANTY CONSTITUTES THE SOLE AND EX-
CLUSIVE WARRANTY OF MANUFACTURER WITH RE-
SPECT TO THE EQUIPMENT, THERE ARE NO OTHER
WARRANTIES, EXPRESS OR IMPLIED, AND MANU-
FACTURER SPECIFICALLY DISCLAIMS ALL OTHER
WARRANTIES, EXPRESS OR IMPLIED, INCLUDING
(WITHOUT LIMITATION), ANY AND ALL WARRANTIES
AS TO THE SUITABILITY OR MERCHANTABILITY OR
FITNESS FOR ANY PARTICULAR
PURPOSE OF THE EQUIPMENT FURNISHED HERE-
UNDER. THE EXCLUSIVE REMEDY OF PURCHASER
AGAINST MANUFACTURER FOR ANY BREACH OF THE
FOREGOING LIMITED WARRANTY SHALL BE TO SEEK
REPLACEMENT OF THE AFFECTED PARTS.
IN NO EVENT WILL MANUFACTURER’S LIABILITY
IN CONNECTION WITH THE EQUIPMENT WHICH IS
FOUND TO BE DEFECTIVE EXCEED THE AMOUNTS
PAID BY PURCHASER TO APPION HEREUNDER FOR
SUCH EQUIPMENT WHICH IS SPECIFICALLY FOUND
TO BE DEFECTIVE. THESE LIMITATIONS APPLY TO
ALL CAUSES OF ACTION IN THE AGGREGATE, BOTH
AT LAW AND IN EQUITY, AND INCLUDING WITHOUT
LIMITATION, BREACH OF CONTRACT, BREACH OF WAR-
RANTY, MANUFACTURER NEGLIGENCE, INFRINGE-
MENT, STRICT LIABILITY, MISREPRESENTATION AND
OTHER TORTS AND CONTRACTUAL CLAIMS. EXCEPT
FOR THE EXCLUSIVE REMEDY PROVIDED ABOVE FOR
MANUFACTURER’S BREACH OF THIS LIMITED WAR-
RANTY, PURCHASER, FOR ITSELF AND ITS SUCCES-
SORS AND ASSIGNS, HEREBY WAIVES AND RELEASES
MANUFACTURER FROM ANY AND ALL OTHER CLAIMS
OR CAUSES OF ACTION THEY HAVE AGAINST MANU-
FACTURER ON ACCOUNT OF OR ASSOCIATED WITH
THE EQUIPMENT PURCHASED HEREUNDER OR FOR
APPION BREACH OF THIS LIMITED WARRANTY. IN NO
EVENT SHALL MANUFACTURER BE LIABLE FOR ANY
INDIRECT, SPECIAL, INCIDENTAL, CONSEQUENTIAL
OR PUNITIVE DAMAGES, SUCH AS, BUT NOT LIMITED
TO, LOSS OF ANTICIPATED PROFITS, LOST SAVINGS,
LOST REVENUES, FINES, OR OTHER ECONOMIC LOSS
IN CONNECTION WITH OR ARISING OUT OF THE EXIS-
TENCE, FURNISHING, FUNCTIONING OR USE OF ANY
ITEM OF EQUIPMENT PROVIDED UNDER THIS AGREE-
MENT, EVEN IF MANUFACTURER HAS BEEN ADVISED
OF THE POSSIBILITY OF SUCH DAMAGES AND/OR
SUCH DAMAGES ARE REASONABLE AND/OR FORE-
SEEABLE. FURTHER, PURCHASER FOR ITSELF AND ITS
SUCCESSORS AND ASSIGNS, WAIVES AND RELEASES
ANY RIGHTS THEY MAY HAVE TO BRING AN ACTION
ARISING OR RESULTING FROM THIS AGREEMENT,
REGARDLESS OF ITS FORM, MORE THAN FIFTEEN (15)
MONTHS AFTER SHIPMENT OF THE AFFECTED EQUIP-
MENT BY MANUFACTURER TO PURCHASER.
The provisions of this warranty shall supersede any con-
trary provisions contained in this agreement, any docu-ment
supplied by Manufacturer to Purchaser or by Purchaser to
Manufacturer, or any other agreement, written
or oral, between Purchaser and Manufacturer, notwithstand-
ing the fact that the provisions contained in this warranty
directly conict with other terms or provisions of this agree-
ment or such other documents, or that such other documents
or agreements were provided, delivered, made or executed
subsequent to this agreement unless such agreements are
in writing, specically refer to this agreement, specically
provide that they are amending this and are signed by the
President of Manfacturer.
12

13
WARRANTY CARD
Name of Purchaser Company Phone Number
Street Address City State Zip Code
Model Date of PurchaseSerial Number Place of Purchase
Please complete this and return it within 10 days of purchase with a copy of your sales receipt to validate your warranty
WARRANTY SERVICE
Please select your primary line of business.
(Check all that apply)
Automotive
Commercial
Residential
Service
Installation
How did you learn about our products?
(Please only check one)
Wholesaler________________________
Recommended By:__________________
Magazine
Mailing
Newspaper Ad
Internet
What features most interested you ?
(Check all that apply)
High Production
Low Maintenance
Versatility
Portability
Ease of Use
Other: ____________________
To Validate your warranty, follow these steps within 10 days of purchase:
1.
2.
Complete the Warranty Card below.
Send (1) completed Warranty Card and (2) copy of your sales receipt to:
To obtain warranty service, contact your wholesaler/distributor to obtain a Return Goods
Authorization (RGA) Number. All returned goods MUST be accompanied by an RGA in
order to receive service.
Appion Inc.
2800 South Tejon Street
Englewood, CO 80110

Appion Inc.
2800 South Tejon Street
Englewood, CO 80110 USA
Phone: 303-937-1580
Fax: 303-937-1599
www.AppionInc.com
Table of contents
Popular Power Pump manuals by other brands

Prosser
Prosser PHD13G Installation and operation manual

Hubbell
Hubbell Anderson PW115V-HD Service and operation manual

Greenlee
Greenlee 950-M3 Operation, service and parts instruction manual

CountyLine
CountyLine CLBU10C owner's manual

Flotec
Flotec FP4105 owner's manual

ITT
ITT ICB Installation, operation and maintenance instructions