Applied Biosystems SimpliAmp Thermal Cycler User manual

For Research Use Only. Not for use in diagnostic procedures.
SimpliAmp™Thermal Cycler
USER GUIDE
Installation, Use, and Maintenance
for use with:
Invitrogen™and Applied Biosystems™PCR reagents
Catalog Number A24811
Publication Number MAN0009889
Revision C.0

The information in this guide is subject to change without notice.
DISCLAIMER
TO THE EXTENT ALLOWED BY LAW, LIFE TECHNOLOGIES AND/OR ITS AFFILIATE(S) WILL NOT BE LIABLE FOR SPECIAL, INCIDENTAL, INDIRECT,
PUNITIVE, MULTIPLE, OR CONSEQUENTIAL DAMAGES IN CONNECTION WITH OR ARISING FROM THIS DOCUMENT, INCLUDING YOUR USE OF IT.
Revision history: Pub. No. MAN0009889
Revision Date Description
C.0 30 June 2016 Rebrand, add Thermo Fisher Connect use
B.0 September 2014 A few feature updates: Remote Service, Simulation Mode, Run Details
A.0 May 2014 New document
Important Licensing Information: This product may be covered by one or more Limited Use Label Licenses. By use of this product, you accept the
terms and conditions of all applicable Limited Use Label Licenses.
Corporate entity: Life Technologies Corporation | Carlsbad, CA 92008 USA | Toll Free in USA 1 800 955 6288
TRADEMARKS: All trademarks are the property of Thermo Fisher Scientific and its subsidiaries unless otherwise specified. AmpliTaq and AmpliTaq
Gold are trademarks of Roche Molecular Systems, Inc. Clorox is a trademark of The Clorox Company. Eppendorf and Mastercycler are trademarks of
Eppendorf AG. Bio-Rad, T100, MJ Research, and MyCycler are trademarks of Bio-Rad Laboratories, Inc. TaKaRa is a trademark of TaKaRa Holdings,
Inc. Bioer is a trademark of Bioer Technology Co., Ltd.
©2016 Thermo Fisher Scientific Inc. All rights reserved.

Contents
■CHAPTER 1 Product information ....................................... 6
Instrument overview ............................................................. 6
■CHAPTER 2 Start, sign on, and configure the instrument ............ 7
Touchscreen menu overview ...................................................... 7
Use the Touchscreen ........................................................... 10
Enter text ................................................................. 11
Enter numerals ............................................................ 12
■CHAPTER 3 Create and run experiments on the instrument ....... 13
Workflow ..................................................................... 13
Create a new run method ....................................................... 14
Edit a run method .............................................................. 16
Load samples into the instrument ................................................ 22
Place the sample tray or plate onto the sample block(s) ........................ 22
Perform a run ................................................................. 22
Perform a run on multiple instruments ....................................... 23
Monitor a run .................................................................. 25
Monitor via the Home screen ................................................ 25
Monitor via the run monitor screen .......................................... 26
If the power fails ........................................................... 28
View and export the run report ................................................... 28
Remove the samples from the instrument ......................................... 28
Manage methods and folders .................................................... 29
■CHAPTER 4 Maintain the instrument ................................. 32
As-needed maintenance ........................................................ 32
Clean the instrument ....................................................... 32
Replace the fuses .......................................................... 34
Upgrade the system firmware ............................................... 34
Self Verification test ....................................................... 36
Order kits and replacement parts ................................................ 37
SimpliAmp™Thermal Cycler User Guide
3

■APPENDIX A Install and connect to a network ....................... 38
Package contents .............................................................. 38
Materials ..................................................................... 38
Required materials ........................................................ 38
Optional protective hardware ................................................ 38
Unpack the product ............................................................ 38
Set up the system .............................................................. 39
Set up the wired connection ................................................. 41
Set up the wireless connection .............................................. 43
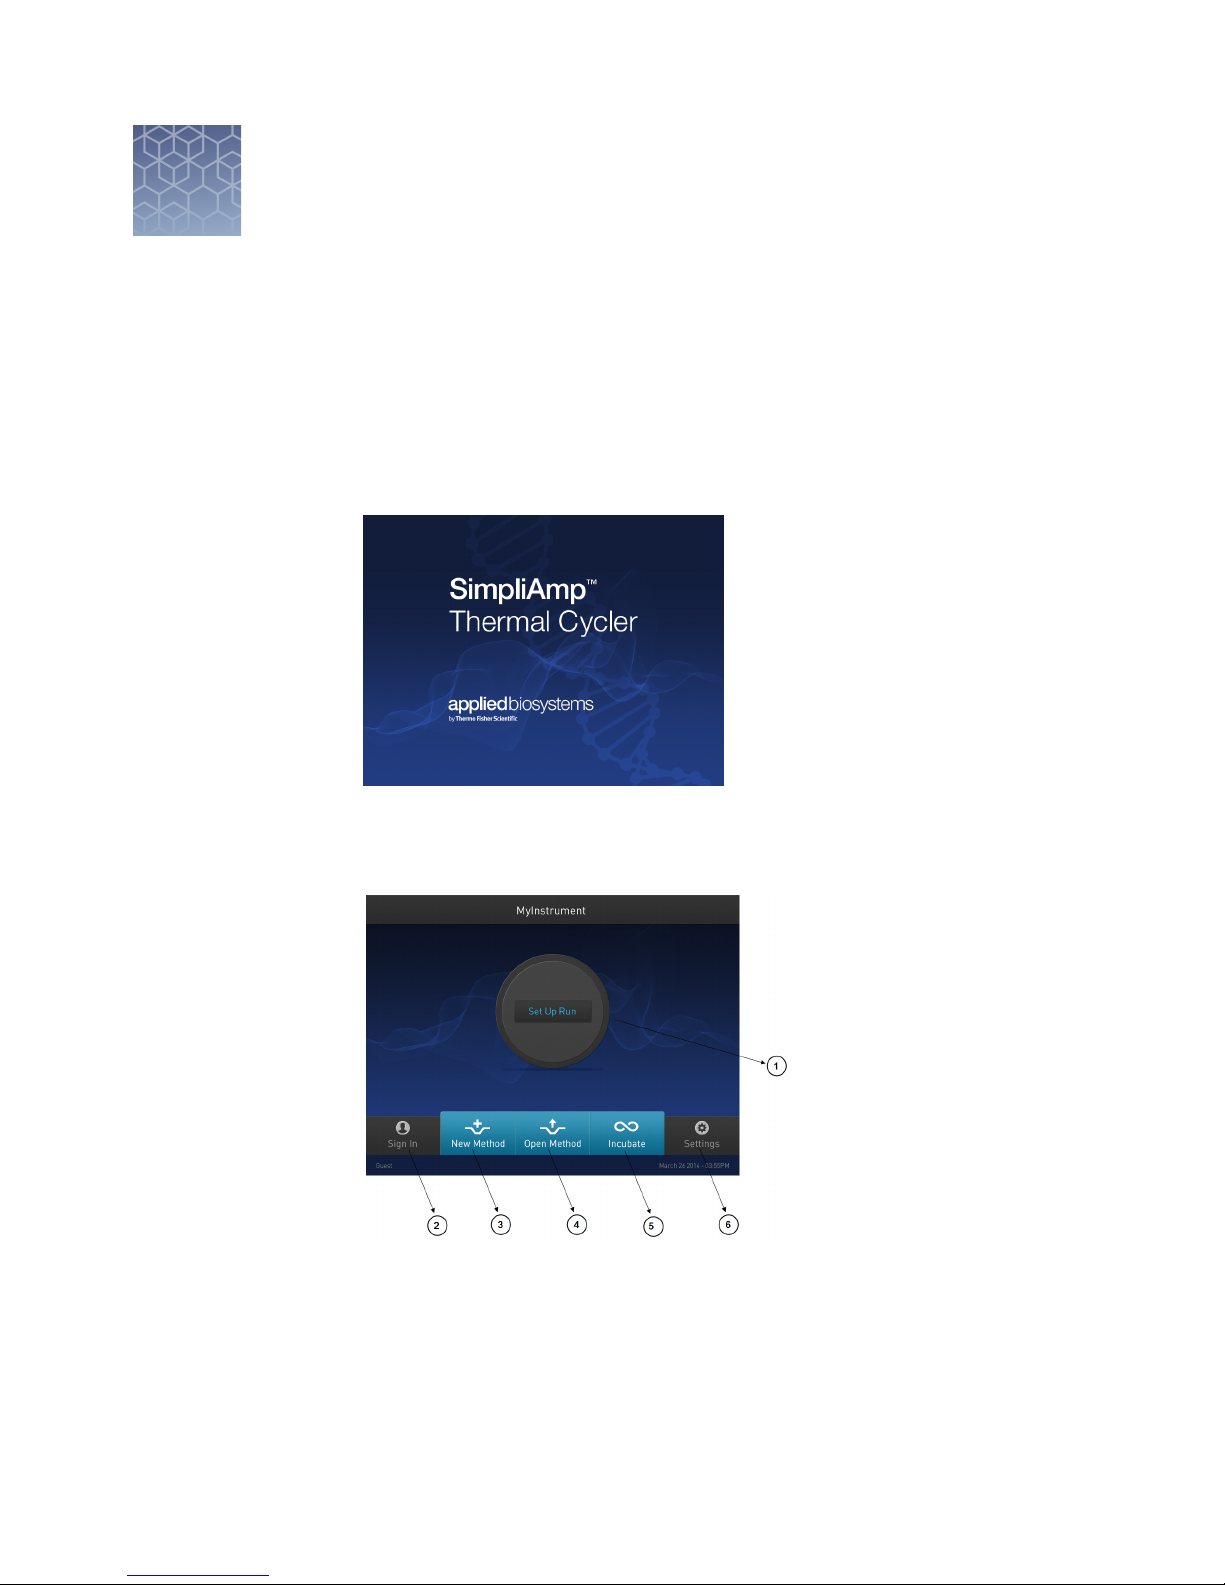
Use instrument without signing in ........................................... 44
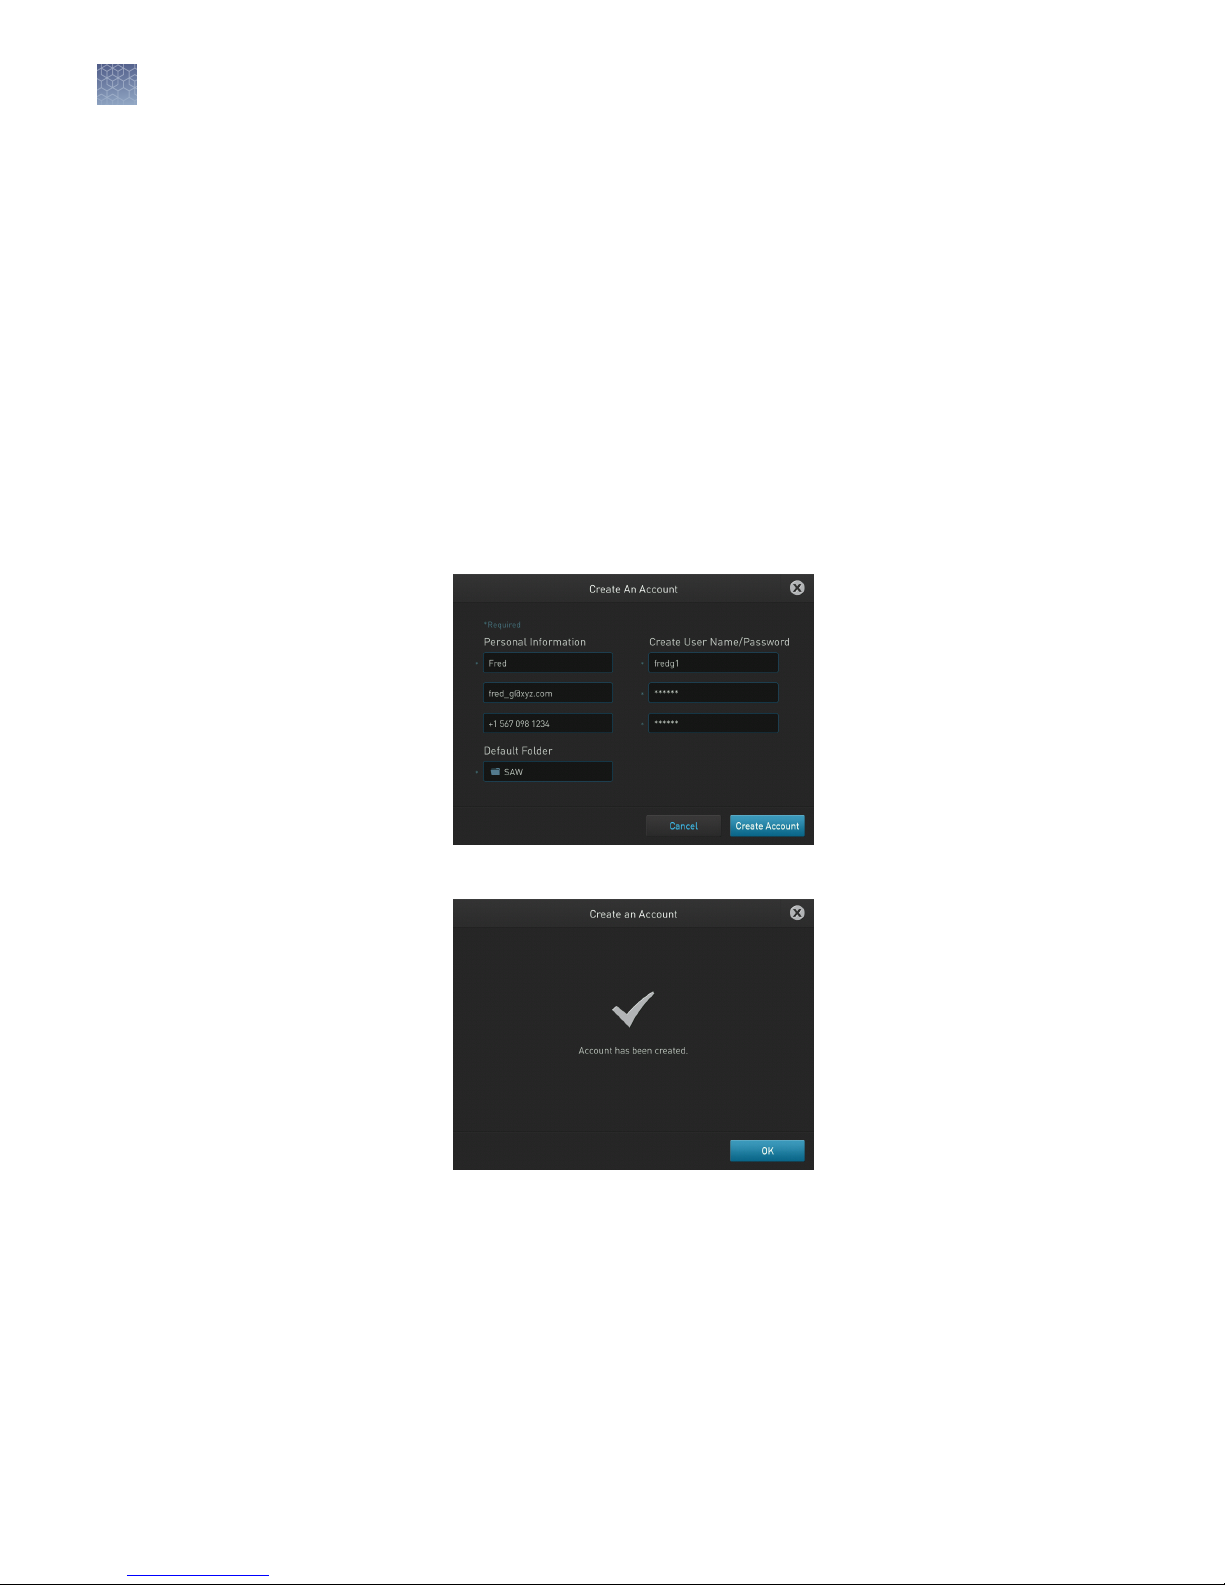
Create a new user profile on the instrument .................................. 44
Sign in .................................................................... 44
Sign out .................................................................. 45
Set up mobile and cloud connectivity to SimpliAmp™Instrument and your
mobile device ............................................................. 45
Link instrument profile to your Thermo Fisher Connect account ................. 46
Recommended instrument settings .......................................... 48
■APPENDIX B Parts and materials ..................................... 58
Instrument part numbers ....................................................... 58
Consumables .................................................................. 58
■APPENDIX C Troubleshooting ......................................... 61
Troubleshooting ............................................................... 61
Return an instrument for service ................................................. 62
■APPENDIX D Instrument specification and layout ................... 63
Site requirements .............................................................. 63
Environmental requirements .................................................... 63
Temperature and humidity requirements ..................................... 63
Pollution ................................................................. 64
Altitude ................................................................... 64
Technical specifications ......................................................... 64
System specifications ........................................................... 65
Location of power point and ports on the instrument ............................... 66
Contents
4
SimpliAmp™Thermal Cycler User Guide

■APPENDIX E Predefined run methods ................................ 67
■APPENDIX F Safety ..................................................... 82
Symbols on the instrument ...................................................... 82
Safety alerts on this instrument .................................................. 83
Location of safety labels on this instrument ................................... 84
Safety information for instruments not manufactured by Thermo Fisher Scientific ..... 85
Instrument safety .............................................................. 85
General .................................................................. 85
Physical injury ............................................................ 85
Electrical ................................................................. 85
Cleaning and decontamination ............................................... 86
Safety and electromagnetic compatibility (EMC) standards .......................... 86
Safety .................................................................... 86
EMC ...................................................................... 86
Environmental design ...................................................... 87
Chemical safety ................................................................ 87
Biological hazard safety ......................................................... 88
■Documentation and support ............................................. 89
Related documentation ......................................................... 89
Customer and technical support ................................................. 89
Limited product warranty ....................................................... 90
Contents
SimpliAmp™Thermal Cycler User Guide
5

Product information
The SimpliAmp™ Thermal Cycler is an end-point thermal cycler, specically designed
for the amplication of nucleic acids using the Polymerase Chain Reaction (PCR)
process. The user interface includes a touchscreen with a graphical display that shows
the time, status, and temperature for each run. A touchscreen keypad allows you to
enter information into elds on the display screen.
Instrument overview
The SimpliAmp™ Thermal Cycler (Cat. no. A24811) allows you to:
• Optimize your PCR with the help of the Veriex™ blocks
• Program the instrument from the touchscreen interface
• Access the system remotely through a mobile application
• Simulate other PCR instruments with Thermal Simulation modes
Figure 1 SimpliAmp™Thermal Cycler
This user guide provides information on how to maximize the capabilities of this
system.
Detailed specications for the SimpliAmp™ Thermal Cycler are found in Appendix D,
“Instrument specication and layout“.
1
6
SimpliAmp™Thermal Cycler User Guide

Start, sign on, and configure the
instrument
Touchscreen menu overview
On powering on the instrument, you will rst see the following Splash screen.
Figure 2 SimpliAmp™Thermal Cycler Splash screen
After the Splash screen, the Home screen appears.
Figure 3 Home screen
2
SimpliAmp™Thermal Cycler User Guide
7

The Home screen includes the following features:
1. Status dial: The Status dial appearing on the Home screen displays the current
temperature of the block, the time elapsed for a run, and the run status while the
instrument is in use.
When the instrument is not in use, the status dial will show the 'Set Up Run'
display. You can start a run by touching the status dial where it says Set Up Run.
For instructions on starting a run by this method, see “Perform a run“ on
page 22.
2. Sign In: Touch Sign In to create an account or to enter information to sign in to
your account.
• To create a new account:
a. In the Sign In screen, touch Sign Up.
b. In the Create An Account screen, enter your personal information,
create a user name and password, and enter a name for the default
folder that will contain the account information.
c. Touch Create Account
Chapter 2 Start, sign on, and configure the instrument
Touchscreen menu overview
2
8
SimpliAmp™Thermal Cycler User Guide

• To sign-in to an existing account:
a. Enter your user name and password.
Note: To sign-in to an existing account as an administrator, enter your
user name as "Administrator" and password as "password".
b. Touch Sign In.
Note: Once you have signed into your account, the Sign In buon on the Home
screen turns to My Account. The user name (custom or administrator) appears in
the boom-left of the Home screen.
3. New Method: Touch New Method to create a new run method with the help of
the default templates that are pre-loaded with the instrument. Touching New
Method takes you to the Setup Run screen that allows you to create a new run
method by using the default templates or existing methods. You can also create a
run method for incubation from the Setup Run screen.
4. Open Method: Touch Open Method to select an existing run method to start a
run. Touching Open Method takes you to the Select Method screen that displays
the existing run methods. The run methods are sorted and stored in various
folders. Select a folder to display the run methods within the folder. Touch a run
method under the Method name to edit that run method in the edit mode.
5. Incubate: Touch Incubate to use the instrument as a precise incubator for non-
PCR workows.
6. Seings: Touch Seings to congure the instrument.
Chapter 2 Start, sign on, and configure the instrument
Touchscreen menu overview
2
SimpliAmp™Thermal Cycler User Guide
9

Use the Touchscreen
You interact with the instrument using a touchscreen. Table 2 describes the several
buons common to many of the screens in the SimpliAmp™ Thermal Cycler.
Table 2 Buttons in the touchscreen
Button Function
Returns to the previous screen
1. Current temperature
2. Time remaining
3. Status of the block (pre-heating, running,
and so on)
4. Username
Scrolls up and down through a list of items.
and buttons. View other stages
Closes the current modal window.
Indicates whether the Wi-Fi is on or off.
Indicates whether a USB is inserted into the
instrument.
Indicates whether the instrument is connected
to the network.
Chapter 2 Start, sign on, and configure the instrument
Use the Touchscreen
2
10
SimpliAmp™Thermal Cycler User Guide

When you touch a eld that requires the input of text, the text editor, as seen in the
following gure, opens. Table 3 displays the buons to touch to enter dierent
information types.
Table 3 Buttons to enter different information
To... Touch
Enter a lowercase letter A letter button.
Enter an uppercase
letter
, then the letter (s). When you are done, touch again.
Enter punctuation or
other symbols
, then the symbol(s). When you are done, touch
again.
Delete the last letter
Close the editor and save
any changes
to accept the entry and close the editor.
Close the editor and
discard any changes
Enter text
Chapter 2 Start, sign on, and configure the instrument
Use the Touchscreen
2
SimpliAmp™Thermal Cycler User Guide
11

When you touch a eld that requires a numerical input, the numeric editor, as seen in
the following gure, opens. Table 4 displays the buons to touch to perform dierent
functions while entering numbers.
Table 4 Functions performed by entering numbers
To... Touch
Enter a number A number button.
Enter decimal, colon, or
infinity symbol
the button with the respective symbol.
Delete the last number
Close the editor and save any
changes
Enter numerals
Chapter 2 Start, sign on, and configure the instrument
Use the Touchscreen
2
12
SimpliAmp™Thermal Cycler User Guide

Create and run experiments on the
instrument
Workflow
Start the instrument
q
Create a new run method
q
Edit a run method
q
Load the plate in the instrument
q
Perform a run
or
Perform a run on multiple instruments
q
(Optional)
Monitor the run
q
View and export the run report
q
Unload the plate from the instrument
3
SimpliAmp™Thermal Cycler User Guide
13

q
(Optional)
Manage methods and folders
Create a new run method
1. In the Home screen, touch New Method.
Figure 4 Touchscreen Home
The Setup Run screen opens up.
Chapter 3 Create and run experiments on the instrument
Create a new run method
3
14
SimpliAmp™Thermal Cycler User Guide

2. In the Setup Run screen, touch Open Template, Open Method, or Incubate.
Figure 5 Setup Run screen
a. Touch Open Template to create a new method using an existing template.
Select from the categories listed in the Select Method Template screen.
Figure 6 Select Method Template screen
b. Touch Open Method to create a new method using an existing run method.
Select from the methods listed in the Select Method screen.
Note: The Select Method screen opens up if you touch Open Method in the
Home screen or in the Setup Run screen.
Figure 7 Select Method screen
Chapter 3 Create and run experiments on the instrument
Create a new run method
3
SimpliAmp™Thermal Cycler User Guide
15

3. Irrespective of the source for creating a new run method, once you select one of
the methods, you will come to the Method Edit screen.
Figure 8 Preview of Run Method
See “Edit a run method“ on page 16 for instructions on editing a run method.
Note: You can choose to directly start a run without editing a run method. To
start a run, touch Next.
Edit a run method
The Edit Method screen serves as a preview of the run method you have selected.
If you do not want to edit any of the parameters, you can start a run directly by
touching Next.
1. In the Edit Method screen for the run method that you have selected, touch Edit
or anywhere on the graphical temperature prole to start editing the parameters.
Figure 9 Options available in the Run Method preview screen
You will see that each of the numbers are surrounded by black elds indicating
that they are editable. At this point, you can edit any of the temperatures, times,
heated cover, number of cycles, and other parameters seen on the screen.
2. Touch Manage Steps to manage the steps; for example, add or delete a stage or
step, or set more advanced parameters.
a. Touch Add Steps to add a step.
Chapter 3 Create and run experiments on the instrument
Edit a run method
3
16
SimpliAmp™Thermal Cycler User Guide

b. Touch Remove Steps to delete a step.
c. Touch Add Stages to add a stage.
d. Touch Remove Stages to delete a stage.
The '+' buons appear while adding a step or stage, while the '–' buons appear
while deleting a step or stage.
Figure 10 Manage Steps screen
Touch Done to nish managing the steps or Advanced Options to modify the
advanced parameters.
3. Touch Advanced Options to edit the VeriFlex™ blocks, AutoDelta, Ramp Rates,
and Simulation Mode parameters.
Figure 11 Advanced Options screen
• Touch Simulation Mode to set the simulation mode. The simulation modes
include the following:
– No Simulation
– Applied Biosystems™ 2720
– Bio-Rad™ T100™
– Bio-Rad™ MyCycler™
– MJ Research™ PTC-200
– Eppendorf™ Mastercycler® gradient
Chapter 3 Create and run experiments on the instrument
Edit a run method
3
SimpliAmp™Thermal Cycler User Guide
17

– TaKaRa® Dice PCR Thermal Cycler
– BIOER™ XP Cycler
Note: Simulation modes make SimpliAmp™ Thermal Cycler perform like
another instrument. This is done by simulating the ramp rate of another
instrument. Not all of the listed simulation modes are available on all
congurations of SimpliAmp™ Thermal Cycler
Figure 12 Advanced Options — Simulation Mode
In the Simulation Mode screen:
a. Select the instrument you would like to simulate.
Touch No Simulation to run the instrument in the default mode
b. Touch Done to save the selection or Cancel to exit the screen.
c. Use the buon in the top right corner of the screen to return to the
Advanced Options screen.
• Touch Ramp Rates to edit the ramp rate of the individual steps.
Figure 13 Advanced Options — Ramp Rates
a. Touch a particular ramp rate to open the editor to edit the ramp rate.
b. Touch Done to save the selection or Cancel to exit the screen.
c. Use the buon in the top right corner of the screen to return to the
Advanced Options screen.
Note: If you set a simulation mode other than No Simulation, then the ramp
rate will be locked and unavailable for editing.
• Touch VeriFlex™ to edit the VeriFlex™ blocks parameter.
Chapter 3 Create and run experiments on the instrument
Edit a run method
3
18
SimpliAmp™Thermal Cycler User Guide

a. Touch the icon to choose the steps you want to apply VeriFlex™.
Figure 14 Advanced Options — VeriFlex™
b. In the Edit VeriFlex™ screen, adjust the temperature range across the
block for the selected steps.
Figure 15 Edit VeriFlex™
– Touch Remove VeriFlex™ to remove the VeriFlex™ blocks seing.
Note: Remove VeriFlex™ is visible only if there is an existing
VeriFlex™ blocks seing.
– Touch Done when nished or Cancel to exit the screen.
Chapter 3 Create and run experiments on the instrument
Edit a run method
3
SimpliAmp™Thermal Cycler User Guide
19

c. Touch Done to return to the Edit Method screen.
d. Use the buon in the top right corner of the screen to return to the
Advanced Options screen.
• Touch AutoDelta to apply the AutoDelta seing to a step.
a. Touch the icon to choose the steps you want to apply AutoDelta.
Figure 16 Advanced Options — AutoDelta
b. In the Edit AutoDelta screen, enter the information for seing up
AutoDelta.
a. Enter the Starting Cycle.
b. Enter the DELTA temperature and/or time. Use the '-' and '+' toggle
buon to set the DELTA values to be either negative or positive,
respectively.
c. Touch Remove AutoDelta to remove the AutoDelta seing.
Note: Remove AutoDelta is visible only if there is an existing
AutoDelta seing.
d. Touch Done when nished or Cancel to exit the screen.
Figure 17 Edit AutoDelta
c. Touch Done to return to the Edit Method screen.
Once you have edited a run method, you can save the method to the destination
folder by touching Save As in the Run Method preview screen or choose to start
a run without saving the run method.
Chapter 3 Create and run experiments on the instrument
Edit a run method
3
20
SimpliAmp™Thermal Cycler User Guide
Table of contents