Aqua Creek Tidal Wave User manual

Copyright © 2016 Aqua Creek Products All Rights Reserved Revised 5/10/16
PART #: F-TWPB
AVAILABLE IN PINK, GREEN OR YELLOW
PATENT PENDING
300 LB. [136 kg] MAXIMUM WEIGHT CAPACITY
MANDATORY
LEAVE THIS MANUAL WITH BIKE OWNER
Read and follow all instructions.
Bike safety can only be ensured if the bike is assembled and
operated according to these instructions.
• NEVER permit children to play on or around the bike.
• Optimal use in water depth of 3 to 5 feet (0.9 to 1.5 meters).
• Bike not intended for use out of water.
• For safety reasons, NEVER excercise alone in the water.
1

Copyright © 2016 Aqua Creek Products All Rights Reserved Revised 5/10/16
Tidalwave Components
1. MAIN FRAME
2. FRONT BASE
3. BACK LEG
4. FIXED HANDLE BARS
5. ADJUSTABLE SEAT
6. LEFT PEDAL
7. RIGHT PEDAL
8. WATER BOTTLE HOLDER
*(OPTIONAL)*
9. HARDWARE BAG
Tidalwave Pool Bike
Table of Contents
PAGE DESCRIPTION PAGE DESCRIPTION
2 Tidalwave Components 9-10 Common Tidalwave Excercises
3-5 Assembly Instructions 11-12 Trainer Reference Guide
6 Storage Instructions 13 Proper Care of Shockwave
7 Operating Instructions 14 Exploded View & Parts List
8 Resistance Adjustment 15 Warranty
1
2
3
4
5
6
7
*8*
9
2

Copyright © 2016 Aqua Creek Products All Rights Reserved Revised 5/10/16
1. Using the supplied allen wrench and at wrench, attach the front base assembly to the main frame
using two (2) 5/16” x 2 1/4” button-head bolts (longest bolts in the hardware bag), 5/16” at washers and
5/16” acorn nuts. See FIG. 1 below.
MAIN FRAME
FRONT BASE ASSEMBLY
5/16" X 2 1/4"
BUTTON-HEAD (2)
5/16" FLAT
WASHER (2)
5/16" LOCK
WASHER (2)
5/16" ACORN
NUT (2)
FIGURE 1
5/16" X 2"
BUTTON-HEAD (2)
BACK LEG
MAIN FRAME
5/16" ACORN
NUT (2)
5/16" LOCK
WASHER (2)
5/16" FLAT
WASHER (2)
FIGURE 2
2. Again using the supplied allen wrench and at wrench, attach the back leg to the main frame using
two (2) 5/16” x 2” button-head bolts, 5/16”at washers and 5/16” acorn nuts. See FIG. 2 below.
Tidalwave Assembly Instructions
TOOLS REQUIRED
3/16” ALLEN WRENCH 9/16” FLAT WRENCH
3

Copyright © 2016 Aqua Creek Products All Rights Reserved Revised 5/10/16
Tidalwave Assembly Instructions
ADJUSTABLE
HANDLEBARS
PLASTIC SLEEVE
ADJUSTMENT
BRACKET
ASSEMBLY
5/16" X 2 1/4"
BUTTON-HEAD (2)
MAIN FRAME
FIGURE 4
4. To attach the adjustable handlebars
rst place the plastic sleeve in place on
the main frame. Then, set the adjustable
handlebars and adjustment bracket
assembly in place on top of the plastic
sleeve. Secure together, using the
supplied allen wrench, with two (2) 5/16”
x 2 1/4” button-head bolts (longest bolts
in the hardware bag).
See FIG. 4 to the right.
3. Once the legs are assembled to the
frame the bike can be stood upright. To
do this, ip the lever up at the main pivot
point of the bike, and fold the bike frame
out until the lever falls into the second slot.
See FIG. 3 to the right.
A
LATCH
(FLIP UP)
DETAIL A
FIGURE 3
TOOLS REQUIRED
3/16” ALLEN WRENCH
4

Copyright © 2016 Aqua Creek Products All Rights Reserved Revised 5/10/16
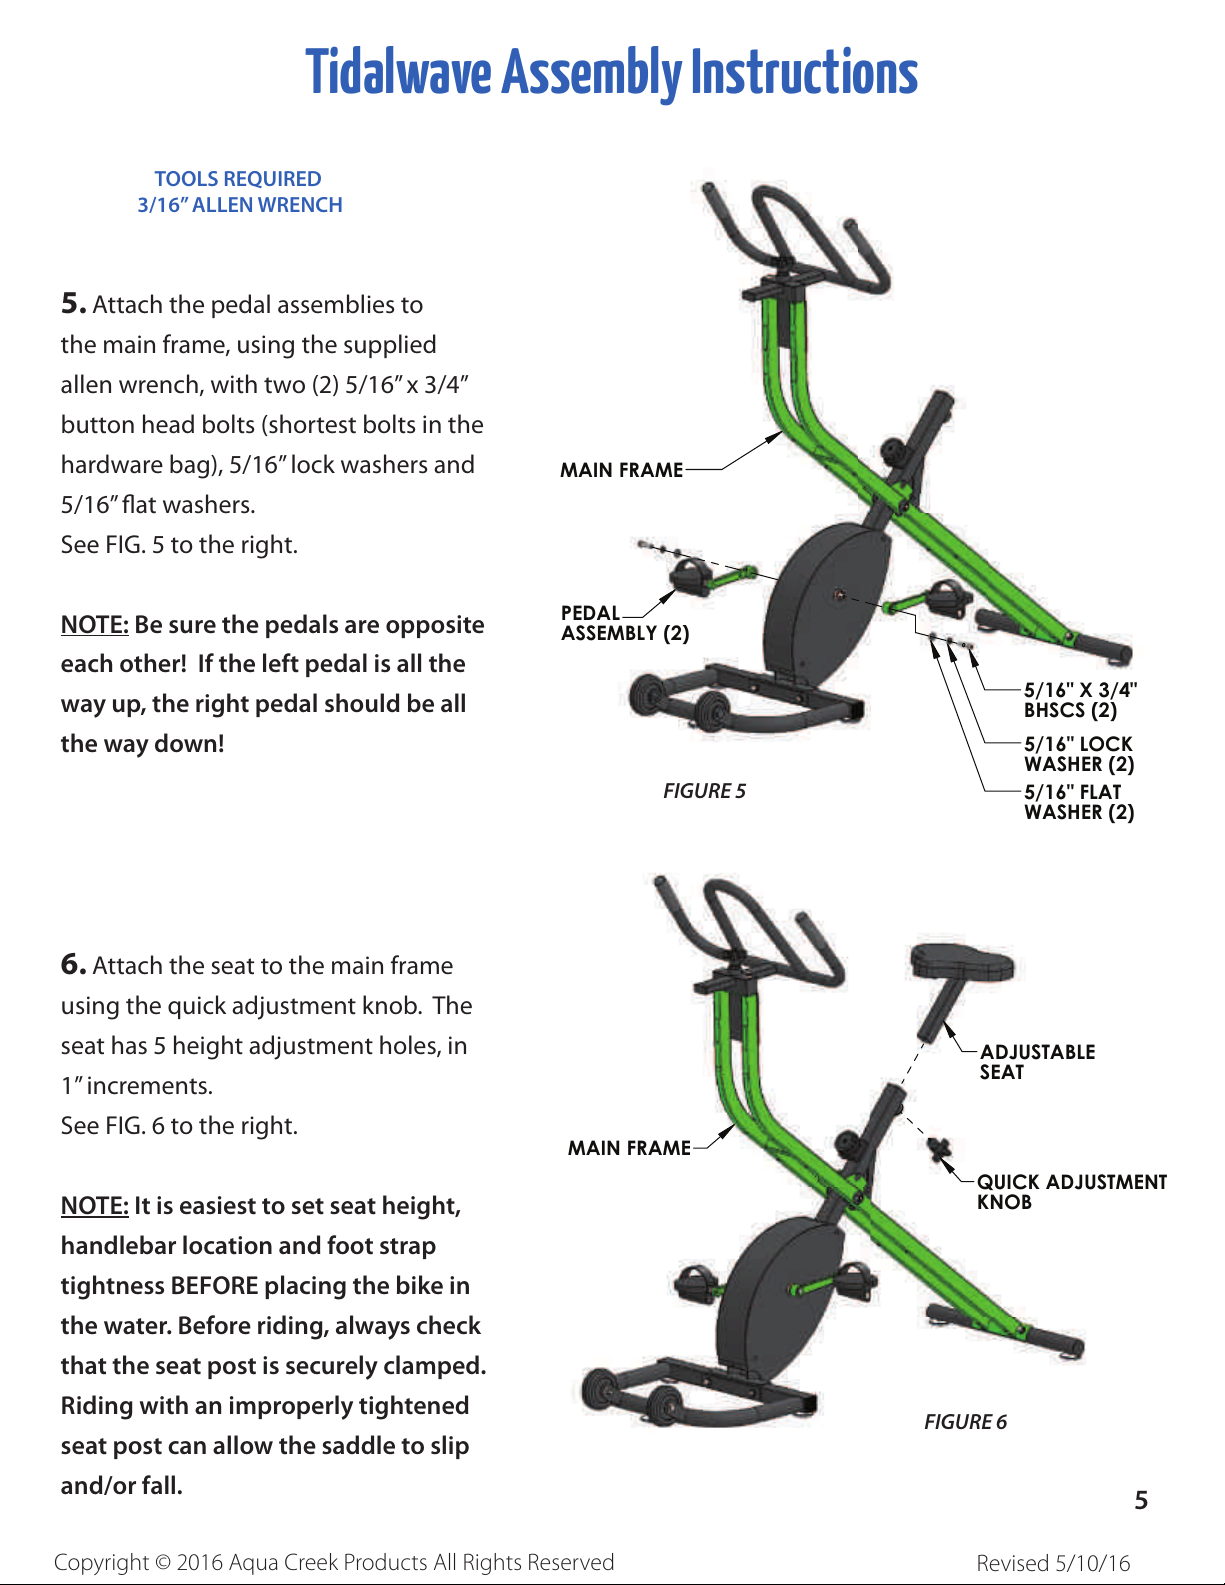
5. Attach the pedal assemblies to
the main frame, using the supplied
allen wrench, with two (2) 5/16”x 3/4”
button head bolts (shortest bolts in the
hardware bag), 5/16” lock washers and
5/16” at washers.
See FIG. 5 to the right.
NOTE: Be sure the pedals are opposite
each other! If the left pedal is all the
way up, the right pedal should be all
the way down!
MAIN FRAME
5/16" X 3/4"
BHSCS (2)
5/16" LOCK
WASHER (2)
5/16" FLAT
WASHER (2)
PEDAL
ASSEMBLY (2)
FIGURE 5
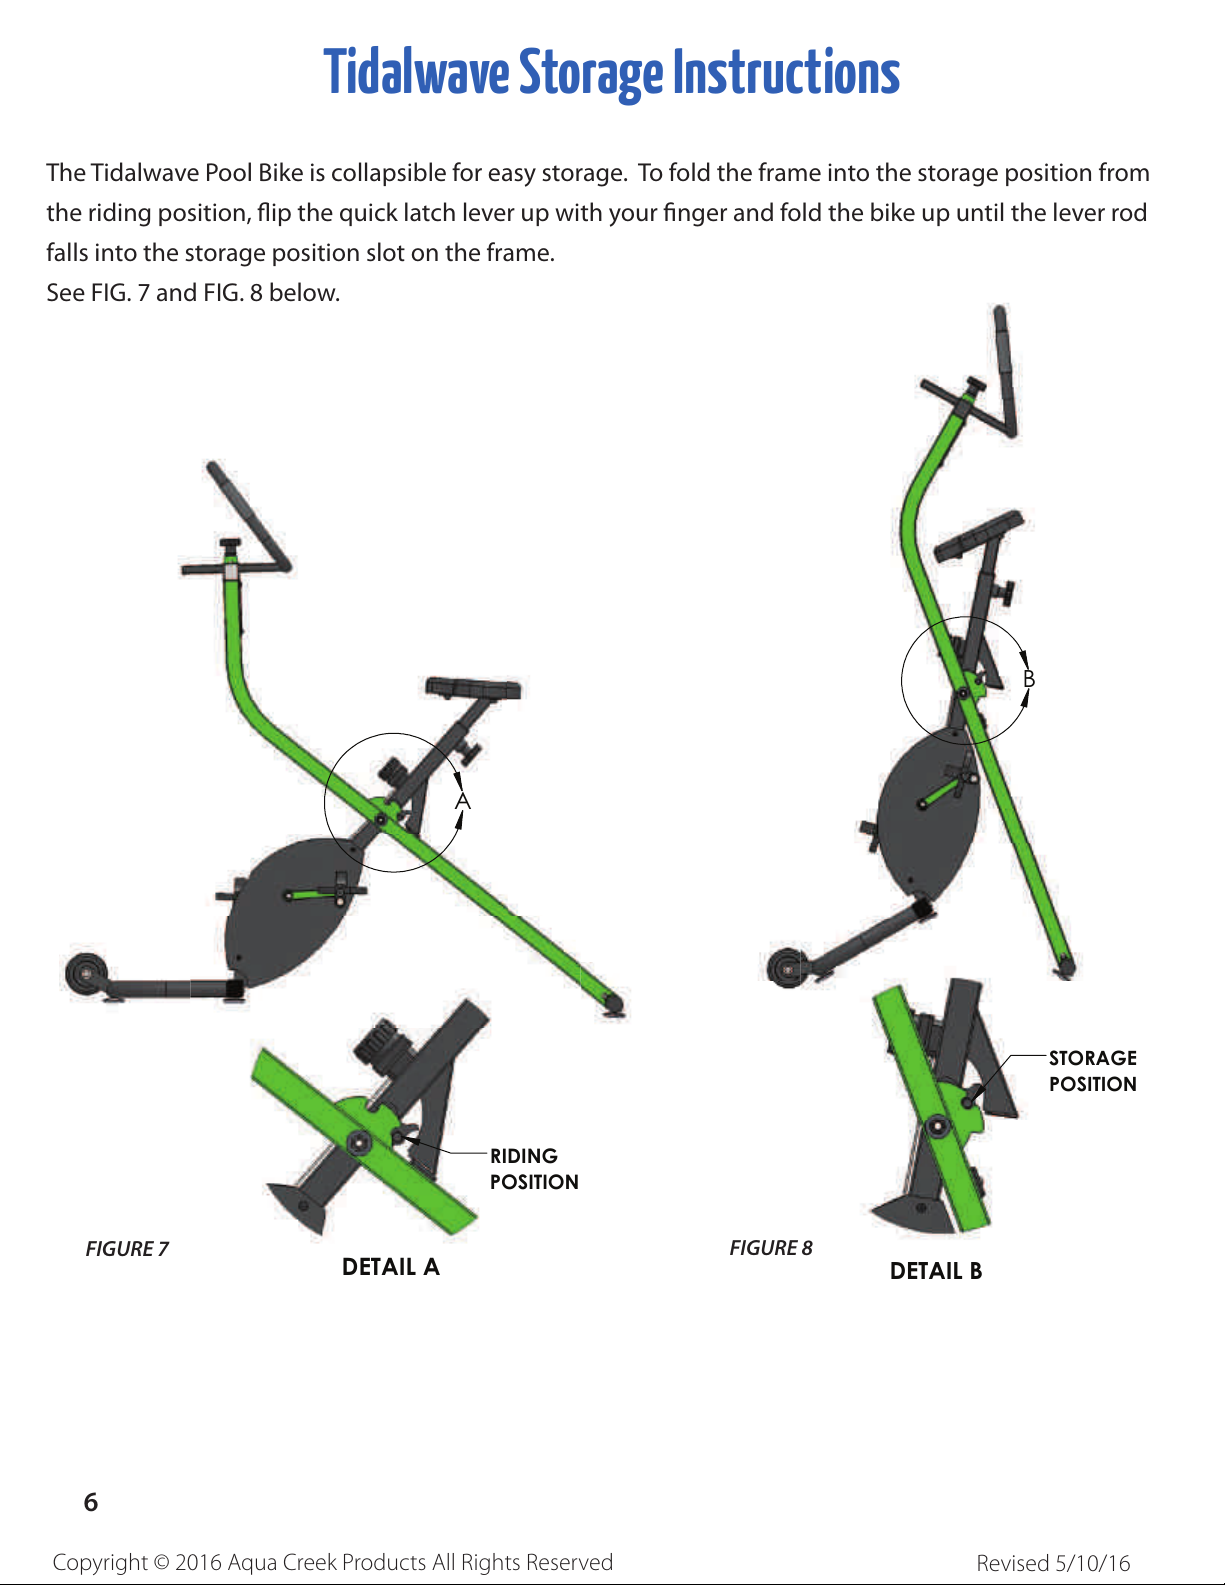
6. Attach the seat to the main frame
using the quick adjustment knob. The
seat has 5 height adjustment holes, in
1” increments.
See FIG. 6 to the right.
NOTE: It is easiest to set seat height,
handlebar location and foot strap
tightness BEFORE placing the bike in
the water. Before riding, always check
that the seat post is securely clamped.
Riding with an improperly tightened
seat post can allow the saddle to slip
and/or fall.
Tidalwave Assembly Instructions
MAIN FRAME
ADJUSTABLE
SEAT
QUICK ADJUSTMENT
KNOB
FIGURE 6
TOOLS REQUIRED
3/16” ALLEN WRENCH
5

Copyright © 2016 Aqua Creek Products All Rights Reserved Revised 5/10/16
Tidalwave Storage Instructions
A
DETAIL A
RIDING
POSITION
FIGURE 7
B
DETAIL B
STORAGE
POSITION
FIGURE 8
The Tidalwave Pool Bike is collapsible for easy storage. To fold the frame into the storage position from
the riding position, ip the quick latch lever up with your nger and fold the bike up until the lever rod
falls into the storage position slot on the frame.
See FIG. 7 and FIG. 8 below.
6

Copyright © 2016 Aqua Creek Products All Rights Reserved Revised 5/10/16
RESISTANCE
ADJUSTMENT
KNOB
RESISTANCE
ADJUSTMENT
ROD
FIGURE 11
3 - 5 FEET
WATER DEPTH
FIGURE 10
Tidalwave Operating Instructions
The Tidalwave Pool Bike was designed for use in and out of the water. To use in water, use the wheels at
the front of the bike to roll the bike down the pool wall into the water. Optimal water depth is 3-5 feet
(0.9 to 1.5 meters). See FIG. 9 & FIG. 10 below.
PLACE IN WATER
FIGURE 9
ROTATE TO
INCREASE
RESISTANCE
ROTATE TO
DECREASE
RESISTANCE
FIGURE 12
*Frame not shown for clarity
The Tidalwave pool bike comes with multiple levels of resistance, similar to a stationary bike. The
resistance adjustment knob is located on the main frame. To increase resistance for a harder workout,
turn the knob clockwise. To decrease resistance, turn the knob counter-clockwise. See FIG. 11 and
FIG. 12 below.
NOTE: Always begin pedaling on the easiest level and increase resistance to more dicult settings
while pedaling. Never start pedaling at high resistance as you may experience a transmission bind
up. However, if this does occur, release the resistance back to easy and begin again.
7

Copyright © 2016 Aqua Creek Products All Rights Reserved Revised 5/10/16
Tidalwave Resistance Adjustment Instructions
After riding the Tidalwave Pool Bike a few times (and all the components get broken in) users may nd
the need to reset the resistance. To do this:
- Set the resistance adjustment knob to the lowest setting by turning the knob counterclockwise.
- Slightly loosen the screw, using a phillips screw driver, on the back of the frame that connects to the
resistance adjustment knob. See FIG. 13 below.
- Slide the resistance adjustment knob assembly up the frame (towards the seat) within the slotted hole.
Very slight movement should be all that is necessary. See FIG. 14 below.
- Retighten the screw on the back of the frame.
- Test the new resistance level.
- Repeat these steps as many times as necessary until a comfortable tension is set.
LOOSEN SCREW
FIGURE 13
SLIDE UP
RESISTANCE
KNOB
FIGURE 14
8

Copyright © 2016 Aqua Creek Products All Rights Reserved Revised 5/10/16
Common Tidalwave Excercises
STANDARD RIDE
Rider is sitting on seat with hands
gripping the handlebars.
RELAXED RIDE
Rider is sitting on seat with hands
dangling in the water.
STANDING RIDE
Rider is o the seat, standing and pedaling,
with hands gripping the handlebars.
FLUTTER KICK
Rider is behind the bike holding the seat
kicks legs in a swimming motion.
9

Copyright © 2016 Aqua Creek Products All Rights Reserved Revised 5/10/16
Common Tidalwave Excercises
CHEST DIP
Rider is behind the bike holding the seat,
lifts legs up and slowly lowers themselves
until their chest hits the seat and then
pushes themselves back up.
ABDOMINAL CRUNCH
Rider is on seat with feet hooked under the
handlebars. Lean back until back of head
hits the water and then return to an upright
position, using only your core.
10

Copyright © 2016 Aqua Creek Products All Rights Reserved Revised 5/10/16
ConnieJasinskas,M.Sc.,CEP www.FortheLoveofFit.comwww.AquaStretchCanada.com
1
October4,15
Re:PoolBikeRecommendations
HelloTyler&AquaCreekCrew,
BelowaresomerecommendationsfrommycolleagueLineMarrandmyselfregardingtheAquaCreekPool
Bike.Linehasnotworkedwiththiscycle(onlyHydroRider),soIamprovidingtheperspectiveofhaving
experiencedtheAquaCreekbike.Lineisalandandwatercyclinginstructor/expert,withyearsofexperience
inthefield.ShewaskindenoughtogivethissomethoughtwhileIwasworkinginBostonthisweekend,sowe
couldturnitaroundmorequicklyforyou.
Recommendationsre:muscleconditioningexercisesusingthebikeasaplatform
¥Sit‐upswiththefeethookedonthehandlebarsorelsewhere,arenotrecommended.
¥Remindpeoplethatthisbikeisdesignedforcardioworkout,notmuscletraining.Muscleconditioning
exercisesarebetterperformedoffthebike.Push‐upsonthesaddleorelsewherecanworkforsome,but
forothers,areproblematic(thebodysinks,thehandsaretoonarrow),it’sreallynottheintendeduseofthe
bike.
¥AvoidthewordTENSION.RefertothebeginningoftheYouTubevideowhereitsays“6levelsofresistance”.
Usethewordresistancethroughout.
¥Therearenospecificpedalcadencesorresistancetobedictatedtoriders.Ridersarebettertouse
perceivedexertion.Wehaveascaleinthebook,butsimply,useascaleof1‐10,with6‐8representinga
goodrangeforcardiowork.Resistanceshouldbelightfornoviceridersandrehabpurposes.
Terminology
”Saddle”:meanstobeseatedonthebikesaddle,withhandsonthehandlebars.
”Saddle-Upright”:meanstobeseatedwithhandsOFFthehandlebars.
”Standing”:offthesaddle,handsonthehandlebars;bodyismoreverticalthanseated
alignment.Pedalingactionishappeningdirectlybelowthehips.Itisrecommendedthat
ridersusethehandlebarsinthisposition,ratherthanpedalinghandsoff.
Trainer Reference Guide
ConnieJasinskas,M.Sc.,CEPwww.FortheLoveofFit.comwww.AquaStretchCanada.com
3
Standing ¥Handsremainonthehandle
barswhilestanding.
¥Thebodyistallandstraight,
nothunchedoverthehandle‐
bars.
¥Gripshouldbefirmbut
relaxed.
¥Avoidtensingtheshoulders
andneck.
CardiovascularExercise
Intervals:
¥1‐2minutesatatime,
increasewhenpossible.
¥Startwithshorterintervalsof
10–20secondsiftherideris
inexperiencedorunfit.
¥Graduallyincreasethetime
spentstanding,and/or
increasetheresistance
settingonthebike.
¥Riderscanadjustcadenceto
increasethechallengeofthe
interval.Fasterismore
difficult.However,smooth
pedalstrokeshouldalways
bemaintained.
¥Perceivedexertionlevelsof7
–9areappropriateunless
healthconcernsdictate
otherwise.Medical
clearanceforcardiovascular
exerciseshouldbe
mentioned.
(Resistance–moderateto
high)
¥Maintainlong,strong
alignmentthroughoutthese
intervals.
¥Inabilitytomaintain
alignmentand/orthe
smoothefficiencyofthe
pedalstrokemeansthework
intervalistoochallenging–
sitandresumeseated
pedalinguntilyouare
recoveredsufficientlytotry
anotherstandinginterval.
¥Monitorthecomfortofthe
lowbackandkneesduring
thisactivity.
¥Addingarmmovementto
thispositionisnotadvised
formost.Veryexperience
ridersmayachievethis,but
alignmentandsmoothpedal
strokearealwaysthe
priority.
¥Vigorousarmmovements
combinedwithinadequate
corestabilitycancausethe
biketotipwhileriding–not
recommended.
Saddle Saddle-Upright Standing
Riding
Position
Hands/arms position Class Component
Length of time & Resistance level
Helpful Cues
11

Copyright © 2016 Aqua Creek Products All Rights Reserved Revised 5/10/16
ConnieJasinskas,M.Sc.,CEPwww.FortheLoveofFit.comwww.AquaStretchCanada.com
2
¥
RidingPosition Hands/armsposition ClassComponent
Lengthoftime&Resistancelevel
HelpfulCues
Saddle
Inthisposition,
waterlevel
shouldbeat
approximately
mid‐sternum.
Handsgripthehorizontalportionof
thehandlebarsorwidergrip.
Tip:Usealightgrip,elbowsslightly
bent–restthehandswheretheyare
mostcomfortableforyourbody.
Experimentwithavarietyofhand
placements&changeplacement
duringtheworkoutasdesired.
NOTE:Whenmoreresistanceis
added,riderstendtogriptoofirmly
onthehandlebars.Maintaina
relaxedgriptoavoidunnecessary
tensioninthearms,shouldersand
neck.Tightgripsrestrictbloodflow
andelevatebloodpressure,soare
notadvised.
Warmup:
¥3‐5minutesofspinningwith
littleorlowresistance.
¥Warm‐upneedstobemore
vigorousandlongerinwater
thatfeelscool.Itcanbe
shorterinwarm(therapy)pools
(≥90F).
¥Thispartoftheworkoutis
usefulforachieving
comfortablealignment,hand
position,andpedalstroke.
¥Exertionlevel:Low;feelsgreat,
youcaneasilytalk;notbreaking
asweat.
¥(Resistance–low)
¥Holdcorrect
body
alignment:long
spine,neutral
neck,shoulders
down.
¥Focusonthe
efficiencyand
smoothnessof
thepedal
stroke.
¥Pedalshould
feeleven
‘aroundthe
clock’;equal
pushandpull,
notjust
pushingdown.
Saddle‐Upright
¥Inthisposition,
watershould
benolower
thanthe
bottomofthe
sternum.
¥Strong
individualscan
useglovesto
increase
resistance.
¥Buoyant
dumbbellsor
resistivehand
wandscanbe
added,but
instruction
shouldbegiven
toprotectthe
shoulders,
neck,elbows&
wrists.
SeatedontheSaddlewithhandsoffthe
handlebars.Thetorsoismoreuprightthan
theSaddleposition.Allarmactionscanbe
donewithbotharmsmovinginunison,or
armsmovingalternately(usuallymore
challengingforthecore).
Arm/handmovementsforinterestand
intensity:Keepthearmsinthewatertouse
theresistanceofthewater.Donotmove
thearmsinandoutofthewater.
¥Breaststroke–largesweepingmovements
forward,tothesides&in.
¥Modifiedbreaststroke:usethebackofthe
arms&handstodothebreaststroke
motion,keepingthethumbsup.Bringthe
armsasfaroutandbehindthebodyas
possible(externallyrotated).
¥Cross‐countryskiarms:palmsfacing
forwardswingthearmsforwardand
backwardbesidethebody,surfaceto
surfaceofthewater–alternateorin
unison.
¥Jumpingjackarms:palmsfacingdown;
don’tletthearmscomeoutofthewater.
Workout:Arm
Intervals
¥Usethisoption
for5–10
minute
intervals
between
episodesof
cardiointervals.
¥Maintainsteady
cadence.
¥Therider
shouldfeel
somewhat
challengedand
slightly
breathless.
¥(Resistance–
moderate)
¥Maintaincorrectbody
alignmentandthe
smoothnessand
efficiencyofthepedal
stroke.
¥Ifalignmentislost,
slowdownthepedal
strokewhileexecuting
armmovements.
¥Avoidhavingthebody
swaysidetoside.
¥Keepthecorefixed,
vertical,andstrong.
¥Staywellconnectedto
thesaddle.
¥Keepthehandsinthe
waterthroughout.
¥Powerposture:core
vertical,shoulders
down,neckrelaxed.
ConnieJasinskas,M.Sc.,CEPwww.FortheLoveofFit.comwww.AquaStretchCanada.com
2
¥
RidingPosition
Hands/armsposition
ClassComponent
Lengthoftime&Resistancelevel
HelpfulCues
Saddle
Inthisposition,
waterlevel
shouldbeat
approximately
mid‐sternum.
Handsgripthehorizontalportionof
thehandlebarsorwidergrip.
Tip:Usealightgrip,elbowsslightly
bent–restthehandswheretheyare
mostcomfortableforyourbody.
Experimentwithavarietyofhand
placements&changeplacement
duringtheworkoutasdesired.
NOTE:Whenmoreresistanceis
added,riderstendtogriptoofirmly
onthehandlebars.Maintaina
relaxedgriptoavoidunnecessary
tensioninthearms,shouldersand
neck.Tightgripsrestrictbloodflow
andelevatebloodpressure,soare
notadvised.
Warmup:
¥3‐5minutesofspinningwith
littleorlowresistance.
¥Warm‐upneedstobemore
vigorousandlongerinwater
thatfeelscool.Itcanbe
shorterinwarm(therapy)pools
(≥90F).
¥Thispartoftheworkoutis
usefulforachieving
comfortablealignment,hand
position,andpedalstroke.
¥Exertionlevel:Low;feelsgreat,
youcaneasilytalk;notbreaking
asweat.
¥(Resistance–low)
¥Holdcorrect
body
alignment:long
spine,neutral
neck,shoulders
down.
¥Focusonthe
efficiencyand
smoothnessof
thepedal
stroke.
¥Pedalshould
feeleven
‘aroundthe
clock’;equal
pushandpull,
notjust
pushingdown.
Saddle‐Upright
¥Inthisposition,
watershould
benolower
thanthe
bottomofthe
sternum.
¥Strong
individualscan
useglovesto
increase
resistance.
¥Buoyant
dumbbellsor
resistivehand
wandscanbe
added,but
instruction
shouldbegiven
toprotectthe
shoulders,
neck,elbows&
wrists.
SeatedontheSaddlewithhandsoffthe
handlebars.Thetorsoismoreuprightthan
theSaddleposition.Allarmactionscanbe
donewithbotharmsmovinginunison,or
armsmovingalternately(usuallymore
challengingforthecore).
Arm/handmovementsforinterestand
intensity:Keepthearmsinthewatertouse
theresistanceofthewater.Donotmove
thearmsinandoutofthewater.
¥Breaststroke–largesweepingmovements
forward,tothesides&in.
¥Modifiedbreaststroke:usethebackofthe
arms&handstodothebreaststroke
motion,keepingthethumbsup.Bringthe
armsasfaroutandbehindthebodyas
possible(externallyrotated).
¥Cross‐countryskiarms:palmsfacing
forwardswingthearmsforwardand
backwardbesidethebody,surfaceto
surfaceofthewater–alternateorin
unison.
¥Jumpingjackarms:palmsfacingdown;
don’tletthearmscomeoutofthewater.
Workout:Arm
Intervals
¥Usethisoption
for5–10
minute
intervals
between
episodesof
cardiointervals.
¥Maintainsteady
cadence.
¥Therider
shouldfeel
somewhat
challengedand
slightly
breathless.
¥(Resistance–
moderate)
¥Maintaincorrectbody
alignmentandthe
smoothnessand
efficiencyofthepedal
stroke.
¥Ifalignmentislost,
slowdownthepedal
strokewhileexecuting
armmovements.
¥Avoidhavingthebody
swaysidetoside.
¥Keepthecorefixed,
vertical,andstrong.
¥Staywellconnectedto
thesaddle.
¥Keepthehandsinthe
waterthroughout.
¥Powerposture:core
vertical,shoulders
down,neckrelaxed.
12

Copyright © 2016 Aqua Creek Products All Rights Reserved Revised 5/10/16
Proper Care of TidalwavePool Bike
PROCEDURE DAILY WEEKLY MONTHLY
Wash down bike with fresh water and dry with clean, soft,
non-abrasive cloth.
Visually inspect bike for damage, corrosion, and loose or
missing hardware.
Thoroughly clean bike frame and apply a liberal coat of car
wax to maintain the bike’s nish.
Check all Warning and Cautionary labels to make sure they
are not faded or worn. Replace as needed.
PROPER CARE NOTES
• Use only fresh water to wash your bike. Do not wash with pool water.• Use only clean, soft, non-abrasive cloths to wipe down your bike.• Remove bike from pool after each use and wash down.• Do not store bike in pump room or near chemicals.• Do not allow children to play on or around this bike.To remove stains, wash aected area with mild dish soap. For stubborn spots
and stains, try using Soft ScrubTM with some brisk rubbing. Apply wax to nish.
STAIN REMOVAL TIPS:
When the useful life of your bike or its components is over, continued use is hazardous. Every bike and its
component parts have a nite, limited useful life. The length of that life will vary with the maintenance
and care the frame and components receive over their life; and the type and amount of use to which the
frame and components are subjected. Aggressive riding, riding in a severe environment (such as a lake
or other non pool environment), riding with heavy loads, commercial activities and other types of non-
standard use can dramatically shorten the life of the frame and components. Any one or a combination
of these conditions may result in an unpredictable failure. You should have your bike and its components
checked periodically for indicators of stress and/or potential failure, including cracks, deformation,
corrosion, powder-coat peeling, dents, and any other indicators of potential problems, inappropriate use
or abuse. These are important safety checks which may help prevent accidents, bodily injury to the rider
and shortened product life.
NOTHING LASTS FOREVER, INCLUDING YOUR BIKE:
13

Copyright © 2016 Aqua Creek Products All Rights Reserved Revised 5/10/16
1
2
3
4
5
6
7
8
9
10
11
12
13
14
15
16
17
18
19
20
21
22
24
23
25
26
27
28
28
28 29
29
29
30
31
31
32
33
34
35
36
37
38
39
40
41
42
43 44
ITEM # QTY PART # DESCRIPTION
1 1 AQF-TBLS-20 TIMING BELT LOWER SHAFT ASSEMBLY
2 1 AQF-300-20 UNIVERSAL SEAT FRAME WELDMENT
3 1 AQF-600-30 FRONT BASE ASSEMBLY
4 1 AQF-605-10 REAR BASE ASSEMBLY
5 1 AQF-800-00 FOLDING LATCH WELDMENT
6 1 AQF-AHB-00 ADJUSTABLE HANDLE BAR ASSEMBLY
7 1 AQF-BDC-05 BELT DRIVE CRANK SHAFT ASSEMBLY
8 1 AQF-TWMF-32 MAIN FRAME ASSEMBLY
9 1 AQF-BRP-00 BRAKE PAD ASSEMBLY
10 2 AQF-LTA-00 LOWER SHAFT TENSION ADJUSTER
11 1 AQF-TKA-10 TENSION KNOB ASSEMBLY
12 1 AQF-SKA-00 SEAT ADJUSTMENT KNOB ASSEMBLY
13 1 AQF-PDR-00 RIGHT PEDAL ASSEMBLY
14 1 AQF-PDL-00 LEFT PEDAL ASSEMBLY
15 1 AQF-CSA-20 COMFORT SEAT ASSEMBLY
16 1 BKSBLT-00 CUTOFF SHOULDER BOLT
17 1 AQF-STSLV-00 PLASTIC SLEEVE INSERT
18 1 AQF-GRCVR-10 TRANSMISSION COVER ASSEMBLY
19 1 AQF-BPL-00 BRAKE PAD LEVER
20 1 SPHF 10 x 1-3/4 SCREW, 316 SS, #10-32 X 1 3/4” PHS
21 6 BB 1/4 X 3/8 BOLT, 316 SS, 1/4-20 X 3/8 BHSCS
22 2 BBF 5/16 X 3/4 BOLT, 316 SS, 5/16-24 X 3/4 BHSCS
23 2 BB 5/16 X 2 BOLT, 316 SS, 5/16-18 X 2 BHSCS
Exploded View & Parts List
ITEM # QTY PART # DESCRIPTION
24 2 BB 5/16 X 2-1/4 BOLT, 316 SS, 5/16-18 X 2 1/4 BHSCS
25 1 BS 3/8 X 1-1/4 BOLT, 316 SS, 3/8 X 1 1/4 SHOULDER, 5/16-18 THREAD
26 1 BBS 5/8 X 4-1/2 BOLT, 316 SS, 5/8 X 4 1/2 SHOULDER, 1/2-13 THREAD,
CUSTOM BHSCS
27 1 WF 10 WASHER, FLAT, #10 SAE, 316 SS
28 6 WL 5/16 LOCK WASHER, 5/16”, 316 SS
29 6 WF 5/16 WASHER, FLAT, 5/16, 316 SS
30 1 BS 1/4 X 3/4 BOLT, 316 SS, 1/4 X 3/4 SHOULDER, 10-24 THREAD
31 4 NA 5/16 NUT, 316 SS, ACORN, 5/16”-18
32 1 NNJ 1/2 NUT, 316 SS, NYLOCK, 1/2”-13, JAM NUT
33 1 NHJ 5/16 NUT, 316 SS, HEX, 5/16”-18, JAM NUT
34 1 WF 1/2 WASHER, FLAT, 1/2, 316 SS
35 2 BB 1/4 X 1 BOLT, 316 SS, 1/4-20 X 1 BHSCS
36 1 BS 3/8 X 2 BOLT, 316 SS, 3/8 X 2 CUSTOM SHOULDER BOLT
37 1 NNJ 5/16 NUT, 316 SS, NYLOCK, 5/16”-18, JAM NUT
38 2 AQF-ELBD-00 CHEMICAL RESISTANT ELASTIC BAND
39 1 AQF-TBT-01 TIMING BELT TENSIONER ASSEMBLY
40 1 NN 10 NUT, 316 SS, NYLOCK, #10-24
41 1 BUSHING, 1/4 X 5/16 X 1/2 BZ BUSHING, BRONZE SLEEVE, 1/4 X 5/16 X 1/2
42 1 BUSHING, 1/4 X 5/16 X 1/4 BZ BUSHING, BRONZE SLEEVE, 1/4 X 5/16 X 1/4
43 1 620-5M-09 BELT, NEOPRENE 5M
44 1 560-5M-09 BELT, NEOPRENE 5M
45 2 WF 1/4 WASHER, FLAT, 1/4, 316 SS
14

Copyright © 2016 Aqua Creek Products All Rights Reserved Revised 5/10/16
Revised: 5/1/2015
AQUA CREEK PRODUCTS, LLC LIMITED THREE (3) YEAR WARRANTY:
TIDALWAVE POOL BIKE
(ITEM #: F-TWPB)
Aqua Creek Products, LLC (a.k.a. Aqua Creek) warrants to the original end user purchaser that products manufactured by Aqua
Creek when properly installed in accordance with assembly and installation instructions, and properly used and maintained, shall
be free from defects in material and workmanship for a period of three (3) years from the date of original purchase, provided that
Aqua Creek receives prompt notice in writing of any defect or failure and satisfactory proof thereof, with the following exception(s):
Exception(s)
•All wear parts, i.e. gear mechanism, belts, etc… shall be warrantied for one (1) year from the date of original purchase.
IMPORTANT: User is not to exceed the rated weight capacity of this product. It is the responsibility of the product owner to verify
the weight of the patron for warranty claim purposes and to ensure that the product is not overloaded.
This warranty specically excludes reimbursement for labor to remove, repair, or install the product and any freight charges. These
warranties do not cover any damages due to accident, misuse, abuse, negligence or failure to properly maintain any products, or
normal wear and tear from day to day operations. In the event that any products are altered, repaired, or improperly installed or
improperly used by anyone without the prior written approval by Aqua Creek, all warranties are void. Non-payment for product
to Aqua Creek may void warranty.
To initiate a warranty claim, the owner of an Aqua Creek product must provide: place of purchase, description of the product, serial
number, date of purchase, installation, and the exact nature of the defect. Within thirty (30) days after receipt of a written warranty
claim by Aqua Creek, and barring any unforeseen delays, the place of purchase will be notied of Aqua Creek’s decision regarding
the claim.
If requested by Aqua Creek, any defective product must be returned, freight prepaid, to Aqua Creek’s designated factory location
or duly appointed distributor for inspection and/or repair. Aqua Creek will, at its option, repair or replace the failed or defective
item, and deliver the repaired product or replacement to the buyer of the product, freight prepaid to the destination provided for
in the original order. Products returned to Aqua Creek for which Aqua Creek provides replacement under this limited warranty shall
become the property of Aqua Creek. A new warranty period shall NOT be established for the repaired or replaced products. Such
products shall remain under warranty only for the remainder of the original warranty period on the original products purchased.
This written limited warranty constitutes the nal, complete and exclusive statement of warranty terms. No person or organization
is authorized to make any other specic or implied warranties or representations on behalf of Aqua Creek.
THE WARRANTIES SET FORTH HEREIN ARE IN LIEU OF ALL OTHER WARRANTIES, EXPRESSED OR IMPLIED, WHICH ARE HEREBY
DISCLAIMED AND EXCLUDED, INCLUDING WITHOUT LIMITATION ANY WARRANTY OF MERCHANTABILITY OR FITNESS FOR A
PARTICULAR PURPOSE OR USE.
THE SOLE AND EXCLUSIVE REMEDIES FOR BREACH OF ANY AND ALL WARRANTIES WITH RESPECT TO THE PRODUCTS SHALL BE
LIMITED TO REPAIR OR REPLACEMENT AT AQUA CREEK’S DESIGNATED FACTORY LOCATION, OR DULY APPOINTED DISTRIBUTOR,
OR IN PLACE AT AQUA CREEK’S OPTION. IN NO EVENT SHALL AQUA CREEK’S LIABILITY EXCEEDTHE ENTIRE AMOUNT PAID TO AQUA
CREEK BY THE ORIGINAL PURCHASER FOR THE FAILED OR DEFECTIVE PRODUCT.
IN NO EVENT SHALL AQUA CREEK PRODUCTS, LLC BE LIABLE FOR ANY INCIDENTAL, CONSEQUENTIAL, SPECIAL, INDIRECT, PUNITIVE
OR EXEMPLARY DAMAGES OR LOST PROFITS FROM ANY BREACH OF THIS LIMITED WARRANTY OR OTHERWISE.
THIS WARRANTY GIVES YOU SPECIFIC LEGAL RIGHTS AND YOU MAY ALSO HAVE OTHER RIGHTS, WHICH MAY VARY FROM STATE TO
STATE. SOME STATES DO NOT ALLOW THE EXCLUSION OR LIMITATION OF INCIDENTAL, SPECIAL OR CONSEQUENTIAL DAMAGES,
SO SOME OF THE ABOVE LIMITATIONS OR EXCLUSIONS MAY NOT APPLY TO YOU.
15
This manual suits for next models
1
Table of contents