Sentec LuMon User manual

Service Manual for the LuMon™ System
2ST200-199 Rev002 │04 2021
Service Manual
For the LuMon™ System
GUI software 1.0.x.x/TIC software 1.6.x.xxx
LuMon™ Belts sizes 47 and smaller / SensorBelts

2 of 33
Service Manual for the LuMon™ System
Warranty
The manufacturer warrants to the initial purchaser that each new component of the LuMon™ System will be
free from defects in workmanship and materials. The manufacturer’s sole obligation under this warranty is to at
its own choice repair or replace any component – for which the manufacturer acknowledges the warranty cover
– with a replacement component.
Warranty exclusions and system performance
SenTec AG can neither guarantee or verify instrument performance characteristics nor accept warranty claims
or product liability claims if the recommended procedures are not carried out, if the product has been subject
to misuse, neglect or accident, if the product has been damaged by extraneous causes, if accessories other than
those recommended by SenTec AG are used, if the warranty seal on the lower side of the monitor is broken, or if
instrument repairs are not carried out by
SenTec Authorized LuMon™ Technicians
.
Design/patents related to the LuMon™ System:Please refer to the specification sheets for the LuMon™
System: www.sentec.com/education/eit/plpm-eit
Trademarks: SenTec™, Advancing Noninvasive Patient Monitoring™, LuMon™ and sentec eit™ are trademarks
of SenTec AG.
Terms of use of software components: SenTec devices that use software may use SenTec, third party and/or
open-source software, depending on their setup. SenTec, third party and/or open-source software may be
subject to different terms of license. Respective information regarding SenTec, third party and/or open-source
software used in the LuMon™ System is available at the following web page: https://www.sentec.com/licenses
©2020 SenTec AG:The contents of this Service Manual may not be reproduced in any form or communicated
to any third party without the prior written consent of SenTec AG.
While every effort is made to ensure the correctness of the information provided in this Service Manual, SenTec
AG assumes no responsibility for errors or omissions. This Service Manual is subject to change without notice.
LuMon™ Monitor
SensorBeltConnector
LuMon™ Connector
SensorBelt
LuMon™ Belt
ContactAgent
NeoContactAgent
Manufacturer:
SenTec AG | Kantonsstrasse 14 | 7302 Landquart | Switzerland | www.sentec.com
EU Representative:
SenTec GmbH | Carl-Hopp-Straße 19A | 18069 Rostock | Germany

Introduction
Service Manual for the LuMon™ System
3 of 33
CONTENT
1INTRODUCTION ....................................................................................................................................4
1.1 ABOUT THIS SERVICE MANUAL.............................................................................................................................................4
1.2 RELATED DOCUMENTS/FORMS ............................................................................................................................................4
1.3 TERMINOLOGY ..........................................................................................................................................................................5
1.4 SAFETY INFORMATION ............................................................................................................................................................5
2SYSTEM OVERVIEW ............................................................................................................................6
2.1 LUMON™SYSTEM ....................................................................................................................................................................6
2.2 LUMON™MONITOR ................................................................................................................................................................ 7
2.3 BELT CONNECTORS .................................................................................................................................................................8
2.4 EIT ADVANCED INTERFACE SET...........................................................................................................................................9
3MAINTENANCE/SAFETY AND FUNCTIONALITY TESTS ..................................................10
3.1 BELT CONNECTOR .................................................................................................................................................................10
3.2 LUMON™MONITOR .............................................................................................................................................................. 13
4TROUBLESHOOTING ........................................................................................................................18
4.1 HOW TO USE THE TROUBLESHOOTING LIST ..................................................................................................................... 18
4.2 TROUBLESHOOTING LIST ...................................................................................................................................................... 19
5REPAIRS OF THE LUMON™ MONITOR .................................................................................... 24
5.1 PRIOR TO REPAIR ................................................................................................................................................................... 24
5.2 REPLACEMENT –SUPPORT FOOT ...................................................................................................................................... 24
5.3 REPLACEMENT –MAIN FUSES ............................................................................................................................................ 25
6SOFTWARE UPDATES/UPGRADES .......................................................................................... 26
7DISPOSAL ...............................................................................................................................................27
7.1 LUMON™MONITOR ..............................................................................................................................................................27
7.2 BELT CONNECTORS ...............................................................................................................................................................27
7.3 BELTS .........................................................................................................................................................................................27
7.4 CONTACT MEDIUM.................................................................................................................................................................27
8APPENDIX I ........................................................................................................................................... 28
8.1 SPARE PARTS AND MAINTENANCE TOOLS ....................................................................................................................... 28
8.2 INTERFACES -PIN ASSIGNMENT ........................................................................................................................................ 28
8.3 TECHNICAL SPECIFICATION................................................................................................................................................30
8.4 CONTACT.................................................................................................................................................................................30
9APPENDIX II - PROTOCOL FOR SAFETY & FUNCTIONALITY TEST ............................ 31
TEST SUMMARY: ................................................................................................................................................................................. 32
BELT CONNECTOR ............................................................................................................................................................................ 33
LUMON™MONITOR ......................................................................................................................................................................... 33

Introduction
4 of 33
Service Manual for the LuMon™ System
1INTRODUCTION
1.1 About this Service Manual
This Service Manual contains information and instructions on servicing the LuMon™ System – i.e. maintenance,
safety, functionality tests, troubleshooting and repairs. Procedures that do not require opening the housing
of the device.
•Maintenance/safety and functionality tests for the LuMon™ System (LMS) intended for qualified
technicians only (3).
•Troubleshooting for the LuMon™ System (4). The troubleshooting list covers three levels of
recommended troubleshooting procedures: Afor the operator, Bfor qualified technicians, and Cfor
SenTec Authorized LuMon™ Technicians
only.
•Repair procedures that do not require opening the cover of the LMS intended for
SenTec Authorized
LuMon™ Technicians
only (5).
NOTE
Statements and instructions in this Service Manual are only applicable for LuMon™ Monitors with the software
versions indicated on the cover page, where “x” can be any number. The software versions of the LuMon™
Monitor – GUI and TIC – are displayed in the ‘system settings’ area of ScoutView [1]. If your LuMon™ Monitor has
other software versions than those indicated on the cover page, please refer to the corresponding version of
the Service Manual.
NOTE
This manual is intended for qualified technicians and
SenTec Authorized LuMon™ Technicians
and must be
read carefully prior performing service and repair. Section ‘safety information’ of the User’s Guide for the
LuMon™ System [1] must be read and understood.
NOTE
Repairs that require opening the LuMon™ Monitor cover are described within the Repair Manual for the
LuMon™ Monitor [3] (which is distributed to
SenTec Authorized LuMon™ Technicians
only).
1.2 Related documents/forms
To perform service you must know how to operate the LuMon™ System (2.1). Refer to the following manuals and
directions for use:
[1] The User’s Guide for the LuMon™ System provides detailed information on the LuMon™ System for
health care practitioners. It is available in several languages and can be downloaded from SenTec’s
webpage: www.sentec.com/education/eit/plpm-eit
[2] The Service Manual for the LuMon™ System (1.1) is available in English and can be downloaded from
SenTec’s webpage: www.sentec.com/education/eit/plpm-eit
[3] The Repair Manual for the LuMon™ Monitor describes repair procedures that require opening the
housing of the monitor for
SenTec Authorized LuMon™ Technicians
. This manual is distributed to
SenTec
Authorized LuMon™ Technicians
only.
[4] The Product Catalogue for the LuMon™ System provides information related to Product Numbers and
purchase of LMS related accessories, key spare parts and documents. It is available in English and can be
downloaded from SenTec’s webpage: www.sentec.com/education/eit/plpm-eit
[5] The Protocol for Safety and Functionality Test – LuMon™ Monitor is a checklist for guiding qualified
service personnel through the complete safety and functionality tests and documenting its results (9).
[6] The Certificate of Disinfection is a form serving as proof of disinfection before shipment. It must be
completed and provided to SenTec AG and must accompany the shipment (outside the package box). A
PDF-copy of this form and the RGA – Return Good Authorization – number are available from SenTec AG
upon request (info-eit@sentec.com).
[7] The Repair or Investigation Request Form – LuMon™ System is a form used to return material to SenTec
AG for service, investigation or repair. A PDF-copy of this form and the RGA – Return Good Authorization –
number are available from SenTec AG upon request (info-eit@sentec.com).
[8] The Technical Service Report Form – LuMon™ System is a form that must be completed and provided to
SenTec AG after software updates and after repairs performed by a
SenTec Authorized LuMon™
Technician.
A PDF-copy of this form is available from SenTec AG upon request (info-eit@sentec.com).
[9] The LuMon™ System – Price List for Special Services is a complete list of services and spare parts that is

Introduction
Service Manual for the LuMon™ System
5 of 33
[10] The Instruction to update the LuMon™ Monitor software provides instruction how to update the
software. A PDF-copy of this document and instruction to download the software PDF-copy of this form is
1.3 Terminology
For symbols used on devices labels and packaging, terminology and abbreviations used in this Service Manual
refer to the User’s Guide for the LuMon™ System [1].
SenTec EIT related terms are described in the User’s Guide [1].Notice that those terms being italicized and/or
capitalized in section ‘terminology’ of the User’s Guide [1] are italicized and/or Capitalized throughout the
entire Service Manual.
1.4 Safety information
A comprehensive list of warnings and cautions is provided in the User’s Guide [1] section ‘safety information’.
Notes are provided in sections where applicable. Carefully read all safety information in the User’s Guide [1]
before operating the device or performing service/repairs.

System overview
6 of 33
Service Manual for the LuMon™ System
2SYSTEM OVERVIEW
2.1 LuMon™ System
The LuMon™ System comprises LuMon™ Monitors (2.1), belt connectors (2.3) to link SenTec’s textile EIT belts
being available in various sizes to the LuMon™ Monitor, as well as SenTec’s contact agents serving as a medium
for impedance coupling between a belt and the patient’s skin. Measuring tapes permit the user to determine
the recommended belt size, i.e. the size of the belt best fitting the respective patient.
The LuMon™ System is available in two configurations
•() for adults and children illustrated in Table 2-1 with a family of belts supporting an underbust girth
range of approximately 76 to 128 cm (abbreviated as LMS-A).
•() for neonates and infants illustrated in Table 2-2 with a family of belts supporting an underbust
girth range of approximately 17 to 52 cm (abbreviated as LMS-N).
Table 2-1: LuMon™ System — Adults/Children configuration ( )
LuMon™ Monitor – Adult SensorBeltConnector SensorBelt ContactAgent
Table 2-2: LuMon™ System — Neonates/Infants configuration ( )
LuMon™ Monitor – Neo LuMon™ Connector LuMon™ Belt NeoContactAgent
System overview
Service Manual for the LuMon™ System
7 of 33
2.2 LuMon™ Monitor
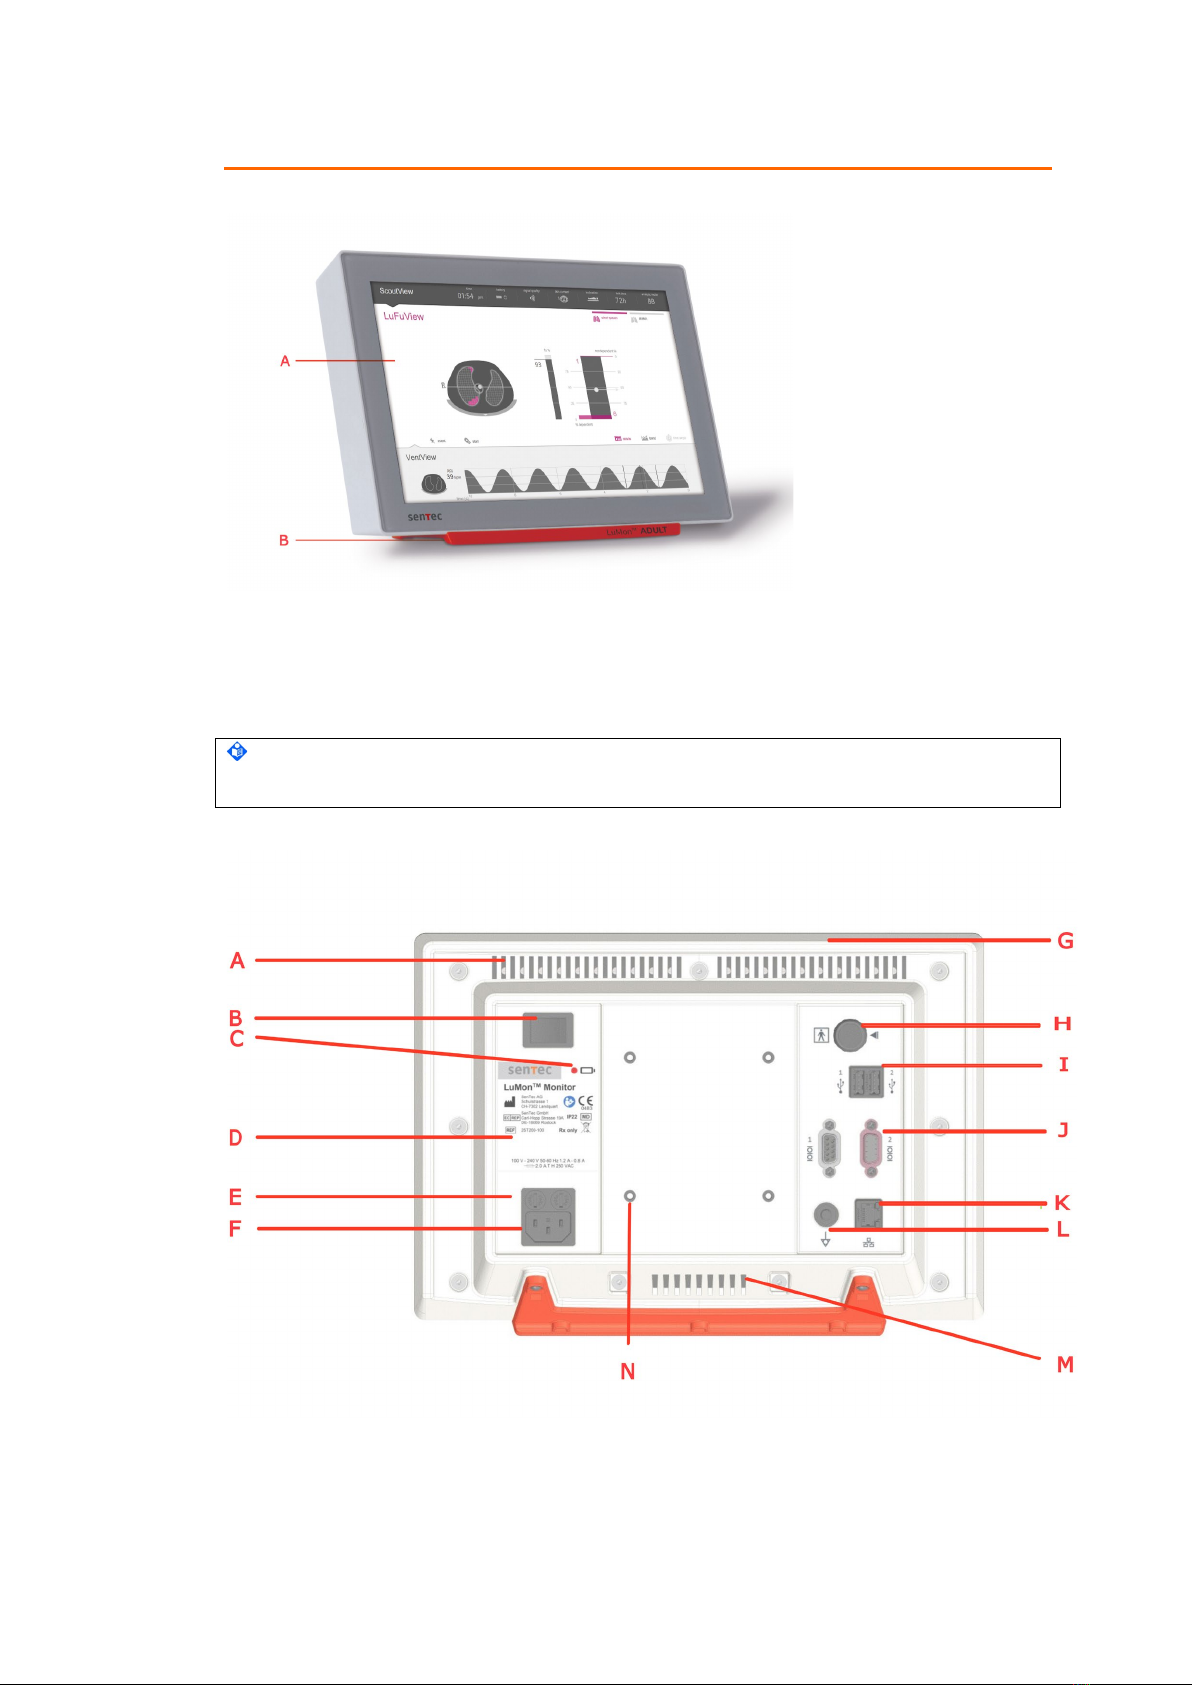
Figure 2-1: LuMon™ Monitor – front panel (here a LuMon™ Monitor – Adult)
A. Touch screen based Graphical User Interface – GUI
B. Support foot indicating the LuMon™ Monitor’s configuration:
LuMon™ ADULT identifies the LuMon™ Monitor – Adult;
LuMon™ NEO identifies the LuMon™ Monitor – Neo.
NOTE
The LuMon™ Monitor performs a calibration of its touch screen after it is switched on. To not disturb the
calibration of the touch screen, do not touch the screen the first few seconds after startup.
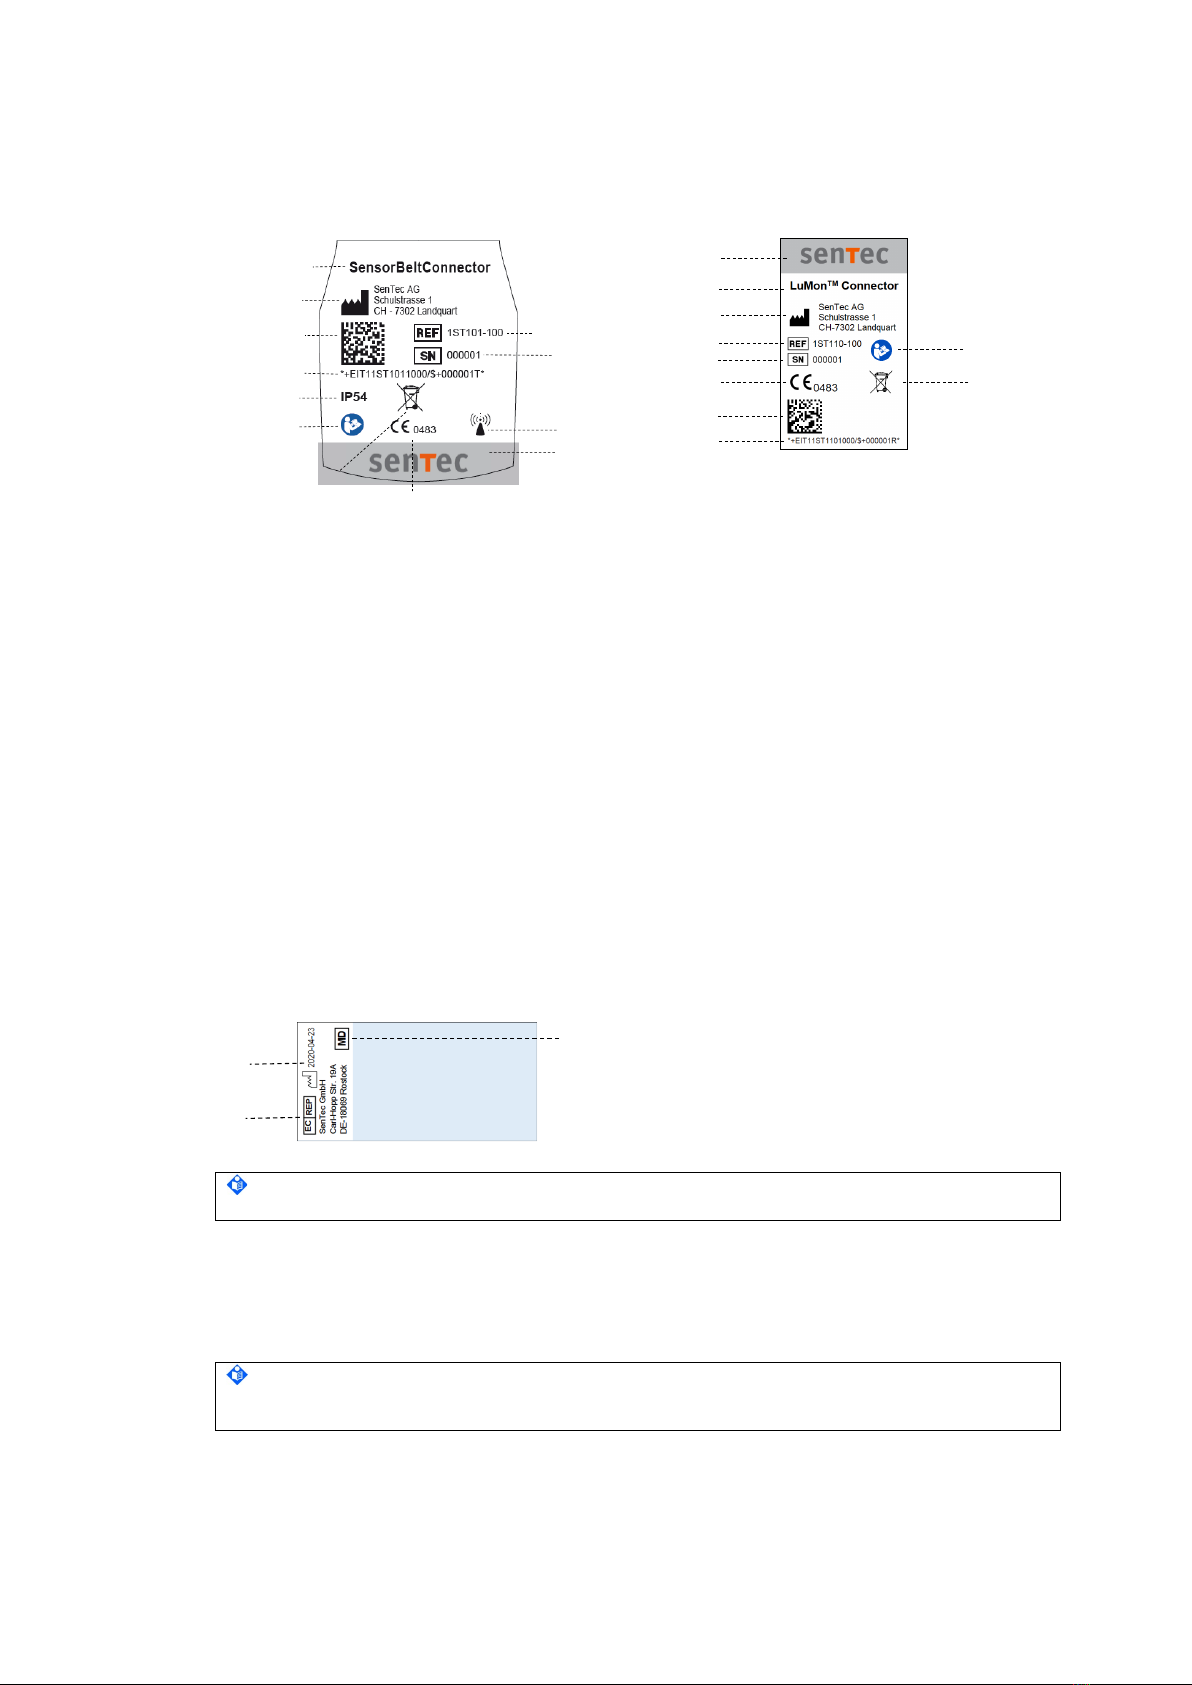
Figure 2-2: LuMon™ Monitor — rear panel

8 of 33
Service Manual for the LuMon™ System
A. Ventilation slot
B. ON/OFF switch
C. AC Power/Battery indicator
D. Type label
E. Fuse holders (2x)
F. AC power inlet
G. Integrated carrying handle
H. Belt connector socket
I. USB ports (2x) – only for use with
memory devices without external power
supply
J. Serial ports (2x) – factory use only
K. Ethernet port – factory use only
L. Equipotentiality terminal connector
M. Ventilation slot
N. VESA 75 compatible mounting holes (4x)
2.3 Belt connectors
The belt connectors are designed to link belts to LuMon™ Monitors. Belt connectors control the injection of
very weak alternating currents into the patient’s thorax and the measurement of the voltages (electrical
potentials) resulting at the skin of the patient’s thorax.
2.3.1 SensorBeltConnector
The SensorBeltConnector (Figure 2-3) links a SensorBelt to a LuMon™ Monitor – Adult. The position sensor
embedded in its MatchBox permits the LuMon™ System to measure and display the patient’s position (
rotation
and
inclination
). If the SensorBeltConnector is properly connected to a LuMon™ Monitor in on-state, the status
indicator LED of its MatchBox continuously lights green if a SensorBelt is connected.
Figure 2-3: SensorBeltConnector
A. MatchBox (includes a position sensor
and a status indicator LED) – connects
to SensorBelts
B. ControlBox (with integrated electronics
and status indicator LED)
C. Monitor plug – connects to the belt
connector socket on the LuMon™
Monitor
2.3.2 LuMon™ Connector
The LuMon™ Connector (Figure 2-4) links a LuMon™ Belt to a LuMon™ Monitor – Neo.
In contrast to the MatchBox of the SensorBeltConnector (2.3.1) the MatchBox of the LuMon™ Connector
contains neither a position sensor nor a status indicator LED.
Figure 2-4: LuMon™ Connector
A. LuMon™ MatchBox – connects to
LuMon™ Belts
B. ControlBox (with integrated electronics
and status indicator LED)
C. Monitor plug – connects to the belt
connector socket on the LuMon™
Monitor

System overview
Service Manual for the LuMon™ System
9 of 33
2.4 EIT Advanced Interface Set
Several tests require an EIT Advanced Interface Set.
Figure 2-5: EIT Advanced Interface Set
A. HR control (HR – Heart Rate)
B. HA control (HA – Heart Amplitude)
C. BR control (BR – Breath Rate)
D. BA control (BA – Breath Amplitude)
E. Voltage in: Connection for external AC/DC Power Supply
F. EIT 1 Fault
G. EIT 7 Fault
H. Too many failing electrodes – SensorBeltConnector only
I. Modes Switch
J. Manual breathing control (RL – Right lung / LL – Left lung)
K. Matchbox for SensorBeltConnector
Use with LuMon™ Connector only:
L. LuMon™ EIT Advanced
Interface Adapter
M. Ribbon Cable Medium (10
cm)
AC-Adapter 12V (for EIT Advanced
Interface)
M
A
J
B
C
D
L
E
F
G
H
I
K

Maintenance/Safety and Functionality Tests
10 of 33
Service Manual for the LuMon™ System
3MAINTENANCE/SAFETY AND FUNCTIONALITY TESTS
At normal use there is no internal adjustment or calibration of the LuMon™ System required. However, to
guarantee continuous performance, reliability and safety of the LuMon™ System, routine checks and
maintenance procedures (including cleaning/disinfection) as well as safety checks should be performed
regularly.
Routine checks and maintenance procedures that can be performed by the operator and instructions for
cleaning and/or disinfecting the LuMon™ Monitor and the belt connectors, are provided in the User’s Guide for
the LuMon™ System [1].
It is recommended that qualified service personnel performs the maintenance and a complete safety and
functionality tests as specified in this manual at regular intervals (recommended every 12 months but at least
every 24 months). Use the Protocol for Safety and Functionality Test (9) to guide you through the complete
safety and functionality tests and to document your test results. To perform a complete safety and functionality
test all tests described in this chapter MUST be performed.
NOTE
If safety or functionality test fail, the respective problem must be fixed before the equipment is returned to the
user.
NOTE
Prior to maintenance, service or repair all components of the LuMon™ System must be cleaned and disinfected.
More details can be found in section ‘cleaning and disinfection’ of the User’s Guide for the LuMon™ System [1].
NOTE
If equipment is send to a
SenTec Authorized LuMon™ Technician
, local SenTec representative or SenTec AG
please refer to section ‘instructions for repackaging and shipping’ of the User’s Guide [1].
A complete ‘Certificate of Disinfection’ [6] and, if applicable, the ‘Repair or Investigation Request Form’ [7] must
be provided.
3.1 Belt connector
3.1.1 Cleaning and Disinfection
For cleaning and disinfection procedures for the SensorBeltConnector and the LuMon™ Connector refer to
section ‘cleaning and disinfection’ of the User’s Guide [1].
3.1.2 Visual Inspection
Visually inspect the belt connector body, cable and plug for damage.
NOTE
If any of the components of the belt connector is damaged, replace the belt connector with a new LuMon™
Connector or SensorBeltConnector (8.1).
Maintenance/Safety and Functionality Tests
Service Manual for the LuMon™ System
11 of 33
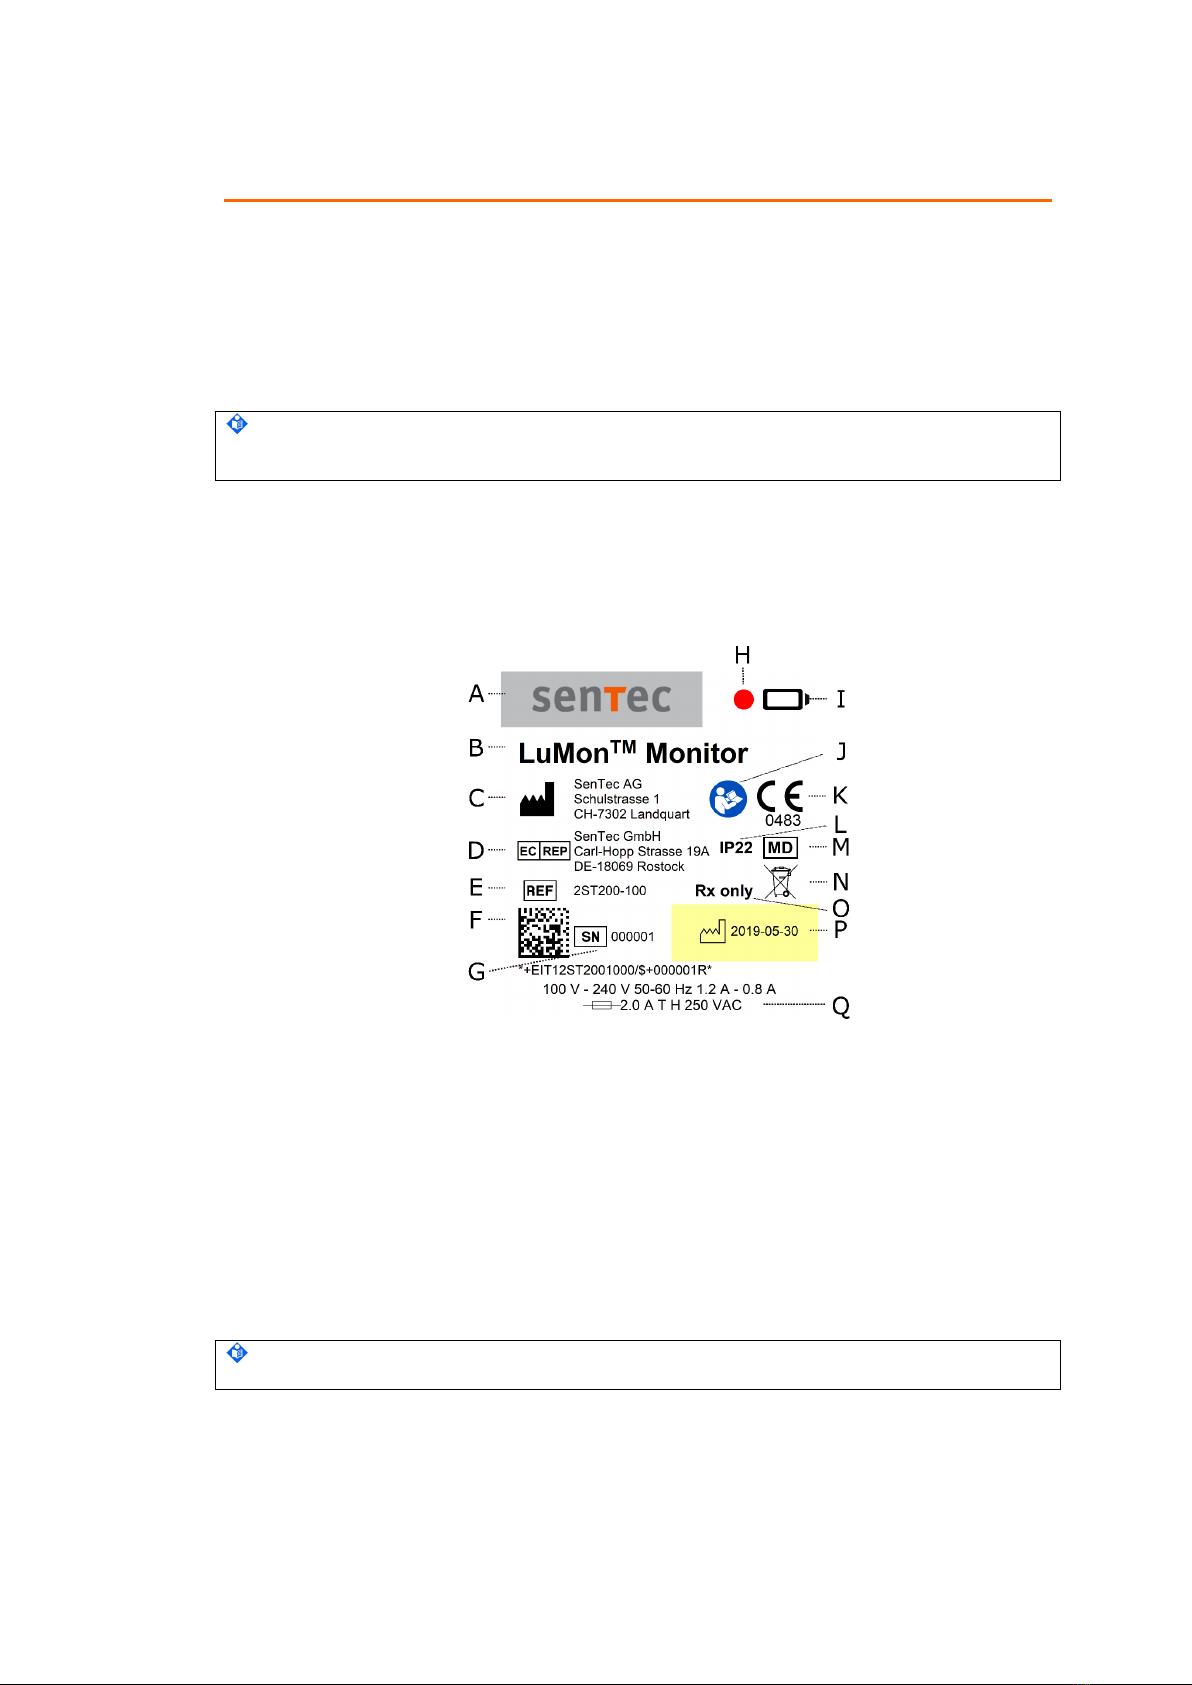
3.1.3 Labeling
Check presence/legibility of the label on the belt connectors.
The type label can be found on the MatchBox part of the belt connectors (2.3). Example labels are shown below.
A
C
D
E
J
H
G
B
F
L
M
I
A
C
D
E
F
G
H
I
K
B
A. Product name
B. Manufacturer symbol and address
C. UDI data matrix code
D. UDI human readable
E. IP (ingress protection class) code
F. Follow instruction for use
G. Dispose of according to Council Directive
2012/19/EU symbol
H. CE (‘Conformité Européene’) label and
notified body number
I. SenTec logo
J. Radio frequency symbol
K. –
L. Serial number symbol and number
M. Reference symbol and number
A. SenTec logo
B. Product name
C. Manufacturer symbol and address
D. Reference symbol and number
E. Serial number symbol and number
F. CE (‘Conformité Européene’) label and
notified body number
G. UDI data matrix code
H. UDI human readable
I. Follow instruction for use
J. -
K. Dispose of according to Council Directive
2012/19/EU symbol
The EU Authorized Representative (EC REP) label can be found on the cable close to the Redel connector
(Figure 2-2
Figure 2-2)
A
B
C
A. Symbol for manufacturing date and
manufacturing date
B. Symbol for EC Representative and the
address
C. Medical device symbol
NOTE:
If the label is not present/legible then contact
SenTec Authorized LuMon™ Technicians.
3.1.4 Status indicator LEDs - SensorBeltConnector
Connect the SensorBeltConnector to the LuMon™ Monitor and switch on the monitor. During the power-up
verify, that the Status LEDs in the ControlBox and MatchBox show the following sequence: MatchBox (Figure
2-3) LED blue ControlBox LED green MatchBox LED red flashing all LEDs off.
NOTE
Any deviation from this sequence – e.g. ControlBox LED lighting up blue or flashing red or MatchBox LED
flashing blue – indicates that the SensorBeltConnector is defective and must be replaced (8.1).

Maintenance/Safety and Functionality Tests
12 of 33
Service Manual for the LuMon™ System
3.1.5 Status indicator LEDs – LuMon™ Connector
Connect the LuMon™ Connector to the LuMon™ Monitor and switch on the monitor. During the power-up
verify that the Status LED in the ControlBox lights up green LED off.
NOTE
Any deviation from this sequence – e.g. ControlBox LED lighting up blue or flashing red – indicates that the
LuMon™ Connector is defective and must be replaced (8.1).
3.1.6 Function Test – SensorBeltConnector
1. Connect the SensorBeltConnector to the LuMon™ Monitor and verify that the hardware and software
version of the belt connector (A/ Figure 3-1) is displayed correctly in the ‘system settings’ area of
ScoutView [1]: 02.01.07-r288 4 1.02-r63 6. The numbers may vary but all numbers shall be present.
2. Connect the SensorBeltConnector to the EIT Advanced Interface (2.4). The indicator LED in the
MatchBox shall light up green indicating that the belt detection works properly. Verify that the ‘serial /
lot no.’ (B/ Figure 3-1) on ‘patient & belt’ area on ScoutView [1] is displayed: e.g. ‘ETAV50200311-
000129’, numbers may vary.
3. Rotate the EIT Advanced Interface left or right and verify on ScoutView that the displayed rotation
changes accordingly.
Figure 3-1: Function Test - Belt connector
3.1.7 Function Test – LuMon™ Connector
1. Connect the LuMon™ Connector to the LuMon™ Monitor and verify that the hardware and software
version of the belt connector (A/ Figure 3-1) is displayed correctly in the ‘system settings’ area of
ScoutView [1]: 02.03.03-r335 4 3.15-r83 13. The numbers may vary but all numbers shall be
present.
2. Connect the LuMon™ Connector to the EIT Advanced Interface using the LuMon™ Advanced
Interface Adapter, the ribbon cable and the AC-Adapter (2.4). Verify that the ‘serial / lot no.’ (B/
Figure 3-1) on ‘patient & belt’ area on ScoutView [1] is displayed: e.g. ‘ETAV50200311-000129’,
numbers may vary).
3. Rotate the MatchBox part of the belt connector – LuMon™ Advanced Interface Adapter – left or right
and verify on ScoutView that the displayed rotation changes accordingly.
Maintenance/Safety and Functionality Tests
Service Manual for the LuMon™ System
13 of 33
3.2 LuMon™ Monitor
3.2.1 Cleaning and Disinfection
For cleaning and disinfection procedures for the LuMon™ Monitor refer to section ‘cleaning and disinfection’ of
the User’s Guide [1].
3.2.2 Visual Inspection
Visually check the entire LuMon™ Monitor for possible damages.
NOTE
If you detect damage, the LuMon™ Monitor needs to be repaired. Contact
SenTec Authorized LuMon™
Technicians.
3.2.3 Labeling
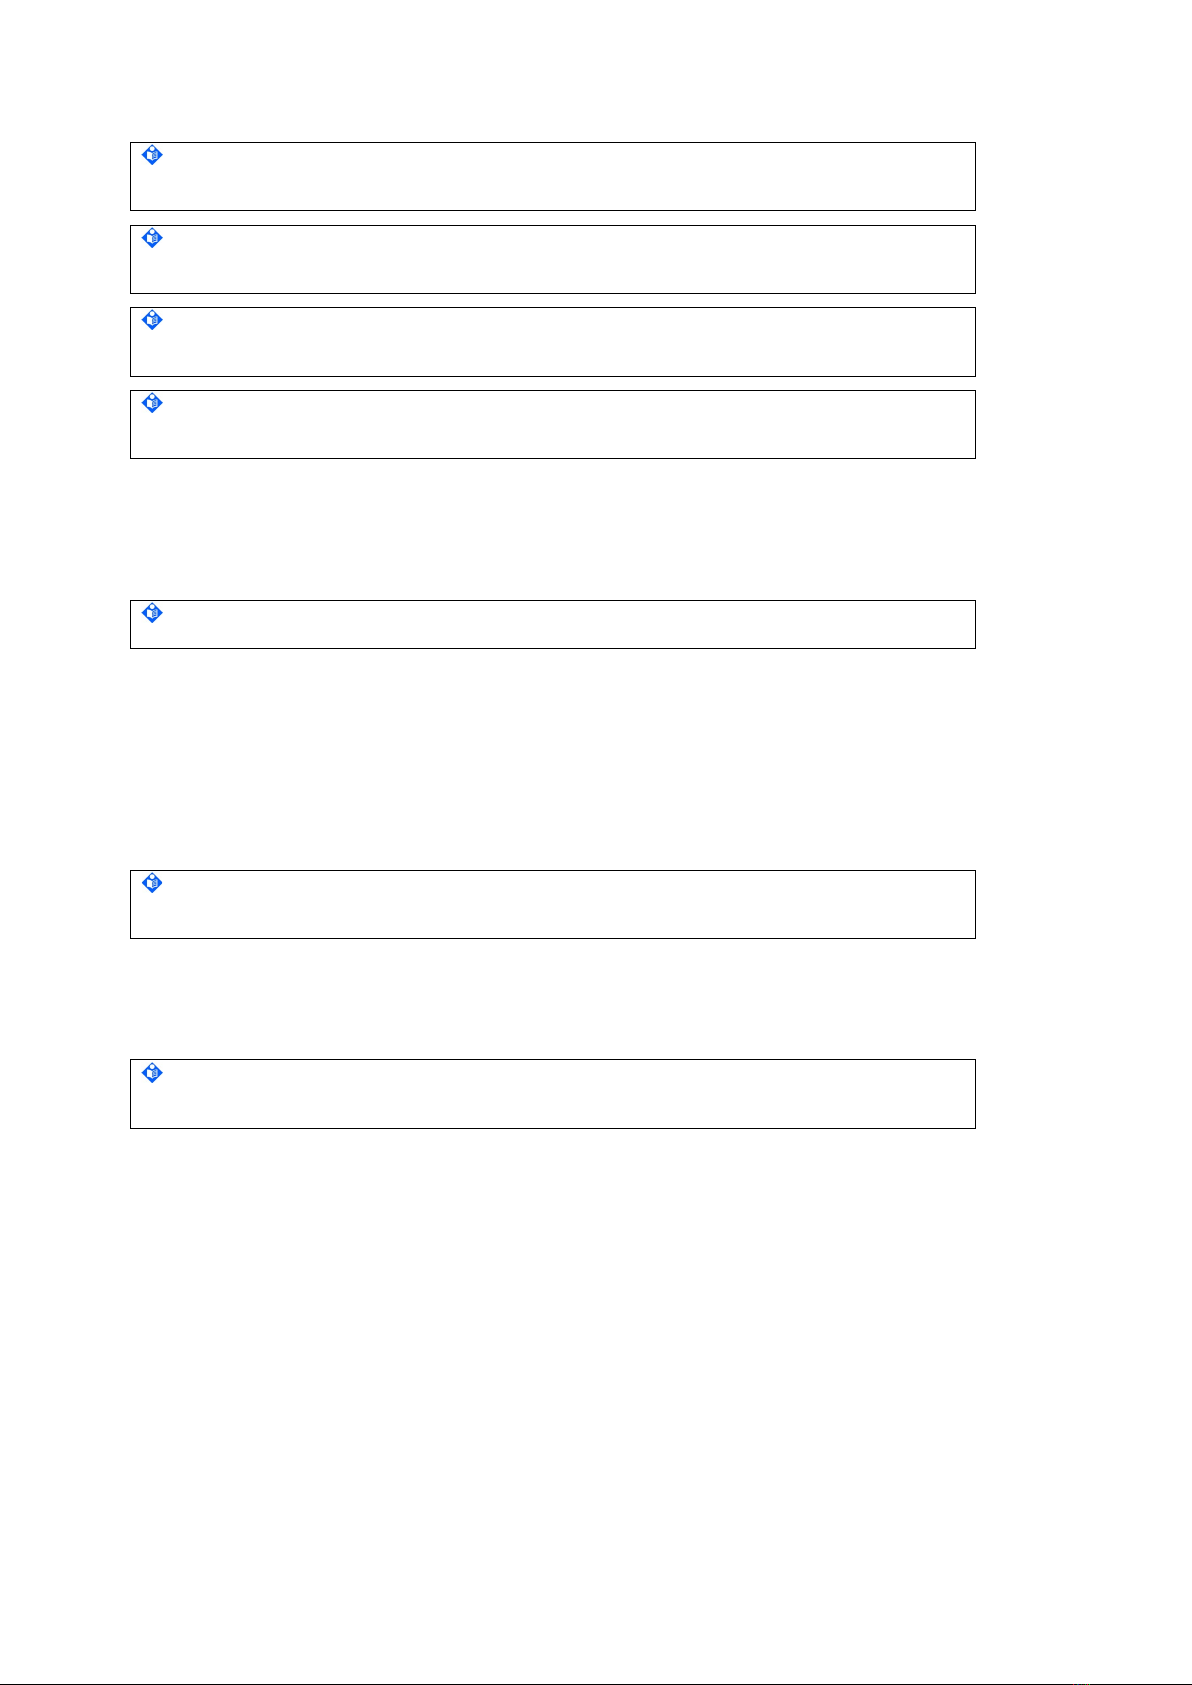
Check presence/legibility of the label on the rear panel (Figure 2-2): Labels of all ports, connectors and
ON/OFF switch and the marking plate. Example labels are shown below.
Figure 3-2: Labeling – LuMon™ Monitor
A. SenTec logo
B. Product name
C. Manufacturer symbol and address
D. EU Authorized Representative
E. Reference symbol and number
F. UDI data matrix code and human
readable
G. Serial number symbol and number
H. Cut out (window for battery status LED)
I. Battery symbol
J. Follow instructions for use
K. CE (‘Conformité Européene’) label and
notified body number
L. IP (ingress protection class) code
M. Dispose of according to Council
Directive 2012/19/EU
N. Medical Device symbol
O. Prescription Device
P. Date of manufacture symbol and
manufacturing date
Q. Power inlet information
NOTE
If the label is not present/legible then contact
SenTec Authorized LuMon™ Technicians.

Maintenance/Safety and Functionality Tests
14 of 33
Service Manual for the LuMon™ System
3.2.4 Electrical Safety Check
The LuMon™ System has been designed to comply with the IEC 60601-1 standard:
•Safety approvals and applied part BF: IEC 60601-1 (3rd edition)
•Electromagnetic compatibility (EMC): IEC 60601-1-2 (4rd edition)
To ensure electrical safety of the equipment it is recommended that qualified service personnel performs the
electrical safety check once a year (but every two years the latest) and after repair.
The electrical safety check for the LuMon™ System must be performed in accordance with the IEC
62353:2014 standards for medical electrical equipment classified as Class 1 and Applied Part Type BF.
Technicians must be familiar with these standards applicable to the institution and the country. Test equipment
and its application must comply with the applicable standard.
NOTE
Safety test according to IEC 62353 may be performed if the following criteria are met:
•The LuMon™ Monitor has not been opened.
•No changes have been made to the mains power connections and none of the protective earth
connections (PE) have been disconnected.
Tools: Electrical safety analyzer for tests according to IEC 62353 (e.g. Rigel 288, Fluke ESA615 or Gossen
Metrawatt Secutest)
NOTE
If the required equipment is not available, send the LuMon™ Monitor to a
SenTec Authorized LuMon™
Technician,
your local SenTec representative or SenTec AG for testing.
NOTE
If equipment is send to a
SenTec Authorized LuMon™ Technician,
your local SenTec representative or SenTec
AG please refer to section ‘instructions for repackaging and shipping’ of the User’s Guide for the LuMon™
System [1].
A complete ‘Certificate of Disinfection’ [6] and, if applicable, the ‘Repair or Investigation Request Form’ [7] must
be provided.
NOTE
Prior to maintenance, service or repair, all components of the LuMon™ System must be cleaned and
disinfected. More details can be found in section ‘cleaning and disinfection’ of the User’s Guide for the LuMon™
System [1].
NOTE
Before performing the safety test, read the operating instructions of your safety analyzer.
NOTE
Make sure that all connecting cables are plugged in correctly. Poor or missing connections may lead to false
positive test results.
NOTE
If safety or functionality test fails, the respective problem must be fixed before the equipment is returned to the
user.
The belt and the belt connector are an applied part of Type BF. The interface ports of the LuMon™ Monitor are
isolated with 2 MOPP to the belt connector socket and 1 MOPP to the mains input. There is no isolation
between the individual interface ports.
The electrical safety check is performed according to IEC 62353. The following connections must be tested:
•Protective Earth Resistance Test: Earth wire of the AC power cord, Equipotentiality terminal
connector (ground). The resistance between two of these must be less than 0.3 Ω.
•Earth Leakage Current: The current must be below 5’000 µA (normal condition) / 10’000 µA
(single fault condition) see IEC 60601-1 Figure 13 and chapter 8.7.3 d).
•Patient Leakage Current from patient connection to earth. The current must be below 100 µA
(normal condition) / 500 µA (single fault condition) see IEC 60601-1 Figure 15.

Maintenance/Safety and Functionality Tests
Service Manual for the LuMon™ System
15 of 33
•Patient Leakage Current caused by an external voltage on the Patient Connection (Type BF). The
current must be below 5000µAsee IEC 60601-1 Figure 16.
•Insulation Resistance Test: L, N of AC power inlet – housing (equipotentiality terminal). The resistance
must be more than 2 MΩ@500V DC.
•Patient Insulation Resistance: Belt connector socket (insulation test cable) – housing (equipotentiality
terminal). The resistance must be more than 2 MΩ@500V DC.
Figure 3-3: Connections for safety test, protective earth resistance and leakage current
Figure 3-4: Connections for safety tests, insulation resistance
NOTE
If the above described tests do not met the corresponding acceptance criteria, the LuMon™ Monitor needs to
be repaired. Refer to section 4.2.4 to further evaluate the problem.
Check the AC power cord for damages of the isolation. Check the belt connectors for damages.
The AC power cord must be tested when connected to the AC power outlet. Thereby the cable must be
swayed to detect potential cable breaks or loose contacts. The AC power cord must be tested together with the
Ground Integrity.
NOTE
If the above specifications are not met, then the AC power cord needs to be replaced by a new AC power cord
from SenTec AG (8.1).
3.2.5 Touchscreen
Switch on the LuMon™ Monitor and wait until the default ScoutView is displayed.
1. Press the button ‘system settings’ to enter ‘system settings’ area and press it again to return to ‘patient
& belt’ area.
2. In ‘patient & belt’ area press ‘weight’ and select a different setting and press ‘OK’.
3. Enter LuFuView, press ‘trend’ and move the ‘T1’ and ‘T2’ flags to different positions.
4. Enter VentView ‘trend’ and check if ‘T1’ and ‘T2’ flags are as set in LuFuView.
Maintenance/Safety and Functionality Tests
16 of 33
Service Manual for the LuMon™ System
NOTE
The LuMon™ Monitor performs a calibration of its touch screen after it is switched on. To not disturb the
calibration of the touch screen, do not touch the screen the first few seconds after startup.
NOTE
If the above described functions do not operate properly contact a
SenTec Authorized LuMon™ Technician,
your local SenTec EIT representative or SenTec AG.
NOTE
If you need to return devices for service or repair follow the shipment instructions in the User’s Guide [1] section
‘instructions for shipment’.
NOTE
Send defective parts together with the completed "Repair or Investigation Request Form" [7] to a
SenTec
Authorized LuMon™ Technician,
your local SenTec EIT representative or SenTec AG.
3.2.6 Clock settings
Verify that the clock settings are correct. If necessary, adjust date and time in the ‘system settings’ area of
ScoutView. Refer to User’s Guide [1] section ‘ScoutView’. Power cycle the LuMon™ Monitor and check date and
time.
NOTE
If the above described functions do not operate properly refer to section 4.2.4 to further evaluate the problem.
3.2.7 Display and AC Power/Battery indicator
Check LED of ‘AC Power/Battery indicator’ (Figure 2-2) and the display for defects:
1. Connect the LuMon™ Monitor to AC power. Switch the LuMon™ Monitor OFF and ON again: The ‘AC
Power/Battery indicator’ LED lights up yellow (battery charging) or green (battery full).
2. Enter VentView and check the readability of the following critical areas: ‘AC Power/Battery’ icon on
status bar,
Plethysmogram
and
Global Dynamic Image
, RRi numerical display.
NOTE
If the above described functions do not operate properly, the LuMon™ Monitor needs to be repaired. Refer to
section 4.2.4 to further evaluate the problem.
3.2.8 Fan
The fan should briefly activate during Power-on Self-test. The fan should rotate freely and without causing
unusual noises.
NOTE
If the above described functions do not operate properly, the LuMon™ Monitor needs to be repaired. Refer to
section 4.2.4 to further evaluate the problem.
3.2.9 Capacity of rechargeable Lithium Ion battery
1. Connect the LuMon™ Monitor to AC power and wait until the battery is completely charged. Verify:
‘AC Power/Battery indicator’ on the rear panel of the LuMon™ Monitor (Figure 2-2) lights up green.
2. Connect the EIT Advanced Interface to the LuMon™ Monitor via a belt connector (2.4).
3. Disconnect the LuMon™ Monitor from AC power and press the ’event’ button [1].
4. Wait until the LuMon™ Monitor fully depletes its battery and shuts down automatically.
5. Connect the LuMon™ Monitor to AC power and wait until it starts up automatically again.
6. Connect a USB memory device to the LuMon™ Monitor, wait for a couple of seconds and then
disconnect it.
7. Connect the USB memory device to a PC. Locate and extract the contents of the file
‘eitMonitorLog.zip’
8. Open the ‘eitMonitor.log’ file with a tex+t viewer (e.g. notepad.exe).
9. Locate the last entry corresponding to the ‘event’: “[StorageMediator] User pressed Event” and
note down the corresponding time stamp of this event as Time1.

Maintenance/Safety and Functionality Tests
Service Manual for the LuMon™ System
17 of 33
10. Scroll to the end of the file, and locate the following entry: “[App] ********** EIT MONITOR
STARTING UP... ****************”
11. Scroll up to locate the last entry of the log file and note down the corresponding time stamp of this
entry as Time2.
12. Scroll further up and locate the following entry: “[HardwareMediator] ++ Hardware Info. Battery %:
100.00 Battery QCount: 16235 …” and note down the value for QCount.
Time1 corresponds to the time when the battery was full and Time2 corresponds to the time when the battery
was empty leading to the shutdown. The run-time of the battery can be computed as the difference between
Time2 - Time1.
The quality of the rechargeable Lithium Ion battery is still acceptable if the LuMon™ Monitor runs for at least
1 hour before the battery management switches off the monitor automatically or the last entry of the QCount
value is less than 26000 or the built in battery not older than 5 years (see the manufacturing date on the rear
panel of the LuMon™ Monitor (Figure 2-2, 3.2.3).
NOTE
If the above described requirements are not met, the LuMon™ Monitor needs to be repaired. Refer to section
4.2.4 to further evaluate the problem.

Troubleshooting
18 of 33
Service Manual for the LuMon™ System
4TROUBLESHOOTING
This section describes problems, possible causes and recommended corrective actions. Repairs (without
having to open the housing of the LuMon™ Monitor) are described in section 5. Repairs that require opening
the housing of the LuMon™ Monitor are to be performed by
SenTec Authorized LuMon™ Technicians
only and
are described in details within the Repair Manual for the LuMon™ Monitor [3].
NOTE
Prior to maintenance, service or repairs all components of the LuMon™ System must be cleaned and
disinfected. If equipment is send to a
SenTec Authorized LuMon™ Technician,
your local SenTec EIT
representative or SenTec AG a completed ‘Certificate for Disinfection’ [6] must be attached.
NOTE
If you need to return devices for service or repair follow the shipment instructions in the User’s Guide [1] section
‘instructions for shipment’. RGA – Return Good Authorization – number is available from SenTec AG upon
request.
NOTE
Send defective parts together with the completed ‘Repair or Investigation Request Form’ [7] to a
SenTec
Authorized LuMon™ Technician,
your local SenTec EIT representative or SenTec AG.
4.1 How to use the troubleshooting list
The troubleshooting list describes problems, possible causes and recommended actions for troubleshooting of
the system. The problems are numbered (EITXXXX) unambiguously. Please reference the respective EITXXXX
code whenever applicable.
This section describes problems, possible causes and recommended actions for troubleshooting.
4.1.1 Levels of recommended actions
The troubleshooting list comprises up to three levels of recommended actions to be performed
A. by the operator (shaded in dark grey) and, if the problem persists,
B. by a qualified technician (shaded in light grey), i.e. troubleshooting at service level (according to this
manual) and, if the problem persists,
C. by
SenTec Authorized LuMon™ Technicians
only (no shading), i.e. troubleshooting at repair level
(according to the Repair Manual [3]).
4.1.2 Abbreviations used in this section
In this sub-section the abbreviations used in this section are described. For a detailed list of abbreviations refer
to the User’s Guide for the LuMon™ System [1].
SB
SensorBelt
Belts
LMB
LuMon™ Belt
SBC
SensorBeltConnector
Belt connectors
LMC
LuMon™ Connector
LMM
LuMon™ Monitor
Monitor

Troubleshooting
Service Manual for the LuMon™ System
19 of 33
4.2 Troubleshooting list
This section describes problems, possible causes and recommended actions for troubleshooting.
NOTE
Concerning equipment, accessories, disposable and parts refer to section ‘warnings and cautions’ of the User’s Guide for the
LuMon™ System [1].
NOTE
Shadings in the troubleshooting table reflect different levels of recommended actions, i.e. for the operator (dark grey), qualified
technicians (light grey) and
SenTec Authorized LuMon™ Technicians
(no shading), see 4.1 for details.
4.2.1 Troubleshooting EIT monitoring
If you suspect a problem with any individual measurement, read the User’s Guide for the LuMon™ System [1] and double-check
that you or the operator have set up the system correctly. In particular, verify proper setup and adequacy of the selected
Analysis
Mode
. To resolve the problem(s) that may be associated with a displayed status message, refer to section ‘status messages’ of the
User’s Guide for the LuMon™ System [1].
Table 4-1: Troubleshooting EIT monitoring
Problem Possible cause(s) Recommended action(s)
EIT0100
Inclination displayed on
GUI— inclination status icon
AND inclination image —
does not suit patient’s
inclination
DockingStation of SB not parallel to
sternum of the patient.
Position sensor is placed in the
Matchbox of the SBC.
Verify belt positioning and a snug fit of the belt on the skin [1]
section ‘checking the proper setup’.
Consider to adjust the routing of the SBC-cable or the
DockingStation.
Position sensor placed behind the
‘bear’ in the LMB not parallel to
sternum of the patient.
Verify belt positioning and a snug fit of the belt on the skin [1]
section ‘checking the proper setup’.
Consider to adjust the LuMon™ Belt to align the ‘bear’ with the
sternum of the patient. In such case the belt displacement
needs to be measured and entered to patient data on monitor,
again.
EIT0101
Rotation displayed on GUI —
Belt-connection/ Skin-
contact/ Rotation status icon
AND all images — does not
suit patient’s rotation.
DockingStation of SB not parallel to
sternum of the patient.
Position sensor placed in the Matchbox
of the SBC.
Verify belt positioning and a snug fit of the belt on the skin [1]
section ‘checking the proper setup’.
Consider to adjust the routing of the SBC-cable or the
DockingStation.
Position sensor placed behind the
‘bear’ in the LMB not placed close to
the midline of the patient.
Verify belt positioning and a snug fit of the belt on the skin [1]
section ‘checking the proper setup’.
Consider to adjust the LuMon™ Belt, positioning the ‘bear’ on
the sternum. In such case the belt displacement needs to be
measured and entered to patient data on monitor, again.
EIT0102
Status icon ‘Belt Time’
displays ‘belt time elapsed’
SB/LMB has been used for longer than
the factory-preset duration a belt can
be used.
Remove and dispose of the old belt and obtain a new belt of
the same size to continue monitoring for the same patient.
EIT0103
Global Dynamic Image and
Plethysmogram fluttering
(Plethysmogram full of
irregular spikes).
Interference from other devices (e.g.
patient monitors, high-frequency
surgical equipment or devices emitting
strong electromagnetic fields).
In case of interferences from other devices – e.g. respiratory
rate measurement through ECG electrodes – try to place the
electrodes of the device as far from the belt as possible.
Note: Concerning interferences with or from other
devices refer to section ‘warnings and cautions’ of the
User’s Guide for the LuMon™ System [1].
If the interference cannot be eliminated Contact
a
SenTec
Authorized LuMon™ Technician,
your local SenTec EIT
representative or SenTec AG.
EIT0104
Indices not reflecting patient
situation - over or
underestimated
Belt applied too far caudally. If applied
too far caudally the measurements may
be influenced by the diaphragm.
Verify belt positioning and a snug fit of the belt on the skin [1]
section ‘checking the proper setup’.
Consider to adjust the belt.
Belt applied too far cranially.
EIT0105
Global Dynamic image is not
inside the Lung ROIs.
Patient and/or belt parameter not set
properly.
Thorax and Lung ROIs models do not
correspond to the patient constitution
and consequently causing either over-
or underestimated measurements.
If necessary, adjust the respective entries in the ‘patient & belt’
area of ScoutView. Enter actual (not lean or ideal) body weight
[1] section ‘belt application and initiating monitoring’.
EIT0106
LuFuView’s indices and
images not visible
BB
Analysis Mode
selected and breaths
not detected.
Black vertical lines displaying the end of
expiration and the end of inspiration
are not visible on
Plethysmogram
.
Verify the adequacy of the selected
Analysis Mode
[1] section
‘checking the adequacy of the selected Analysis Mode’.
Consider to change
Analysis Mode
.
Troubleshooting
20 of 33
Service Manual for the LuMon™ System
Problem Possible cause(s) Recommended action(s)
Impedance change is too small.
Black vertical lines displaying the
Analysis Interval
are not visible on
Plethysmogram
.
EIT0107
LuFuView’s ‘silent spaces’
and ‘stretch’ areas not
accessible
TB-II
Analysis Mode
selected.
LuFuView’s ‘silent spaces’ and ‘stretch’
areas not accessible when TB-II
Analysis Mode
is selected.
Verify the adequacy of the selected
Analysis Mode
[1] section
‘checking the adequacy of the selected Analysis Mode’.
Consider to change
Analysis Mode
.
EIT0108
LuFuView’s indices and
images are not stable
Patient is breathing irregularly.
Verify the adequacy of the selected
Analysis Mode
[1] section
‘checking the adequacy of the selected Analysis Mode’.
Consider to change
Analysis Mode
.
EIT0109
Respiratory Rate not visible
Patient is breathing irregularly or the
breath amplitude is too small.
-
EIT0110
EELi/ EILI trend not visible or
only partly visible
BB
Analysis Mode
selected and breaths
not detected.
Black vertical lines displaying the end of
expiration and the end of inspiration
are not visible on
Plethysmogram
.
Verify the adequacy of the selected
Analysis Mode
[1] section
‘checking the adequacy of the selected Analysis Mode’.
Consider to change
Analysis Mode
.
Impedance change is too small.
Black vertical lines displaying the
Analysis Interval
are not visible on
Plethysmogram
.
EIT0111
Aeration not visible
Aeration is visible in TB-II
Analysis
Mode
only.
Enter ScoutView and select TB-II
Analysis Mode
[1] section
‘ScoutView’.
4.2.2 Belt-specific troubleshooting
Table 4-2: Belt-specific troubleshooting
Problem Possible cause(s) Recommended action(s)
EIT0200
Despite a belt is connected
to SBC/LMC and LMM the
status message ‘connect
belt’ is displayed.
Bad contact (SBC/LMC not properly
connected)
Verify connections (disconnect and reconnect belt connector)
and – if necessary – power cycle the monitor.
SB/LMB defective
To identify the defective part, exchange the belt connector
and try again – if necessary, permute and try on a different
monitor.
In case of damage of the belt replace it (8).
SBC/LMC defective
In case of damage of the belt connector replace it.
LMM defective
Refer to 4.2.3 to further evaluate the problem.
EIT0201
MatchBox part of the SBC
cannot be inserted into the
DockingStation of the SB.
SB defective
In case of damage of the belt replace it (8).
EIT0202
Status message ‘belt fault’
SB/LMB defective
To identify the defective part, exchange the belt connector
and try again – if necessary, permute and try on a different
monitor.
In case of damage of the belt replace it (8).
EIT0203
Status message ‘insufficient
skin contact’
Incorrect positioning of the SB/LMB on
the skin
If necessary, adjust the belt and tighten it fit. If tightening the fit
of the belt, ensure not to restrict breathing. See User’s Guide
[1] section ‘Belt application and initiating monitoring’.
Contact medium is not applied or
incorrectly applied
Apply contact medium to the belt striped fabric on the
patient-facing side. Repeat the spraying until the striped fabric
is wetted evenly and entirely. See User’s Guide [1] section ‘Belt
application and initiating monitoring’.
SB/LMB defective
To identify the defective part, exchange the belt connector
and try again – if necessary, permute and try on a different
monitor.
In case of damage of the belt replace it (8).
Other manuals for LuMon
1
Table of contents
Other Sentec Medical Equipment manuals


Popular Medical Equipment manuals by other brands

AMD
AMD AMD-3700 Installation and operation manual

Hologic
Hologic SUPERSONIC IMAGINE AIXPLORER MultiWave Cleaning Instruction Guide

Aivia
Aivia 200 Installation and operating manual

SALUDA MEDICAL
SALUDA MEDICAL Evoke SCS System Surgical Guide

Aivia
Aivia A-MIP 200 Installation and user guide

Steeper
Steeper Espire Pro Elbow Quick setup guide


natus
natus Nicolet SCU user guide

Aircraft Medical
Aircraft Medical McGRATH MAC EMS Operator's manual

ABTECH SAFETY
ABTECH SAFETY SLIXRR Instruction & Maintenance Manua

Fresenius Medical Care
Fresenius Medical Care DIASAFE 2008 K Operator's manual

Globus
Globus Magnum XL operating manual

ZOLL
ZOLL CPR-D-padz quick start guide