Invisia Serena Seat Series User manual

Serena-Seat
INV-WS18 / INV-WS26
(DC145 - RevE)
invisiacollection.com

A
3
2
1
4
AL
4.80lbs
2.18kg
BAMBOO
WS18: 8.6lbs / 3.90kg
WS26: 12.6lbs / 5.72kg
MAX
500lbs
227kg
HW176
2

B
???
?
?
?
?Fe
12
34
5
3

B
10
67
89
4

C
<36" / <914mm
>36" / >914mm
17-19"
432-483mm
>24" / >610mm
17-19"
432-483mm
5

D
34
56
12
6

D
910
8
11 12
7
7

E
15.50"
394mm
1.19" / 30mm
15.75" / 400mm
4.75" / 121mm
1.75"
44.5mm
A
#C
D
B
5.38" / 137mm
2.75"/ 69.9mm
2.375"
60.3mm
8

E
F
9

English
OVERVIEW
Thank you for choosing the Invisia Serena-Seat. Please read and
understand the instructions in this manual; keep manual for future
reference. It is your responsibility to see that your Invisia Serena-Seat is
properly assembled, installed, and cared for. Failure to follow instructions in
this manual could result in serious injury or death. If you are not equipped
to undertake the outlined work, we would recommend that you have your
Invisia Serena-Seat installed by a qualified contractor.
The Serena-Seat is a high quality, commercial grade, fold down shower
seat. The Serena-Seat is intended to provide shower seating support for
people with reduced mobility. The Serena-Seat is intended to bear weight
ONLY when the seat is in the down position; the seat is not intended to
bear weight in any other position. The Serena-Seat is intended to be folded
up when not in use.Afriction hinge ensures that the handle will not
inadvertently lower when it is in the up position. The Serena-Seat is
installed with appropriate fasteners to a structural wall. The maximum user
weight for this product is 500lbs / 227kgs. Note: Product is not intended to
support full body weight (i.e. do not stand on the seat). The Serena-Seat is
not to be used in any other way than described above.
LIMITED LIFETIME WARRANTY
Products are covered by a limited lifetime warranty against defects in
materials and workmanship for the original purchaser. Warranty excludes
products that have been damaged through misuse, accidental damage,
alteration, normal wear and tear, wood material and stain, or the use of
corrosive or abrasive cleaning products.
Buyer hereby indemnifies, agrees to hold harmless and defend HealthCraft
Products Inc. from and against any and all liabilities, claims, (founded and
unfounded), losses, damages, costs and expenses (including without
limitation consequential damages and reasonable professional fees)
resulting from buyers specification, application, or improper use of goods
described hereon; buyers omission or neglect. HealthCraft Products Inc.
does not assume any liability for damage resulting from services performed
by others or faulty installation, misuse or misapplication of goods sold by
HealthCraft Products Inc. HealthCraft Products Inc. shall not be liable for
prospective profits or special, indirect, or consequential damages, or for the
cost of any corrective work done without HealthCraft Products Inc. prior
approval. HealthCraft Products Inc. total liability hereunder shall in no
event exceed the purchase price of the goods specified hereon.
Specifications subject to change without notice.
HealthCraft Products Inc.
2790 Fenton Road
Ottawa, Canada
K1T 3T7
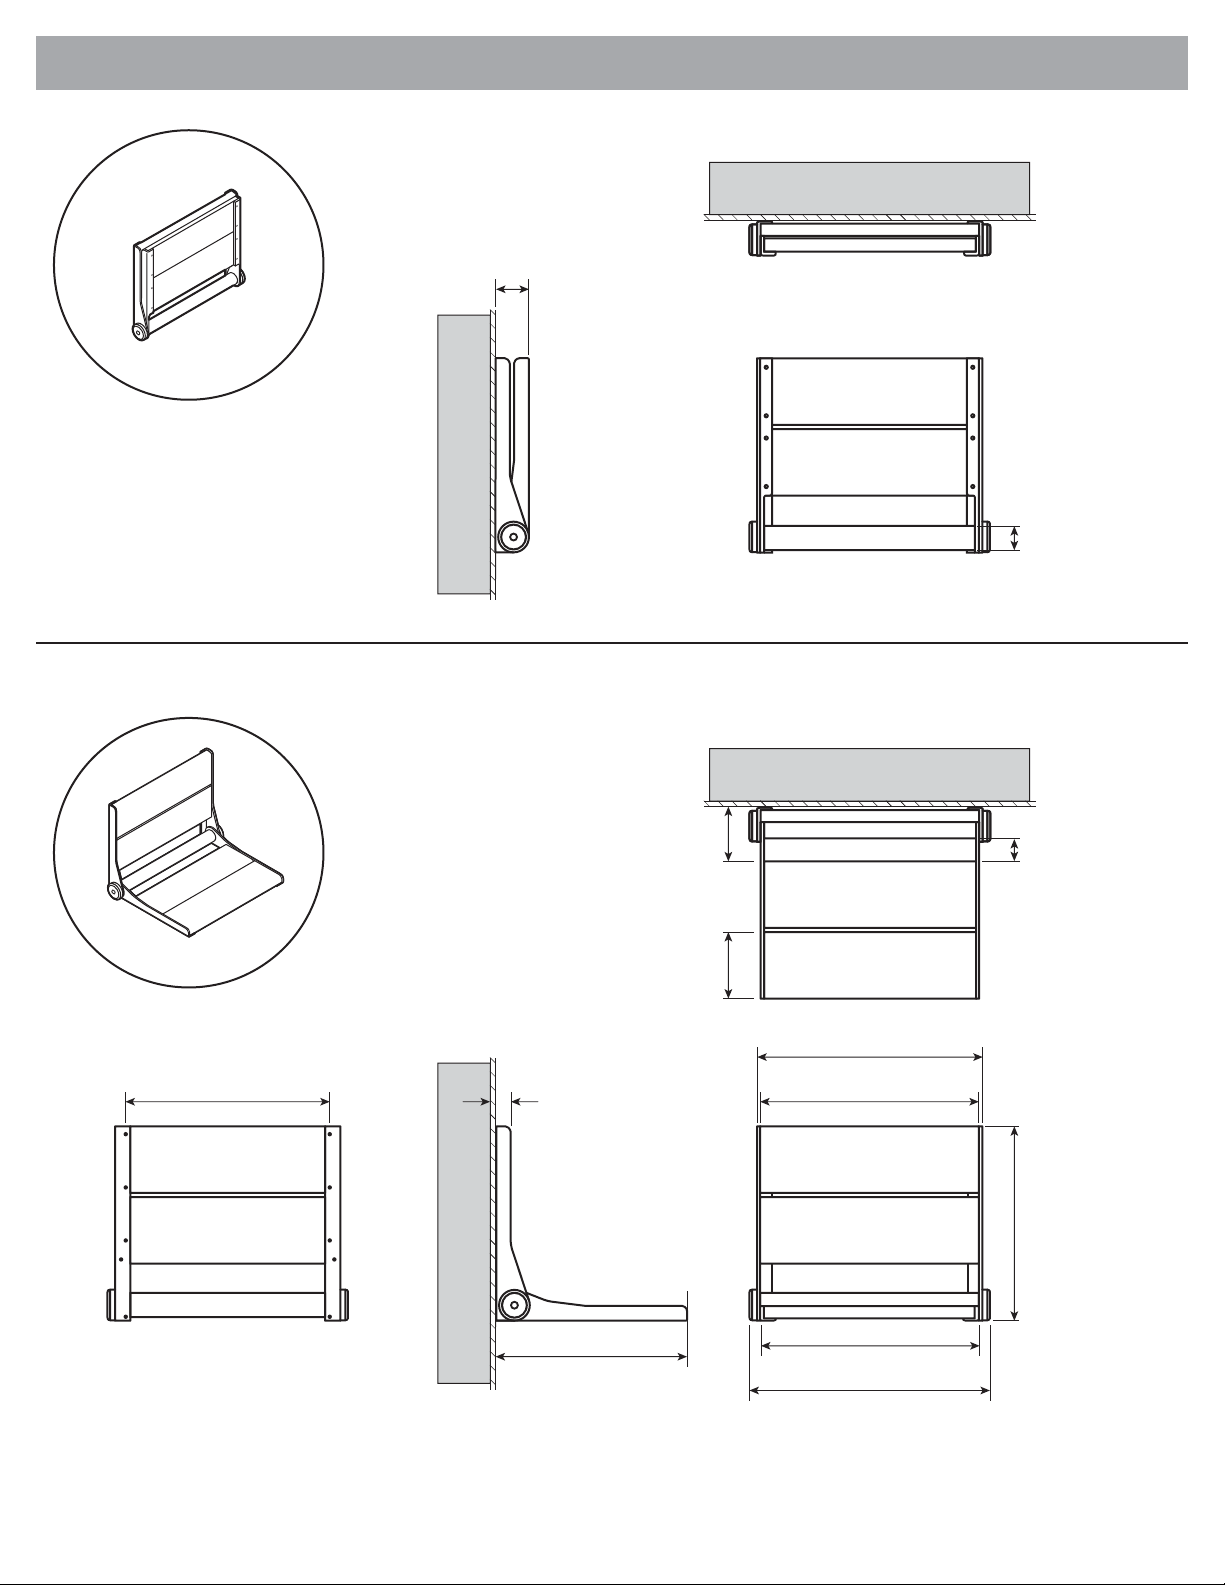
DELIVERYCONTENTS / PARTS FIGUREA.
1. SeatAssembly
2. Bottom Wall Panel
3. Top Wall Panel
4. #10 x 3" Wood Screw, S/S (x8)
INSTALLATION WARNINGS FIGURE B.
1. Seat must be installed to walls that are structurally sound.
2. If desired installation location does not have adequate structure, add
wood blocking.
3. CAUTION - Do not install if structure behind walls is unknown.
4. CAUTION - Do not install into metal studs.
5. CAUTION - Do not install in fiberglass / acrylic shower enclosures with
insufficient stiffness and strength.
6. CAUTION - Do not use seat for purposes other than sitting.
7. CAUTION - Do not more seat more than 1 person at a time.
8. CAUTION - Gap between wood and aluminum frame.
9. CAUTION - Pinch points present when folding seat.
10. CAUTION - Seat and bathtub are slippery when wet.
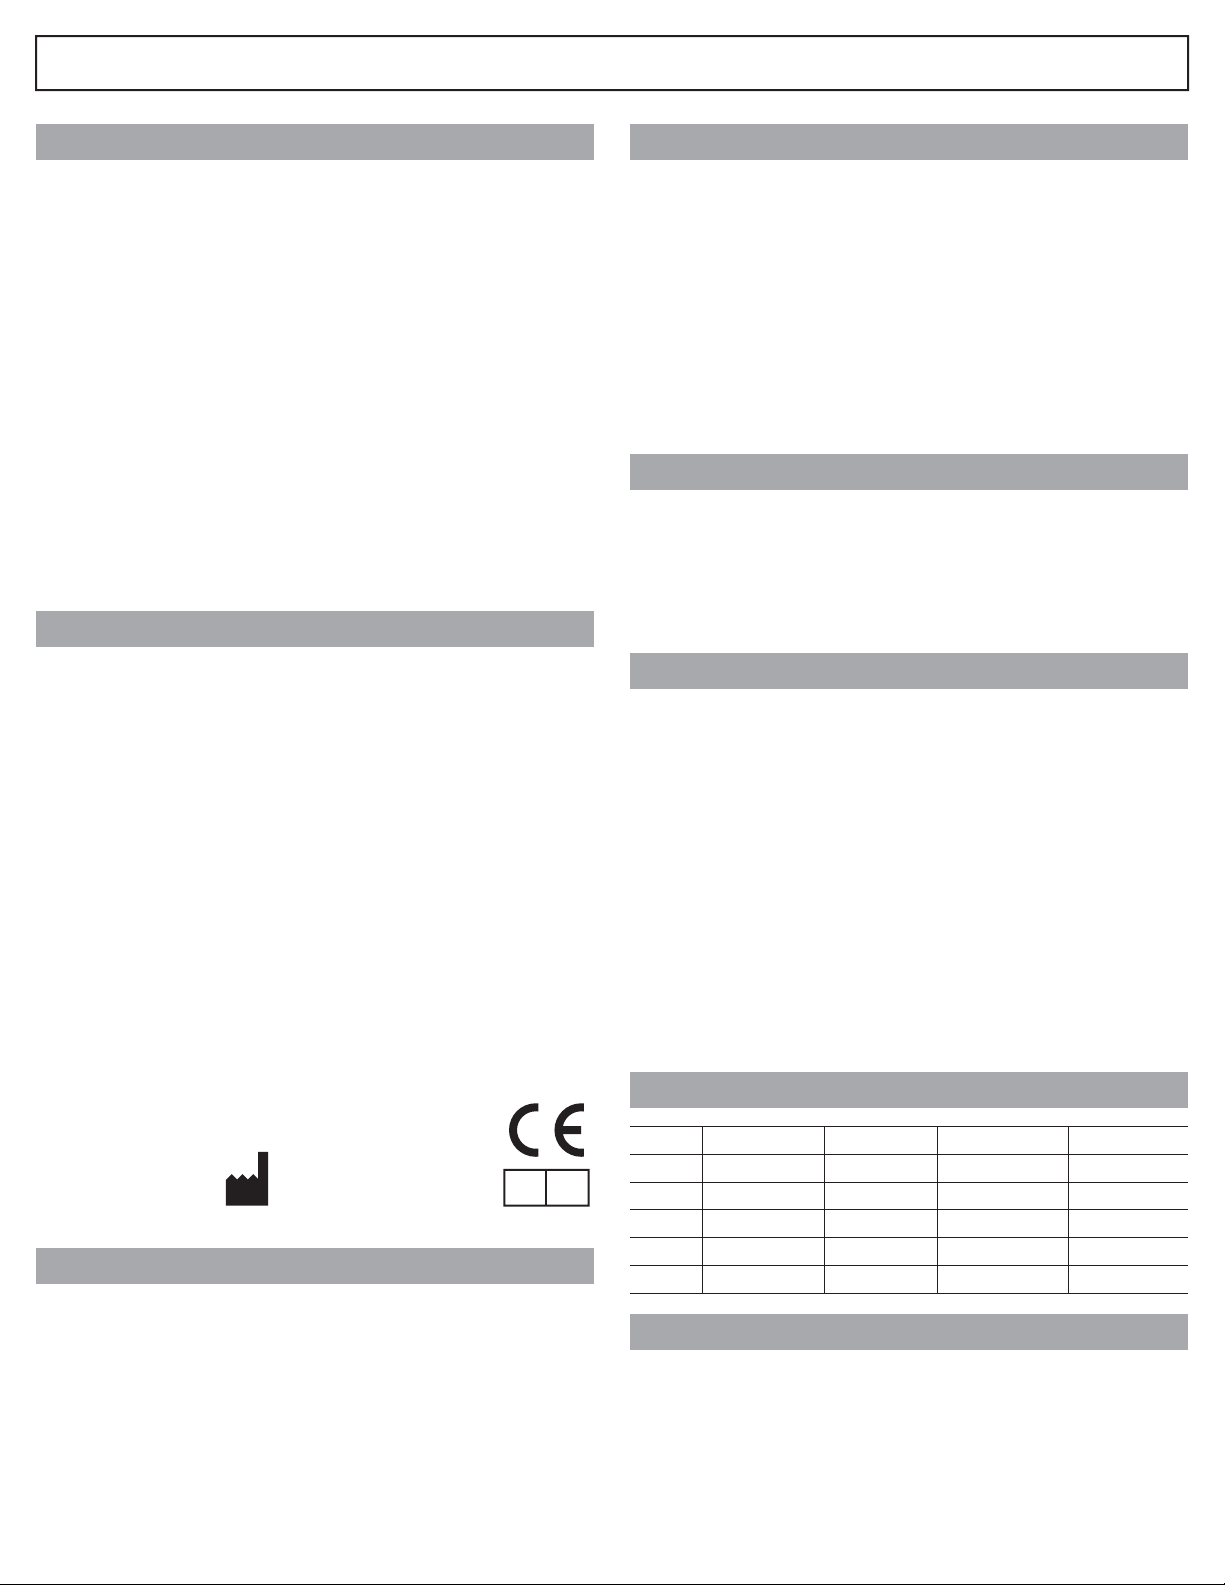
SUGGESTED SERENA-SEAT LOCATIONS FIGURE C.
To determine the optimal mounting location, we recommend consulting
with an appropriate healthcare professional. If side wall (to faucet) is less
than 36" / 914mm, seat can be mounted on the back wall. If side wall (to
faucet) is greater than 36" / 914mm, seat can be mounted on side wall
(less than 24" / 610mm from faucet wall).ADArecommend seat height
from finished floor 17-19" / 432-483mm.
INSTALLATION FIGURE D.
1. Slide wall panels off of frame.
2. Mark the location on the wall of the top hole of the frame (to position the
seat surface at the required height).
3. Drill pilot hole for fastener.
4. Fasten the frame to the wall using appropriate fastener and
waterproofing.
5. Slide lower wall panel onto frame.
6. Use a level to ensure the seat is level and mark location on the wall of
top hole on the frame.
7. Drill pilot hole for fastener.
8. Fasten the frame to the wall using appropriate fastener and
waterproofing.
9. Slide lower wall panel off of frame.
10. Repeat step 7 and 8 for remaining holes (x6)
11. Slide wall panels onto frame.
12. Inspect hardware regularly, and tighten if required.
TECHNICALDATA FIGURE E.
PRODUCT USAGE
See Figure F.
Gate 88
Kanalgatan 45B
Skellefteå, Sweden
93123
B
Seat
17.96"
456mm
25.96"
659mm
C
Hole Spacing
16.83"
427mm
24.83"
631mm
D
Overall Width
19.84"
504mm
27.84"
707mm
Model
WS18
WS26
A
Back Rest
18.58"
472mm
26.58"
675mm
10
EC REP

Français
11
APERÇU
Nous vous remercions d’avoir opté pour le Siège Serena Invisia. Veuillez
lire et vous familiariser avec les instructions du présent manuel; veuillez
conserver ce manuel pour consultation ultérieure. Il vous incombe de
veiller à ce que le Siège Serena Invisia est correctement assemblé, installé
et entretenu. Le défaut d’observer les instructions contenues dans le
présent manuel pourrait entraîner des blessures graves ou la mort. Si vous
ne disposez pas de l’équipement nécessaire pour effectuer le travail décrit,
nous vous conseillons de recourir à un entrepreneur compétent pour
l’installation.
Le Siège Serena Invisia est un siège rabattable pour la douche d’une
grande qualité commerciale. Le Siège Serena est destiné à offrir un
soutien en position assise sous la douche pour les personnes à mobilité
réduite. Le Siège Serena est conçu pour supporter un poids
UNIQUEMENT lorsqu’il est rabaissé; le siège n’est pas conçu pour
supporter un poids dans toute autre position. Le Siège Serena doit être
rabattu lorsqu’il n’est pas utilisé. Une charnière de friction assure que la
poignée ne descendra pas plus bas par mégarde lorsqu’elle est en position
relevée. Le Siège Serena s’installe dans la paroi structurelle murale au
moyen de dispositifs de fixation appropriés. Le poids maximal de l’usager
pour ce produit est de 227 kg/500 lb. Remarque : Le produit n’est pas
destiné à soutenir entièrement le poids corporel (c’.-à-d. qu’il ne faut pas
s’y tenir debout). Le Siège Serena ne doit pas être utilisé autrement qu’il
est décrit ci-dessus.
GARANTIE LIMITÉE À VIE
Les produits sont protégés par une garantie à vie contre les défauts,
pièces et main-d’œuvre, pour l’acheteur initial. La garantie ne s’applique
pas aux produits qui ont été endommagés en raison d’un abus, d’un
dommage accidentel, d’une modification, d’une usure normale, non plus
qu’elle s’applique aux matériaux en bois ou aux taches, ou suite à
l’utilisation de produits d’entretien abrasifs et corrosifs.
L'acheteur, par la présente, indemnise, accepte de garantir et de défendre
HealthCraft Products inc. à l'égard de toutes responsabilités, réclamations
(fondées et non fondées), pertes, dommages, coûts et dépenses (y
compris, mais sans s'y limiter, des dommages consécutifs et des
honoraires professionnels raisonnables) résultant de la spécification des
acheteurs, une application ou une mauvaise utilisation des produits décrits
ici; l'omission ou la négligence des acheteurs. HealthCraft Products inc.
décline toute responsabilité pour les dommages résultant de services
rendus par d'autres parties ou suite une installation défectueuse, une
mauvaise utilisation ou une mauvaise application des marchandises
vendues par HealthCraft Products inc. HealthCraft Products inc. ne sera
pas responsable pour les bénéfices potentiels ou dommages spéciaux,
indirects ou consécutifs, ou pour le coût des travaux correctifs réalisés
sans l'approbation préalable de HealthCraft Products inc. La responsabilité
totale de HealthCraft Products inc. en vertu des présentes ne doit en
aucun cas excéder le prix d'achat des marchandises, tel que précisé aux
présentes. Les caractéristiques peuvent faire l’objet de à changement sans
préavis.
HealthCraft Products Inc.
2790 Fenton Road
Ottawa, Canada
K1T 3T7
CONTENU À LALIVRAISON – SIÈGE SERENA FIGUREA.
1. Siège
2. Panneau mural inférieur
3. Panneau mural supérieur
4. Vis à bois #10 x 2 po, S/S (x8)
AVERTISSEMENTS LORS DE L’NSTALLATION FIGURE B.
1. Le siège doit être installé sur des murs dont la structure est solide.
2. Si l’emplacement désiré n’offre pas une structure adéquate, ajoutez des
blocs de bois.
3.ATTENTION – Ne pas installer si la structure derrière le mur n’est pas
connue.
4.ATTENTION – Ne pas installer dans des colombages métalliques.
5.ATTENTION – Ne pas installer sur des cabinets de douche en fibre de
verre ou en acrylique n’offrant pas suffisamment de rigidité et de
robustesse.
6.ATTENTION – Ne pas utiliser le siège autrement que pour s’asseoir.
7.ATTENTION – Ne pas assoir plus d’une personne à la fois.
8.ATTENTION – Il y a un espace entre le cadrage de bois et l’aluminium.
9.ATTENTION – Points de pincement lors du rabat du siège.
7.ATTENTION – Le siège et la baignoire sont glissants lorsque mouillés.
EMPLACEMENT SUGGÉRÉ POUR LE SIÈGE SERENA FIGURE C.
Afin de déterminer l’emplacement optimal pour l’installation, nous
conseillons de faire appel à un professionnel de la santé. Si le mur latéral
(au robinet) est de moins de 914 mm/36 po, le siège peut être installé sur
le mur arrière. Si le mur latéral (au robinet) est de plus de 914 mm/36 po,
le siège peut être installé sur le mur latéral (moins de 610 mm/24 po du
mur du robinet. L’ADA(organisme américain pour personnes
handicapées) recommande une hauteur de 432-483 mm/17-19 po,
mesurée depuis la surface du plancher.
INSTALLATION FIGURE D.
1. Faites glisser les panneaux muraux hors du cadre.
2. Marquez sur le mur l’emplacement du trou supérieur du cadre (afin de
positionner la surface du siège à la hauteur exigée).
3. Percez le trou pilote pour le dispositif de fixation.
4. Fixez le cadre au mur au moyen d’un dispositif de fixation approprié et
imperméabilisez.
5. Faites glisser le panneau mural inférieur dans le cadre.
6. Utilisez un niveau afin de vous assurer de la position du siège et
marquez sur le mur l’emplacement du trou supérieur du cadre.
7. Percez un trou pilote pour le dispositif de fixation.
8. Fixez le cadre au mur au moyen d’un dispositif de fixation approprié et
imperméabilisez.
9. Faites glisser le panneau mural inférieur dans le cadre.
10. Répétez les étapes 7 et 8 pour les autres trous (x6).
11. Faites glisser les panneaux muraux dans le cadre.
12. Vérifiez régulièrement la quincaillerie, et resserrez au besoin.
DONNÉES TECHNIQUES FIGURE E.
UTILISATION DU PRODUIT
Voir la Figure F.
Gate 88
Kanalgatan 45B
Skellefteå, Sweden
93123
B
Siège
17.96"
456mm
25.96"
659mm
C
Espacement des trous
16.83"
427mm
24.83"
631mm
D
Largeur
19.84"
504mm
27.84"
707mm
Modèle
WS18
WS26
A
Dossier
18.58"
472mm
26.58"
675mm
EC REP

Español
12
GENERAL
Gracias por elegir el asiento Invisia Serena. Lea y asegúrese de
comprender las instrucciones de este manual, y guárdelo para referencia
futura. Es su responsabilidad verificar que su asiento Invisia Serena sea
ensamblado, instalado y cuidado correctamente. Si no se siguen las
instrucciones de este manual, podrían producirse como resultado lesiones
graves o aun la muerte. Si usted no tiene los medios para realizar el
trabajo que se describe, recomendaríamos que haga instalar el asiento
Invisia Serena por un contratista calificado.
El asiento Invisia Serena es un asiento plegable para la ducha de alta
calidad y de categoría comercial. El asiento Serena ha sido concebido
para ofrecer apoyo a las personas con movilidad reducida cuando se
sientan en la ducha. El asiento Serena ha sido concebido para soportar
peso ÚNICAMENTE cuando el asiento está bajo; el asiento no ha sido
concebido para soportar peso en ninguna otra posición. El Serena ha sido
concebido para quedar plegado hacia arriba cuando no está en uso.
Gracias a una bisagra de fricción, la agarradera no bajará
impensadamente cuando está hacia arriba. El asiento Serena se instala
con sujetadores apropiados que lo fijan a una pared estructural. El peso
máximo del usuario de este producto es de 500 lb/227 kg. Nota: El
producto no está destinado a soportar el peso total del cuerpo (es decir, no
se pare sobre el asiento). El asiento Serena no debe usarse de ninguna
otra forma fuera de lo antes descrito.
GARANTÍALIMITADADE POR VIDA
Los productos están cubiertos por una garantía limitada de por vida por
defectos en los materiales y la mano de obra, en beneficio del comprador
original. La garantía excluye productos que hayan sido dañados por uso
incorrecto, daño accidental, alteración, desgaste normal, materiales de
madera y teñido, o el uso de productos de limpieza corrosivos o abrasivos.
Por el presente, el comprador mantiene indemne y se manifiesta de
acuerdo en liberar y defender a HealthCraft Products Inc. de toda
responsabilidad, reclamo (fundado o infundado), pérdida, daño, costo y
gasto (incluidos, sin que esto excluya otras posibilidades, los daños
derivados y las costas profesionales razonables) que resulte de la
especificación, la aplicación o el uso inapropiados de los productos que
aquí se describen, como también de toda omisión o negligencia por parte
del comprador. HealthCraft Products Inc. no asume ninguna
responsabilidad por daños resultantes de los servicios prestados por otros,
como tampoco de la instalación defectuosa, del uso incorrecto o de la
aplicación incorrecta de los bienes vendidos por HealthCraft Products Inc.
HealthCraft Products Inc. no será responsable por los beneficios
potenciales o los daños especiales, indirectos o derivados, ni por el costo
de ninguna tarea correctiva realizada sin la previa aprobación de
HealthCraft Products Inc. La responsabilidad total de HealthCraft Products
Inc. en virtud del presente no será superior en ningún caso al precio de
compra de los productos aquí especificados.
Las especificaciones están sujetas a cambios sin previo aviso.
HealthCraft Products Inc.
2790 Fenton Road
Ottawa, Canada
K1T 3T7
CONTENIDO ENTREGADO/ASIENTO SERENA FIGURAA.
1. Conjunto del asiento
2. Panel respaldo inferior
3. Panel respaldo superior
4. Tornillo para madera #10 x 3",A/I (x8)
ADVERTENCIAS DE INSTALACIÓN FIGURAB.
1. El asiento se debe instalar sobre paredes de estructura sólida.
2. Si el lugar donde se desea hacer la instalación no tiene una estructura
adecuada, agregue suplementos de madera.
3. PRECAUCIÓN – No instalar si se desconoce la estructura que está
detrás de la pared.
4. PRECAUCIÓN – No instalar sobre montantes de metal.
5. PRECAUCIÓN – No instalar en cerramientos para ducha de fibra de
vidrio o acrílico sin la suficiente rigidez y resistencia.
6. PRECAUCIÓN – No usar para otros fines más que para sentarse.
7. PRECAUCIÓN – No se debe sentar más de 1 persona a la vez.
8. PRECAUCIÓN – Espacio entre la madera y la estructura de aluminio.
9. PRECAUCIÓN – Hay puntos de compresión al plegar el asiento.
10. PRECAUCIÓN – El asiento y la tina son resbaladizos cuando están
húmedos.
UBICACIONES SUGERIDAS PARAELASIENTO SERENAFIGURAC.
Afin de determinar la ubicación óptima para montar el asiento,
recomendamos consultar a un profesional de atención de la salud
adecuado. Si la distancia de la pared lateral (al grifo) es menor de 36" /
914mm, el asiento se puede montar sobre la pared trasera. Si la distancia
de la pared lateral (al grifo) es mayor de 36" / 914mm, el asiento se puede
montar sobre la pared lateral (menos de 24" / 610mm de la pared del
grifo).ADArecomienda que el asiento esté a una altura de 17-19" /
432-483mm desde la terminación del piso.
INSTALACIÓN FIGURAD.
1. Retirar los paneles de respaldo de la estructura.
2. Marcar la ubicación sobre la pared del orificio superior de la estructura
(para ubicar la superficie del asiento a la altura requerida).
3. Perforar orificio guía para el sujetador.
4. Fijar la estructura a la pared usando un sujetador apropiado e
impermeabilizante.
5. Volver a colocar el panel de respaldo inferior en la estructura.
6. Usar un nivel para asegurar que el asiento esté a nivel y marcar la
ubicación en la pared del orificio superior de la estructura.
7. Perforar orificio guía para el sujetador.
8. Fijar la estructura a la pared usando un sujetador apropiado e
impermeabilizante.
9. Retirar el panel de respaldo inferior de la estructura.
10. Repetir los pasos 7 y 8 para los orificios restantes (x6).
11. Volver a colocar los paneles de respaldo en la estructura.
12.Inspeccionarregularmentelosaccesoriosdeferretería,yajustarsiesnecesario.
DATOS TÉCNICOS FIGURAE.
UTILIZACIÓN DELPRODUCTO
Consulte la Figura F.
Gate 88
Kanalgatan 45B
Skellefteå, Sweden
93123 EC REP
B
Asiento
17.96"
456mm
25.96"
659mm
C
Espaciado de orificios
16.83"
427mm
24.83"
631mm
D
Ancho total
19.84"
504mm
27.84"
707mm
Modelo
WS18
WS26
A
Respaldo
18.58"
472mm
26.58"
675mm

13
B
Sits
17.96"
456mm
25.96"
659mm
C
Hålavstånd
16.83"
427mm
24.83"
631mm
D
Övergripande bredd
19.84"
504mm
27.84"
707mm
Modell
WS18
WS26
A
Ryggstöd
18.58"
472mm
26.58"
675mm
Svenska
ÖVERSIKT
Tack för att du väljer Invisia Serena-Seat. Läs igenom och se till att du
förstår anvisningarna i den här handboken. Spara handboken för framtida
bruk. Du ansvarar själv för att se till att din Invisia Serena-Seat monteras,
installeras och underhålls ordentligt. Underlåtelse att följa anvisningarna i
den här handboken kan leda till allvarliga skador eller dödsfall. Om du inte
klarar av att utföra det arbete som beskrivs, rekommenderar vi att du låter
en behörig hantverkare installera Invisia Serena-Seat.
Serena-Seat är en högkvalitativ nedfällbar duschsits av handelskvalitet.
Serena-Seat är avsedd att tillhandahålla sittstöd i dusch för personer med
nedsatt rörlighet. Serena-Seat är avsedd att belastas ENDAST i nedfällt
läge. Sitsen är inte avsedd att belastas i något annat läge. Serena-Seat är
avsedd att fällas upp när den inte används. Ett friktionsgångjärn ser till att
den inte sänks oavsiktligt när den är i uppfällt läge. Serena-Seat installeras
med lämpliga fästelement på en bärande vägg. Maxvikten för en
användare av den här produkten är 227 kg. Obs! Produkten är inte avsedd
att stödja full kroppsvikt (dvs. stå ej på sitsen). Serena-Seat ska inte
användas på något annat sätt än enligt beskrivningen ovan.
BEGRÄNSAD LIVSTIDSGARANTI
Den ursprungliga köparen får en begränsad livstidsgaranti som täcker fel i
material och tillverkningen av produkterna. Garantin gäller inte produkter
som har skadats till följd av felaktig användning, genom olyckshändelse,
modifiering, normalt slitage, kontakt med eller missfärgning från
trämaterial, eller användningen av frätande eller slipande rengöringsmedel.
Köparen samtycker härmed till att gottgöra, försvara och hålla HealthCraft
Products Inc. skadelösa från alla betalningsskyldigheter, anspråk (med
eller utan grund), förluster, skador, kostnader och utgifter (inklusive, men
inte begränsat till, följdskador och rimliga arvoden) som uppstår till följd av
köparens specifikation, tillämpning eller felaktiga användning av varor som
beskrivs häri, samt köparens försummelse eller vårdslöshet. HealthCraft
Products Inc. bär inget ansvar för skador som uppstår till följd av tjänster
som utförs av tredje part eller felaktig installation, felaktig användning eller
tillämpning av varor som säljs av HealthCraft Products Inc. HealthCraft
Products Inc. bär inget ansvar för eventuella vinster eller särskilda eller
indirekta skador eller följdskador, eller för kostnaden av korrigerande
arbeten som utförs utan godkännande från HealthCraft Products Inc.
HealthCraft Products Inc. totala betalningsskyldighet ska inte under några
omständigheter överstiga inköpspriset för varorna som anges häri.
Specifikationerna kan ändras utan föregående meddelande.
HealthCraft Products Inc.
2790 Fenton Road
Ottawa, Canada
K1T 3T7
Distribueras av Now BoardingAB i Sverige.
LEVERANSINNEHÅLL/SERENA-SEAT FIGURA.
1. Sits
2. Nedre väggpanel
3. Övre väggpanel
4. #10 × 3" träskruv, S/S (× 8)
INSTALLATIONSVARNINGAR FIGUR B.
1. Sitsen ska installeras på väggar som är konstruktionsmässigt lämpliga.
2. Om konstruktionen på önskad installationsplats inte är godtagbar kan
du använda kortlingar.
3. VARNING – Installera inte sitsen om du inte vet hur konstruktionen
bakom väggarna ser ut.
4. VARNING – Sätt inte fast sitsen i metallreglar.
5. VARNING – Installera inte sitsen i duschkabiner i glasfiber/akryl som
inte är tillräckligt styva eller starka.
6. VARNING –Använd inte sitsen i något annat syfte än att sitta på.
7. VARNING – Sitt inte fler än 1 person åt gången.
8. VARNING – Gap mellan trädelen och aluminiumramen.
9. VARNING – Klämrisk föreligger när sitsen fälls ihop.
10. VARNING – Sitsen och badkaret är hala när de är våta.
FÖRESLAGNAINSTALLATIONSPLATSER FÖR SERENA-SEAT
FIGUR C.
För att fastställa den bästa möjliga installationsplatsen rekommenderar vi
att du rådgör med en lämplig yrkesutövare inom hälso- och sjukvården.
Om sidoväggen (vid blandaren) är kortare än 91 cm kan sitsen installeras
på den bakre väggen. Om sidoväggen (vid blandaren) är längre än 91 cm
kan sitsen installeras på sidoväggen (mindre än 61 cm från den vägg där
blandaren sitter). DenADA-rekommenderade sitshöjden från golvytan är
43–48 cm.
INSTALLATION FIGUR D.
1. Ta bort väggpanelerna från ramen genom att skjuta dem uppåt.
2. Märk upp placeringen för ramens översta hål på väggen (för att placera
sittytan i rätt höjd).
3. Förborra hål för fästelement.
4. Sätt fast ramen i väggen med hjälp av lämpligt fästelement och
vattentätning.
5. Sätt i den nedre väggpanelen i ramen genom att skjuta in den.
6.Använd ett vattenpass och se till att sitsen sitter rakt. Märk upp
placeringen för ramens översta hål på väggen.
7. Förborra hål för fästelement.
8. Sätt fast ramen i väggen med hjälp av lämpligt fästelement och
vattentätning.
9. Ta bort den nedre väggpanelen från ramen genom att skjuta dem uppåt.
10. Upprepa steg 7 och 8 för resterande hål (× 6).
11. Sätt i väggpanelerna i ramen genom att skjuta in dem.
12. Kontrollera fästelement och beslag regelbundet. Dra åt dem vid behov.
TEKNISKAUPPGIFTER FIGUR E.
PRODUKTANVÄNDNING
Se figur F.
Gate 88
Kanalgatan 45B
Skellefteå, Sweden
93123 EC REP
This manual suits for next models
2
Table of contents
Popular Medical Equipment manuals by other brands

BMC
BMC Polymate YH-1000C user manual

Orliman
Orliman ONE PLUS OPL354 Instructions for use

CA.MI
CA.MI Clineb Pro instruction manual

Osprey Medical
Osprey Medical DyeVert Power XT Instructions for use

TensCare
TensCare perfect BEAUTY Instructions for use

Drive DeVilbiss Healthcare
Drive DeVilbiss Healthcare iGo 2 manual