manuals.online logo
Brands
  1. Home
  2. •
  3. Brands
  4. •
  5. AQUAMAXX
  6. •
  7. Aquarium
  8. •
  9. AQUAMAXX cTech T Series User manual

AQUAMAXX cTech T Series User manual

A
A
B
B
C
C
Before Assembly
Please open the package carefully, and check if there are any damaged or lost parts.
We should have:
While we take great care to keep any contaminants away from our products during assembly, please take a moment to clean with warm water ONLY.
Never clean Acrylic with alcohol-based products or other chemicals. Use caution when handling acrylic scratches easily.
Main reactor body and lid
Inlet filter (with hose and pinch valve) / bubble counter (with hose) / holder
D
D
Hose (inlet/outlet) / hose holder
Wash your media before you use them.
Leave at least 50mm from media to lid.
Assembly
1
2
Loosen the thumb screws. Turn lid counterclockwise to release.
3Once you finished filling, make sure the o-ring is in the groove, then place the lid, and screw back. (DO NOT OVER-TIGHTEN)
Remember to leave one screw to install the inlet holder.
Fill in your media, but watch out not to fill into the central tube. You can temporarily block the top of the central tube to stop additives from going down the central tube.
Tips:
Tighten the screws in a star pattern to evenly secure the lid.
Pump ( T-1 / T-2 / T-3 with baffle )
cTech T-Series
Calcium Reactor T-Nano / T-1 / T-2 / T-3
Additional Parts Needed (sold separately)
• Feeding Pump
• Calcium Reactor Media
• CO2 Cylinder
• CO2 Check Valve
• CO2 Regulator
• CO2 Tubing
• pH test kit, pH monitor or pH controller
[email protected]
www.aquamaxxaquariums.com
4Install the pump 5Separete the bubble counter, and take off the
air hose to fill in freshwater, and once it’s 3/4
full, install the check valve to the bottom of
bubble counter.
6Reinstall the inlet filter, and install the holder onto the lid. 7Connect the bubble counter to the central, the inlet to the pump.
Tips: block the bottom of bubble counter by
your finger and put it into water, you can
easily fill it off.
How to separate the hose?
8Cut a suitable length of the included white tubing for the inlet and outlet. Connect the feeding pump to the inlet, and CO₂regulator to the reactor.
9Take off the lid of pH probe holder to install the pH test probe
DO NOT PULL OUT THE TUBING DIRECTLY
AS THIS WILL DAMAGE THE FITTINGS
2
12
3
inlet
CO2
outlet
PUMP DOSING PUMP
CO2
inlet
outlet
to middle tube
to inlet
(1) (2) (3)
remove the blue clip press down the small
white collar
pulling out the tubing
1
1
Open the flow control valve, make sure the CO2regulator is not open yet. Turn on the feeding pump.
2
2
Turn on the Calcium Reactor pump on for 20-30 minutes or until the water inside the chamber runs
clear. Take this opportunity to check for leaks.
3
3
Adjust the flow control valve until the drip rate is approximately 2 drips per second.
4
4
With the needle valve on the CO2regulator opened slightly, slowly open the main valve on the CO2tank.
5Slowly adjust the needle valve while keeping an eye on the bubble counter. Adjust CO2injection rate to 1 bubble every 2 seconds.
6Once the reactor is running, you will adjust the flow of CO2 and effluent to match your aquarium’s calcium/alkalinity demand.
Over the course of the next week or two, you will need to fine tune the flow of CO2 and drip rate to match your aquarium’s calcium and alkalinity demands. Every
tank is different and testing your water chemistry is the only way to determine the exact drip rate and CO2 Injection rate that is appropriate for your aquarium
7As changes to the CO2 bubble rate or the drip rate need time to take effect, we recommend making small changes and allow a few hours (or overnight) for the change to
take effect before making further changes.
inlet
outlet
To Start Operating
*The cTech will work most efficiently if the internal pH is between 6.5-6.8. For best results, do not set the internal pH lower than 6.4 or higher than 6.9.
Maintenance
It is very easy for the water inlets and outlets to become blocked by the very slow flow
rate, please check the water and air inlets and outlets during regular maintenance. Check the effluent pH of the water from the water outlet regularly if not using
a controller.
Replace the media annually or as needed.
Replace the filter media of inlet regulary or as needed.
5Regular maintenance of the pump will ensure a long life and maximum performance
(recommended every 3 months). You can disassemble the pump through the following steps:
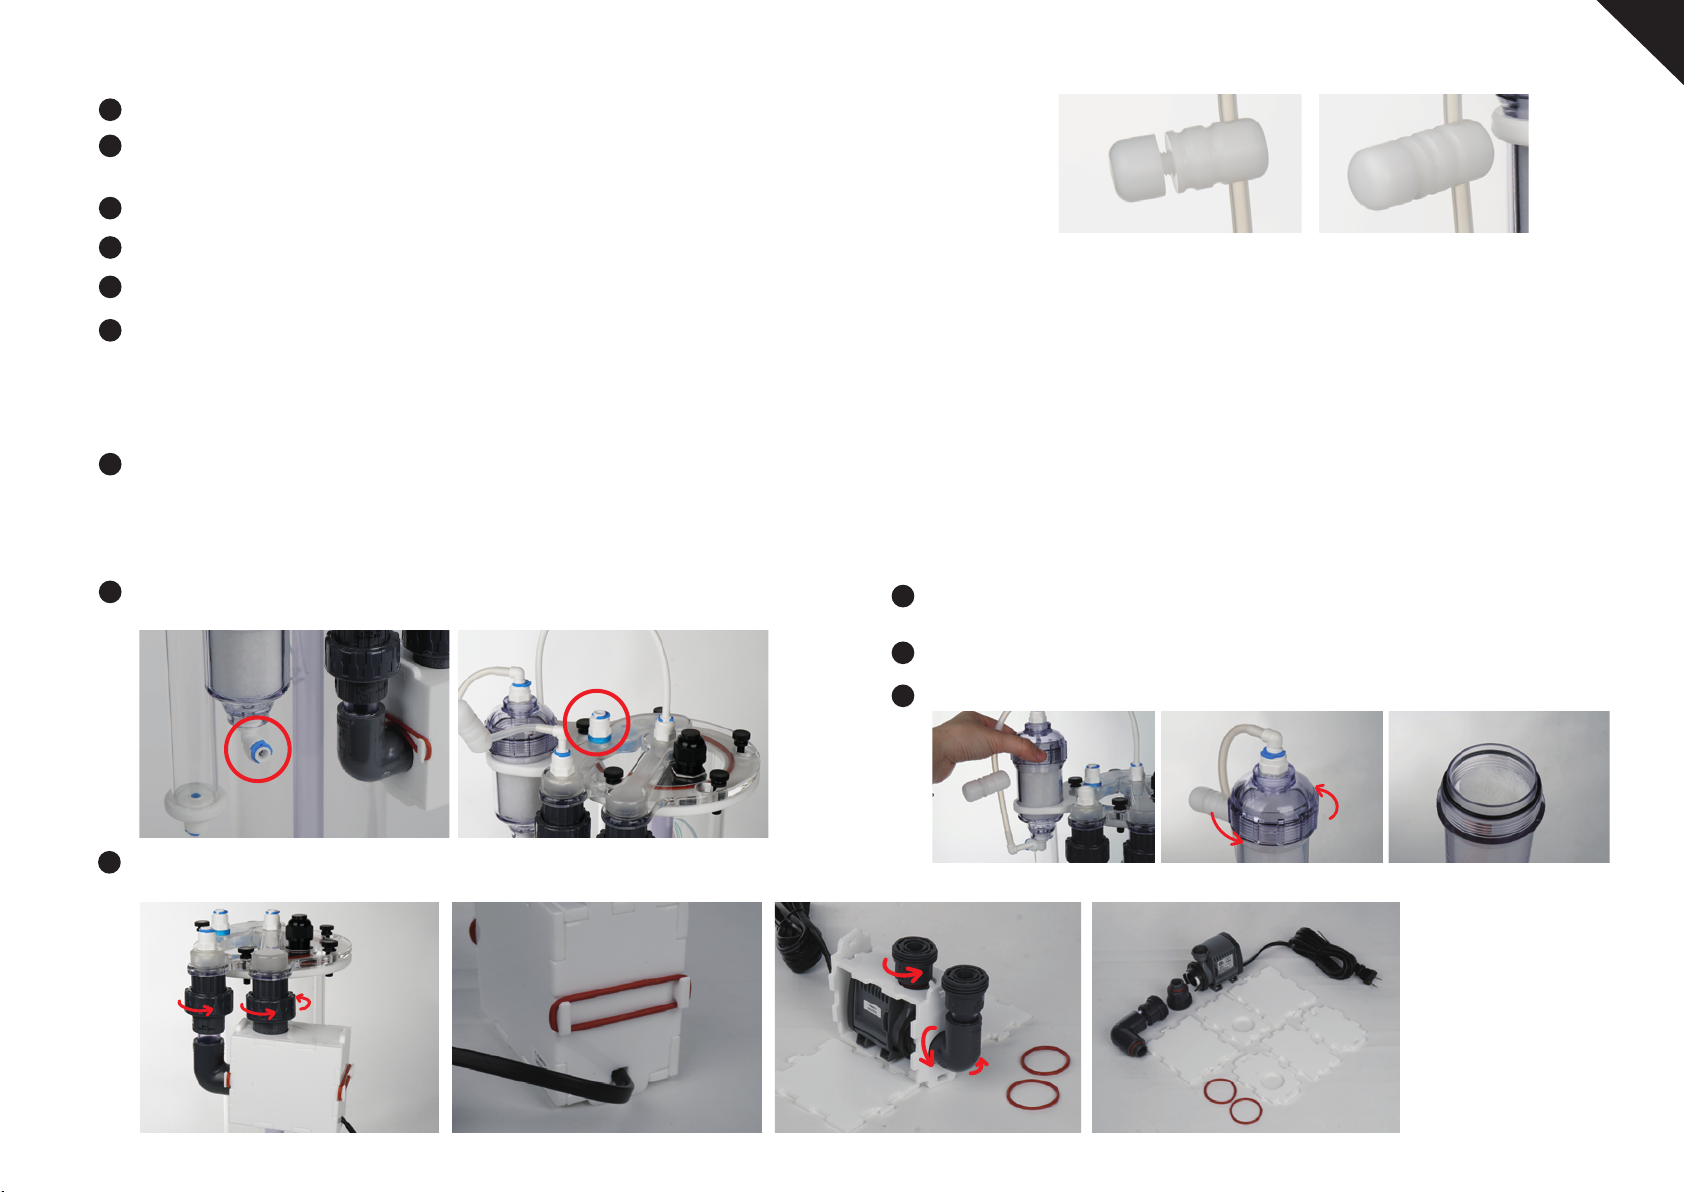
3
flow control valve (opened) flow control valve (closed)
To lower the pH: raise the bubble rate or lower drip rate.
To raise the pH: lower the bubble rate or raise drip rate.
(2) take off the oring on both side(1) take off the pump (3) take off the tubes (4) Take off all the baffles
1
2
4
35
6
6Assembly of the pump baffle:
4
(5) Take off the cover of pump (6) Pull out the inside parts
(Make sure to put back in right position)
(7) The rotor could be disassembled.
Should be installed this way,
or the inlet can’t be installed.
How to remove the limescale?
NO OTHER CHEMICALS, soak in a mixture of 1 part water and 1 part vinegar (citrin acid also
available) for at least 24 hours. Once you finish, please rinse with warm water.
1 2 3
front Top Side-A
4
Side-B
5
Wire
6
Bottom
Warranty
AquaMaxx warrants all AquaMaxx products to be free from manufacturing defects for one year from the original purchase date when purchased through an authorized AquaMaxx
retailer. This warranty does not cover any damages caused by misuse, neglect, alterations or improper handling / transport / maintenance / installation. Physical damages are not covered
by warranty. AquaMaxx does not cover personal injury, personal loss, or other damages associated with the use of our products. In order to request warranty service, please email us at
[email protected]. A purchase receipt is required for any warranty service. Products requiring warranty service must be returned to AquaMaxx. You are responsible for the
cost of shipping a warranty claim to AquaMaxx and any damages that may occur during transit. Once a returned product has been inspected, it will be repaired or exchanged at our
discretion and returned to you. International and/or expedited shipping are not covered under your AquaMaxx warranty.

This manual suits for next models

5

Other AQUAMAXX Aquarium manuals

AQUAMAXX FR-SE GFO User manual

AQUAMAXX

AQUAMAXX FR-SE GFO User manual

AQUAMAXX AM100 User manual

AQUAMAXX

AQUAMAXX AM100 User manual

AQUAMAXX Sicce Series User manual

AQUAMAXX

AQUAMAXX Sicce Series User manual

AQUAMAXX FR-S User manual

AQUAMAXX

AQUAMAXX FR-S User manual

AQUAMAXX BioMaxx Standard User manual

AQUAMAXX

AQUAMAXX BioMaxx Standard User manual

AQUAMAXX ConeS DFC Series User manual

AQUAMAXX

AQUAMAXX ConeS DFC Series User manual

AQUAMAXX AM250 User manual

AQUAMAXX

AQUAMAXX AM250 User manual

Popular Aquarium manuals by other brands

TMC Aquarium V2iLumenAir 900 Instructions for installation and use

TMC Aquarium

TMC Aquarium V2iLumenAir 900 Instructions for installation and use

Dennerle Trocal LED Control quick start

Dennerle

Dennerle Trocal LED Control quick start

Dennerle Scaper’s Tank quick guide

Dennerle

Dennerle Scaper’s Tank quick guide

SuperFish Planty 25 Warranty and manual

SuperFish

SuperFish Planty 25 Warranty and manual

Sera Marin Precision Biotop LED Cube 130 Instructions for installation and use

Sera

Sera Marin Precision Biotop LED Cube 130 Instructions for installation and use

GNC BluRayPro manual

GNC

GNC BluRayPro manual

Nuvo Fusion Micro 30L owner's manual

Nuvo

Nuvo Fusion Micro 30L owner's manual

Marineland EXPLORER II Quick setup guide

Marineland

Marineland EXPLORER II Quick setup guide

TMC Reef Photon Troubleshooting

TMC

TMC Reef Photon Troubleshooting

TMC Reel Pulsar Connect LPS-6 instruction sheet

TMC

TMC Reel Pulsar Connect LPS-6 instruction sheet

Waterbox EDEN X 60 manual

Waterbox

Waterbox EDEN X 60 manual

icasa LEDP20 user manual

icasa

icasa LEDP20 user manual

Ferplast Ferplast Dubai Corner 90 Black Replacement manual

Ferplast

Ferplast Ferplast Dubai Corner 90 Black Replacement manual

Dupla MARIN Ocean Lux LED Controller instructions

Dupla MARIN

Dupla MARIN Ocean Lux LED Controller instructions

Hobby Artemix Instructions for use

Hobby

Hobby Artemix Instructions for use

CIANO EMOTIONS PRO Series instructions

CIANO

CIANO EMOTIONS PRO Series instructions

Casa Del Vetro Acquario Milo 80 Luxline Black manual

Casa Del Vetro

Casa Del Vetro Acquario Milo 80 Luxline Black manual

Red Sea REEFER 170 Assembly manual

Red Sea

Red Sea REEFER 170 Assembly manual

manuals.online logo
manuals.online logoBrands
  • About & Mission
  • Contact us
  • Privacy Policy
  • Terms and Conditions

Copyright 2025 Manuals.Online. All Rights Reserved.