manuals.online logo
Brands
  1. Home
  2. •
  3. Brands
  4. •
  5. AQUAMAXX
  6. •
  7. Aquarium
  8. •
  9. AQUAMAXX FR-S User manual

AQUAMAXX FR-S User manual

This manual suits for next models

1

Other AQUAMAXX Aquarium manuals

AQUAMAXX FR-SE GFO User manual

AQUAMAXX

AQUAMAXX FR-SE GFO User manual

AQUAMAXX BioMaxx Standard User manual

AQUAMAXX

AQUAMAXX BioMaxx Standard User manual

AQUAMAXX ConeS DFC Series User manual

AQUAMAXX

AQUAMAXX ConeS DFC Series User manual

AQUAMAXX cTech T Series User manual

AQUAMAXX

AQUAMAXX cTech T Series User manual

AQUAMAXX Sicce Series User manual

AQUAMAXX

AQUAMAXX Sicce Series User manual

AQUAMAXX AM100 User manual

AQUAMAXX

AQUAMAXX AM100 User manual

AQUAMAXX AM250 User manual

AQUAMAXX

AQUAMAXX AM250 User manual

Popular Aquarium manuals by other brands

Tetra Bubbling LED Kit 1 Gallon Hexagon Quick setup guide

Tetra

Tetra Bubbling LED Kit 1 Gallon Hexagon Quick setup guide

AquaLighter Aquascape quick start guide

AquaLighter

AquaLighter Aquascape quick start guide

EHEIM 600 T operating instructions

EHEIM

EHEIM 600 T operating instructions

Red Sea REEFER XL300 Assembly manual

Red Sea

Red Sea REEFER XL300 Assembly manual

AutoAqua Smart Stir SS-100 manual

AutoAqua

AutoAqua Smart Stir SS-100 manual

eKoral eKoral Pro user manual

eKoral

eKoral eKoral Pro user manual

fish mate F14 instructions

fish mate

fish mate F14 instructions

Amtra VEGA manual

Amtra

Amtra VEGA manual

JBL PRO SILENT S-100 Instructions for use

JBL

JBL PRO SILENT S-100 Instructions for use

Innovative Marine MightyJet 8500 Mini How to use

Innovative Marine

Innovative Marine MightyJet 8500 Mini How to use

SuperFish Planty 25 Warranty and manual

SuperFish

SuperFish Planty 25 Warranty and manual

Royal Exclusiv Bubble King DeLuxe 300 datasheet

Royal Exclusiv

Royal Exclusiv Bubble King DeLuxe 300 datasheet

Sera Marin Precision Biotop LED Cube 130 Instructions for installation and use

Sera

Sera Marin Precision Biotop LED Cube 130 Instructions for installation and use

Commodity Axis ViaAqua Titanium Heater manual

Commodity Axis

Commodity Axis ViaAqua Titanium Heater manual

JBL CRISTALPROFI i60 greenline manual

JBL

JBL CRISTALPROFI i60 greenline manual

GNC BluRayPro manual

GNC

GNC BluRayPro manual

JBL Blanki Set quick start guide

JBL

JBL Blanki Set quick start guide

Red Sea REEFER XL300 Assembly manual

Red Sea

Red Sea REEFER XL300 Assembly manual

manuals.online logo
manuals.online logoBrands
  • About & Mission
  • Contact us
  • Privacy Policy
  • Terms and Conditions

Copyright 2025 Manuals.Online. All Rights Reserved.

Internal GFO Carbon and Biopellet Filter Media Reactor
1Please open the package carefully, and check
if there’s any damaged or missing part. 2While we take great care to keep any contaminants away from our products during assembly, please take a
moment to clean with warm water ONLY. Never clean Acrylic with alcohol-based products. Use caution when
handling acrylic scratches easily.
3Some media (such as phosphate control products) is not designed to be aggressively fluidized in a reactor –
please read the instructions for your media carefully.
5
6
7
4
Biopellets may initially clump during break-in. Turn off the pump and allow the clumps to settle at the bottom
of the reactor. Gently shake the reactor to break up clumps. Once the pellets go through this initial break-in
process, they generally require no further action.
For media designed to be fully fluidized, the reactor should be filled no more than two-thirds full to allow
the media room to move around. With heavy or fine media, you may need to add less.
(1)
[email protected]
www.aquamaxxaquariums.com
FR-S / FR-M
FR-S
(1) Main media reactor body and lid
(2) Pump: Sicce Syncra Nano
(3) Sponges *4
FR-M
(1) Main media reactor body and lid
(2) Pump: Sicce Micra
(3) Sponges *4
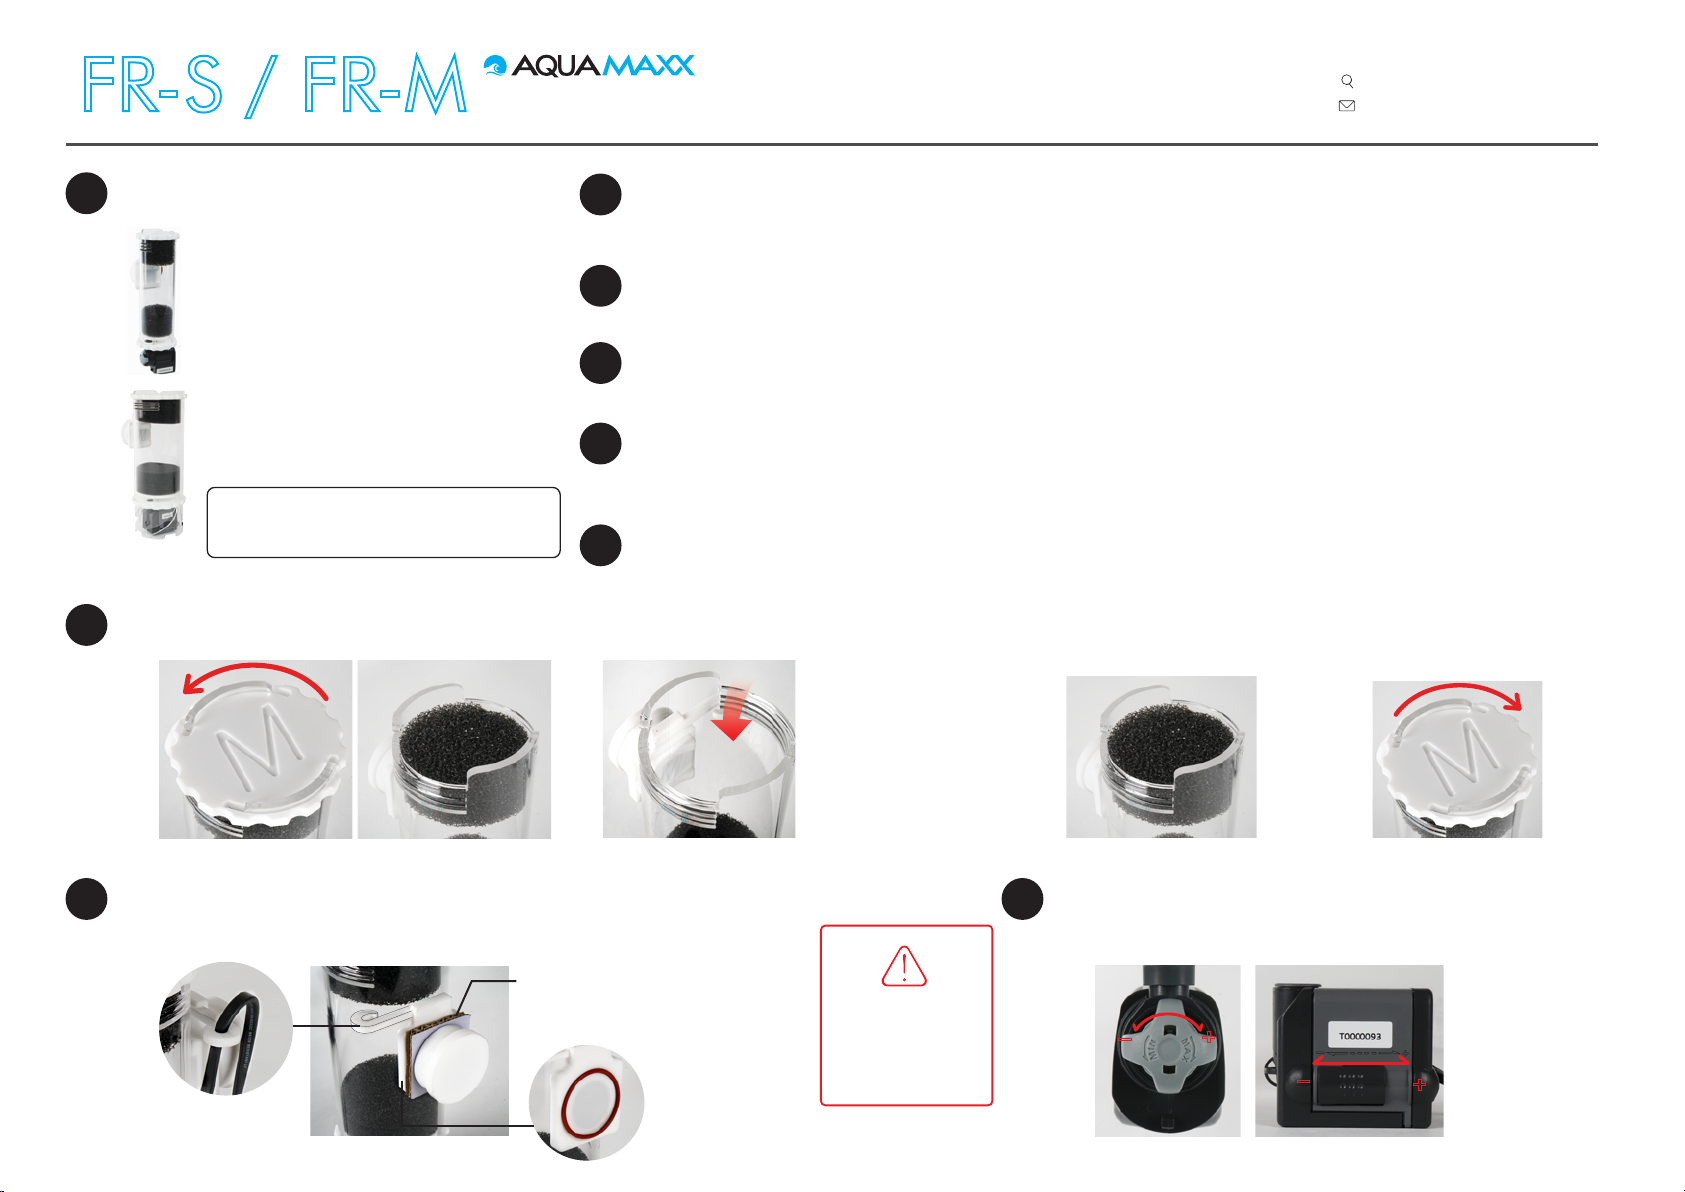
Turn counterclockwise to release the lid
(1) The pump must be completely submerged underwater when in use.
(2) Attachment with a magnet holder for a glass thickness up to 10mm (3/8")
Please discard the
cardboard between the
magnets before use.
Make sure
the O-ring is
in position.
To fill in the media:
8Select a suitable place to set your media reactor:
(1) Set the flow control on the pump to its lowest setting.
(2) Plug in the pump. Adjust the flow rate with the input control dial.
9To Start
FR-M
FR-S
(2) Pick up the upper sponges to fill in the media. (3) Put back the sponges.
(could be skipped for Biopellet)
(4) Turn clockwise to tighten the lid.
Wash your media before you use it. It is recommended that biopellets are soaked for 24 hours in aquarium
water before use. Start with 25% of the total amount of biopellets then add 25% more weekly.
Sponges are not
necessary for Biopellet,
if you are going to use
Biopellet, you can pick
up all the sponges.
Do not over-tighten.
Put the wire here
TO AVOID DANGER,
KEEP THE POWERFUL
MAGNETIC MOUNT
AWAY FROM BABIES
AND CHILDREN.
-
+
+
-
You can change the order of the sponges depends
on media size. Original setting (top-bottom):
coarse - fine - fine - coarse
Warranty
AquaMaxx warrants all AquaMaxx products to be free from manufacturing defects for one year from the original purchase date when purchased through an authorized Aqua-
Maxx retailer. This warranty does not cover any damages caused by misuse, neglect, alterations or improper handling / transport / maintenance / installation. Physical damag-
es are not covered by warranty. AquaMaxx does not cover personal injury, personal loss, or other damages associated with the use of our products. In order to request warranty
service, please email us at [email protected]. A purchase receipt is required for any warranty service. Products requiring warranty service must be returned to
AquaMaxx. You are responsible for the cost of shipping a warranty claim to AquaMaxx and any damages that may occur during transit. Once a returned product has been
inspected, it will be repaired or exchanged at our discretion and returned to you. International and/or expedited shipping are not covered under your AquaMaxx warranty.
FR-M
FR-S
11 Regular maintenance of the pump will ensure long life and maximum performance: recommended every 3 months.
Disassemble the pump by following steps to clean:
10 For best performance, please clean the reactor and sponges regulary.
Pull out the pump from the bottom.
Pull out cover of the pump.
Separate the cover from the pump.
Pull out the rotor and sponge.
Pull out the rotor.
How to remove the limescale?
NO OTHER CHEMICALS, soak in a mixture of 1 part water and 1 part vinegar (citrin acid also
available) for at least 24 hours. Once you finish, please rinse with warm water.