Aquaport AQP-WCS Manual

PREMIUM
Installation
& Operating Instructions
Premium Selection
AQP-WCS
Executive Water Cooler
Cold and Room

Register your warranty on line at www.aquaport/warranty
CUSTOMER HOTLINE: 1300 764 325
Register your warranty online at www.aquaport/warranty
Aquaport Corporation Pty Ltd
PO Box 81 Findon SA 5023 Australia
Telephone: 1300 764 325
Facsimile: 08 8354 0722
Email: aquaport@aquaport.com.au
Web: www.aquaport.com.au
Congratulations on your purchase
of an Aquaport water cooler unit
Thank you for purchasing the Aquaport Executive water cooler.
This unit is easy to install and can be used with any 11-19lt spring water bottle and most lter bottles.
Note: Please read through the instructions carefully before using or installing the product and ensure that the
manual is kept in a safe place for future reference.
The system must be properly installed and located in accordance with the installation instructions before it is used.
Electrical Requirements:
Australia / New Zealand 240V / 230V 50Hz
Rated Current: 0.8A
Consumption: 85W
Capacity: ≤10°C 2L/H
Climatic Class: T
N 23934

INSTALLATION AND OPERATING INSTRUCTIONS 1
IMPORTANT SAFEGUARDS
When using electrical appliances, basic safety precautions should
always be followed.
• Read all instructions carefully.
• Ventilation – The air vents must not be obstructed at any time, air
ow is required for unit to operate effectively.
• This appliance is not intended for use by persons (including
children) with reduced physical, sensory or mental capabilities, or
lack of experience and knowledge, unless they have been given
supervision or instruction concerning use of the appliance by a
person responsible for their safety.
Children should be supervised to ensure that they do not play with the
appliance
• To protect against re, electric shock and personal injury, do not
immerse cord, plugs, or appliance in water or other liquid.
• Unplug from outlet when not in use and before cleaning.
• Do not operate any appliance with a damaged cord or plug or after
the appliance malfunctions, or has been damaged in any manner.
• Return appliance to the nearest authorized service facility for
examination, repair or adjustment.
• The use of accessory attachments not recommended by the
appliance manufacturer may result in re, electric shock or
personal injury.
• Do not use outdoors.
• Do not let cord hang over edge of table or counter, or touch hot
surfaces.
• Do not place on or near a hot gas or electric burner, or in a heated
oven.
• Do not use appliance for other than intended use.
• This appliance should always be used in conjunction with a safety
switch.
• Place unit in a at well-ventilated location at least 100mm from wall
or other Appliances.
• Ensure unit is properly grounded.
• A power outlet is required to operate the water cooler.
For best performance, do not place the unit near an oven, heater,
direct sunlight or any other heat source.

2INSTALLATION AND OPERATING INSTRUCTIONS
SPECIAL PRODUCT INSTRUCTIONS
This appliance is designed for either household or personal use. Each
model is designed to supply a certain maximum number of servings
per hour. Please consult with your sales representative or our Website
for the proper Aquaport unit for your specic needs.
Any servicing other than cleaning and user maintenance will violate
the terms of this WARRANTY.
CAUTIONS:
• Do not immerse base in water or try to disassemble.
• Do not lay unit on its side, always keep upright.
• If the supply cord is damaged, it must be replaced by the
manufacturer, its service agent or similarly qualied persons in
order to avoid a hazard.
• Check voltage to be sure that the voltage indicated on the
nameplate agrees with your voltage.
• Never clean with scouring powders or abrasives.
• Keep the product away from direct sunlight.
• A power outlet is required to operate the water cooler.

INSTALLATION AND OPERATING INSTRUCTIONS 3
A. Bottle support and spike
B. Cold Tap
C. Room Tap
D. Drip Tray
E. Bottle Support and Spike
F. Carry Handle
G. ID Plate & Serial Number
H. Fuse Holder
I. Power Switch
J. Thermostat
A
B
C
D
E
F
G
H
I
J
PARTS IDENTIFICATION DIAGRAM

4INSTALLATION AND OPERATING INSTRUCTIONS
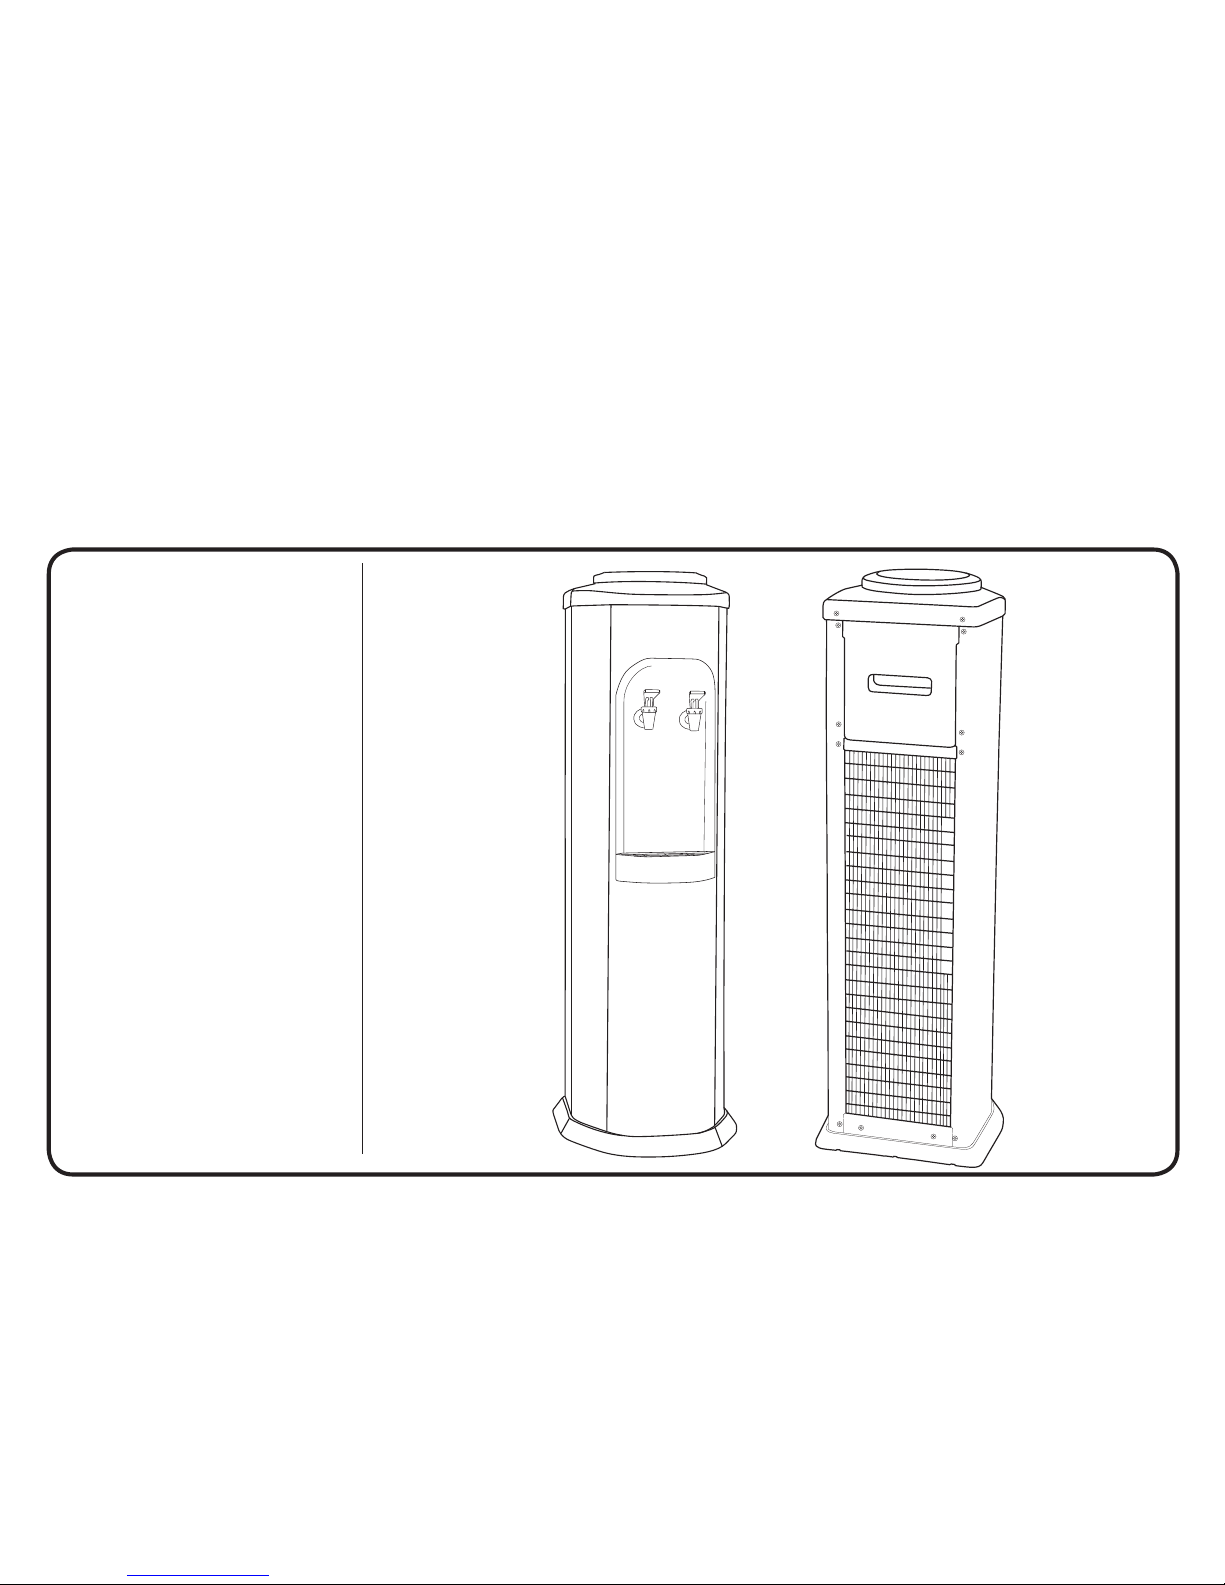
A. EXECUTIVE WATER COOLER INSTALLATION
FOR SPRING WATER BOTTLES.
Please follow the instructions below if you are using a spring water
bottle.
Do not turn on the water cooler until the following instruction have
been followed.
1. Vertically insert a spring water bottle into the bottle supporter on
top of the water cooler, the spike will pierce the bottle cap. You
will see bubbles appear inside the bottle, wait until the bubbling
has stopped before dispensing water form both taps
Note:
If you are applying a spring water bottle to the water cooler for
the rst time and you do not see any bubbles appear inside the bottle,
open both taps until the bubbling starts and water ows from both
taps. Refer to the trouble shooting guide for more information.
2. Once the bubbling has stopped, drain 1-2lts of water from both
taps.
Note:
The water cooler has been ushed before it left the factory
however we strongly recommend 2-3lts of water is ushed through
the unit before using.
3. Insert the power plug into the wall socket, and turn the green
power switch ON. The power switch is situated at the rear of the
unit.
4. At the front of the unit there are 3 indicator lights, the red LED
on the right is the power light and will continually illuminate while
the unit is turned on. The Green LED cooling light on the left will
illuminate when the compressor is running and cooling the water.
When cooling is nished the Green cooling LED light will turn
off and the middle Yellow Auxiliary LED light will illuminate until
cooling is required again.
5. When the unit is turned on for the rst time, allow the unit to cool
the water for 1-2 hours before dispensing cold water.
B. EXECUTIVE WATER COOLER INSTALLATION FOR FILTER BOTTLE.
Please follow the instructions below if you are using a lter bottle.
Do not turn on the water cooler until the following instruction have
been followed.
1. Remove the bottle support and spike from the water cooler. See
gure 1 on page 5.
2. To remove the bottle supporter there is an arrow and the word
“OPEN” embossed into the bottle support. Line this up with the
small sticker found on the top panel of the water cooler that also
has an arrow the word “OPEN”. Then grab the bottle supporter by
placing your ngers under the rim and vertically pull off.
3. When the bottle support is removed you should be able to see
inside the stainless steel cooling tank.

INSTALLATION AND OPERATING INSTRUCTIONS 5
4. Follow the instructions that come with the lter bottle for correct
installation.
5. Place the lter bottle on top of the water cooler and ll as per the
instruction in the lter bottle user manual.
Note:
Filter bottles generally have a slower ow rate compared to
spring water bottles, hence it will take longer to ll the cooling tank.
Allow the cold tank to ll for 30 minutes before following Steps 2-5 as
explained in section A) Executive water cooler Installation for Spring
Water bottles.
C. PRODUCT USE
Always closely supervise children around this appliance.
If the supply cord is damaged, it must be replaced by the
manufacturer, its service agent or similarly qualied persons in order
to avoid a hazard.
The Aquaport Executive water cooler has been rated to provide a
limited number of servings per hour. On average you should be able to
receive 2-4L of cold water within 1hour. Higher ambient temperature
will affect its performance.
The thermostat has been set by the manufacturer and does not
need to be adjusted. Do not adjust the thermostat unless advised by
Aquaport. Unauthorised adjustment or modication to the unit will
void the warranty.
Do not hesitate to contact our Customer Care Service line on
1300 764 325 or aquaport@aquaport.com.au
Fig 1

6INSTALLATION AND OPERATING INSTRUCTIONS
D. EXECUTIVE WATER COOLER NOT USED FOR LONG PERIODS
If the Aquaport Executive water cooler will not been used for a long
period of time, turn the unit off from the rear power switch and unplug
from the wall socket. Remove the spring water or lter bottle from the
unit and drain all water from the taps. If there is any water left inside
the cooling tank, gently tip the water cooler upside down to remove
the water. DO NOT leave the water cooler upside down for more then
20 seconds.
Fill the water cooler with fresh water as per the instructions on page 4.
E. SANITATION
We recommend that the water cooler be cleaned and sanitised every
3-4 months. Contact Aquaport should you wish to purchase Sanitising
Sachets on 1300 764 325.
WARNING:
Before cleaning unit turn off power and unplug unit to
avoid electrical shock.
Hand wash all components:
• Remove bottle support and spike, twist anti-clockwise and lift.
• Pull out inner dividing plate (or bafe)
• Wash the stainless steel tank reservoir and rinse out.
Drain all water out through the taps. AVOID GETTING ANY
WATER ON THE UNIT.
• Use a soft damp cloth to wipe down the unit.
• Do not submerge the unit in water or spray with any harsh
cleaning substances.
• After cleaning the product, replace water bottle and ensure water
is running out of the taps before turning on the power switch.
Do not hesitate to contact our Customer Care Service line on
1300 764 325 or aquaport@aquaport.com.au

INSTALLATION AND OPERATING INSTRUCTIONS 7
TROUBLE SHOOTING
BEFORE YOU CALL FOR SERVICE PLEASE REVIEW THE TROUBLE SHOOTING TIPS FIRST.
Problem Possible Causes What To Do
No Power
1. Unit is not plugged into the wall socket.
2. Power switch at rear of unit is turned off.
3. Fuse has blown.
1. Check connection to wall socket.
2. Turn unit on from rear power switch.
3. Replace with new fuse.
Not Cooling
1. Unit is not plugged into the wall socket.
2. Power switch at rear of unit is turned off.
3. Unit may have been laid down during
transport.
1. Check connection to wall socket.
2. Turn unit on from rear power switch.
3. If the unit has been laid down during transport, keep the unit up
right for 48 hours before turning on. If still not cooling call customer
service on 1300 764 325.
Water is leaking.
*99% of leaks
that may occur
with this unit are
caused by the
bottle used with
the water cooler*
1. Pin hole in spring water bottle.
2. Faulty oat valve on lter bottle.
3. Tap is not installed correctly.
4. Loose hose connection.
1. Pin hole leaks are common when using polycarbonate spring water
bottles. The bottle supporter of the Executive Water Cooler is tted
with a non-spill valve which will stop the water cooler leaking if a
spring water bottle has a pin hole. However it is highly recommended
that the spring water bottle is replaced and the fault reported to the
spring water supplier.
2. Float valve on lter bottle is not shutting off, contact lter bottle
supplier for replacement oat valve.
3. Ensure the tap in screwed onto the water cooler tightly.
4. Call customer service on 1300 764 325.

8INSTALLATION AND OPERATING INSTRUCTIONS
Problem Possible Causes What To Do
No Water Flow
From Faucet
1. Water bottle is empty.
2. Air block.
3. Unit is freezing.
4. Filters are blocked in the lter bottle.
1. Replace spring water bottle or re-ll lter bottle.
2. Open both taps until water dispenses from both taps. An air block will
only usually occur when the unit is brand new.
3. If the cold thermostat has been adjusted then this may cause the
unit to over cool and freeze. Reset back to factory setting. If the
thermostat has not been adjusted Call customer service on 1300
764 325.
4. Change lter cartridges in lter bottle or re-soak the lters to loosen
material inside according to the lter instructions.
Bad Taste From
Cooler
1. Filters are old.
2. Contaminated water supply.
3. Unit is brand new.
1. Change lters in lter bottle.
2. Check with spring water supplier to ensure water has not been
contaminated.
3. Flush water from the unit thoroughly for 10 minutes to alleviate taste.
If taste persists drain all water from unit and air for 24 hours with the
taps opened before re-lling with water. If the problem persists call
customer service on 1300 764 325.
Excessive Noise
From Unit
1. Improper installation.
2. Damaged during transport.
1. Turn off unit and ensure the unit is on a solid level surface.
2. Call customer service on 1300 764 325.

INSTALLATION AND OPERATING INSTRUCTIONS 9
Your Aquaport 12 Month Repair or Replacement Warranty
Aquaport warrants this appliance to the rst purchaser and subject to the
stated conditions:
Warranty covers any defects in material or workmanship in the
manufactured product within the rst twelve months from the date of
purchase.
To make a warranty claim you must call Aquaport on toll free number
1300 764 325 for instructions.
If a product is found to be faulty there is a 90 day return policy from the
date of purchase. Product returned to store MUST be accompanied by a
valid proof of purchase and Customer Reference number received from
Aquaport. Call 1300 764 325.
For warranty claims outside of 90 days from date of purchase, product
will be repaired or replaced at our discretion. Repair or replacement
costs of the product will be covered under warranty by Aquaport.
Goods presented for repair may be replaced by refurbished goods of the
same type rather than being repaired. Refurbished parts may be used to
repair the goods.
Warranty does not cover lter cartridge which is a consumable unless
proven to have defects in material or workmanship in the manufactured
product.
Our goods come with guarantees that cannot be excluded under the
Australian Consumer Law. You are entitled to a replacement or refund for
a major failure and compensation for any other reasonably foreseeable
loss or damage. You are also entitled to have the goods repaired or
replaced if goods fail to be of acceptable quality and the failure does
not amount to a major failure. Register your warranty online at www.
aquaport.com.au/warranty
Conditions Of This Warranty:
1. This product has been fully installed in accordance with the
user manual installation instructions.
2. The warranty extends only to repairing or replacing
any component that proves to be defective in material
or workmanship.
3. The warranty does not cover defects occasioned by misuse,
alterations, accidents, or used for other than the intended
purpose.
4. The warranty does not cover use of this product where water is
microbiologically unsafe or of unknown quality, without adequate
disinfection before or after the system.
5. The warranty does not cover damage to the product caused by
accident, re, or oods.
6. Proof of purchase is required for warranty claims.
Please keep purchase receipt in a safe place.
To enable us to register your warranty and provide service should a
problem occur, we recommend you register your warranty online at www.
aquaport.com.au/warranty
Aquaport Corporation Pty Ltd
5 John Street Flinders Park,
South Australia 5025
Customer Care 1300 764 325

CUSTOMER HOTLINE: 1300 764 325
Aquaport Corporation Pty Ltd
PO Box 81 Findon SA 5023 Australia
Telephone: 1300 764 325
Facsimile: 08 8354 0722
Email: aquaport@aquaport.com.au
Web: www.aquaport.com.au
Table of contents
Other Aquaport Water Dispenser manuals

Aquaport
Aquaport AQP-SFS-IH Manual

Aquaport
Aquaport AQP-20SIL Manual

Aquaport
Aquaport AQP-OT User manual

Aquaport
Aquaport AQP-QJUG-2B User manual

Aquaport
Aquaport PolarClear User manual

Aquaport
Aquaport AQP-WCS-FBOT4 User manual

Aquaport
Aquaport DELUXE AQP-WCM User manual

Aquaport
Aquaport AQP-BM4 User manual

Aquaport
Aquaport AQP-3TAP-SS Manual

Aquaport
Aquaport AQP-10CS User manual
Popular Water Dispenser manuals by other brands

vitapur
vitapur VWD602BLS Use & care guide

Everpure
Everpure EV9273-93 Specification sheet

Symphony
Symphony 110CT400A/W-L Installation, operation and service manual

Oasis
Oasis VERSAFILLER P EBF Series installation instructions

Avalon
Avalon A14-S Use and care guide

Oasis
Oasis PCPEBQ installation instructions