manuals.online logo
Brands
  1. Home
  2. •
  3. Brands
  4. •
  5. AQUASONIC
  6. •
  7. Speakers
  8. •
  9. AQUASONIC AQ339 User manual

AQUASONIC AQ339 User manual

www.clarksynthesis.com Underwater Speaker
CAUTION: THIS SPEAKER CONTAINS AN
EXTREMELY POWERFUL MAGNET. DO NOT
PLACE IN CLOSE PROXIMITY TO TUBE TV
MONITORS, TUBE VIDEO MONITORS, AND
MAGNETIC MEDIA.
Table of Contents
2
3
4
5
6
7
8
10
11
Tel: 303-797-7500
Fax: 303-797-7501
www.clarksynthesis.com
UNDERWAT ER LOUDSPEAKERS
®
www.clarksynthesis.comUnderwater Speaker
!
www.clarksynthesis.com Underwater Speaker
www.clarksynthesis.comUnderwater Speaker
www.clarksynthesis.com Underwater Speaker
www.clarksynthesis.comUnderwater Speaker
www.clarksynthesis.com Underwater Speaker
www.clarksynthesis.comUnderwater Speaker
Carefully remove the speaker from its box. Install the mounting gasket around the rubber ring of the sound
lens (as shown below). Insure the mounting gasket is installed evenly and is firmly seated against the entire
circumference of the sound lens.
1
Place the speaker on a non-abrasive surface with the sound lens facing up. Hold the face ring above the
sound lens, allowing the clamp tabs to fall open. Set the face ring against the mounting gasket, insuring
each clamp tab is on the outside of the mounting gasket. Hold the entire assembly together and place it
on the non-abrasive surface as shown in the third picture below. Carefully position the sound lens so it is
centered over the face ring.
2
Pull the bundled speaker wire through the wire clamp. Place the wire clamp under each clamp tab, verifying
the nut and bolt adjuster is accessible when the clamp is placed under the tabs. Insure the mounting gasket
and face ring are still evenly centered.
3
www.clarksynthesis.com Underwater Speaker
Use a wrench and a Phillips screwdriver to tighten the wire clamp. When fully tightened, the wire clamp
should be firmly seated in each clamp tab and the speaker should be secure. Pick up the assembly and
insure it is still properly centered in the face ring. If not, loosen the wire clamp and adjust.
4
Take the end of the speaker wire and pull it through the conduit hole in the back of the niche using a wire
puller. Leave 10 to 12 ft. of speaker wire in the niche to allow for easier access during future servicing of
the speaker. Place the speaker inside the light niche.
Note: In actual applications, the niche will already be mounted in the wall of the pool.
5
Carefully set the lock tab located on the bottom of the face ring behind the receiving plate located on the
bottom of the niche. Align the bolt/rubber washer on the face ring with the threaded receiving hole on the
niche. Attach the trim ring securely to the niche by gently tightening the bolt. You are now ready to connect
the speaker to your audio system.
6
www.clarksynthesis.comUnderwater Speaker
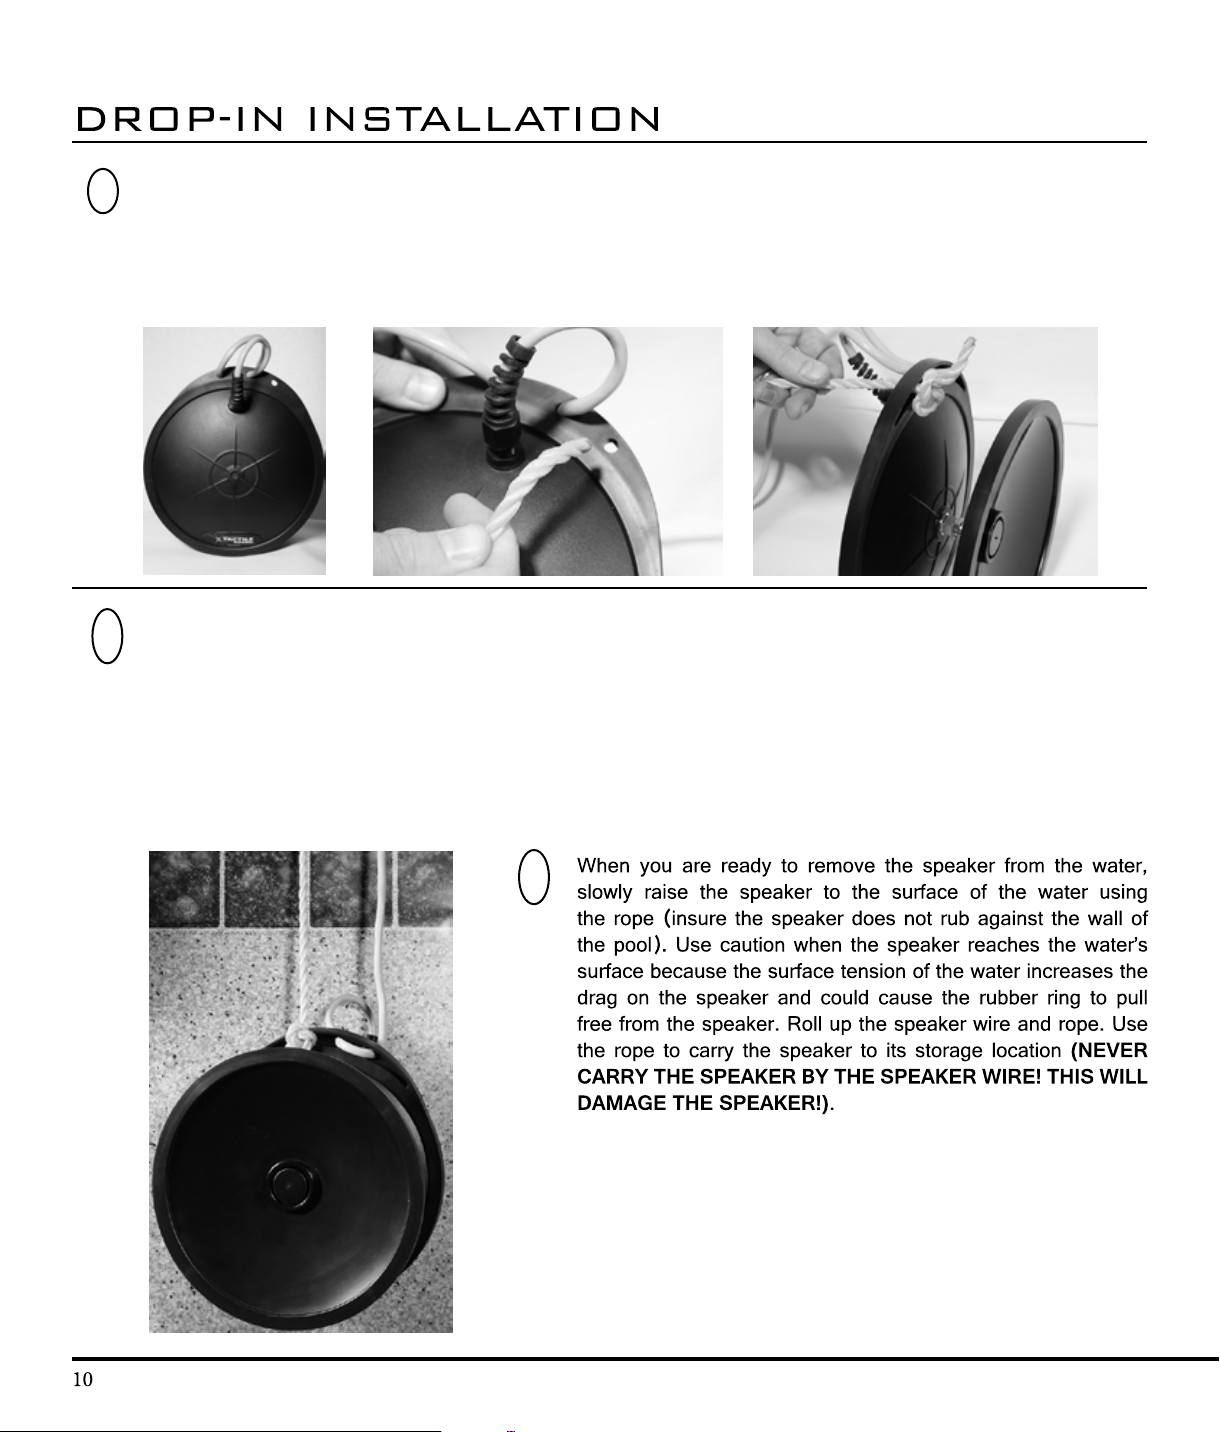
Find a length of rope (1/8” to 1/4” outside diameter) that will allow you to place the speaker in the area
of the pool where you would like sound (see General Information section at the beginning of this manual
for precautions when using this type of application). Carefully remove the speaker from its box. Locate the
open hole on the speaker’s rubber ring (next to the interlaced speaker wire). Thread the rope through the
hole. Tie a knot that will not come undone or slip through the hole.
1
Connect the speaker to your audio system with the attached speaker wire. Carry the speaker to the pool
using the rope (NEVER CARRY THE SPEAKER BY THE SPEAKER WIRE! THIS WILL DAMAGE THE
SPEAKER!). Gently lower the speaker into the pool, insuring the speaker and wire are not scratching along
the wall of the pool (NEVER THROW THE SPEAKER INTO THE WATER. THIS WILL DAMAGE THE
SPEAKER AND MAY CAUSE PERSONAL INJURY). When the speaker is under the water at the desired
depth, insure the sound lens is facing away from the wall and allow the speaker to rest against the wall. Tie
the rope to a sturdy object (noting the precautions listed in the front of this manual).
2
3
www.clarksynthesis.com Underwater Speaker
www.clarksynthesis.comUnderwater Speaker
UNDERWAT ER LOUDSPEAKERS
®

Other manuals for AQ339

1

Other AQUASONIC Speakers manuals

AQUASONIC AQ339 User manual

AQUASONIC

AQUASONIC AQ339 User manual

AQUASONIC AC339 User manual

AQUASONIC

AQUASONIC AC339 User manual

Popular Speakers manuals by other brands

MOOSE M10 user manual

MOOSE

MOOSE M10 user manual

Gadhouse MILES user manual

Gadhouse

Gadhouse MILES user manual

Brooklyn BP50 instruction manual

Brooklyn

Brooklyn BP50 instruction manual

Spector&Co T110 Dynamic user manual

Spector&Co

Spector&Co T110 Dynamic user manual

Krix Hemispherix AS20 installation guide

Krix

Krix Hemispherix AS20 installation guide

Ibiza sound PORT12VHF-MKII-TWS manual

Ibiza sound

Ibiza sound PORT12VHF-MKII-TWS manual

Jabra SoleMate Mini Get started

Jabra

Jabra SoleMate Mini Get started

Origin Acoustics DSP2-200 installation manual

Origin Acoustics

Origin Acoustics DSP2-200 installation manual

Revox Re:sound H190 Specification sheet

Revox

Revox Re:sound H190 Specification sheet

Technomad DragonFly owner's manual

Technomad

Technomad DragonFly owner's manual

Monacor TM-17 M instruction manual

Monacor

Monacor TM-17 M instruction manual

Ken A Vision kfc-x683c Installation

Ken A Vision

Ken A Vision kfc-x683c Installation

Infinity INTERLUDE IL10 Technical manual

Infinity

Infinity INTERLUDE IL10 Technical manual

Titus Outdoor 360 manual

Titus

Titus Outdoor 360 manual

Studiomaster Professional 10 SUB instruction manual

Studiomaster Professional

Studiomaster Professional 10 SUB instruction manual

Philips Beolink 1000 quick start guide

Philips

Philips Beolink 1000 quick start guide

BIK B-Questa BMS-3012 owner's manual

BIK

BIK B-Questa BMS-3012 owner's manual

Pioneer MRX-5 Advanced manual

Pioneer

Pioneer MRX-5 Advanced manual

manuals.online logo
manuals.online logoBrands
  • About & Mission
  • Contact us
  • Privacy Policy
  • Terms and Conditions

Copyright 2025 Manuals.Online. All Rights Reserved.